Does anybody have pics of their crank pinned.

 01-13-2008, 09:13 PM
#22
9 Second Club
iTrader: (8)
Join Date: Aug 2005
Location: Little Rock, AR
Posts: 270
Likes: 0
Received 0 Likes
on
0 Posts
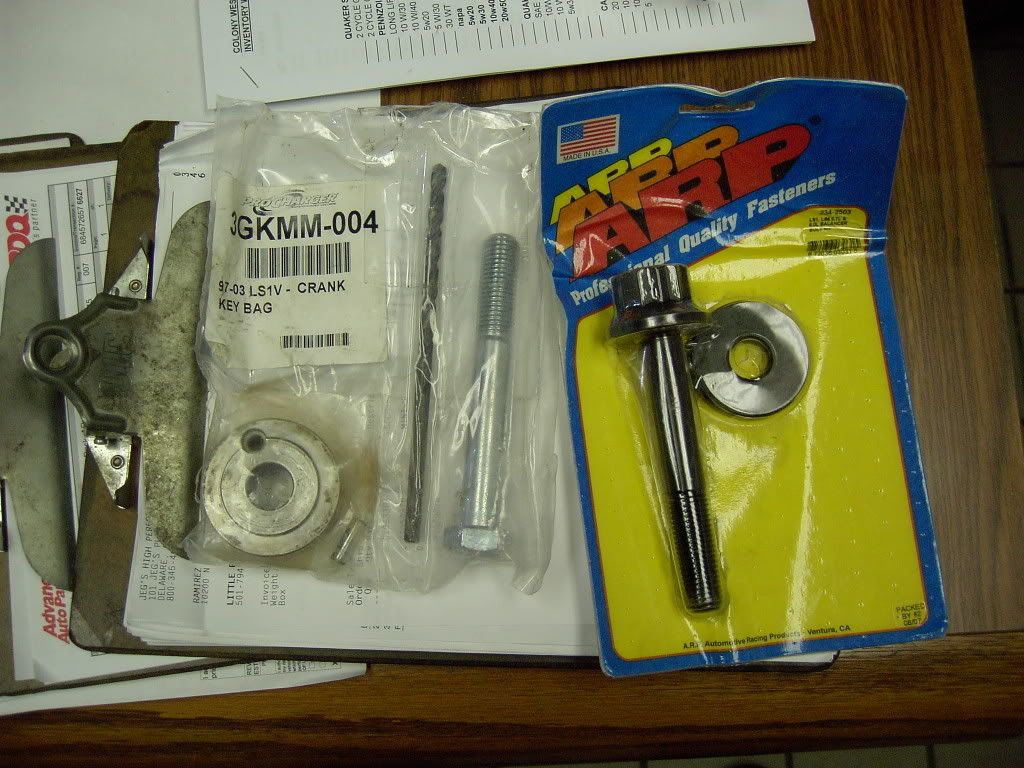
Yes it will work with the ATI balancer. I got this one from EPP. It works simple. bolt the balancer up with stock bolt and torque it. Take bolt back out. Install the big round drilling fixture in the bag with the supplied bolt snugly. drill the pin hole with the bit in the bag to a depth of I think a half inch (could be wrong on the length of the pin). pull the fixture off. cut pin to that length. tap pin in the hole drilled. install crank bolt and torque. you are done.
01-13-2008, 09:15 PM
#23
It's prochargers kit. I have the ATI balancer, so yes it works and yes that is the pin you see. It's about 3/4" if I remember right. I think it's plenty, I've never heard of someone having a problem with this kit. The ATI balancer already has a grove in it for being pinned so I just lined up the tool to drill the hole where the slot was. Worked great and drilled nice and easy.
01-13-2008, 09:22 PM
#25
12 Second Club
Thread Starter
iTrader: (13)
Join Date: Jul 2006
Location: Wisconsin
Posts: 1,142
Likes: 0
Received 0 Likes
on
0 Posts

It's prochargers kit. I have the ATI balancer, so yes it works and yes that is the pin you see. It's about 3/4" if I remember right. I think it's plenty, I've never heard of someone having a problem with this kit. The ATI balancer already has a grove in it for being pinned so I just lined up the tool to drill the hole where the slot was. Worked great and drilled nice and easy.

Call EPP. they have them in stock.
http://www.exoticperformanceplus.com/
http://www.exoticperformanceplus.com/
01-13-2008, 09:27 PM
#27
9 Second Club
iTrader: (8)
Join Date: Aug 2005
Location: Little Rock, AR
Posts: 270
Likes: 0
Received 0 Likes
on
0 Posts
Yes you drill it with the balancer fully installed.
One problem you may run into is the drilling fixture may be to big around to fit inside the ATI balancer. You may have to grind the fixture down to make it small enough to set inside the balancer hub.
One problem you may run into is the drilling fixture may be to big around to fit inside the ATI balancer. You may have to grind the fixture down to make it small enough to set inside the balancer hub.
01-13-2008, 09:42 PM
#30
9 Second Club
iTrader: (8)
Join Date: Aug 2005
Location: Little Rock, AR
Posts: 270
Likes: 0
Received 0 Likes
on
0 Posts
Call EPP. they have them in stock.
http://www.exoticperformanceplus.com/
http://www.exoticperformanceplus.com/
Jake from EPP was talking to you earlier
01-13-2008, 09:55 PM
#32

This one will not work on an ATI balancer. Listen the one you pictured is right sworaz! You install the fixture like you would your balancer so yes you have to take it back off to pin it! In stall fixture drill and then ream once remove reinstall balancer with pin. What keep the pin in is the crank bolt! Like I told you before the one you pictured is correct for your application That is why ATI sells it! GL! Look a lot of people don't know about the ATI's haveing a smaller opening so they are sugesting something that won't work like the above no offence to any one, but anyone who has installed one of these kits will know about what you can and can't do with different balancers.
 01-13-2008, 10:20 PM
#33
9 Second Club
iTrader: (8)
Join Date: Aug 2005
Location: Little Rock, AR
Posts: 270
Likes: 0
Received 0 Likes
on
0 Posts
This one will not work on an ATI balancer. Listen the one you pictured is right sworaz! You install the fixture like you would your balancer so yes you have to take it back off to pin it! In stall fixture drill and then ream once remove reinstall balancer with pin. What keep the pin in is the crank bolt! Like I told you before the one you pictured is correct for your application That is why ATI sells it! GL! Look a lot of people don't know about the ATI's haveing a smaller opening so they are sugesting something that won't work like the above no offence to any one, but anyone who has installed one of these kits will know about what you can and can't do with different balancers.
This guy apparently hasn't built much.
I used the vertical pin kit on a 402 F1A build with an ATI 8 rib balancer stock diameter with a 4.25 blower pulley. It sheared the pin and spun the balancer on the dyno at EPP being tuned. It was replaced with the pin kit I just listed by EPP at there shop. The small pin in the vertical pin kit won't hold under high stress. It let loose at 840 rwhp.
It would probably be fine for your application
http://s204.photobucket.com/albums/b...1A402VIDEO.flv
01-13-2008, 10:22 PM
#34
12 Second Club
Thread Starter
iTrader: (13)
Join Date: Jul 2006
Location: Wisconsin
Posts: 1,142
Likes: 0
Received 0 Likes
on
0 Posts
This one will not work on an ATI balancer. Listen the one you pictured is right sworaz! You install the fixture like you would your balancer so yes you have to take it back off to pin it! In stall fixture drill and then ream once remove reinstall balancer with pin. What keep the pin in is the crank bolt! Like I told you before the one you pictured is correct for your application That is why ATI sells it! GL! Look a lot of people don't know about the ATI's haveing a smaller opening so they are sugesting something that won't work like the above no offence to any one, but anyone who has installed one of these kits will know about what you can and can't do with different balancers.
 I didn't know if either would work or just one...thanks for informing me.
 Your not pissed about Dallas losing are you?
01-13-2008, 10:34 PM
#36
9 Second Club
iTrader: (8)
Join Date: Aug 2005
Location: Little Rock, AR
Posts: 270
Likes: 0
Received 0 Likes
on
0 Posts
The pin kit above is for a F-body or vertical crank pin kit. You will put the fixture on the crank, hold it in place with the crank bolt, put your drill bit orifice in the fixture, drill thru crank half way till you hit the crank bolt. Take the drill orifice out and put in the reamer orifice in the fixture, ream the drilled hole according to the instructions. Unbolt the fixture. You will need to measure how long the pin needs to be and cut pin accordingly so it is seated fully into the drilled hole in the crank and sticking out the distance of the key way that is in the balancer.
(in a nutshell)
(in a nutshell)
Both will do the job. the second option is stronger!
You would know this if you worked with blowers much!
01-13-2008, 11:02 PM
#37

You need a different Crank pin kit for the ATI balancer. YOU DO NOT DRILL INTO THE ATI BALANCER!!!... The ATI balancer has a Key way that you put the pin into. Its super easy to do. I have a ATI crank pinning kit. with 1 pin. Im selling it for 70 bucks shipped.
Its very easy to do.
Its very easy to do.
01-13-2008, 11:06 PM
#38
12 Second Club
Thread Starter
iTrader: (13)
Join Date: Jul 2006
Location: Wisconsin
Posts: 1,142
Likes: 0
Received 0 Likes
on
0 Posts
You need a different Crank pin kit for the ATI balancer. YOU DO NOT DRILL INTO THE ATI BALANCER!!!... The ATI balancer has a Key way that you put the pin into. Its super easy to do. I have a ATI crank pinning kit. with 1 pin. Im selling it for 70 bucks shipped.
Its very easy to do.
Its very easy to do.
01-13-2008, 11:18 PM
#39
Here. I had the same exact question you did. Pinning the crank is super easy. I even bought a drill extension. Just got to home depot and buy a 11/64 drill bit for 3 bucks and drill. I just put a ittle glue on the pin to hold it in place while i put the balancer on. Also i had problems with the ARP bolt. Just use a stock new bolt.
, here they are:
Crank Pin Drill Fixture Kit for LS1
Part# 918993
Using ATI's crank pin drill fixture kit, you can install 1 or 2 dowel pins in the LS1 crank to eliminate the damper twist on the shaft - a must for engines used for circle track racing or supercharging!
Note: All drilling and reaming dry - no lubricants or cutting oils are necessary!
1. Remove the damper
2. Install the fixture to the crank and position 1 bushing hole for best drill access
3. Using the old crank bolt, lock the fixture to the crank so it can not move
4. Install the 11/64 bushing in the adapter and snug the holding screw
5. Using the 11/64 drill bit, drill through the crank to the center bore
6. Change the bushing to the 3/16 bushing and ream the 11/64 hole to 3/16 with one pass in and out at low RPM.
7. For a second pin at 180^, rotate the crank. Do not loosen bolt!
8. Repeat steps 4, 5, and 6 on the opposite side if you are installing 2 pins
9. Blow the outside and center bore clean of all chips before removing adapter. Then remove adapter.
10. Install the 3/16 pin , allowing it to protrude above the crank surface .093" to fit the keyway in the hub.
11. Install the damper and pull it tight to 200 ft/lbs with the old bolt
12. Install a new bolt (GM Part #12557840) with red #262 Loctite and torque the bolt to 240/250 ft/lbs.
Note: All ATI LS1 dampers have one 3/16 keyway in the hub or ATI can key your existing damper.
01-13-2008, 11:23 PM
#40
12 Second Club
Thread Starter
iTrader: (13)
Join Date: Jul 2006
Location: Wisconsin
Posts: 1,142
Likes: 0
Received 0 Likes
on
0 Posts
Thanks for throwing those instructions up there, I haven't been able to find them anywhere.
I wouldn't mind taking that pin kit off your hands.
I wouldn't mind taking that pin kit off your hands.
Here. I had the same exact question you did. Pinning the crank is super easy. I even bought a drill extension. Just got to home depot and buy a 11/64 drill bit for 3 bucks and drill. I just put a ittle glue on the pin to hold it in place while i put the balancer on. Also i had problems with the ARP bolt. Just use a stock new bolt.
, here they are:
Crank Pin Drill Fixture Kit for LS1
Part# 918993
Using ATI's crank pin drill fixture kit, you can install 1 or 2 dowel pins in the LS1 crank to eliminate the damper twist on the shaft - a must for engines used for circle track racing or supercharging!
Note: All drilling and reaming dry - no lubricants or cutting oils are necessary!
1. Remove the damper
2. Install the fixture to the crank and position 1 bushing hole for best drill access
3. Using the old crank bolt, lock the fixture to the crank so it can not move
4. Install the 11/64 bushing in the adapter and snug the holding screw
5. Using the 11/64 drill bit, drill through the crank to the center bore
6. Change the bushing to the 3/16 bushing and ream the 11/64 hole to 3/16 with one pass in and out at low RPM.
7. For a second pin at 180^, rotate the crank. Do not loosen bolt!
8. Repeat steps 4, 5, and 6 on the opposite side if you are installing 2 pins
9. Blow the outside and center bore clean of all chips before removing adapter. Then remove adapter.
10. Install the 3/16 pin , allowing it to protrude above the crank surface .093" to fit the keyway in the hub.
11. Install the damper and pull it tight to 200 ft/lbs with the old bolt
12. Install a new bolt (GM Part #12557840) with red #262 Loctite and torque the bolt to 240/250 ft/lbs.
Note: All ATI LS1 dampers have one 3/16 keyway in the hub or ATI can key your existing damper.
, here they are:
Crank Pin Drill Fixture Kit for LS1
Part# 918993
Using ATI's crank pin drill fixture kit, you can install 1 or 2 dowel pins in the LS1 crank to eliminate the damper twist on the shaft - a must for engines used for circle track racing or supercharging!
Note: All drilling and reaming dry - no lubricants or cutting oils are necessary!
1. Remove the damper
2. Install the fixture to the crank and position 1 bushing hole for best drill access
3. Using the old crank bolt, lock the fixture to the crank so it can not move
4. Install the 11/64 bushing in the adapter and snug the holding screw
5. Using the 11/64 drill bit, drill through the crank to the center bore
6. Change the bushing to the 3/16 bushing and ream the 11/64 hole to 3/16 with one pass in and out at low RPM.
7. For a second pin at 180^, rotate the crank. Do not loosen bolt!
8. Repeat steps 4, 5, and 6 on the opposite side if you are installing 2 pins
9. Blow the outside and center bore clean of all chips before removing adapter. Then remove adapter.
10. Install the 3/16 pin , allowing it to protrude above the crank surface .093" to fit the keyway in the hub.
11. Install the damper and pull it tight to 200 ft/lbs with the old bolt
12. Install a new bolt (GM Part #12557840) with red #262 Loctite and torque the bolt to 240/250 ft/lbs.
Note: All ATI LS1 dampers have one 3/16 keyway in the hub or ATI can key your existing damper.