1dirtyZ V3.2 build (F2 procharger , 427, etc. )
 07-08-2015, 04:25 AM
#401
8 Second Club
Thread Starter
iTrader: (1)
Join Date: Nov 2001
Location: the not so stock tribe
Posts: 3,697
Likes: 0
Received 0 Likes
on
0 Posts

its been a while so here goes 
for my record , i swapped the rear slicks to a fresh set .
i also blew one of the front flexible brake lines - it was my fault and was lucky it happened when it did before the race . so i swapped both front lines.
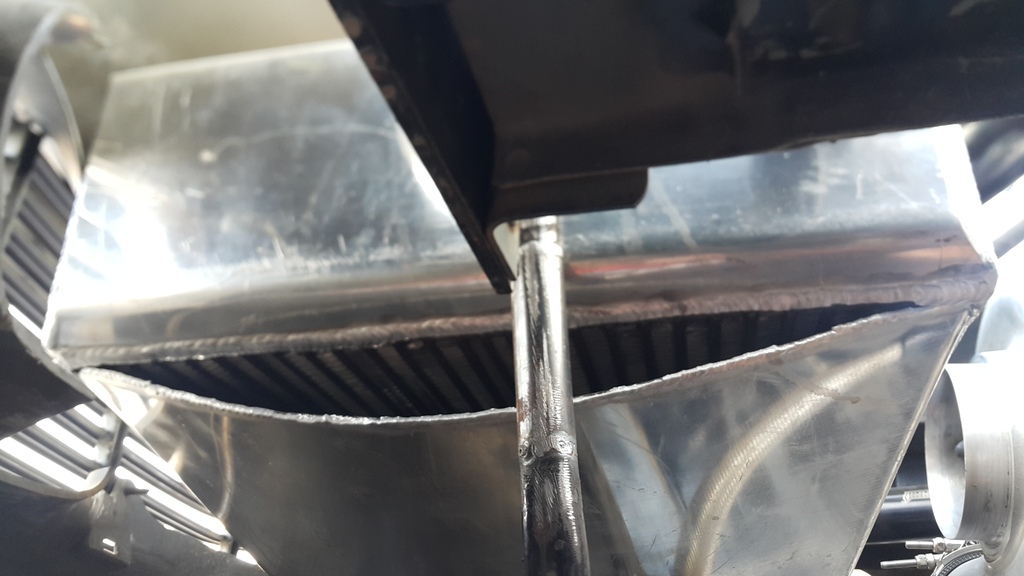
I did manage to finish the intercooler tank and plumb it , and then I found out how much water it holds ; too much!!
so here is how it looks after its all done and installed in the car:

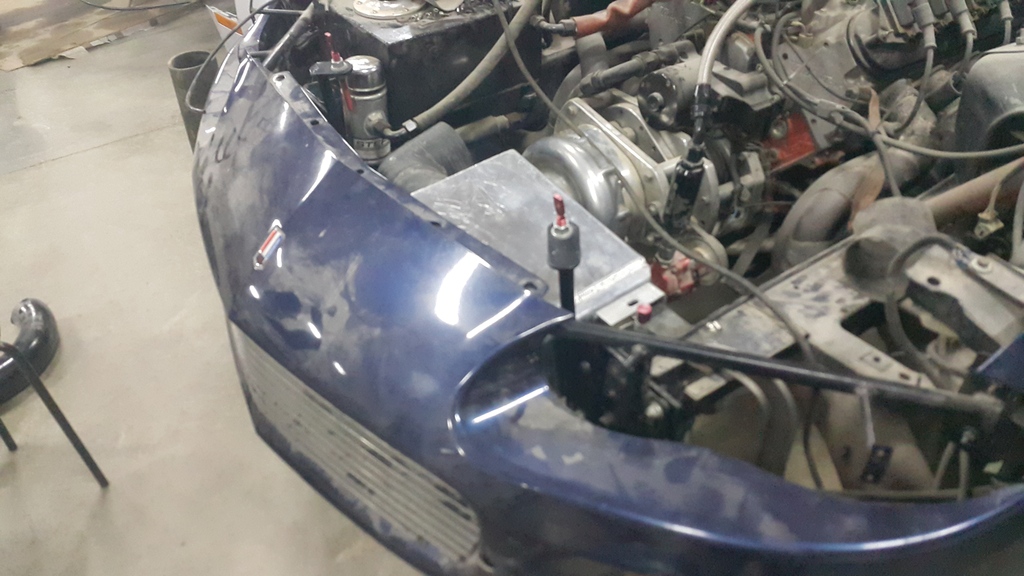
after that I went back to the front of the car, I managed to modify the front core support ( or what used to be the support ) where it now acts like a cradle for the intercooler :

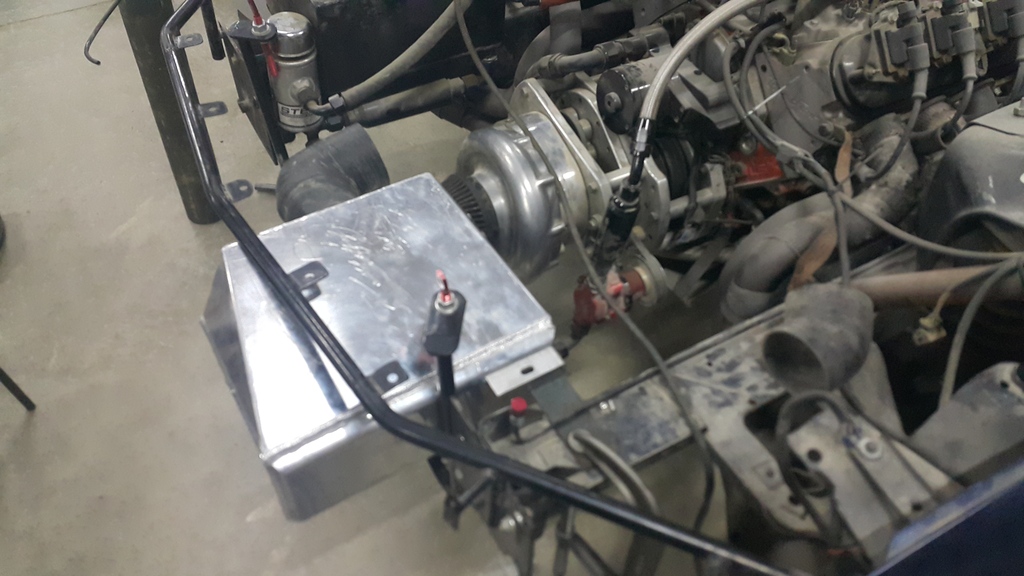
and here is how the nose fits :
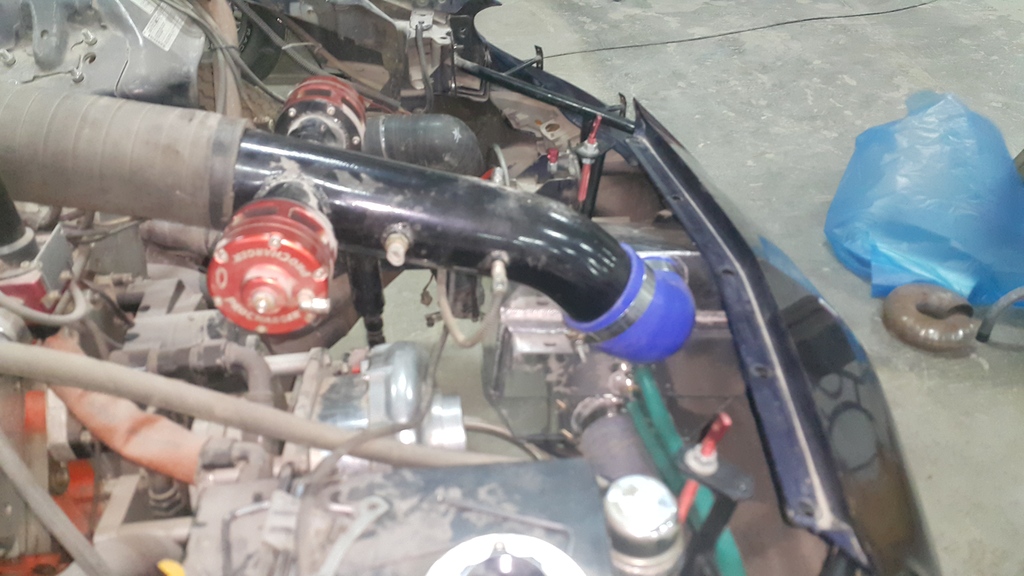
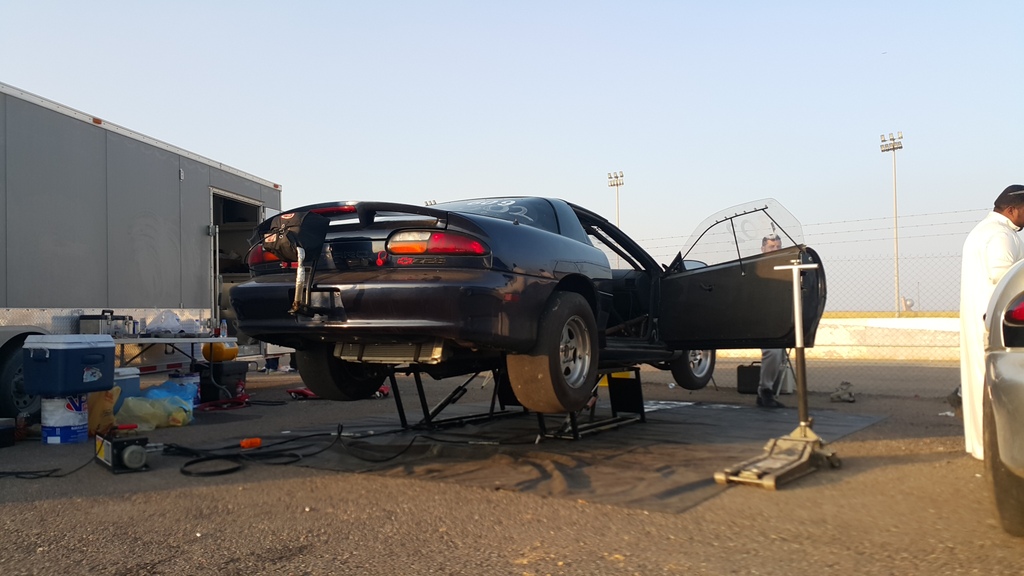
due to a local race coming up I had to hustle and get the piping done real fast , which meant I had to re use most of the old piping. that meant it would not look good and not work as efficiently.
so basically here is how it looked before the race:
so after the race I learned a few lessons :
- first off one of the two batteries I have took a crap on me - good thing there was another one that managed to do the job
- second thing is like I mentioned before the tank is huge! I think it holds something like 7-8 gallons of water and ice - the down side is weight and amount of ice being used ,,,, the up side is I can fill it up with water and lots of ice and just chill in the staging lanes forever without worrying about the ice melting away
- the third and most important thing I learned is that the 550 GPH intercooler pump I had on there is not enough ; it just does not flow enough.
so after the race the first thing to happen was a quick swap from the 500GPH to a 1100GPH pump ( same pump dimensionally just more flow).
I will give it a try and see how it goes , if I don't like it I will switch to a big rule 2500GPH in tank pump and maybe to another tank if I deem necessary
i also managed to fry the tranny at that race - ruined the clutches
so it was out with the tranny and off to get it redone and re installed .
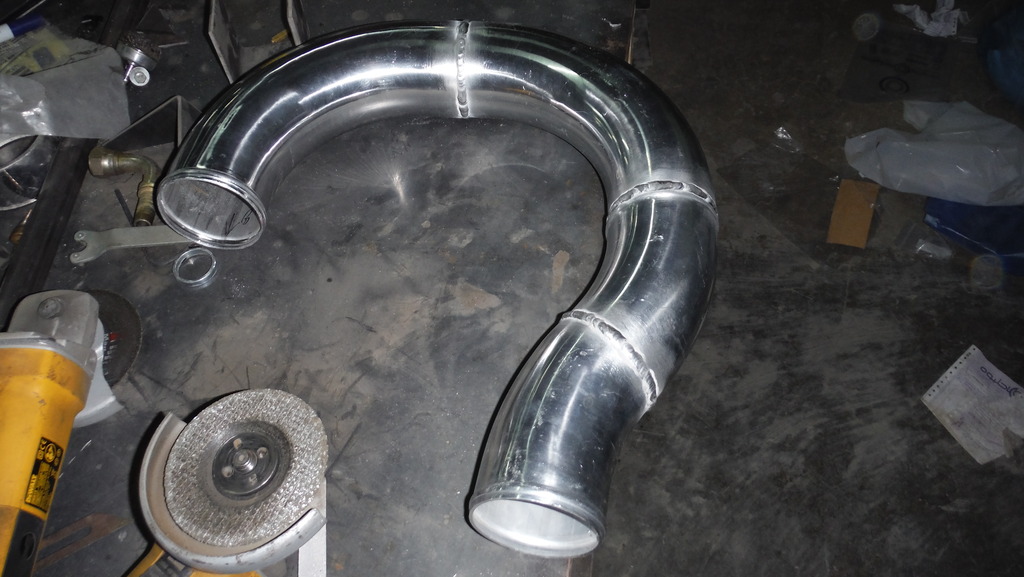
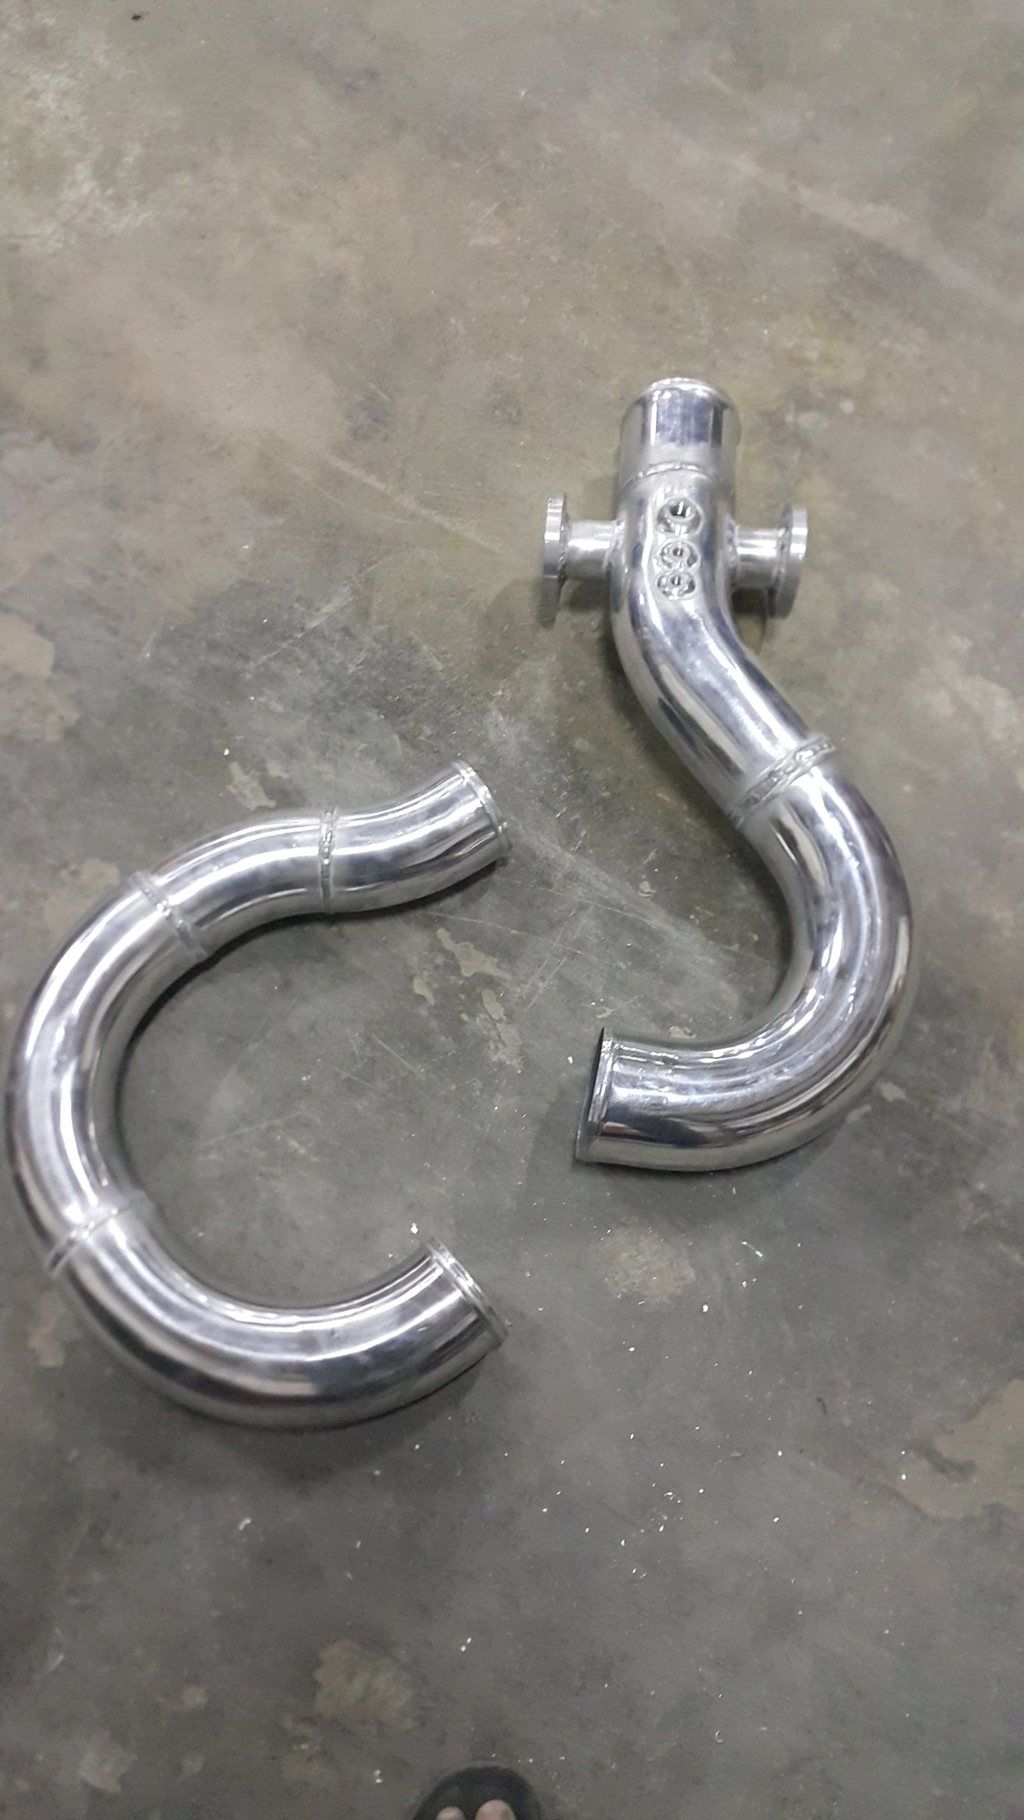
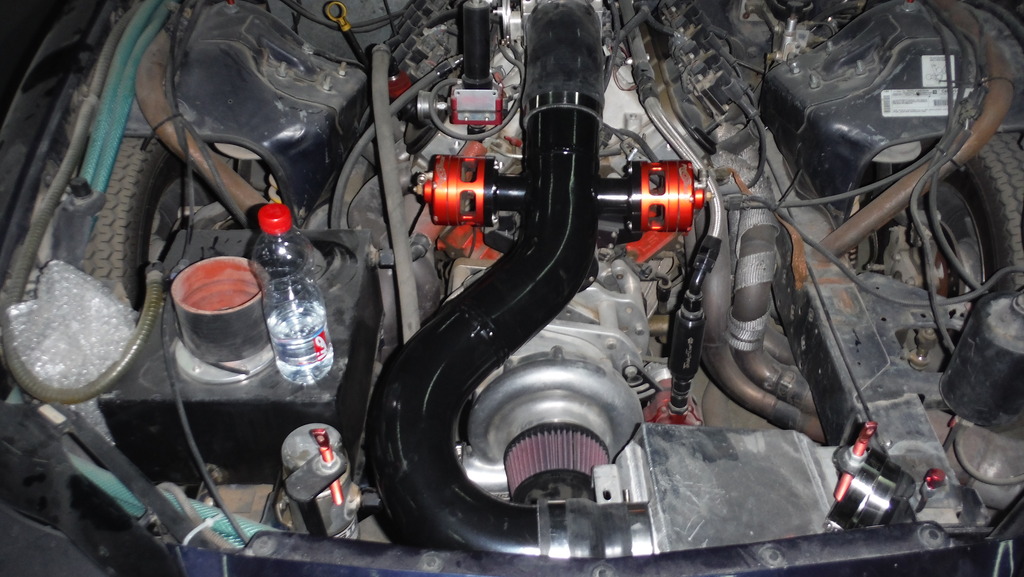
moving on ,,, It was time to address the charge pipes. i started with the pipe coming from the intercooler to the throttle body; the plan was to make it with the as smooth of a curve as possible while still being able to re use it if I decide to change the intake later ( location of the throttle body moves up or down relative to its current position).
so i started off with bead rolling the end pieces cause it would be easier to do it now rather than when the whole thing is all done and hard and awkward to manipulate:

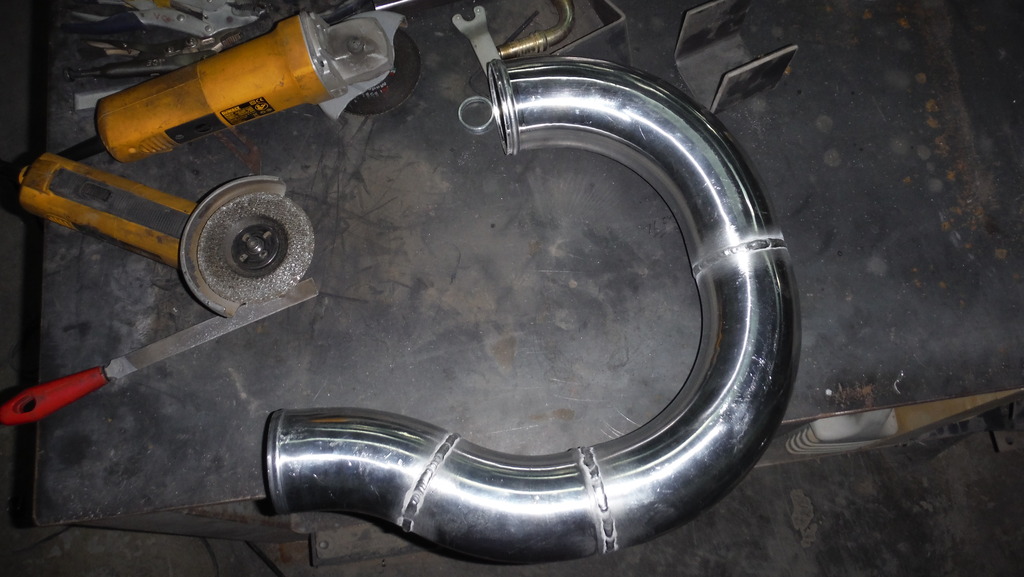
next up was welding the three pieces together to form the smooth curve as well as knocking out the 2 BOV pipe holes and BOV pipes :
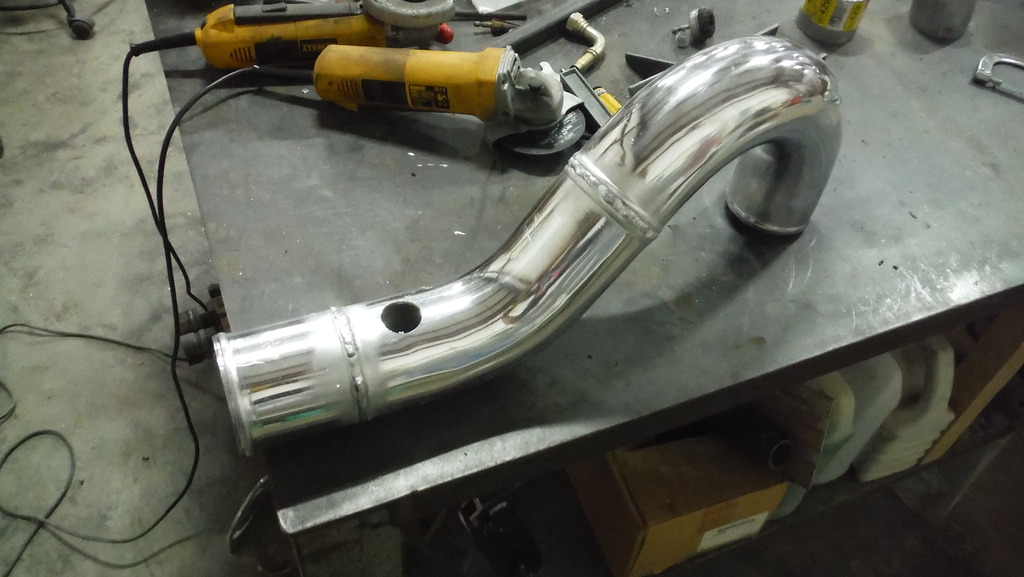

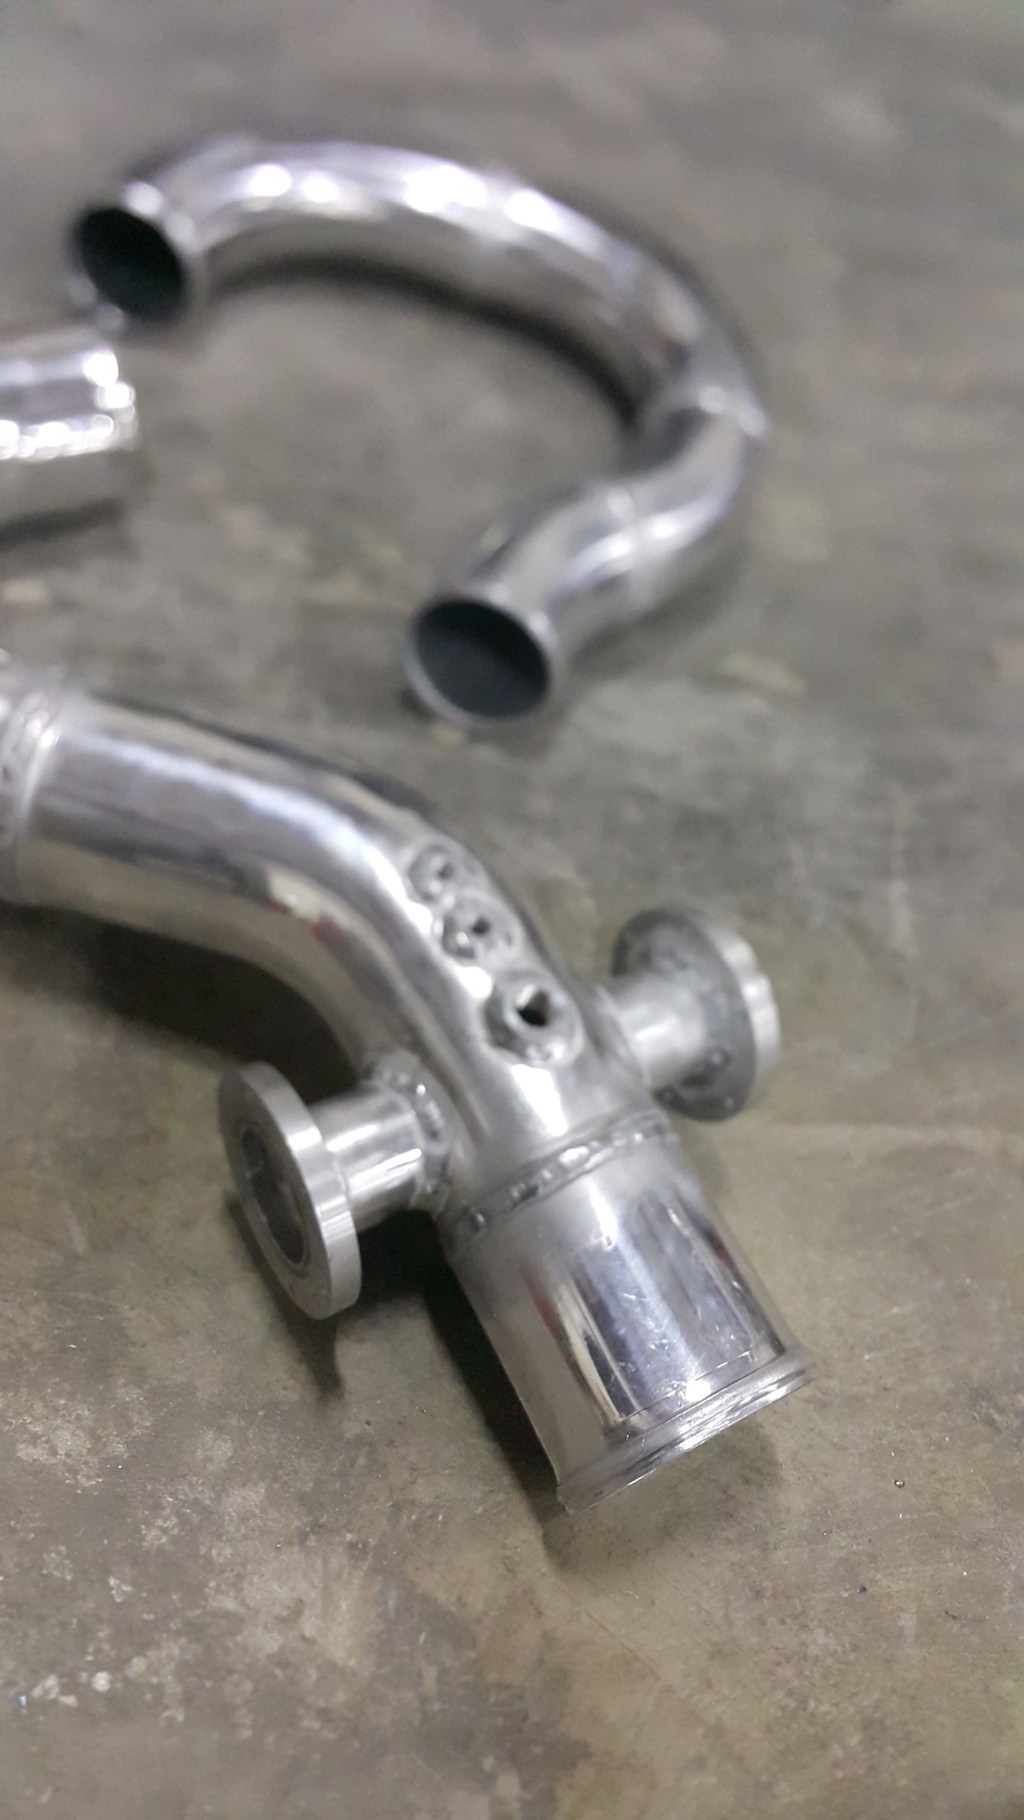
next up was welding the aluminum BOV flange to the pipes and then welding those to the charge pipe :
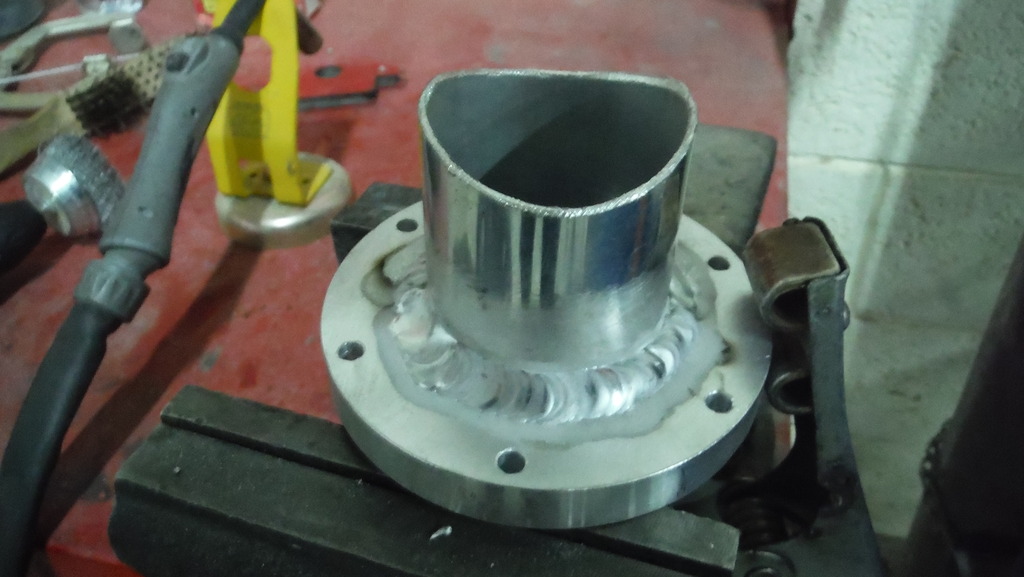

after that i drilled and welded three bungs underneath for an IAT sensor and 2 Meth nozzles incase i need them later on. ( pics later below.)
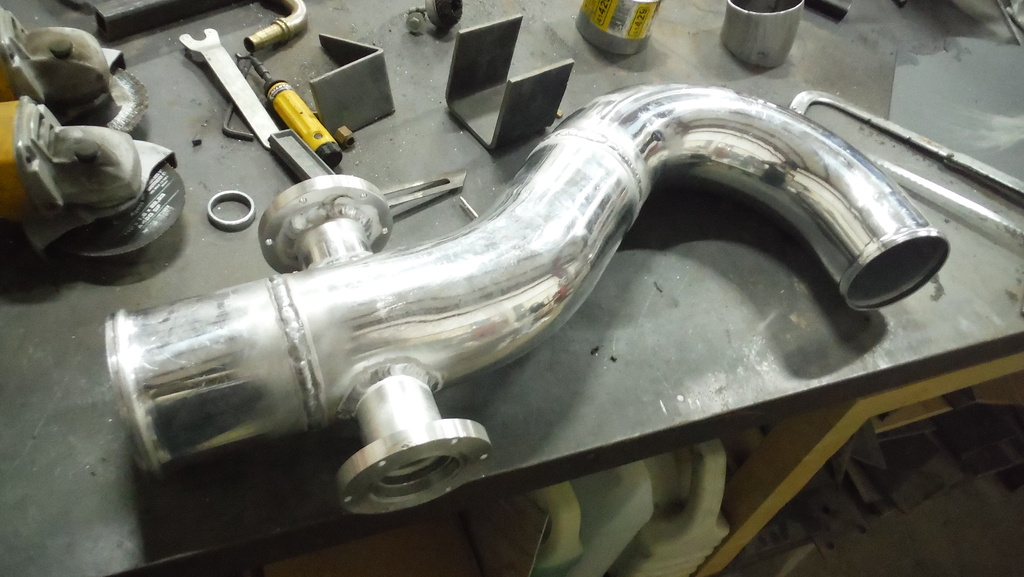
so after finishing the upper charge pipe , i started on the lower one. this one needed to have a funny curve to it to cleat the core support . so a few cuts here , beads rolled here , and a few welds there and we have this :
and here is the almost finished product:
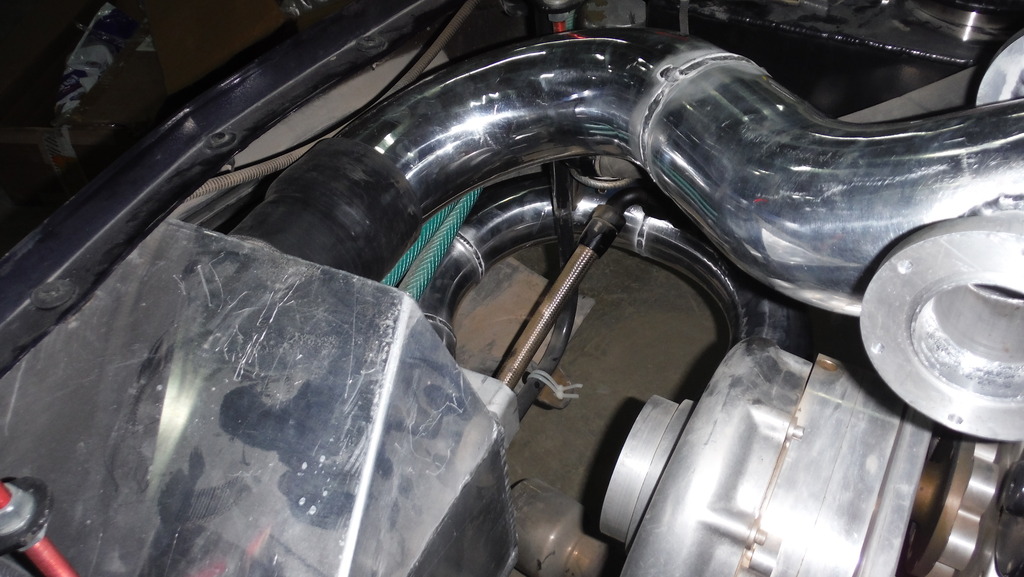
and how it looks in the car :

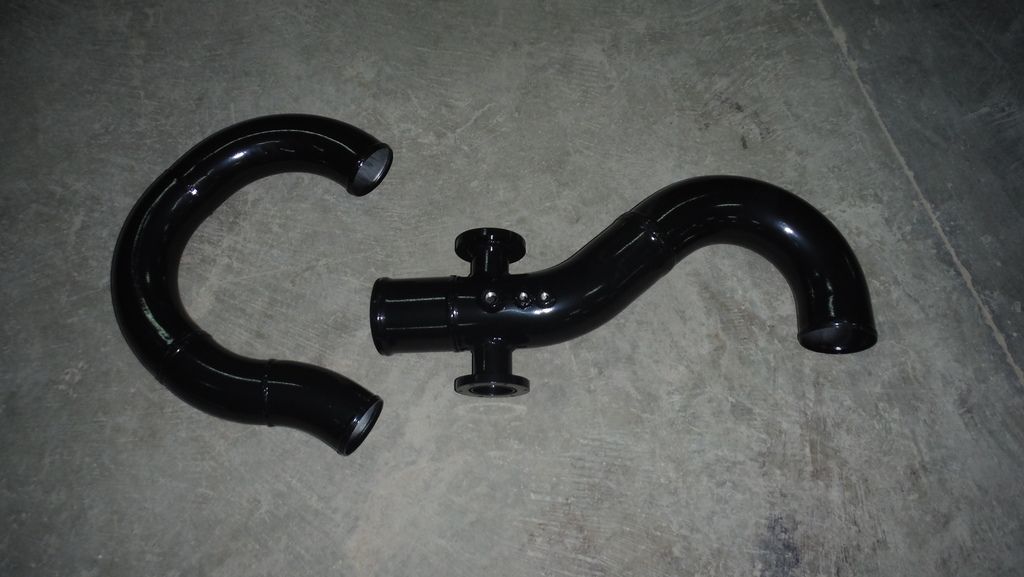
so now all that is left is to take the pipes to get powder coated black , then install the BOVs on them and slap them on the car.
the next thing i want to address is putting a window brace on the front windshield , and starting to clean up all the wiring and hoses i have running all through the engine compartment . i also want to swap the ugly green hose going from the intercooler to the tank
and i think it would be a good time to get a new battery in there as well
for my record , i swapped the rear slicks to a fresh set .
i also blew one of the front flexible brake lines - it was my fault and was lucky it happened when it did before the race . so i swapped both front lines.
I did manage to finish the intercooler tank and plumb it , and then I found out how much water it holds ; too much!!
so here is how it looks after its all done and installed in the car:

after that I went back to the front of the car, I managed to modify the front core support ( or what used to be the support ) where it now acts like a cradle for the intercooler :


and here is how the nose fits :

due to a local race coming up I had to hustle and get the piping done real fast , which meant I had to re use most of the old piping. that meant it would not look good and not work as efficiently.
so basically here is how it looked before the race:

so after the race I learned a few lessons :
- first off one of the two batteries I have took a crap on me - good thing there was another one that managed to do the job
- second thing is like I mentioned before the tank is huge! I think it holds something like 7-8 gallons of water and ice - the down side is weight and amount of ice being used ,,,, the up side is I can fill it up with water and lots of ice and just chill in the staging lanes forever without worrying about the ice melting away
- the third and most important thing I learned is that the 550 GPH intercooler pump I had on there is not enough ; it just does not flow enough.
so after the race the first thing to happen was a quick swap from the 500GPH to a 1100GPH pump ( same pump dimensionally just more flow).
I will give it a try and see how it goes , if I don't like it I will switch to a big rule 2500GPH in tank pump and maybe to another tank if I deem necessary
i also managed to fry the tranny at that race - ruined the clutches
so it was out with the tranny and off to get it redone and re installed .
moving on ,,, It was time to address the charge pipes. i started with the pipe coming from the intercooler to the throttle body; the plan was to make it with the as smooth of a curve as possible while still being able to re use it if I decide to change the intake later ( location of the throttle body moves up or down relative to its current position).
so i started off with bead rolling the end pieces cause it would be easier to do it now rather than when the whole thing is all done and hard and awkward to manipulate:

next up was welding the three pieces together to form the smooth curve as well as knocking out the 2 BOV pipe holes and BOV pipes :


next up was welding the aluminum BOV flange to the pipes and then welding those to the charge pipe :


after that i drilled and welded three bungs underneath for an IAT sensor and 2 Meth nozzles incase i need them later on. ( pics later below.)
so after finishing the upper charge pipe , i started on the lower one. this one needed to have a funny curve to it to cleat the core support . so a few cuts here , beads rolled here , and a few welds there and we have this :


and here is the almost finished product:


and how it looks in the car :


so now all that is left is to take the pipes to get powder coated black , then install the BOVs on them and slap them on the car.
the next thing i want to address is putting a window brace on the front windshield , and starting to clean up all the wiring and hoses i have running all through the engine compartment . i also want to swap the ugly green hose going from the intercooler to the tank
and i think it would be a good time to get a new battery in there as well

 07-14-2015, 03:48 AM
#405
8 Second Club
Thread Starter
iTrader: (1)
Join Date: Nov 2001
Location: the not so stock tribe
Posts: 3,697
Likes: 0
Received 0 Likes
on
0 Posts
not much to report other than i just got some parts in from the powedercoater, and slapped them on the car

so now that is out of the way, its time to focus on the little stuff; i guess i can start with the windshield brace , then tackle the wires and hoses in the engine compartment and clean them up a bit along with the green hose.


so now that is out of the way, its time to focus on the little stuff; i guess i can start with the windshield brace , then tackle the wires and hoses in the engine compartment and clean them up a bit along with the green hose
.
01-24-2017, 02:59 AM
#410
8 Second Club
Thread Starter
iTrader: (1)
Join Date: Nov 2001
Location: the not so stock tribe
Posts: 3,697
Likes: 0
Received 0 Likes
on
0 Posts
Damn! one year and a half since the last update!!
let me try to remember what happened so far
I won a few races

I also destroyed a few parts in the process ; intercooler does not want any part of the 28 psi I was throwing at it :

I got that patched up and braced and now works like a champ .
I also got my bend pack portable lift in, and put it to good use

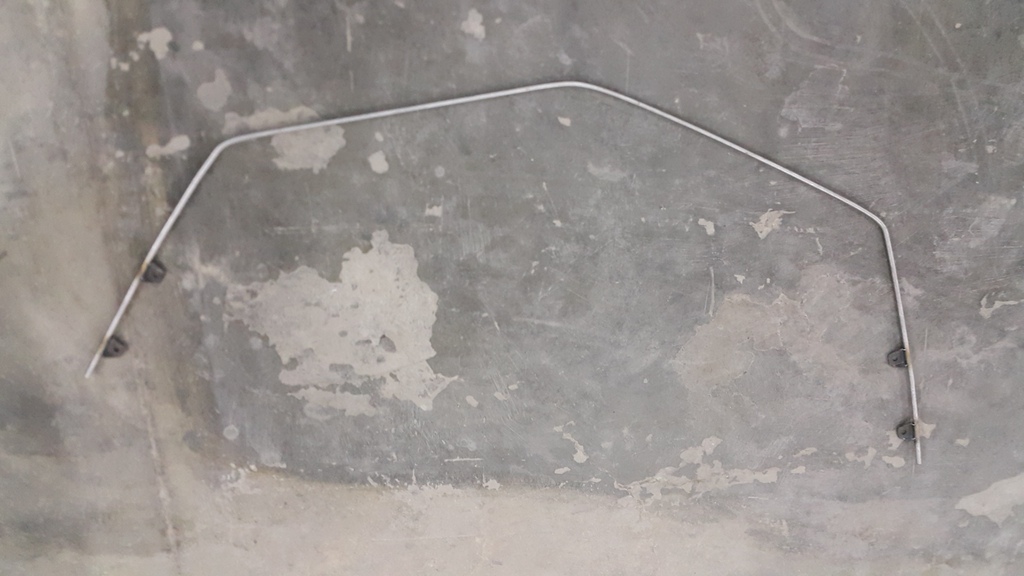
bent up some bars to make the lower nose brace to keep it from pushing in at high speeds:

also one of the two 12 volt batteries I have on the car went bad, changed that. electric water pump seized twice ( once in the final race of championship, and the other after another race later on.) the first time I thought I forgot to turn it on , the second time is when I found out that it was sticking and not turning when powered.
and yes the car did get " warm " ,,,, about 270-280* warm . still runs ok
I also sent the transmission in to rossler to get a refresh , and got both transmissions in with a clean bill of heath ( the main and spare ones) .
I got my new welds in and on the car , they are 18's in the front and 15 single bead locks in the rear ( couldn't find double bead locks in stock offset size) :


sorry, but oddly enough I have no pics of the front wheels on the car or the side of the car with the new shoes. i'll snap a few today and post them.
moving on , I decided to finally check on the car over for a change , and guess what ,,,, she's showing her age :p
I removed the plugs and did a compression and leak down test to see what is going on ; the pugs didn't look very well nor did the leakdown and compression numbers:

so I guess its time for a refresh, running the car a few times at 280 deg. does not work well
so its time to remove the engine and give here the once over . and since I'm yanking her out i though this would be a good time to see how the new turbo headers i got fit and how i might be routing the plumbing for them.
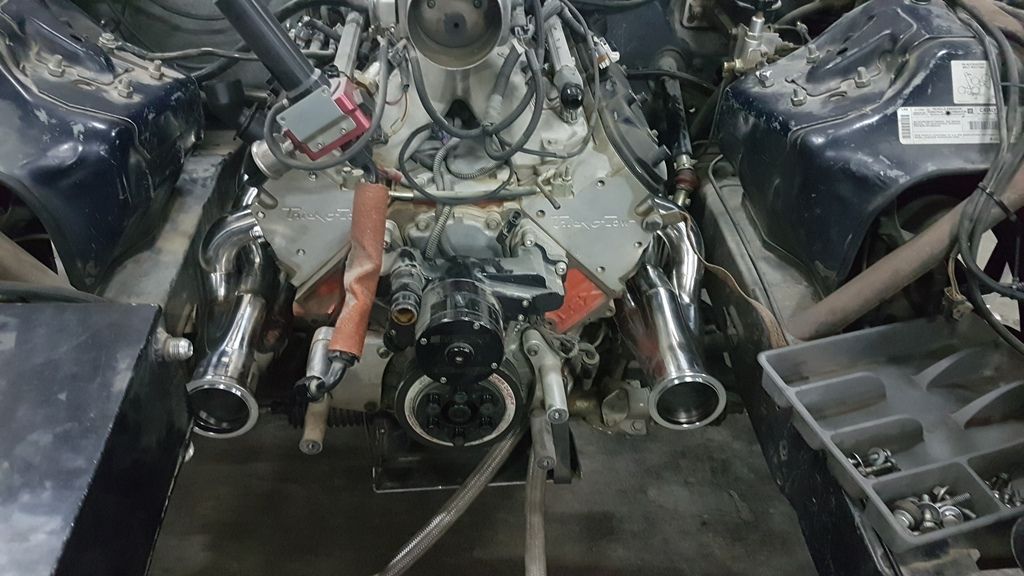
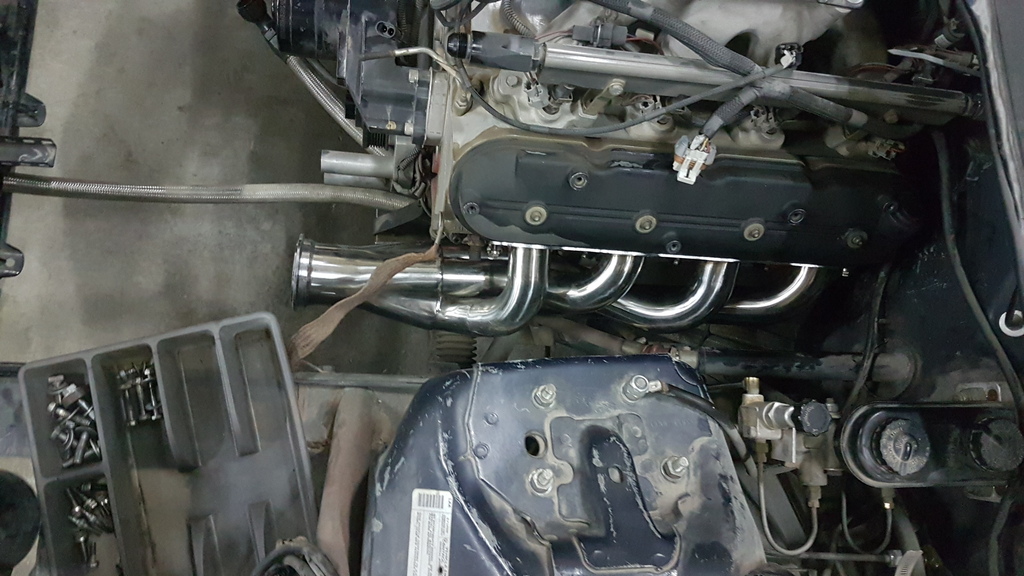
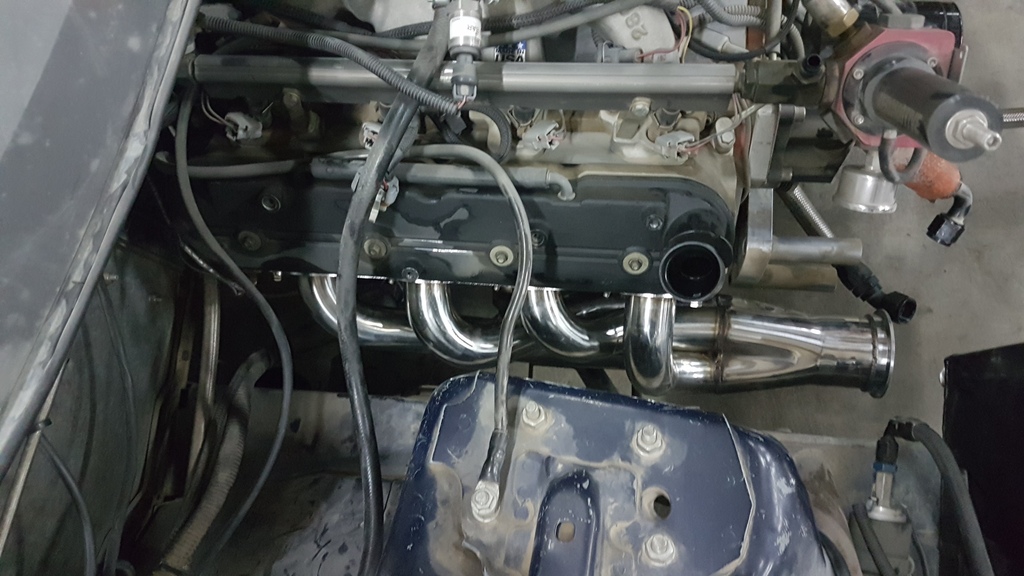

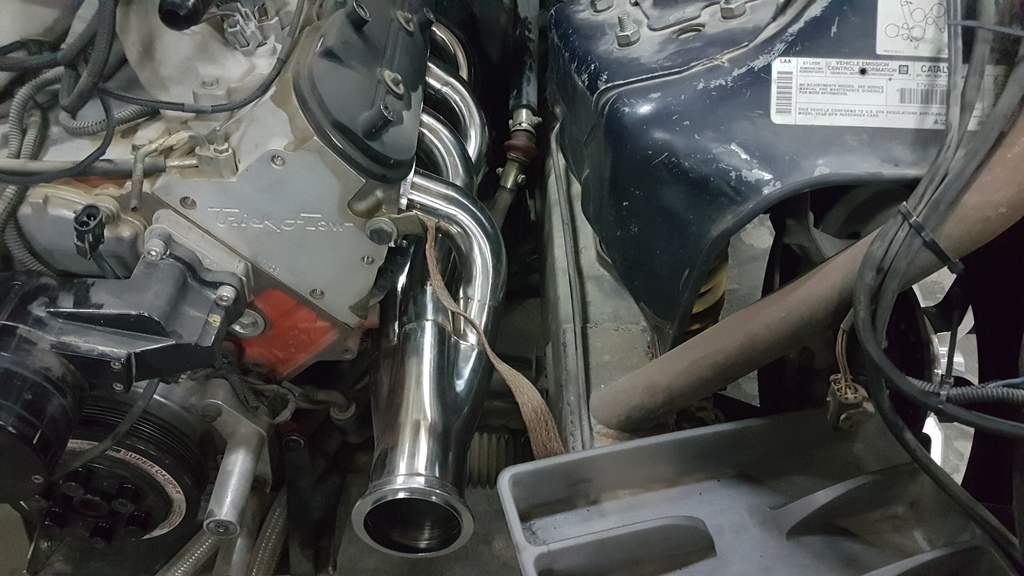

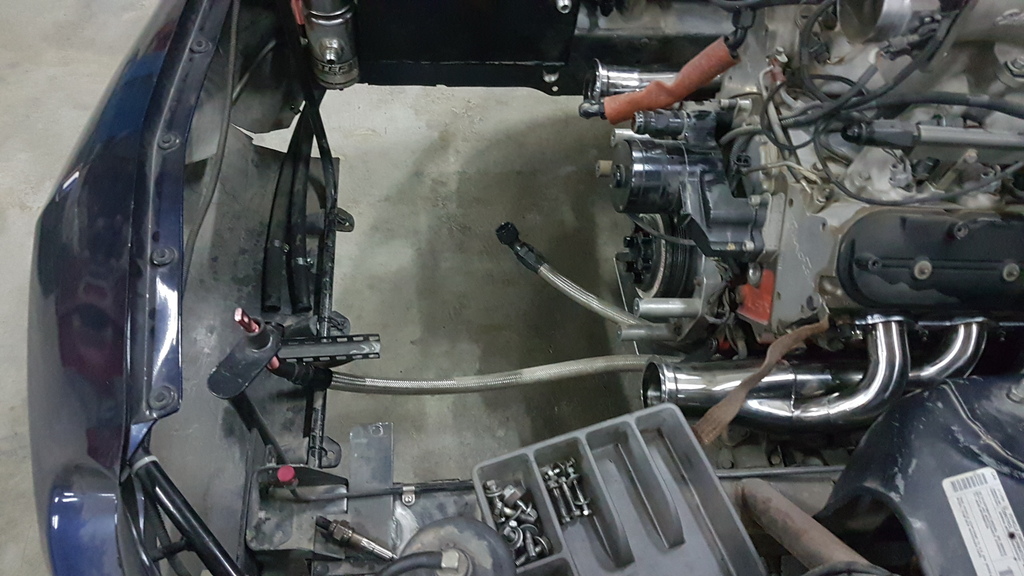
do you think i have enough space
the plan is to get the parts all ready for when the blower ***** the bed given how dependable procharger has been lately , and replace it with a decent size single turbo setup. I'm going to try to use as much as i can of the old setup . so i would like to keep the intercooler in the same place to keep things simple .
i will also need to relocate the fuel cell, its a bit too close to the pass. side manifold.
so the plan now is to remove the engine , refresh the heads and shortblock , clean up the engine compartment ( re-wire and re route a few hoses ) and paint it. I'm hoping the pistons are still ok ( i just ordered a new set of rings for the short block , and a few extra valves for the heads and a new set of bearings ) so if the damage is only what i think it is i will install the thing back in again.
wish me luck
let me try to remember what happened so far
I won a few races

I also destroyed a few parts in the process ; intercooler does not want any part of the 28 psi I was throwing at it
: 

I got that patched up and braced and now works like a champ .
I also got my bend pack portable lift in, and put it to good use


bent up some bars to make the lower nose brace to keep it from pushing in at high speeds:


also one of the two 12 volt batteries I have on the car went bad, changed that. electric water pump seized twice ( once in the final race of championship, and the other after another race later on.) the first time I thought I forgot to turn it on , the second time is when I found out that it was sticking and not turning when powered.
and yes the car did get " warm " ,,,, about 270-280* warm . still runs ok
I also sent the transmission in to rossler to get a refresh , and got both transmissions in with a clean bill of heath ( the main and spare ones) .
I got my new welds in and on the car , they are 18's in the front and 15 single bead locks in the rear ( couldn't find double bead locks in stock offset size) :


sorry, but oddly enough I have no pics of the front wheels on the car or the side of the car with the new shoes. i'll snap a few today and post them.
moving on , I decided to finally check on the car over for a change , and guess what ,,,, she's showing her age :p
I removed the plugs and did a compression and leak down test to see what is going on ; the pugs didn't look very well nor did the leakdown and compression numbers:

so I guess its time for a refresh, running the car a few times at 280 deg. does not work well
so its time to remove the engine and give here the once over . and since I'm yanking her out i though this would be a good time to see how the new turbo headers i got fit and how i might be routing the plumbing for them.


do you think i have enough space
the plan is to get the parts all ready for when the blower ***** the bed given how dependable procharger has been lately , and replace it with a decent size single turbo setup. I'm going to try to use as much as i can of the old setup . so i would like to keep the intercooler in the same place to keep things simple .
i will also need to relocate the fuel cell, its a bit too close to the pass. side manifold.
so the plan now is to remove the engine , refresh the heads and shortblock , clean up the engine compartment ( re-wire and re route a few hoses ) and paint it. I'm hoping the pistons are still ok ( i just ordered a new set of rings for the short block , and a few extra valves for the heads and a new set of bearings ) so if the damage is only what i think it is i will install the thing back in again.
wish me luck
02-05-2017, 03:53 AM
#413
8 Second Club
Thread Starter
iTrader: (1)
Join Date: Nov 2001
Location: the not so stock tribe
Posts: 3,697
Likes: 0
Received 0 Likes
on
0 Posts
so I took the thing apart again
and man do I abuse this thing
here is what I found :
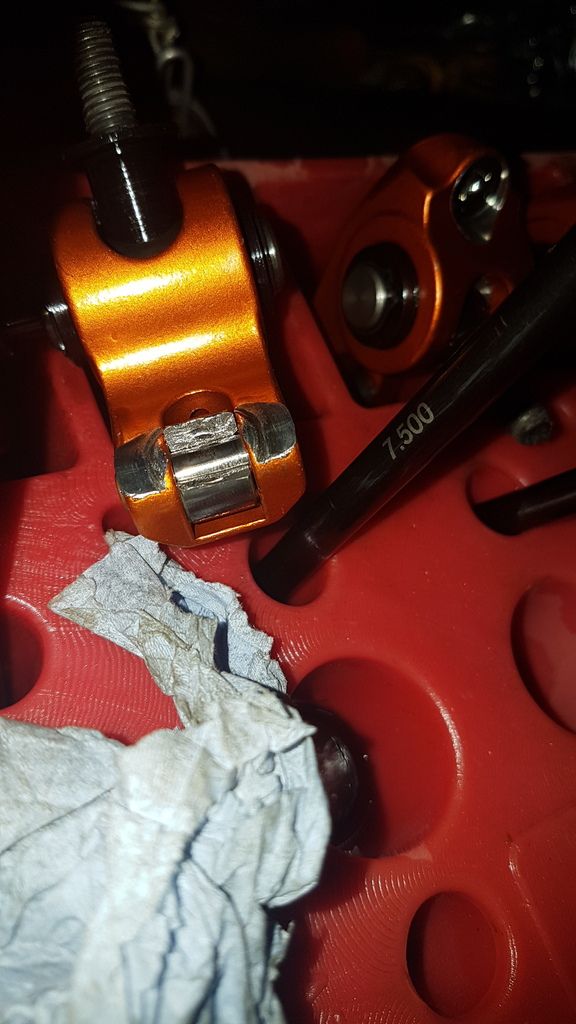
i'll start off with the rockers ,,,, this was interesting :


this messed up one of the valve tips and retainers , which needs to be replaced .
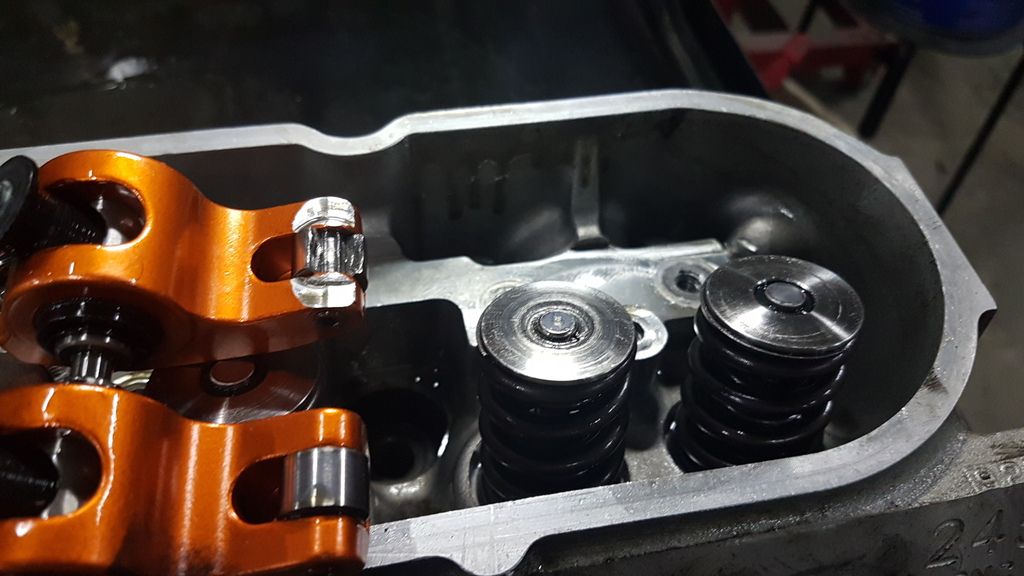
next up is the broken valve guide:

moving on , none of the valve tips were on the same height ( I put a straight edge across the tips and it looked like seismograph chart ) , so I'm assuming the overheating and lean running took its toll on the heads

so I'm assuming the worst-ish ; burnt valves , tuliped valves , ruined seats and worn out guides. the good news ( and strange thing) is the heads are relatively straight . I will get them surfaced just incase and to gain a bit of compression.
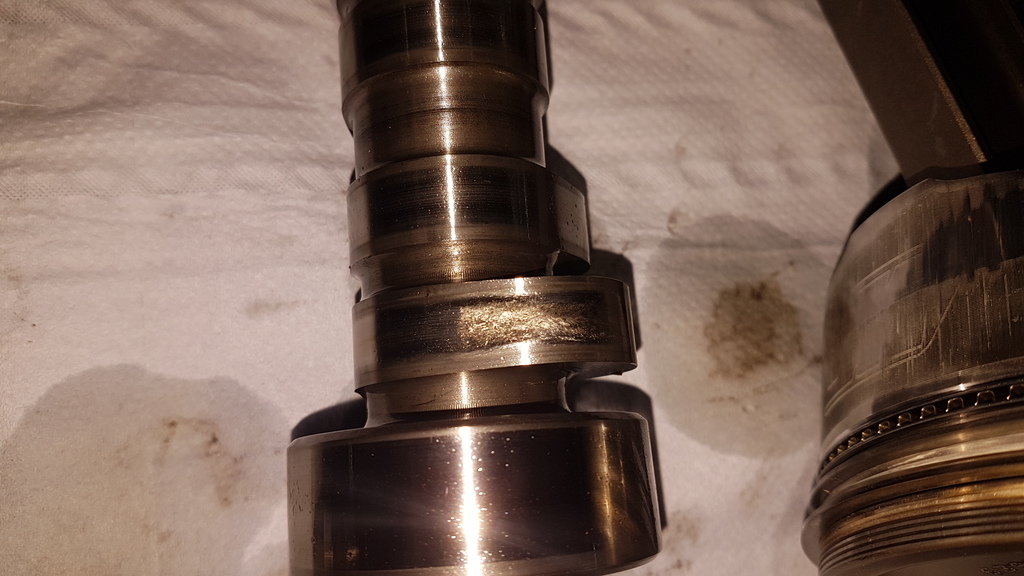
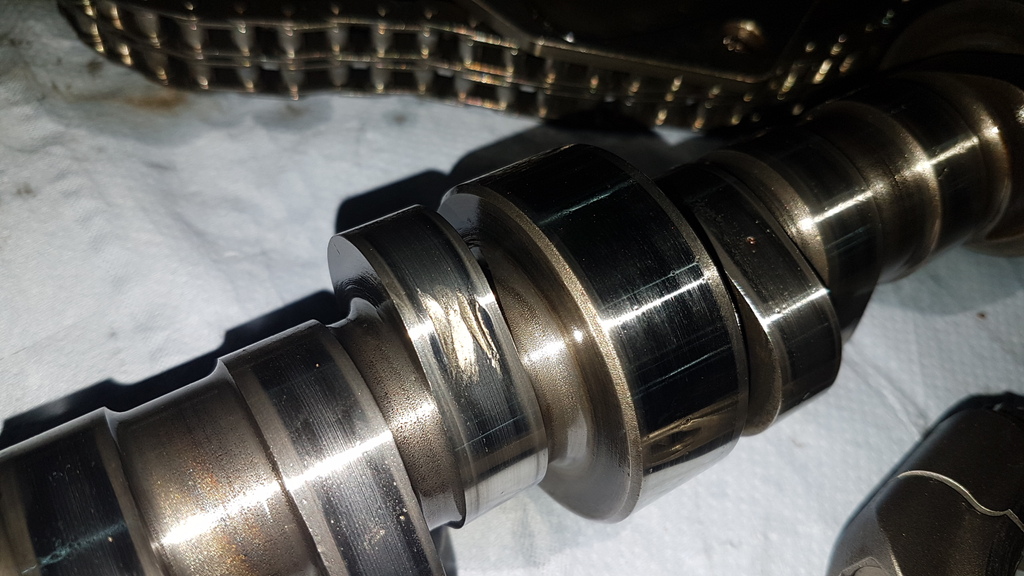
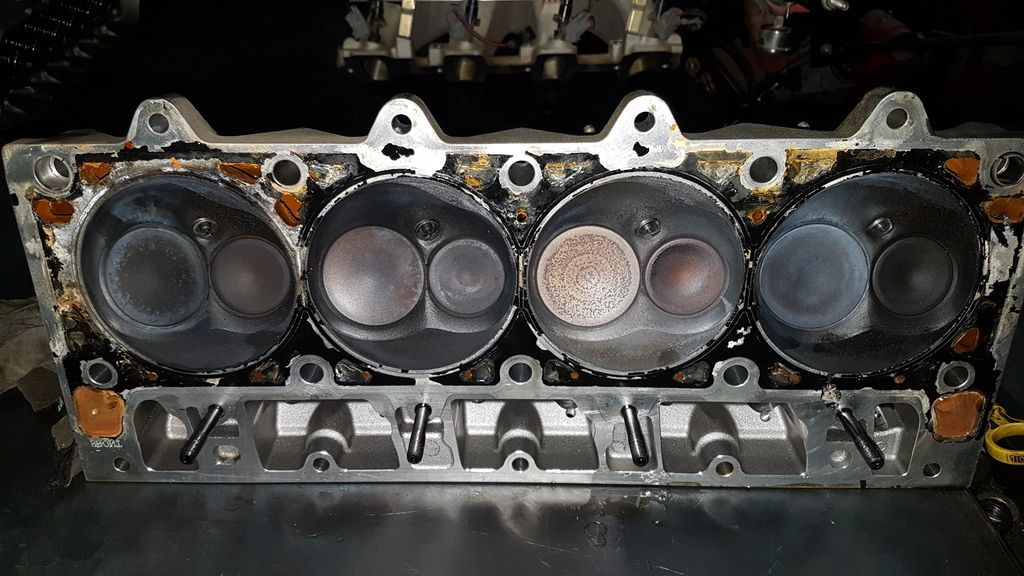
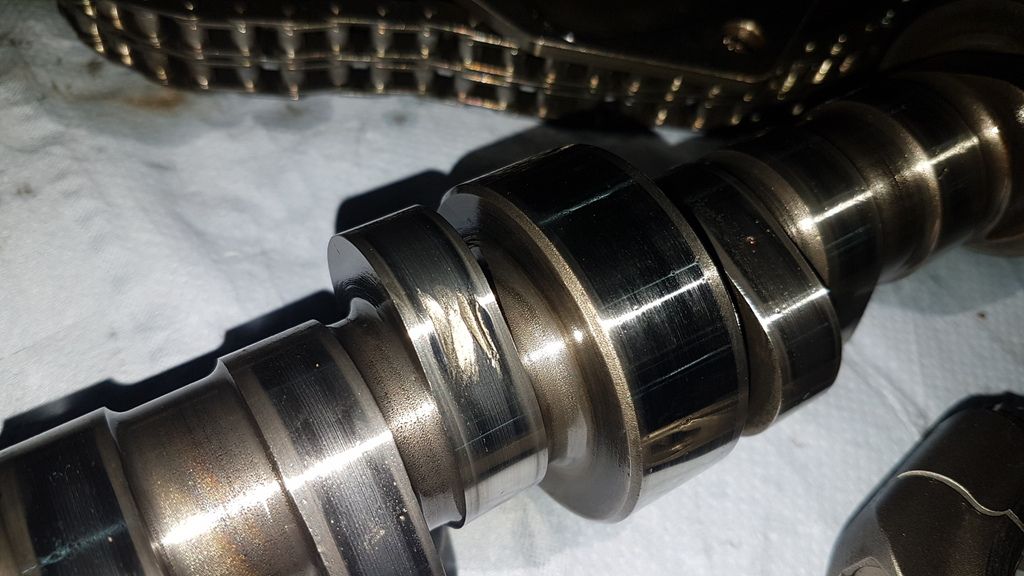
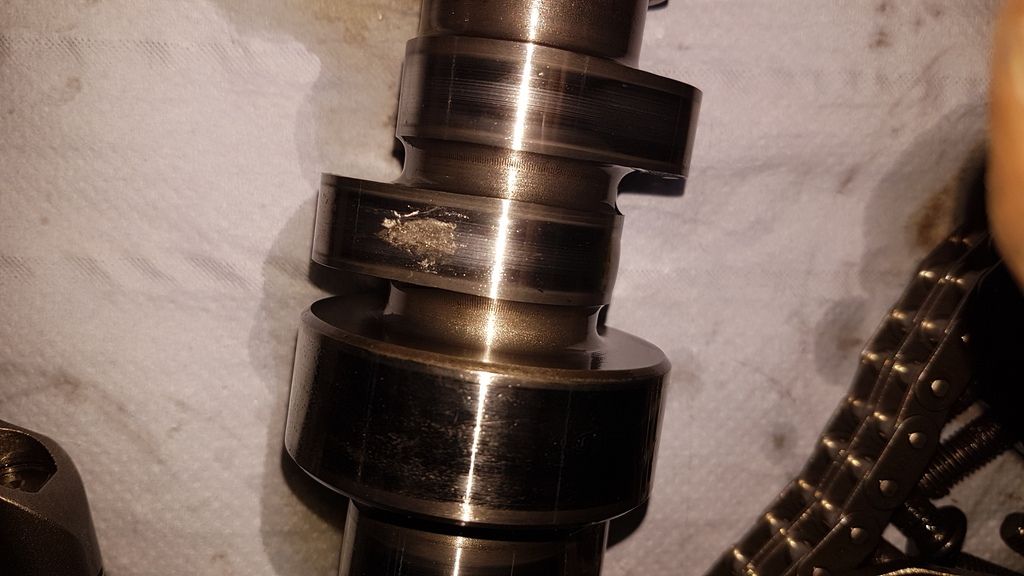
moving on , the bores look great and I still can see the cross hatch , but I honed it just in case . the cam on the other hand is ,, well,,, not good

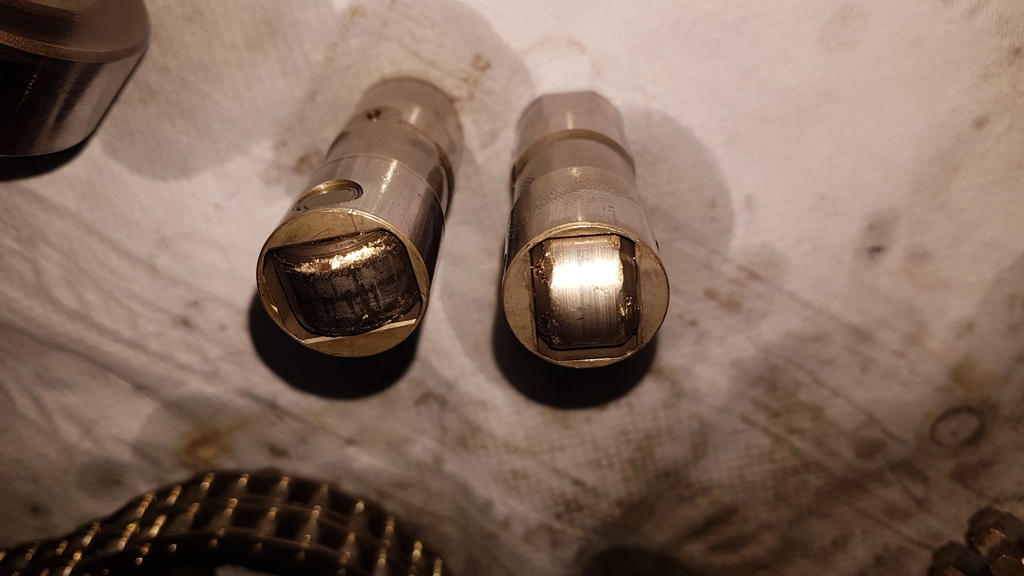
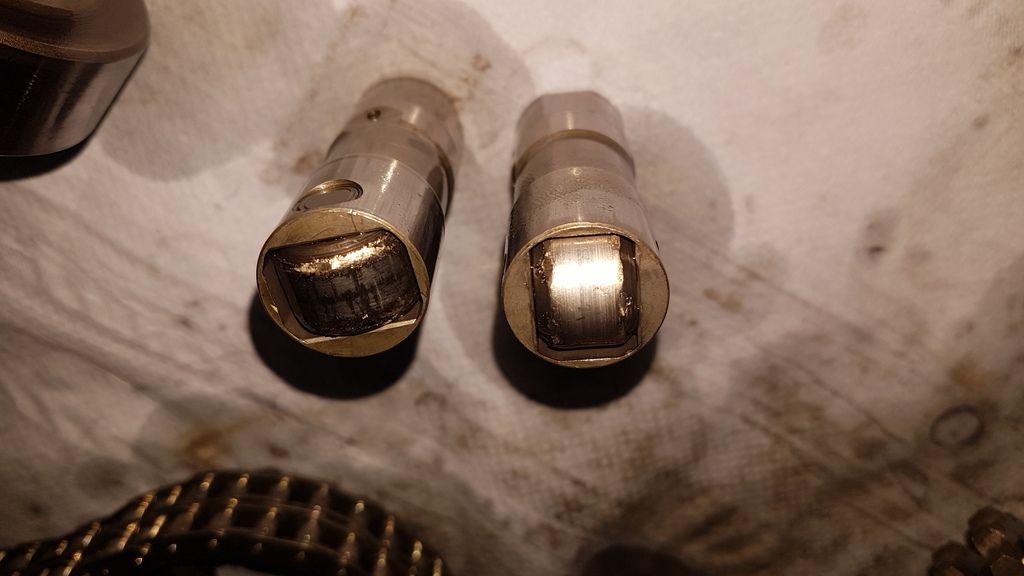
and once again two lifters were banged up :
and when I tore the shortblock even further I found this :
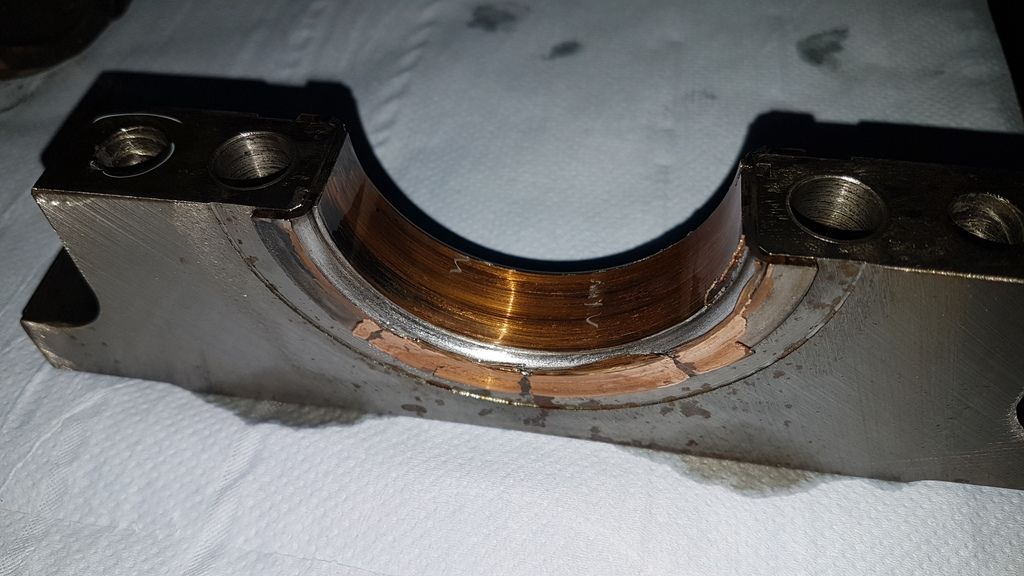
lower main bearings:


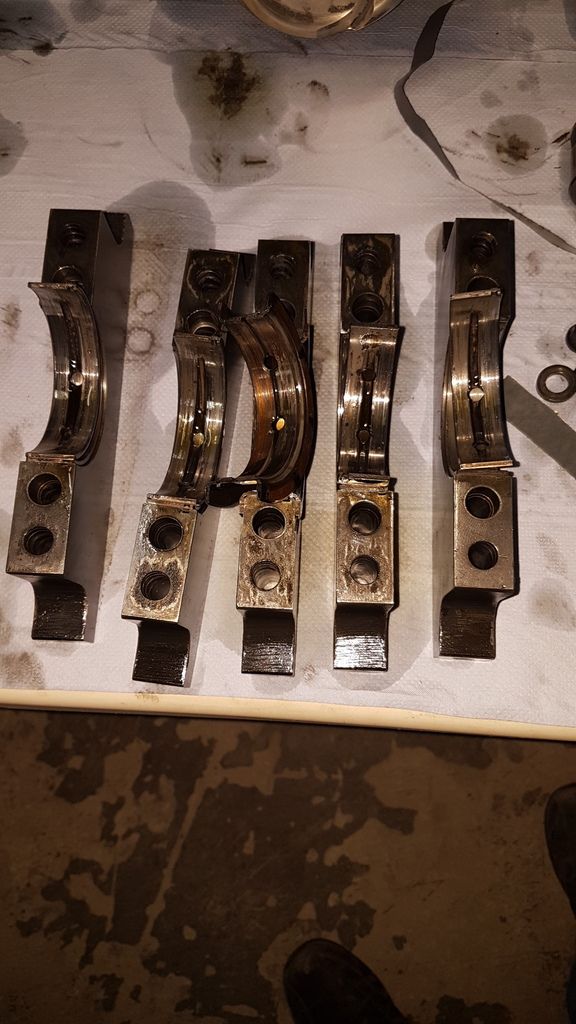
upper main bearings :

the good news is the crank is ok and does not need machining, and the rod bearings look great . piston to wall clearance is still good at 0.004"
so the plan is as follows :
clean up the crank - no machining needed - and install a new set of bearings, reuse the current rings as the gap is still ok . I'm planning on machining crank and bores once the need comes to send stuff to the machine shop and install new pistons.
I will reuse the cam ( I know its not the right thing to do ) , but I am planning on swapping it later to a turbo cam and converting to a solid roller lifter setup in the not so distant future . I will just swap out the broken rockers and lifters for now, and redo the heads with new guides , seats , valves and springs and retainers - basically a complete head refresh.
hopefully this will get me through the season for now until I can get all the turbo parts ready .
the plan later is just like I said swap to a solid lifter setup ( lifters and rockers on the way) , turbo cam and a new turbo setup, and a converter setup once I get all the details in.
so for now its refresh the engine as I mentioned above, clean and repaint the engine compartment , rearrange and clean up the wiring and hoses in the engine compartment , start working on a new fuel cell ( to clear the turbo header) , and a pair of oil catch cans .
and man do I abuse this thing
here is what I found :
i'll start off with the rockers ,,,, this was interesting :


this messed up one of the valve tips and retainers , which needs to be replaced .
next up is the broken valve guide:

moving on , none of the valve tips were on the same height ( I put a straight edge across the tips and it looked like seismograph chart
) , so I'm assuming the overheating and lean running took its toll on the heads 
so I'm assuming the worst-ish ; burnt valves , tuliped valves , ruined seats and worn out guides. the good news ( and strange thing) is the heads are relatively straight . I will get them surfaced just incase and to gain a bit of compression.
moving on , the bores look great and I still can see the cross hatch , but I honed it just in case . the cam on the other hand is ,, well,,, not good


and once again two lifters were banged up :

and when I tore the shortblock even further I found this :
lower main bearings:


upper main bearings :

the good news is the crank is ok and does not need machining, and the rod bearings look great . piston to wall clearance is still good at 0.004"
so the plan is as follows :
clean up the crank - no machining needed - and install a new set of bearings, reuse the current rings as the gap is still ok . I'm planning on machining crank and bores once the need comes to send stuff to the machine shop and install new pistons.
I will reuse the cam ( I know its not the right thing to do ) , but I am planning on swapping it later to a turbo cam and converting to a solid roller lifter setup in the not so distant future . I will just swap out the broken rockers and lifters for now, and redo the heads with new guides , seats , valves and springs and retainers - basically a complete head refresh.
hopefully this will get me through the season for now until I can get all the turbo parts ready .
the plan later is just like I said swap to a solid lifter setup ( lifters and rockers on the way) , turbo cam and a new turbo setup, and a converter setup once I get all the details in.
so for now its refresh the engine as I mentioned above, clean and repaint the engine compartment , rearrange and clean up the wiring and hoses in the engine compartment , start working on a new fuel cell ( to clear the turbo header) , and a pair of oil catch cans .
02-05-2017, 05:54 AM
#414

Man, you tear stuff up!  I would not reuse that cam, it is not worth the chance of it trashing more parts. Bob
I would not reuse that cam, it is not worth the chance of it trashing more parts. Bob
__________________
ATI ProCharger and Moser Sales 260 672-2076
PM's disabled, please e-mail me
E-mail: brutespeed@gmail.comob@brutespeed.com
https://brutespeed.com/ Link to website

ATI ProCharger and Moser Sales 260 672-2076
PM's disabled, please e-mail me
E-mail: brutespeed@gmail.comob@brutespeed.com
https://brutespeed.com/ Link to website
 02-05-2017, 07:57 AM
#415
8 Second Club
Thread Starter
iTrader: (1)
Join Date: Nov 2001
Location: the not so stock tribe
Posts: 3,697
Likes: 0
Received 0 Likes
on
0 Posts
hey bob ,
I'm debating doing that , the issue is I don't want to swap to a turbo cam yet ( I want to see what I can do with the blower I have ) , and hopefully this cam will last a few passes before the racing season is over here ( we stop when it gets hot )
I'm debating doing that , the issue is I don't want to swap to a turbo cam yet ( I want to see what I can do with the blower I have ) , and hopefully this cam will last a few passes before the racing season is over here ( we stop when it gets hot
)
02-05-2017, 08:55 AM
#416
From the looks if it I'd be concerned you're going to hurt more parts. It might be a lot less money to put another blower cam in there for now. Bob
__________________
ATI ProCharger and Moser Sales 260 672-2076
PM's disabled, please e-mail me
E-mail: brutespeed@gmail.comob@brutespeed.com
https://brutespeed.com/ Link to website
ATI ProCharger and Moser Sales 260 672-2076
PM's disabled, please e-mail me
E-mail: brutespeed@gmail.comob@brutespeed.com
https://brutespeed.com/ Link to website
02-05-2017, 11:19 PM
#417
so I took the thing apart again
and man do I abuse this thing
here is what I found :
i'll start off with the rockers ,,,, this was interesting :
this messed up one of the valve tips and retainers , which needs to be replaced .
next up is the broken valve guide:

moving on , none of the valve tips were on the same height ( I put a straight edge across the tips and it looked like seismograph chart ) , so I'm assuming the overheating and lean running took its toll on the heads
so I'm assuming the worst-ish ; burnt valves , tuliped valves , ruined seats and worn out guides. the good news ( and strange thing) is the heads are relatively straight . I will get them surfaced just incase and to gain a bit of compression.
moving on , the bores look great and I still can see the cross hatch , but I honed it just in case . the cam on the other hand is ,, well,,, not good

and once again two lifters were banged up :
and when I tore the shortblock even further I found this :
lower main bearings:

upper main bearings :
the good news is the crank is ok and does not need machining, and the rod bearings look great . piston to wall clearance is still good at 0.004"
so the plan is as follows :
clean up the crank - no machining needed - and install a new set of bearings, reuse the current rings as the gap is still ok . I'm planning on machining crank and bores once the need comes to send stuff to the machine shop and install new pistons.
I will reuse the cam ( I know its not the right thing to do ) , but I am planning on swapping it later to a turbo cam and converting to a solid roller lifter setup in the not so distant future . I will just swap out the broken rockers and lifters for now, and redo the heads with new guides , seats , valves and springs and retainers - basically a complete head refresh.
hopefully this will get me through the season for now until I can get all the turbo parts ready .
the plan later is just like I said swap to a solid lifter setup ( lifters and rockers on the way) , turbo cam and a new turbo setup, and a converter setup once I get all the details in.
so for now its refresh the engine as I mentioned above, clean and repaint the engine compartment , rearrange and clean up the wiring and hoses in the engine compartment , start working on a new fuel cell ( to clear the turbo header) , and a pair of oil catch cans .
and man do I abuse this thing
here is what I found :
i'll start off with the rockers ,,,, this was interesting :
this messed up one of the valve tips and retainers , which needs to be replaced .
next up is the broken valve guide:
moving on , none of the valve tips were on the same height ( I put a straight edge across the tips and it looked like seismograph chart
) , so I'm assuming the overheating and lean running took its toll on the heads so I'm assuming the worst-ish ; burnt valves , tuliped valves , ruined seats and worn out guides. the good news ( and strange thing) is the heads are relatively straight . I will get them surfaced just incase and to gain a bit of compression.
moving on , the bores look great and I still can see the cross hatch , but I honed it just in case . the cam on the other hand is ,, well,,, not good
and once again two lifters were banged up :
and when I tore the shortblock even further I found this :
lower main bearings:
upper main bearings :
the good news is the crank is ok and does not need machining, and the rod bearings look great . piston to wall clearance is still good at 0.004"
so the plan is as follows :
clean up the crank - no machining needed - and install a new set of bearings, reuse the current rings as the gap is still ok . I'm planning on machining crank and bores once the need comes to send stuff to the machine shop and install new pistons.
I will reuse the cam ( I know its not the right thing to do ) , but I am planning on swapping it later to a turbo cam and converting to a solid roller lifter setup in the not so distant future . I will just swap out the broken rockers and lifters for now, and redo the heads with new guides , seats , valves and springs and retainers - basically a complete head refresh.
hopefully this will get me through the season for now until I can get all the turbo parts ready .
the plan later is just like I said swap to a solid lifter setup ( lifters and rockers on the way) , turbo cam and a new turbo setup, and a converter setup once I get all the details in.
so for now its refresh the engine as I mentioned above, clean and repaint the engine compartment , rearrange and clean up the wiring and hoses in the engine compartment , start working on a new fuel cell ( to clear the turbo header) , and a pair of oil catch cans .
I'd go back and look at that crank. With that cam lobe going away and metal moving through the oil and the looks of those mains, especially the thrust surface, there is little to no chance that the crank doesn't need some work.