


Installing solid pinion spacer in 10 bolt. Need advice
Hello. I am ordering a solid pinion spacer for my 10 bolt. I have never done anything that in depth to a rear end and would like to know what would be involved? I am keeping my gear set and am just changing the carrier and probably installing new bearings on both the carrier and pinion gear. What all would be involved in installing the spacer? What is the procedure? Do I just keep record of the shims that come out when I pull the gears out and re-use them in that order? Any help on installing the solid pinion spacer would be GREATLY appreciated.
When I installed my solid spacer I made the mistake of using the old outer pinion bearing as a setup bearing (ID slightly opened up so it was a slip fit on pinion) to make setting the solid spacer/pinion rotational torque easier. Well when I did the final install with new bearings the pinion drag was off because the old bearing was worn. I would recomend buying spare new bearings to use as setup bearings. Ratech specs IIRC 125ftlb torque on the pinion nut in their solid spacer kit. I measured the pinion nut run-on torque (how much torque it takes just to overcome the self locking feature of the nut) and added this figure to the 125ftlb to get my final pinion nut torque. 125ftlb + 30ftlb=155ftlb that I torqued mine to during initial solid spacer setup and for final torque. You must be consistant to get repeatable results.
I am inclined to think you could just pull the front seal and bearing then take out the factory spacer with a magnet; reinstall new spacer, used bearing, and new seal. Torque to specs...
first, what all are you going to change? if just the spacer, measure the old one, then create a shimpack to achieve that same size. if you are changing the pinion bearings too, you may have to try a few times to get the preload where you want it.
Joined: Aug 2007
Posts: 24,241
Likes: 89
From: Turnin' Wrenches Infractions: 005
Based on what you said, you don't seem to be familiar with the rebuilding process. I would suggest reading several write-ups to get comfortable with what you are about to jump into. You will need to buy some special tools, and regardless of what you change, you should check specs before and after to compare and make sure things are staying on the right track. Jaws gear has a write up on their site.
Joined: Aug 2007
Posts: 24,241
Likes: 89
From: Turnin' Wrenches Infractions: 005
You have to measure rolling pinion torque when installing the new collar whether it is the crush-able type or the solid type. You need an inch/pounds beam style torque wrench to measure this. You measure it with the carrier out of the housing so the posi has to come out. So basically you are disassembling the entire rear end. Please read and read some more and you will hit the ground running.
Trending Topics
LS1 Tech Stories
The Best V8 Stories One Small Block at Time

Gas Monkey Built a 6-Wheel Ferrari Testarossa With a Corvette LT4 Engine
Verdad Gallardo
7 Most Reliable High-Performance Engines GM Has Ever Built
Verdad Gallardo
Amazing '71 Camaro Restomod Is Modern Muscle Car Under the Skin
Verdad Gallardo
6 Common C5 Corvette Failures and What's Involved In Repairing Them
Pouria Savadkouei
Retro Modern Bandit Pontiac Trans AM Comes With Burt Reynolds' Autograph
Verdad Gallardo
Top 10 Greatest Cadillac V Series Performance Models Ever, Ranked
Pouria Savadkouei
Top 10 Most Powerful Chevy Trucks Ever Made!

Hennessey's New Supercharged Silverado ZR2 Has 700 HP
Verdad Gallardo
Coachbuilt N2A Anteros Is an LS2-Powered C6 Corvette In Italian Clothes
Verdad Gallardo I am probably picking up a rear with gears/carrier that I would like to use in my housing (since I have nicely welded LCA relocation brackets). Simply put, can I just swap over the parts (making sure to take note of where shims are placed) to my rear? I will measure backlash and check gear pattern, that is no problem. I was just wondering the method for installing a solid pinion spacer. Do I just measure the old crush collar with it's shims and take that measurement and transfer it over using the solid spacer and shims? I will definitely do some more reading. That website you recommended (01ssreda4) was very helpful, thank you!
7.5" crush collar doesn't have shims!!!!!! you "crush" it till you get to the right preload!!!! hence the name CRUSH COLLAR!!!!!!!!!!
the solid pinion spacer should come with several different shims to get the right preload because you aren't going to be able to "crush" it to get it to the right size. thats why you may have to do it a few times. if its not right, it has to come back apart, whether its loose or tight. crush collars only have to come apart if you get them too tight.
depending on bearing wear, you can do as i said earlier, or add a little to get the factory preload back.
like people said though, you are better off leaving it alone if there is no problem. if you dont know what you're doing and you dont get that front bearing BEYOND hospital clean, it wont sit back in the cone right and you'll cause more damage than what you are trying to prevent.
I am swapping posi and gears out from a rear I am buying to my rear (which has a shot posi unit and terrible gearset for my transmission/tire combo). I figured while I am in there to just throw in a solid spacer. Don't know the history of the rear I am buying so who knows how worn it is. If the bearings seem decent I will leave them. So from what I gathered from your posts, I should just measure the old crush collar and create a shim pack using the solid spacer and shims and get as close as possible to the size of the old crush collar (assuming it was in spec). Correct?
and bare with me here. I realize that it is probably not the best way to learn by jumping in the fire in this case, but I am left with no choice. I am without a doubt mechanically inclined but can safely say I have never dealt with a rear end to this extent. I also apologize that I did not know the crush collar did not have shims. No need to go CAPSLOCK/yelling on me 
Thank you for your input though, it definitely helped.
Thank you for your input though, it definitely helped.
why not just swap the rears then? you don't want to swap used innards from one rear to another. things have already meshed together and its a 1 in a googol chance of getting everything back to the right mesh. that again will kill the whole purpose of the job.
My rear has LCA relocation brackets TIG welded in. I guess I can hack them off and have them welded on again? Just trying to see what is easiest on the pocketbook. I am a full time student trying to get into medical school so I do not work. Money = tight. But I know, you have to pay to play... 
This is standard practice for the use of torque wrenches with adapters. In this case the axle flange is acting like a adapter transferring the force of the wrench from the lug nut to the center of the axle shaft.
Last edited by guppymech; Nov 10, 2011 at 03:02 AM.
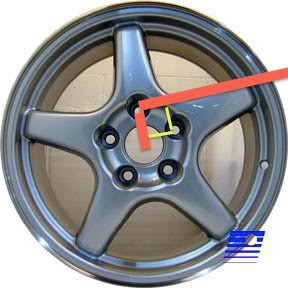
I appreciate it! So going by my illustration, if I do it that way the break away torque should be in the range of what you listed in your last post? I apologize for all of the questions. You have been very helpful and informative. Definitely learned something new
As long as you are able to keep your wrench close to 90 deg you will get a accurate measurement of the force to make the cones slip in the posi unit. If the force falls outside of the range of 43-67 ftlbs on the low side I would say the posi is worn out. I bought a spare rearend that was drained of lube and when I tested the posi this way my readings were about 4 ftlbs higher than what I got after I filled the rear with lube.....it had somewhat more friction in its 'dry' state. So beware of a low reading on a empty rearend.
You're welcome, glad I could help.
You're welcome, glad I could help.
Last edited by guppymech; Nov 10, 2011 at 11:21 AM.
One last question (I promise). Does it matter which way you turn it? Clockwise (towards rear of vehicle) or counter clockwise (towards front)? Thank you once again! You are a life saver man