
 04-25-2016, 04:57 PM
Last edit by: IB Advertising
See related guides and technical advice from our community experts:
Browse all: Steering and Suspension Guides
- Camaro and Firebird: Steering Column Disassembly
Step by step instructions for do-it-yourself repairs
Browse all: Steering and Suspension Guides

How-To; Steering Column Repair


 07-18-2012, 11:57 PM
#24
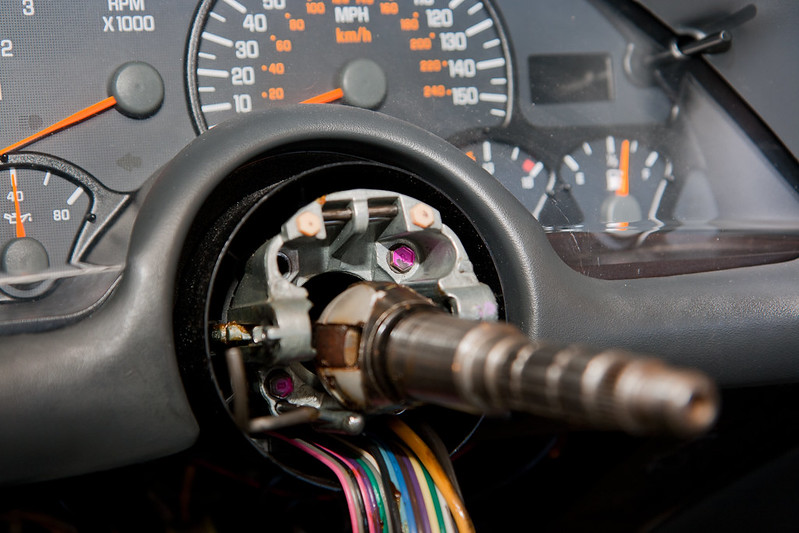
so Use the Torx 30 from the back and loosen the two screws holding the airbag. Once removed, pull the yellow connector from the back of the airbag, do not open the connector, remove the entire plug pulling straight away from the surface. Then use a smaller Torx and remove the horn contacts on either side of the center and place them and their screws in a baggie. Loosen the nut in the center of the wheel and remove, then use the wheel puller per instructions that should be included. When it is time to replace, just reverse, and be sure to refer to your phone pic to position the wheel on the same spline as before or you will be doing this all over again.
right?
right?
09-02-2012, 03:07 PM
#25
I just had to put in a new ignition cylinder, everything is back together and now my blinkers dont work, but the hazard switch is also in and the hazards work fine. the ignition switch is all back together correctly and the linkage moves the cam back and forth
I switched the blinkers under the dash with the hazards as well as the fuse, still didnt work
I dont want to put the steering wheel back on until I can get the blinkers working am i forgetting something?
I switched the blinkers under the dash with the hazards as well as the fuse, still didnt work
I dont want to put the steering wheel back on until I can get the blinkers working am i forgetting something?
09-02-2012, 05:54 PM
#26
Not unless you broke the turn signal switch or cut a wire when you were removing it. I'd check:
- The power at the turn signal flasher with the turn signal switch on. If you are getting power there, the switch is fine and you can button up the steering wheel and start a new thread.
- Look to make sure the wires at the base of the steering column are all plugged in. If so, you'll need to trace the switch and make sure its still good.
09-19-2012, 07:45 PM
#28

I am considering switching to the Burkart Steering Column. My question concerns safety of that and I havent gotten any responses from the MFG. If you replace the Stock Steering column to install the Aftermarket column do you lose any of the collapsibility by using the Burkhart Column. I know their column is non-collapsible but I am not sure that the part I would be replacing has any built into it either. Does anyone know for sure?
Joe
Joe
09-19-2012, 11:18 PM
#29
I am considering switching to the Burkart Steering Column. My question concerns safety of that and I havent gotten any responses from the MFG. If you replace the Stock Steering column to install the Aftermarket column do you lose any of the collapsibility by using the Burkhart Column. I know their column is non-collapsible but I am not sure that the part I would be replacing has any built into it either. Does anyone know for sure?
Joe
Joe
See page 18 of this document: https://ls1tech.com/forums/newreply....ply&p=16738030
09-19-2012, 11:37 PM
#30
See page 18 of this document: https://ls1tech.com/forums/newreply....ply&p=16738030
I agree 100% but I just dont think its safe either way to be honest so I guess I will pass on the Non-Collapsible column. Its so easy to make one that does that there is no real reason not to.
Joe
03-06-2013, 05:56 AM
#31

To remove the steering column housing, you must remove the pivot pins, and this requires a �steering pivot pin remover.� I borrowed mine, but I�m pretty sure you can pick it up from a parts store. You just screw it into the center of the pivot pin, then pop that sucker on out. Do the same to both sides. You also have to remove the �upper bearing inner race seat� that keeps the steering shaft from sliding forward and backwards. To do this, use the hook tool (or something) to simply pull it out.
Now, there are two ways that I know of to get the entire steering column housing off.
1) Remove the dowel pin. I inserted a small punch (see picture) and gently tapped on it until it popped through.
2) Attach your tilt lever; pull it back all the way to disengage the �steering wheel lock shoes� and tilt up on the housing to try and wiggle it free. With this method you don�t have to worry about the steering wheel lock shoes coming disengaged.

IMO method 1 is easier. However, if the steering wheel lock shoes fall out, continue reading. If they don�t fall out, just skip to the next paragraph. For me, I was fiddling with the housing once it was removed and the steering wheel lock shoes fell out� So if this happens to you, you have to reposition them between the spring and the tilt lever, then get the dowel pin back in place. The 1st shoe wasn�t too difficult, but to get the dowel pin through the 2nd shoe I had to use the punch to position it while tapping the dowel pin through the other side with the hammer.

Now you should be able to pull the steering column housing off. When you pull it out the �wheel tilt spring� and the �switch actuator rack� might fall out.
If your �steering column housing support assembly� needs replacing, remove the 4 screws holding it in place and do so. Somehow mine broke where the left pivot pin is secured, thereby jamming my ignition switch so I could barely turn my car off�like WTF mate�

Now, there are two ways that I know of to get the entire steering column housing off.
1) Remove the dowel pin. I inserted a small punch (see picture) and gently tapped on it until it popped through.
2) Attach your tilt lever; pull it back all the way to disengage the �steering wheel lock shoes� and tilt up on the housing to try and wiggle it free. With this method you don�t have to worry about the steering wheel lock shoes coming disengaged.
IMO method 1 is easier. However, if the steering wheel lock shoes fall out, continue reading. If they don�t fall out, just skip to the next paragraph. For me, I was fiddling with the housing once it was removed and the steering wheel lock shoes fell out� So if this happens to you, you have to reposition them between the spring and the tilt lever, then get the dowel pin back in place. The 1st shoe wasn�t too difficult, but to get the dowel pin through the 2nd shoe I had to use the punch to position it while tapping the dowel pin through the other side with the hammer.
Now you should be able to pull the steering column housing off. When you pull it out the �wheel tilt spring� and the �switch actuator rack� might fall out.
If your �steering column housing support assembly� needs replacing, remove the 4 screws holding it in place and do so. Somehow mine broke where the left pivot pin is secured, thereby jamming my ignition switch so I could barely turn my car off�like WTF mate�
I am stuck at this point. I'd rather not push the pin out and mess with the wheel lock shoes. But I can't seem to get it to come off with Method #2. Can you describe this to me a little better?
Also, once the 'steering column housing' comes off, will I have access to the four (4) E8 external torx screws which come loose over time? I sure hope so. Haha.
03-31-2013, 07:41 AM
#33
Question for anyone who has done this before. When I got to the 'lower housing assembly', I was expecting to find four (4) E8 external torx bolts. I found these instead.......
Yes, I had removed one in the picture, it was not missing. So I took these out and applied loctite to them. Before I put everything back together, should I look into sourcing the E8 torx bolts that are 'supposed' to be in there?
I'm thinking someone replaced these at one point, or my 1998 Pontiac steering column differed from all other GM steering columns.
04-01-2013, 12:04 PM
#34
Question for anyone who has done this before. When I got to the 'lower housing assembly', I was expecting to find four (4) E8 external torx bolts. I found these instead.......
Yes, I had removed one in the picture, it was not missing. So I took these out and applied loctite to them. Before I put everything back together, should I look into sourcing the E8 torx bolts that are 'supposed' to be in there?
I'm thinking someone replaced these at one point, or my 1998 Pontiac steering column differed from all other GM steering columns.
04-01-2013, 12:21 PM
#35
I wouldn't think the bolts are a problem. The paint marks look like they were done in a manufacturing operation for quality control, so it woudn't worry me that much. Maybe it was rebuilt for the previous owner, or something like that? If those bolts are the right size and you can get a socket in there, there wouldn't be any need to go to a torx bolt. The drive, doesn't have any bearing on strength, etc.

If that appears to be in good shape, and no excessive wear, then I will button everything back up and hope I fixed my problem!
05-06-2013, 08:25 AM
#36
Registered User

Join Date: Apr 2013
Location: Austin, TX
Posts: 5
Likes: 0
Received 0 Likes
on
0 Posts
I noticed my clock spring is at the 2 oclock position but yours is at 12, does it matter? I'm fairly certain nobody has taken this steering wheel off before so I'm guessing thats how it is from factory.
Thanks
Thanks
05-07-2013, 11:32 AM
#38
Registered User
Join Date: Apr 2013
Location: Austin, TX
Posts: 5
Likes: 0
Received 0 Likes
on
0 Posts
You werent lying about patience when removing the lock rings. Going on hour 2 
Took off the upper housing and the high beam follower fell out. I checked the article you posted, it showed how it looked and worked but not how to reinstall it. Actually that and the link bar thing (step 19) fell out too but right after I unscrewed it so I dont know how that goes back on either
Took off the upper housing and the high beam follower fell out. I checked the article you posted, it showed how it looked and worked but not how to reinstall it. Actually that and the link bar thing (step 19) fell out too but right after I unscrewed it so I dont know how that goes back on either
Last edited by blackwolfLS1; 05-07-2013 at 03:47 PM.
07-18-2016, 12:05 PM
#39
Moderator
iTrader: (4)
Join Date: Jul 2014
Location: My own internal universe
Posts: 10,446
Received 1,838 Likes
on
1,146 Posts
Not to necropost, but how is this thread not a sticky? I couldn't find it using LS1Tech search, but found via google "How to steering column LS1".
There is another thread similar to this one that could also be stickied.

There is another thread similar to this one that could also be stickied.