


Stop express window down sooner

Thread Starter
Launching!


Joined: Feb 2017
Posts: 225
Likes: 19
Is there a way to stop auto/express window before it hits the bottom?
With the door panel off, I noticed the motor/track are binding and pushing out on the inside of the door. I replaced the motor, which uses bolts/nuts to replace the old rivets. The bolts/nuts are listening and widening the holes in the the plastic/fiberglass door frame when the express feature tries forcing the window down further.
I read threads about disabling the auto down feature all together, which I�ll use as a last resort.
thanks
Yes. It's in the owners manual. Just tap "up" as the window is going down.
All doors bulge a bit when the glass hits the rubber stops in the bottom or the door. This is normal and not a problem.
It sounds like the bolts might be too big. You'll want to make sure you are also using nylock nuts here as many people have had problems with these things backing out. (There are many reasons why the car came with rivets here.)
It is also highly recommended that you use the shbox method for motor replacement. This will prevent many other types of damage to the door. It will also give you more room for the motor-to-regulator hardware.
You aren't talking about using nuts and bolts to attach the door regulator to the composite door skin, are you? This would be a HUGE problem. That attachment must use specialized rivets from GM. Standard hardware will destroy the composite panel. (structure of the door)
Thread Starter
Launching!
Joined: Feb 2017
Posts: 225
Likes: 19
probably. I didn�t rivet anything when I replaced the motor w a dorman motor from amazon. I followed the first set of instructions I found. Seems to work fine except the loosening nuts, which I can replace w lockers while the panel is off. Maybe I�ll use a little jb weld to rebuild the ovaled hole from the loose bolt. Thanks
probably. I didn�t rivet anything when I replaced the motor w a dorman motor from amazon. I followed the first set of instructions I found. Seems to work fine except the loosening nuts, which I can replace w lockers while the panel is off. Maybe I�ll use a little jb weld to rebuild the ovaled hole from the loose bolt. Thanks
1) Get the proper GM rivets in the door to secure the regulator. They are special steel mandrel/aluminum jacket rivets, made specifically for the composite door. Any GM dealer can get them for you. You'll also need a special oversize riviter that does 1/4" rivets. Menards has a great price on a tool for this: https://www.menards.com/main/tools/h...241182&ipos=13
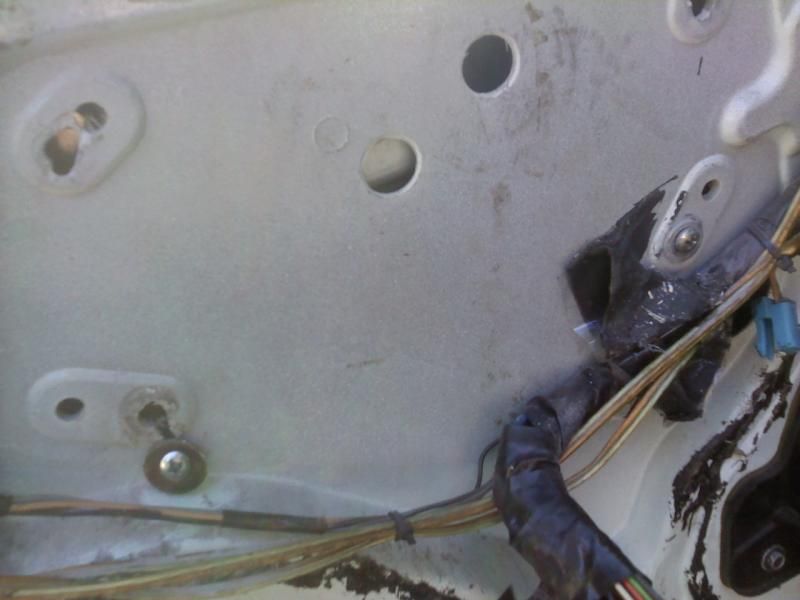
The rivets are critical. If not used, bolts will tear through the door like this and throw off your window geometry so the glass will not seal:
2) Follow the shbox instructions to drill holes in the panel to access the motor bolts: http://shbox.com/page/windowmotor.html
Then, replace the nuts you have on the motor with nylock nuts. If those things vibrate loose, the motor gear will grind and remove the regulator. This is the way you want to replace the motor in the future, also because the process for drilling out the regulator rivets enlarges the holes in the door. (No doubt, as you found the hard way.)
^^ All of this should also resolve the concerns you originally posted about.
Thread Starter
Launching!
Joined: Feb 2017
Posts: 225
Likes: 19
You are in a bad place. Here are some things you need to do in order to get to a good position for longevity: BTW - JB Weld won't help you. If a hole is badly rounded, you would need to epoxy a washer to the position where the hold needs to be. The following threads and links discuss that.
1) Get the proper GM rivets in the door to secure the regulator. They are special steel mandrel/aluminum jacket rivets, made specifically for the composite door. Any GM dealer can get them for you. You'll also need a special oversize riviter that does 1/4" rivets. Menards has a great price on a tool for this: https://www.menards.com/main/tools/h...241182&ipos=13
The rivets are critical. If not used, bolts will tear through the door like this and throw off your window geometry so the glass will not seal:

2) Follow the shbox instructions to drill holes in the panel to access the motor bolts: http://shbox.com/page/windowmotor.html
Then, replace the nuts you have on the motor with nylock nuts. If those things vibrate loose, the motor gear will grind and remove the regulator. This is the way you want to replace the motor in the future, also because the process for drilling out the regulator rivets enlarges the holes in the door. (No doubt, as you found the hard way.)
^^ All of this should also resolve the concerns you originally posted about.
1) Get the proper GM rivets in the door to secure the regulator. They are special steel mandrel/aluminum jacket rivets, made specifically for the composite door. Any GM dealer can get them for you. You'll also need a special oversize riviter that does 1/4" rivets. Menards has a great price on a tool for this: https://www.menards.com/main/tools/h...241182&ipos=13
The rivets are critical. If not used, bolts will tear through the door like this and throw off your window geometry so the glass will not seal:
2) Follow the shbox instructions to drill holes in the panel to access the motor bolts: http://shbox.com/page/windowmotor.html
Then, replace the nuts you have on the motor with nylock nuts. If those things vibrate loose, the motor gear will grind and remove the regulator. This is the way you want to replace the motor in the future, also because the process for drilling out the regulator rivets enlarges the holes in the door. (No doubt, as you found the hard way.)
^^ All of this should also resolve the concerns you originally posted about.
I�m going to add it to my winter project list. I also noticed the pass side window has slowed down, so I�ll grab the rivets and riveter and get to work on both doors.
thanks again.
BTW - The Rivet Part Number is 10157547. I have three if anyone needs a random one. (They come in packs of 5, so for a new project - mine won't be helpful.)
TECH Junkie


Joined: Nov 2013
Posts: 3,913
Likes: 366
From: White Bear, Mn
Except imo it leads to the door panels cracking. I have never let my windows hit the bottom and always leave my windows up above the door about 1 inch and I have zero door cracks.
Trending Topics
This is urban F-Body myth. This was debunked years ago by many of our members. Even when the car sits and isn't used, the door panels crack. The bulging also creates forces in the opposite direction of how the door panel cracks form. The door panels just have a flaw in the design, which is alleviated by the mod in the door panel thread.
LS1 Tech Stories
The Best V8 Stories One Small Block at Time

Topdon ONE vs. Artidiag 800 BT2: Which is the Diagnostic Tablet For You?
Pouria Savadkouei
Gas Monkey Built a 6-Wheel Ferrari Testarossa With a Corvette LT4 Engine
Verdad Gallardo
7 Most Reliable High-Performance Engines GM Has Ever Built
Verdad Gallardo
Amazing '71 Camaro Restomod Is Modern Muscle Car Under the Skin
Verdad Gallardo
6 Common C5 Corvette Failures and What's Involved In Repairing Them
Pouria Savadkouei
Retro Modern Bandit Pontiac Trans AM Comes With Burt Reynolds' Autograph
Verdad Gallardo
Top 10 Greatest Cadillac V Series Performance Models Ever, Ranked
Pouria Savadkouei
Top 10 Most Powerful Chevy Trucks Ever Made!

Hennessey's New Supercharged Silverado ZR2 Has 700 HP
Verdad Gallardo
TECH Addict
Joined: Mar 2013
Posts: 2,628
Likes: 30
Is there a way to stop auto/express window before it hits the bottom?
With the door panel off, I noticed the motor/track are binding and pushing out on the inside of the door. I replaced the motor, which uses bolts/nuts to replace the old rivets. The bolts/nuts are listening and widening the holes in the the plastic/fiberglass door frame when the express feature tries forcing the window down further.
I read threads about disabling the auto down feature all together, which I�ll use as a last resort.
thanks
With the door panel off, I noticed the motor/track are binding and pushing out on the inside of the door. I replaced the motor, which uses bolts/nuts to replace the old rivets. The bolts/nuts are listening and widening the holes in the the plastic/fiberglass door frame when the express feature tries forcing the window down further.
I read threads about disabling the auto down feature all together, which I�ll use as a last resort.
thanks
Thread Starter
Launching!
Joined: Feb 2017
Posts: 225
Likes: 19
Thanks RockinWs6. I saw that mod a few times and have it on my winter list. my ws6 is at speedinc getting dyno'd w it's new 416...therefore, going to put as many miles as I can this fall before taking the interior apart (windows, headliner, seat repair, stereo).
Thread Starter
Launching!
Joined: Feb 2017
Posts: 225
Likes: 19
The trick is to not touch the rivets on the passenger side at all. The shbox link will show how to replace the motor without touching the regulator (or the regulator rivets) at all. This makes the job much easier and will keep the attachment points on the door eternally solid.
BTW - The Rivet Part Number is 10157547. I have three if anyone needs a random one. (They come in packs of 5, so for a new project - mine won't be helpful.)
BTW - The Rivet Part Number is 10157547. I have three if anyone needs a random one. (They come in packs of 5, so for a new project - mine won't be helpful.)
I think when I do the pass side i'll have a better understanding of the internals and go back to the drivers side to see how I re-secure the regulator without bolts/screws. I did, however, get my ds window to seal perfectly around the weatherstripping and being careful about not rolling the window down all the way...but suspect this may not last long
Thanks again.
The GM Service Manual left out a procedure to do this, but shbox (again) pioneered figuring this out when the third gen came out: http://shbox.com/1/adj_window.html
^ You'll want to back track and make sure that you followed this procedure in this order to make sure things don't get bent out of shape in the door.