

Headers/Catted Y/Magnaflow...I'm going in.
 09-29-2009, 01:33 AM
#21
Well today was a disappointment. Apparently I overstated my progress when I said I had the headers in. I had the driver's side header in with all the bolts torqued down, but I just had the passenger header on with the bolts loosely threaded in. Unfortunately it took most of my evening to get the bolts torqued down on that side.
For some reason, even though I'm reusing the stock manifold bolts, the bolts are really, really tough going in. So tough I was worried I was cross-threading, but I checked and rechecked and no signs of metal bits or abnormal marks on the bolt threads. But for some reason, a couple of the bolts have been a real bastard to get torqued down. And I should have listened and moved the coil packs, because my hands look like I've washed them with concertina wire.
Anyways, I finally got the passenger side header on and torqued down, and only had time to get a couple plug wires on and reconnect the passenger side AIR pipe. I pray to sweet baby jesus tomorrow goes considerably better.
 09-29-2009, 06:35 AM
#22
On The Tree
Join Date: Apr 2008
Location: Galesburg
Posts: 108
Likes: 0
Received 0 Likes
on
0 Posts

Good luck -Q-..I know it is a real pain. I am close to being done with mine too. I hope to wrap it up tonight.
I don't know how you did it with those coil packs in the way. I removed my passenger side ones, the drivers side was fine...
Keep us updated...
Don
I don't know how you did it with those coil packs in the way. I removed my passenger side ones, the drivers side was fine...
Keep us updated...
Don
09-29-2009, 09:41 AM
#23

Yea man, holy **** I dont even know how you did anything on the pass. side with the coils in the way. My hands were jacked up big time and I moved the coils, I cant imagine what yours look like, lol.
After the headers are in and the plugs/wires on, its a little more downhill from there.
After the headers are in and the plugs/wires on, its a little more downhill from there.
09-29-2009, 03:47 PM
#25
On The Tree
iTrader: (1)

Join Date: Jun 2008
Location: Laurel, MD
Posts: 178
Likes: 0
Received 0 Likes
on
0 Posts
Did you wirewheel the old threadlocker off the stock bolts? If not, that's why they were so hard to get back in. I cleaned mine up real good and was able to thread 'em in and torque 'em up in about 20 minutes.
09-29-2009, 08:26 PM
#26
I did clean them up a little, but it didn't make a difference. I even tried a couple of the bolts that came with the Pacesetters, and they were no good either. I think some of the threadlocker stayed in the threads of the bolt holes in the head...if I had to do it again, I'd try to run a small round wire brush up in the bolt holes to make sure they were free from debris.
09-29-2009, 09:57 PM
#27
I did clean them up a little, but it didn't make a difference. I even tried a couple of the bolts that came with the Pacesetters, and they were no good either. I think some of the threadlocker stayed in the threads of the bolt holes in the head...if I had to do it again, I'd try to run a small round wire brush up in the bolt holes to make sure they were free from debris.
09-29-2009, 11:56 PM
#28
OK, this is probably a really dumb question, but here goes...
I've gotten the headers in (really, this time all the way in!) and everything hooked up...O2 sensors with extensions, Sims, AIR, EGR blockoff, plug wires, etc. I'm fitting the new style TSP catted Y, and I think I've got it just about right. Good ground clearance, tight fit. I pushed the pipes that slide onto the headers as far as I possibly can, and the flanges are almost to the O2 bungs, so they are on there really far.
Here's the dumb question. I've seen pics of this Y installed, and the band clamps supplied are used at the header-to-Y slip fit. I've got the pipes slid on so far up the headers, I don't think the band clamps will fit on there and clear the O2 bungs without sliding the pipes back a little. This seems counter-productive, since it sounds like there have been issues with people having to cut 6 or more inches out of their cat-back I-pipe to get it to fit with the Y.
Are you supposed to use the supplied band clamps at the header-to-Y slip fit? Or could I use them somewhere else on the Y and just use the U-style clamps there at the headers?
09-30-2009, 07:40 AM
#29
On The Tree
Join Date: Apr 2008
Location: Galesburg
Posts: 108
Likes: 0
Received 0 Likes
on
0 Posts
-Q-
I was about to ask the same question. I have mine pretty close to the O2 bungs also.
I talked to Texas speed and they said I should not have to cut anything. I have the Pacesetter headers, Texas Speed ORY, and Magnaflow 16723 cat back. I have all the pipes connect right now and just need to make some final adjustments before I start clamping things down. I planned on finishing last night, but had something scratch my eye while working on it and it hurt like a mother last night.
Here are some pictures where I am at at this time. They are in this thread.
https://ls1tech.com/forums/generatio...magnaflow.html
09-30-2009, 10:47 AM
#30
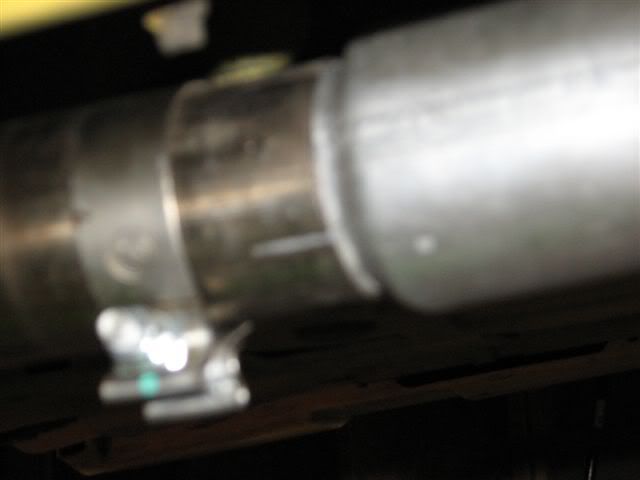
I used the clamps that came with it and had to cut some off the cat back to fit everything together. I dont have mine slid all the way forward like you guys are saying.
Heres a pic you can see about where I have it.
http://i32.photobucket.com/albums/d1...PY-pipe001.jpg
http://i32.photobucket.com/albums/d1...PY-pipe004.jpg
Heres a pic you can see about where I have it.
http://i32.photobucket.com/albums/d1...PY-pipe001.jpg
http://i32.photobucket.com/albums/d1...PY-pipe004.jpg
09-30-2009, 11:04 AM
#31
Donman, yours looks like its in almost the exact spot mine is. I think I'm going to go with it right there and just use some of the U-clamps for now, since I'm going to be ordering some band clamps to replace all the U-clamps anyways. I'll tighten everything down where it is, and start putting the cat-back on tonight and see how everything shapes up.
09-30-2009, 11:28 AM
#32
On The Tree
Join Date: Apr 2008
Location: Galesburg
Posts: 108
Likes: 0
Received 0 Likes
on
0 Posts
-Q-
Cool,
Hopefully tonight we will both be done. I know I have some adjusting to do on the catback since my tips on the passeneger side are about 1/2" to 1" out farther than the drivers side. Hopefully nothing stops me tonight...I want this project done :-)
Don
Cool,
Hopefully tonight we will both be done. I know I have some adjusting to do on the catback since my tips on the passeneger side are about 1/2" to 1" out farther than the drivers side. Hopefully nothing stops me tonight...I want this project done :-)
Don
09-30-2009, 06:25 PM
#35
On The Tree
Join Date: Apr 2008
Location: Galesburg
Posts: 108
Likes: 0
Received 0 Likes
on
0 Posts
I used the clamps that came with it and had to cut some off the cat back to fit everything together. I dont have mine slid all the way forward like you guys are saying.
Heres a pic you can see about where I have it.
http://i32.photobucket.com/albums/d1...PY-pipe001.jpg
http://i32.photobucket.com/albums/d1...PY-pipe004.jpg
Heres a pic you can see about where I have it.
http://i32.photobucket.com/albums/d1...PY-pipe001.jpg
http://i32.photobucket.com/albums/d1...PY-pipe004.jpg
Don
09-30-2009, 06:40 PM
#36
Don, that's what I was talking about earlier...I didn't put them on there because I was able to push the slip fit all the way onto the header to the point it almost came to the O2 bung. With all the talk about cutting Ys because they were too long, I got the impression that maybe that's where the extra length was coming from; the collectors not being pushed all the way onto the headers in an effort to use the band clamps there. So I'm going to use the clamps elsewhere, and maybe just use a U-clamp on the headers. Or some really thin band clamps if I can find them. Honestly, I don't even know if it would leak at all there at the collector if I didn't put a clamp on at all...those pipes are WAY up on there, and tight at that.
09-30-2009, 06:54 PM
#37
On The Tree
Join Date: Apr 2008
Location: Galesburg
Posts: 108
Likes: 0
Received 0 Likes
on
0 Posts
-Q-
Ok I am going to go for it with the band clamps at the collector and see what happens. I have all the clamps on the headers and y-pipe now. Time to go to the back and see how the cat-back fits. I will update this later..
Don
Ok I am going to go for it with the band clamps at the collector and see what happens. I have all the clamps on the headers and y-pipe now. Time to go to the back and see how the cat-back fits. I will update this later..
Don
09-30-2009, 07:28 PM
#38
On The Tree
Join Date: Apr 2008
Location: Galesburg
Posts: 108
Likes: 0
Received 0 Likes
on
0 Posts
-Q-
It did not work very well. Here is what you get...:-(
Others reading this thread, these pictures show how far off the cat back is if you use the band clamps at the collectors, which moves the whole y-pipe back. Which in turn moves the I-pipe back and the catback...
I was hoping everything would just go together. This is the first time I have used band clamps. On the collectors I have them all the way forward before the collector starts going from round to square.
Don
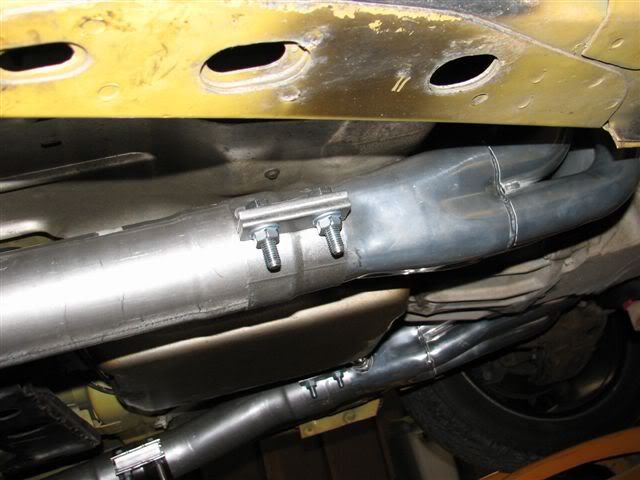
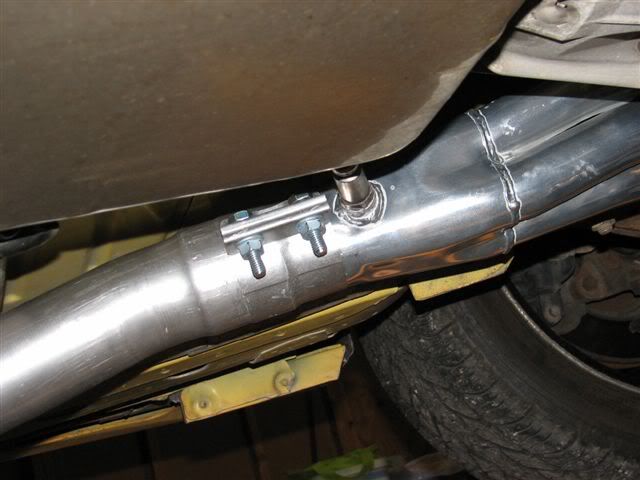
09-30-2009, 09:20 PM
#40
On The Tree
Join Date: Apr 2008
Location: Galesburg
Posts: 108
Likes: 0
Received 0 Likes
on
0 Posts
-Q-
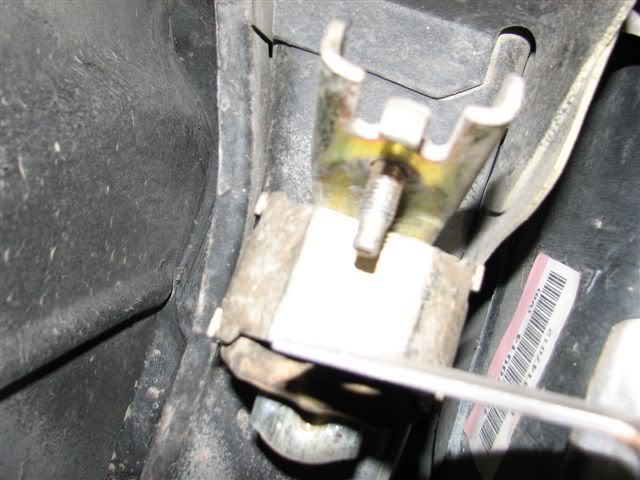
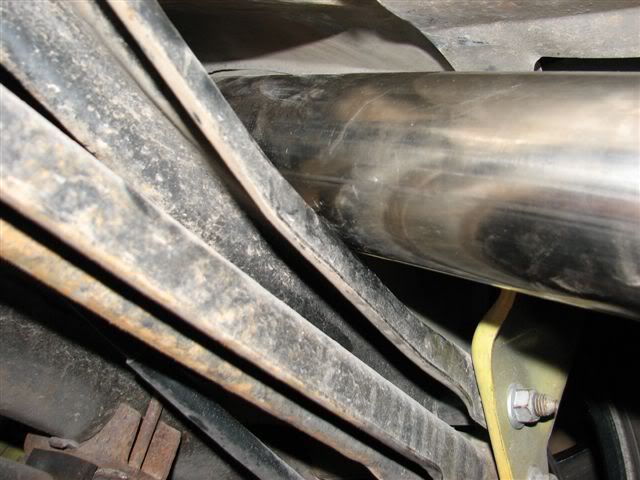
I am guessing maybe 2" . That picture with the bolt is how far away the bracket on the 3" pipe going to the muffler is.
I just took the whole freaking mess off the car (ypipe and Ipipe). I am so frustrated. I was hoping everything would fit together. It probably will if I use the muffler clamps instead of band clamps.
I did measure the 2 3/4" section of the merge (it was about 2" long) and the 2 3/4" section of the I-pipe (which was about 3" deep). You could probably gain an inch there, i am just guessing if you cut an inch off the 3" part of the I- pipe where it connects to Y-pipe.
Keep us up to date on how your idea turns out...sooner or later we will get this :-)
Don