


Custom low budget cross ram intake
Staging Lane
Joined: Mar 2013
Posts: 94
Likes: 1
From: Easton ny
im focusing on the same thing for my n/a lq4. have you done any of the math to get the intake runner size down or just shooting for the middle? i figured out to run twin throttle bodies you'll need to go down to 68mm which twin 68s equal out to what a 96mm single would give you for area.
this is what im thinking of
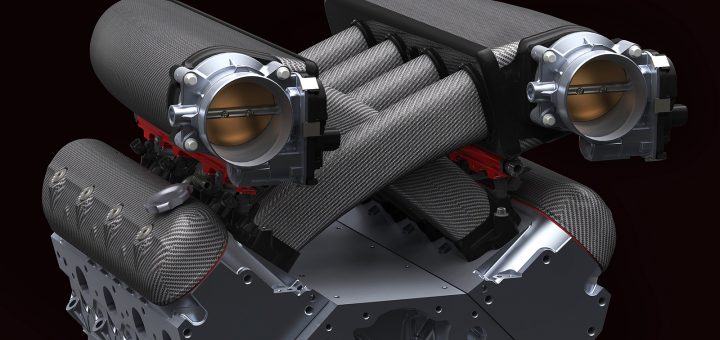
this is what im thinking of
what are vehicle are you putting this on? if its a camaro your going to have problems with height restrictions, we ended up having to dimple the bottom of the plenums to clear the runners. The path from the plenum to the back of the valve is 12 inches.
Staging Lane
Joined: Mar 2013
Posts: 94
Likes: 1
From: Easton ny
what size intake runners did you use length x diameter? what size plenums?
Thread Starter
TECH Enthusiast


Joined: Nov 2011
Posts: 609
Likes: 6
From: jacksonville,fl
I.ve studied up on what works for other intakes for years & got a little backup knowledge on other forums from a few who know a little (lot) more than me on intakes . One person is one of the gm engineers involved with projects such as the ls7 intake. Got a little general info from Tony Mamo also, can't go wrong there. Basically should come out as good as anyone working off known knowledge & not spending hundreds of hours dyno & flow testing multiple variables.
This was over 2 years ago when I first started coming up with sizing figures so I don't remember all the specs running through my head at the time. But the largest thing in my favor is going off a design that is superior powerwise throughout the rpm range.. The internals of a fast lsxrt, with a little porting is a great starting point, had dimensions, but can't find them now. The p.d. intake , osmo cross ram, x-ram & now the variram x are all pretty similar.
I was going to make runners shaped like the pd intake, which resemble the older c5r itb race intakes, but I don't have that much free time. The pipe I have is 2"nominal 316 drainage pipe, which measures 2 3/8 od & approx. 2 3/16 id. The shape of the ls1 intake runner 3" up is equal to approx 2 1/8" plus id.. Round shapes supposedly flow better at the important bell mouth entrances, which is what the osmo has. I have 13" now, but will likely slightly shorten for packaging.
I also will be machining all the taper I can into the ends of the thick pipe I have.
To make the portside runner shape as seen in tabletop pic, I layed the top on pvc trimboard to flatten the bottom without distorting the top & layed each side on an anvil to flatten with a 3 pound hammer. Went back & forth between sides & bottom with the beatings. Does take practiced skill to do, but not rocket science.
Working on finding or making something for some all out shaped bellmouths (velocity stacks) without spending $400 up on premades. This is a key area to a good intake, which is the worst area of the ls1 factory intake.
The plenum area is the less important area of the bunch, mainly can't be too small ,too big & has to extend enough past the rear cylinders not to starve them, another factory intake issue.
I'll be doing a 2 into 1 on mine, need some help deciding if a larger throttle body is much of a benefit for a mostly stock ls1. Still working out size.
I'm posting this project both for my benefit of knowledgeable people helping me out & inspiring others. In fact I challenge & dare anyone else to make their own manifold. If it comes out better than mine, I'll be happy.
My vehicle is the custom 2010 Camaro nose el camino, which has a pretty fair amount of room, except for the hood mechanism connecting bar behind the intake limiting the ps rear area.
Southpaw, first saw an intake like yours in tenacity Camaro pics.I may shape my plenums similar to yours. Did you do an intake only swap to tell what difference it made?
Last edited by jlcustomz; Jul 10, 2014 at 07:35 PM.
TECH Enthusiast
iTrader: (5)
Joined: Jan 2010
Posts: 676
Likes: 2
From: Huntsville, Alabama - SA, TX is home
Damn, thats bad! good work! Did it perform well for you? Better then a LS6 intake at least? It looks great.
Staging Lane
Joined: Mar 2013
Posts: 94
Likes: 1
From: Easton ny
I.ve studied up on what works for other intakes for years & got a little backup knowledge on other forums from a few who know a little (lot) more than me on intakes . One person is one of the gm engineers involved with projects such as the ls7 intake. Got a little general info from Tony Mamo also, can't go wrong there. Basically should come out as good as anyone working off known knowledge & not spending hundreds of hours dyno & flow testing multiple variables.
This was over 2 years ago when I first started coming up with sizing figures so I don't remember all the specs running through my head at the time. But the largest thing in my favor is going off a design that is superior powerwise throughout the rpm range.. The internals of a fast lsxrt, with a little porting is a great starting point, had dimensions, but can't find them now. The p.d. intake , osmo cross ram, x-ram & now the variram x are all pretty similar.
I was going to make runners shaped like the pd intake, which resemble the older c5r itb race intakes, but I don't have that much free time. The pipe I have is 2"nominal 316 drainage pipe, which measures 2 3/8 od & approx. 2 3/16 id. The shape of the ls1 intake runner 3" up is equal to approx 2 1/8" plus id.. Round shapes supposedly flow better at the important bell mouth entrances, which is what the osmo has. I have 13" now, but will likely slightly shorten for packaging.
I also will be machining all the taper I can into the ends of the thick pipe I have.
To make the portside runner shape as seen in tabletop pic, I layed the top on pvc trimboard to flatten the bottom without distorting the top & layed each side on an anvil to flatten with a 3 pound hammer. Went back & forth between sides & bottom with the beatings. Does take practiced skill to do, but not rocket science.
Working on finding or making something for some all out shaped bellmouths (velocity stacks) without spending $400 up on premades. This is a key area to a good intake, which is the worst area of the ls1 factory intake.
The plenum area is the less important area of the bunch, mainly can't be too small ,too big & has to extend enough past the rear cylinders not to starve them, another factory intake issue.
I'll be doing a 2 into 1 on mine, need some help deciding if a larger throttle body is much of a benefit for a mostly stock ls1. Still working out size.
I'm posting this project both for my benefit of knowledgeable people helping me out & inspiring others. In fact I challenge & dare anyone else to make their own manifold. If it comes out better than mine, I'll be happy.
My vehicle is the custom 2010 Camaro nose el camino, which has a pretty fair amount of room, except for the hood mechanism connecting bar behind the intake limiting the ps rear area.
Southpaw, first saw an intake like yours in tenacity Camaro pics.I may shape my plenums similar to yours. Did you do an intake only swap to tell what difference it made?
This was over 2 years ago when I first started coming up with sizing figures so I don't remember all the specs running through my head at the time. But the largest thing in my favor is going off a design that is superior powerwise throughout the rpm range.. The internals of a fast lsxrt, with a little porting is a great starting point, had dimensions, but can't find them now. The p.d. intake , osmo cross ram, x-ram & now the variram x are all pretty similar.
I was going to make runners shaped like the pd intake, which resemble the older c5r itb race intakes, but I don't have that much free time. The pipe I have is 2"nominal 316 drainage pipe, which measures 2 3/8 od & approx. 2 3/16 id. The shape of the ls1 intake runner 3" up is equal to approx 2 1/8" plus id.. Round shapes supposedly flow better at the important bell mouth entrances, which is what the osmo has. I have 13" now, but will likely slightly shorten for packaging.
I also will be machining all the taper I can into the ends of the thick pipe I have.
To make the portside runner shape as seen in tabletop pic, I layed the top on pvc trimboard to flatten the bottom without distorting the top & layed each side on an anvil to flatten with a 3 pound hammer. Went back & forth between sides & bottom with the beatings. Does take practiced skill to do, but not rocket science.
Working on finding or making something for some all out shaped bellmouths (velocity stacks) without spending $400 up on premades. This is a key area to a good intake, which is the worst area of the ls1 factory intake.
The plenum area is the less important area of the bunch, mainly can't be too small ,too big & has to extend enough past the rear cylinders not to starve them, another factory intake issue.
I'll be doing a 2 into 1 on mine, need some help deciding if a larger throttle body is much of a benefit for a mostly stock ls1. Still working out size.
I'm posting this project both for my benefit of knowledgeable people helping me out & inspiring others. In fact I challenge & dare anyone else to make their own manifold. If it comes out better than mine, I'll be happy.
My vehicle is the custom 2010 Camaro nose el camino, which has a pretty fair amount of room, except for the hood mechanism connecting bar behind the intake limiting the ps rear area.
Southpaw, first saw an intake like yours in tenacity Camaro pics.I may shape my plenums similar to yours. Did you do an intake only swap to tell what difference it made?
Thread Starter
TECH Enthusiast
Joined: Nov 2011
Posts: 609
Likes: 6
From: jacksonville,fl
I do a lot of cool stuff without a proper machine shop, but I have to cut back a little on time if I ever want this to be a reality. Going stainless over aluminum is a bit harder also.
If I don't find anything premade for cheap, I may consider 4" delrin stock to turn on a wood lathe for bellmouths.
If I don't find anything premade for cheap, I may consider 4" delrin stock to turn on a wood lathe for bellmouths.
Staging Lane
Joined: Mar 2013
Posts: 94
Likes: 1
From: Easton ny
I do a lot of cool stuff without a proper machine shop, but I have to cut back a little on time if I ever want this to be a reality. Going stainless over aluminum is a bit harder also.
If I don't find anything premade for cheap, I may consider 4" delrin stock to turn on a wood lathe for bellmouths.
If I don't find anything premade for cheap, I may consider 4" delrin stock to turn on a wood lathe for bellmouths.
LS1 Tech Stories
The Best V8 Stories One Small Block at Time

Gas Monkey Built a 6-Wheel Ferrari Testarossa With a Corvette LT4 Engine
Verdad Gallardo
7 Most Reliable High-Performance Engines GM Has Ever Built
Verdad Gallardo
Amazing '71 Camaro Restomod Is Modern Muscle Car Under the Skin
Verdad Gallardo
6 Common C5 Corvette Failures and What's Involved In Repairing Them
Pouria Savadkouei
Retro Modern Bandit Pontiac Trans AM Comes With Burt Reynolds' Autograph
Verdad Gallardo
Top 10 Greatest Cadillac V Series Performance Models Ever, Ranked
Pouria Savadkouei
Top 10 Most Powerful Chevy Trucks Ever Made!

Hennessey's New Supercharged Silverado ZR2 Has 700 HP
Verdad Gallardo
Coachbuilt N2A Anteros Is an LS2-Powered C6 Corvette In Italian Clothes
Verdad Gallardo Thread Starter
TECH Enthusiast
Joined: Nov 2011
Posts: 609
Likes: 6
From: jacksonville,fl
Wondering the same. Also like to know what you did as far as bellmouths at the end of the runners.
Not much time to work on things this time of year, but got all 8 runners cut & bent sideways to make the plenums come out more even with each other.
Strongly considering making clear lexan covers on sides of plenums to expose the bellmouths.
Also trying to decide if a larger & more optimumly shaped bellmouth is worth the trouble or not.
Thread Starter
TECH Enthusiast
Joined: Nov 2011
Posts: 609
Likes: 6
From: jacksonville,fl

Got a little more shape into the pipes last week, got them fitting better, will post new pics later.. My thought now on plenums is a dual plenum on each side where the main plenum has a slot in it & a 2nd plenum has the tapered shape & feeds the air in , resulting in better distribution.https://www.google.com/search?hl=en&...31%3B752%3B800
If I do this they will be underneath the main plenums. Also may just use round tubing for the main plenums, as in mock up, & have clear covers capping off the front, which will let you see the velocity stacks inside. Wondering how that would look?

Last edited by jlcustomz; Jul 21, 2014 at 12:36 AM.


Thread Starter
TECH Enthusiast
Joined: Nov 2011
Posts: 609
Likes: 6
From: jacksonville,fl
Started welding up the thin 20 gauge stainless sheet metal plenums. Warpage is so hard to control that I don't think I could get them done good enough to look proper in mirror finish. Heavier stainless is out of the question, so I may have to just make the plenums out of aluminum like most everybody else.
I have some .063 3003 h/14 sheet in stock, but I'm thinking .090 would come out nicer. Also wondering if there is another locally available sheet aluminum grade that would polish up or hold a shine better than 3003 grade?
I have some .063 3003 h/14 sheet in stock, but I'm thinking .090 would come out nicer. Also wondering if there is another locally available sheet aluminum grade that would polish up or hold a shine better than 3003 grade?
Thread Starter
TECH Enthusiast
Joined: Nov 2011
Posts: 609
Likes: 6
From: jacksonville,fl
Picked up some .090 aluminum to remake plenums. Also designing 4 bolt flanges to connect each runner to the plenums. Will weld velocity stacks to runners . This will allow me to still use my stainless stacks with aluminum plenums & also eliminate the upper rubber connectors. Similar to Ozmo setup. Should look cleaner.

