

Went to junkyard to scope out my first LSx details
 01-29-2017, 02:30 PM
#21

I think I am going to buy a pair of these cheap engines from the same place in ebay for 650~ each, maybe they will compression test them for me, or pull a valve cover (doubt it though) found some with 160k.
Slap on a new starter, flexplate & spacer, proper accessories, LS1 intake, ls6 valley cover, prep for 4l80e (shift kit) need to find out more about the starter, flexplate, and converter details (I heard they can make me a converter to use the OEM flexplate for the 4l60e) and figure out a local driveshaft shop that can swap the yolk from the 60 to 80e style (if its possible). And try the truck shifter in my car I guess.
update today for fun:
I bought an 5.3 and 4l80e from "robertsonautosalvage" In massechuets.. massechas... massachuche... massechet... that state that I cant spell...
The engine shows a cluster with 140k, the trans shows a cluster with 94k, both from ebay. Seems almost too good to be true honestly. The engine was 630 shipped and the trans was 674 shipped. I get some kind of discount through ebay, not sure why but it was like $30off each. I've been using ebay for about 15 years, and made approx $80,000 in sales over that time, so I am very very familiar with the way ebay sales work, and the power of the buyers. The trans is being shipped directly to the transmission shop so I didnt have to pay the $50 extra to delivery to the residence like I did for the engine. They had a bunch of engines for sale... which I thought was good, it means a few things, for starters I figure I am protected through ebay if something goes terribly wrong I can swap one engine/trans for another if I need to. Just be sure you pay with a credit or paypal in situations like this. Another good thing when a seller has a bunch of the same items is they tend to spend less time "fixing up and polishing" their items, in other words, it wont be all "pretty" when its a warehouse of 100 engines as much as when its like 1 or 2 engines for sale. So you get more of what see, and less of the illusion of ebay, generally.
Ill show what I do with the engine and trans when I get them(2-10-17 to 2-15-17 I am guessing they will arrive) to diagnostically clue yourself in, its pretty basic stuff but I really do know alot of people who have installed engines without doing something simple like a compression test, and only to find that the engine was bad once it was running. On the bright side, my entire drivetrain is officially only worth about $1300, meaning if the engine and trans both failed together on the same day, it would only cost $1500~ to replace them. That was the goal from the beginning... to build a car in the 400-500hp range (out of reach of a stock SR20 longblock) with extremely cheap, highly available parts that can swap out easily in a day or two (this will be a real trick, use a stopwatch and time a swap, I actually do something like this). My previous 240 was exactly similar to this: except the power range was only 300-350 for $1200 longblocks, so the cost of engines for me now is almost half as much as it was before, despite the additional 100-200 horsepower I will produce for half the price per longblock. So I am upgrading approx 150~ horsepower for reduced engine cost, plus the 5.3L engines are newer (the sr20det are 95-98 models), the 5.3L engines are 01-03 in that price range, and there are FAR more of them available from trucks of all sorts.
So imagine my surprise when I show up the junkyard, thinking "truck shifter" and I walk up to the first truck I see and wam... it hits me. trucks use a column shifter. I just sigh and went under it for the shifter bracket. I took a look at a camaro (or something like it) and found all the parts, shifter, cable, etc... but it looked like way too much work to get to. I practically broke the center console into tiny pieces just trying to look under it. I found some shifter assembly in ebay complete for 65~shipped so I think I will just buy them there (probably cost 40 from the junkyard here).
Once I get back to the car the plan is: pressure wash the bay, and cut out the core support, remove the stock condenser, hammer out the transmission tunnel. Should take a whole day. If there is time I will vacuum the car and prep the interior (remove the forward part of carpet and perhaps the dash). I am not sure if the 4l80e is going to fit deep in the tunnel without having to cut something out of the center of the car, so it will be ready for that. The engine arrives in maybe a week, it will take a full day to deal with accessories, intake, belt, steam port/valley, and clean it, test it. When the transmission gets to the trans-shop, the owner is going to open it with me and we are going to look inside it to make sure its in good shape. Then we will install the "HD2" shift kit and I will bring it back. The converter should be there the same time and I will mate the trans and push the engine/trans into the car and see where it hits, then mod the car to make it fit with plenty of room, I can't stand vibrations or little noises while driving. Holding the trans up with a jack to see where I need to modify the cross member to hold the trans up. I have some plate I can cut and shape to make a new crossmember shape. This stuff all happens this week (2-10-17), or early next week(2-14-17). The engine should be started at least by next week(2-15-17), no exhaust plumbing but it won't hurt to start for a moment with open manifolds. I know most 'build threads' take months or years but this one will be pretty quick, I have nearly every obstacle planned for and I want to drive this car so badly I can taste it. It won't be fast off the bat, I might even use the oem ls1 injectors for a while just to make sure it runs normal, drives and warms up normal for plenty of long highway drives. It is more important for me that this vehicle be reliable transportation than anything else; power will come later, a couple months maybe. It depends how itchy my trigger finger gets. The hardest part of this build for me is actually going to be the exhaust system; not the turbo plumbing, or the downpipe, but the actual exhaust from the downpipe back. I have no idea how I am going to run it yet, and I refuse to buy an off the shelf system so it might just be a straight pipe and a random muffler for a while. My dream is to double or even triple muffler the car, to make it as quiet as a stock vehicle, and then if necessary run a cutout for stuff like dyno passes. But that is getting too far ahead of myself...
Last edited by kingtal0n; 02-07-2017 at 10:38 PM.
 01-29-2017, 05:41 PM
#22
Pin 34: If the vehicle you're using has a built in neutral safety, this is irrelevant.
Most cars/trucks have the neutral safety switch on the column or in the shifter. You could wire one in with an aftermarket shifter fairly easily and do away with the wire from the PCM.
You don't need the range sensor on the side of the trans. In a swap, its only function will be neutral safety. Its just easier to use the wire coming from the PCM than to run multiple to the switch on side of trans.
32
34
72
And pin 62 on the Red connector
All say something like "PRND A input" or "PRND B input" etc
I am not sure what to do with them. One says "may need grounded for CKP relearn" That sounds important. Should I just ground all these wires? Leave them open? remove them? Put them on my factory car's neutral safety switch, which grounds when in park or neutral?
I'd like to just remove them all together and ignore them. But I dont want to screw up the "CKP relearn" or whatever. Thats for when installing a new crankshaft sensor, internet search reveals, but I can't imagine that it is absolutely necessary. And yet...
update:
Just in case you are stuck here, the LTswap website says to remove all but the black/white wire, which happens to be 100% ground all the time. Initially I did this, however, I looked into it a little more and apparently one of the other wires is a reverse wire. So now I am thinking i will put my trans into reverse, and check to see what the wire puts out, if I get a signal out I will use it to trip the reverse lights on the car. Its the middle wire out of 3 on the bottom (top has 4 I think) Thats kinda what I remember (for when I check it out).
Last edited by kingtal0n; 02-12-2017 at 11:59 PM.
01-30-2017, 11:55 AM
#23
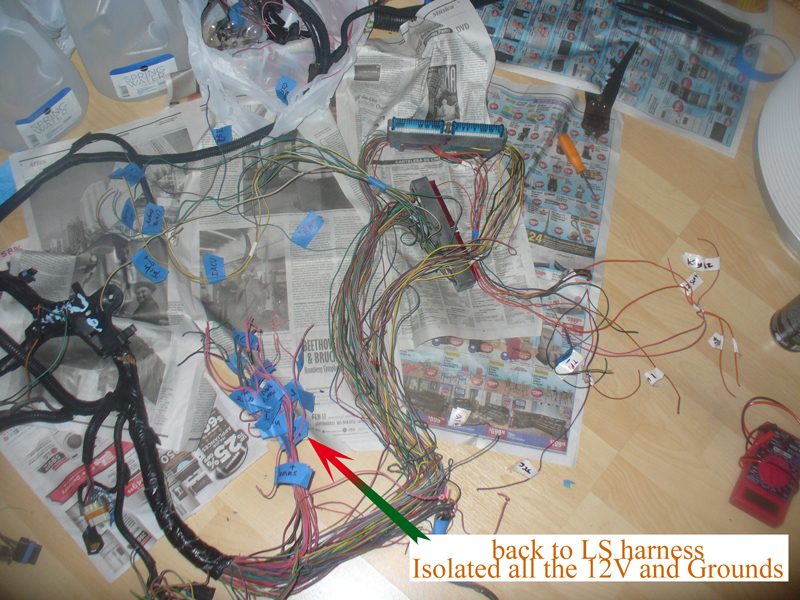
Last night I did the majority of the wiring, by following the pinout and discussions on lt1swap. I think I figured out what to do with that range selector; pin 32 is a black wire with a white stripe and has continuity with all the grounds in the harness, so it is a constant ground, and as per the instructions on lt1swap.com (many thanks to that site!) It is the only wire left on the "range selector" plug when finished, grounded.
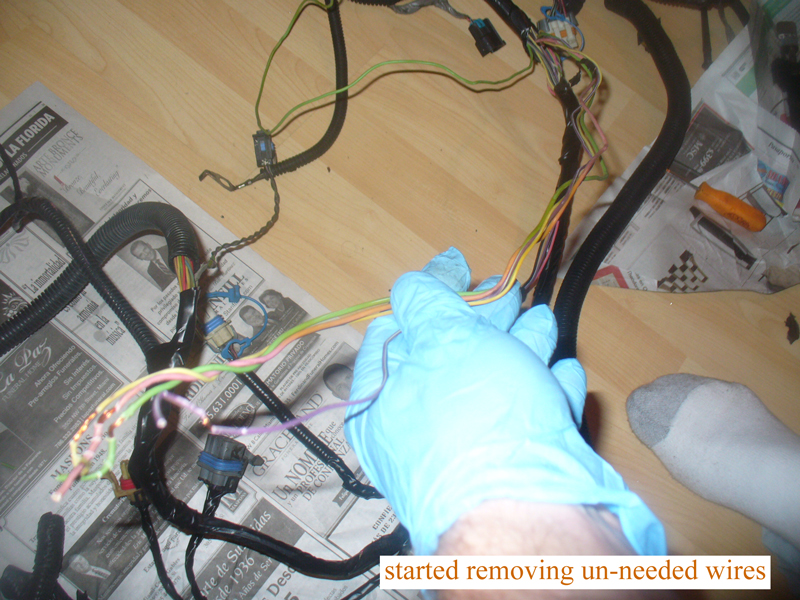
Now, about the A/C, LT1swap site says to remove all the a/c wires (hah!) but Ileft them all in because I want A/C. The question is, how in the world am I going to 1)(*@(!3*.... I love questions! Mysterious! new neurons to drown me in, long term potentiation- forging new connections and then letting them decay
update (5-4-17) alllmost done mounting the turbo. It looks like it will be in the way for the high mount (top, passenger side) A/C compressor I see people using on this chassis. So I might try to use the truck, OEM compressor down low. It might fit. I need to find out if they are single displacement (pretty sure they are) and how the pressure switches all work to keep it from sploding. If anyone knows off hand it would really help, drop me a line...
Last edited by kingtal0n; 05-04-2017 at 01:14 AM.
01-30-2017, 01:01 PM
#24
Restricted User

So I am just collecting other random stuff atm, wouldn't mind some insights
Will these DEI Titanium protect a boot work on the LSx engine coilpacks

I am using the DEI titanium wrap of course on the plumbing as well.
I was going to buy this starter, " SR8581N " But I suppose I should wait until i have the engine in the car to decide how difficult it is to change first (would be nice to put a new starter on it if its difficult to change)
Also, I am getting the 4l80E soon, but I heard there is a flexplate spacer. Will the spacer work with the OEM starter when using the OEM flexplate, or how does that whole thing work. I know I need to look it up but I figured I would ask if someone just knew off their hand.
Also I am curious if the truck shifter will fit my car, or if you think I will have to use an Fbody shifter.
Will these DEI Titanium protect a boot work on the LSx engine coilpacks
I am using the DEI titanium wrap of course on the plumbing as well.
I was going to buy this starter, " SR8581N " But I suppose I should wait until i have the engine in the car to decide how difficult it is to change first (would be nice to put a new starter on it if its difficult to change)
Also, I am getting the 4l80E soon, but I heard there is a flexplate spacer. Will the spacer work with the OEM starter when using the OEM flexplate, or how does that whole thing work. I know I need to look it up but I figured I would ask if someone just knew off their hand.
Also I am curious if the truck shifter will fit my car, or if you think I will have to use an Fbody shifter.
A buddy of mine uses them on his because his plug wires literally lay on the passenger side turbo manifold. The wrap seems to work fine. No melted wires.
As for starter, just try to stock to a stock style. When you get an aftermarket one you might run into oddball fitment issues or the need for shims (which sucks).
Look up the Pioneer 4.8 4L80e flexplate. It was used in the vans and has the spacer built in already. $45 for the whole thing.
01-30-2017, 11:31 PM
#25
thanks again!
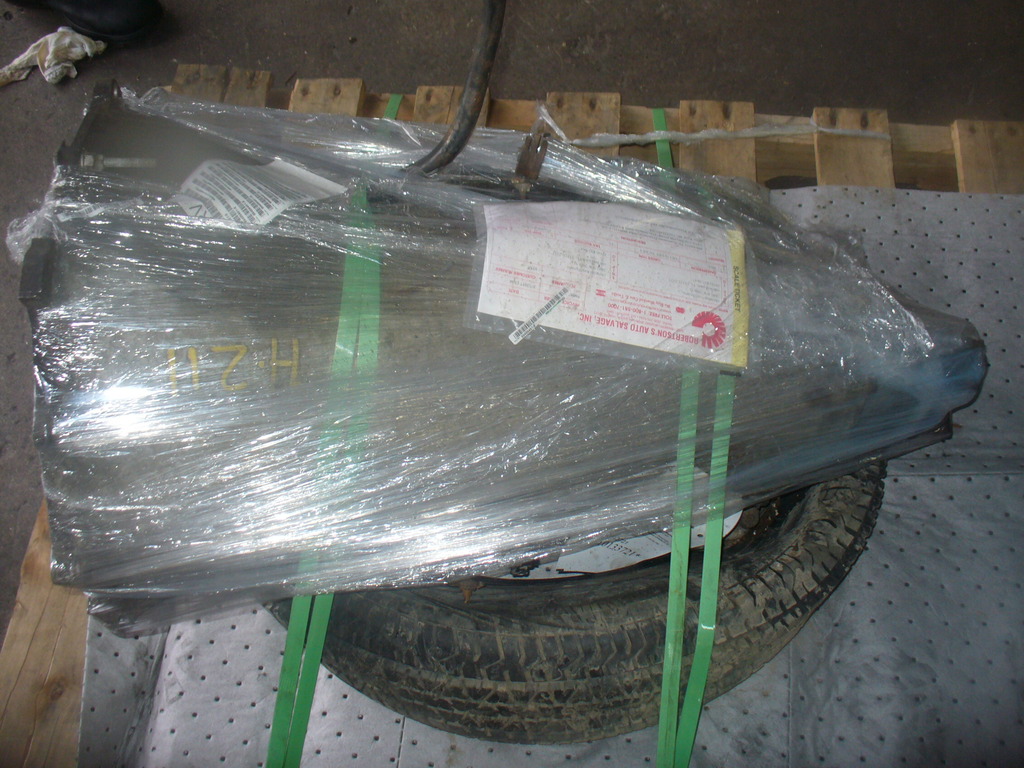
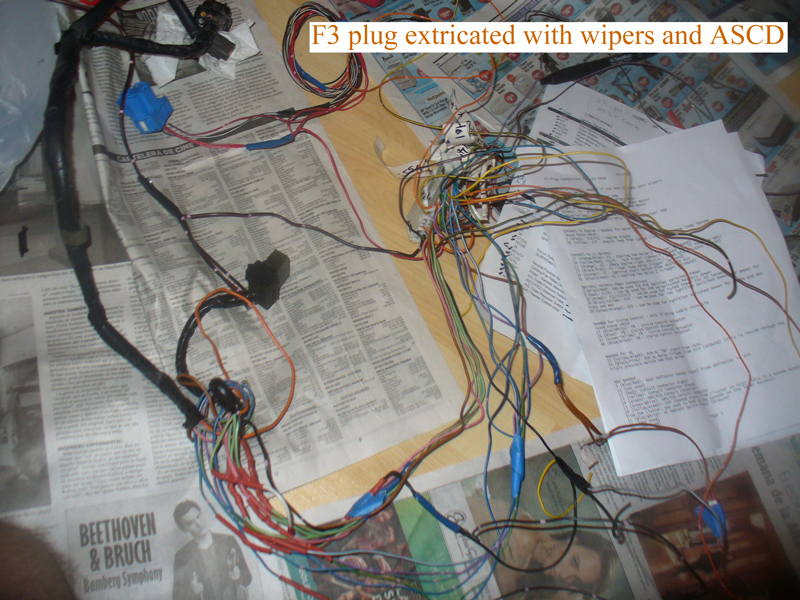
Today was great. Pulled the KA motor from the 240sx, its a 95 chassis, pretty rough (perfect for cutting up as I see fit) got it dirt cheap. The previous owner wanted the motor back, so I made him a deal for just the rolling chassis and promised I would yank the motor for him, worked out perfectly. I've purchased 25+ 240sx chassis in the past and this was the cheapest one ever. Looked at the core support area and it looks pretty simple to come out. I think I will trash the OEM condenser (It can't possibly remove quick) and use a special one. Also went back to the junkyard and grabbed an TPS and IACV From a truck engine (Will it work on the LS1 intake manifold/TB? Doubt it but at least I have them now, and the plugs). And now that I have the 240sx harness, I can cut the F3 plug from it and use it to more or less finish my wiring of the LSx harness.
Today was great. Pulled the KA motor from the 240sx, its a 95 chassis, pretty rough (perfect for cutting up as I see fit) got it dirt cheap. The previous owner wanted the motor back, so I made him a deal for just the rolling chassis and promised I would yank the motor for him, worked out perfectly. I've purchased 25+ 240sx chassis in the past and this was the cheapest one ever. Looked at the core support area and it looks pretty simple to come out. I think I will trash the OEM condenser (It can't possibly remove quick) and use a special one. Also went back to the junkyard and grabbed an TPS and IACV From a truck engine (Will it work on the LS1 intake manifold/TB? Doubt it but at least I have them now, and the plugs). And now that I have the 240sx harness, I can cut the F3 plug from it and use it to more or less finish my wiring of the LSx harness.
01-31-2017, 11:46 AM
#26
Today is 2-22-17 and this is an update! In order to save space and prevent unnecessary post counts, the thread is not entirely linear at this point (some posts after this are earlier dates) however, I have not actually done much of anything to the car or engine or transmission yet, and once I start doing those things, I will linearize them properly so it can be followed easily, sequentially.
First thing to note is, If you haven't heard, I am having bad luck finding an engine.
https://ls1tech.com/forums/generatio...3l-engine.html
Today I received my third 5.3L Engine and its been raining all day so I could not check it out yet. So this is where the engine situation is left off.
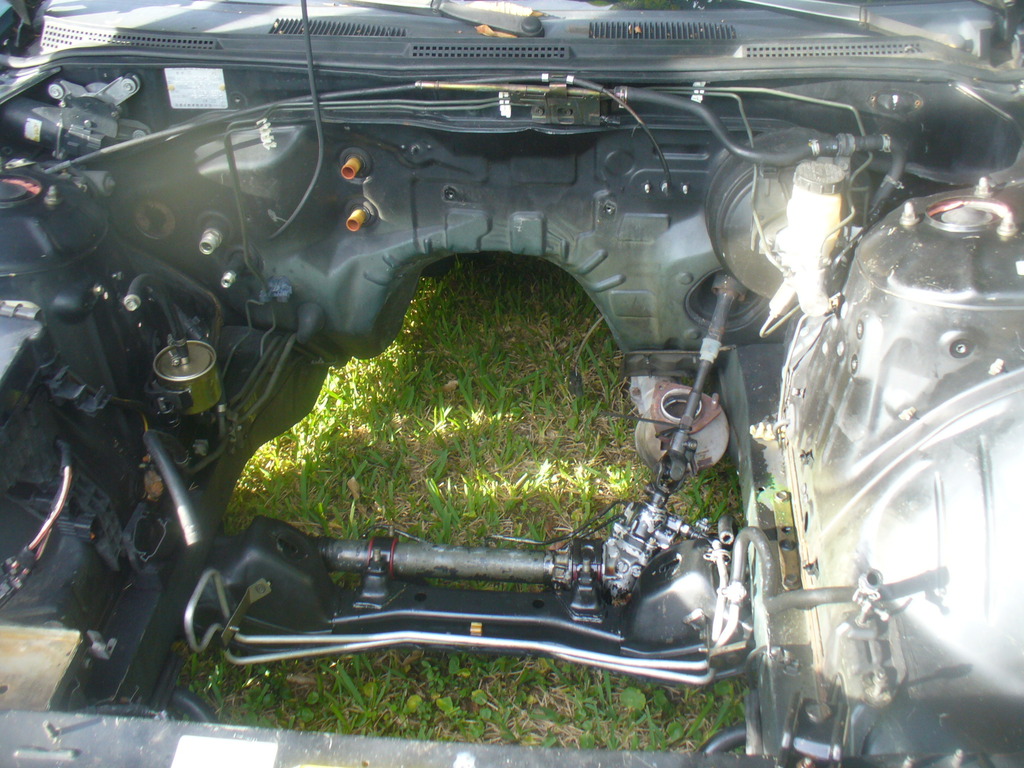
Next, here is a sneak preview of my engine bay
The 4l80e Transmission arrived today as well, at the trans shop. In a day or two I will know if it is any good...
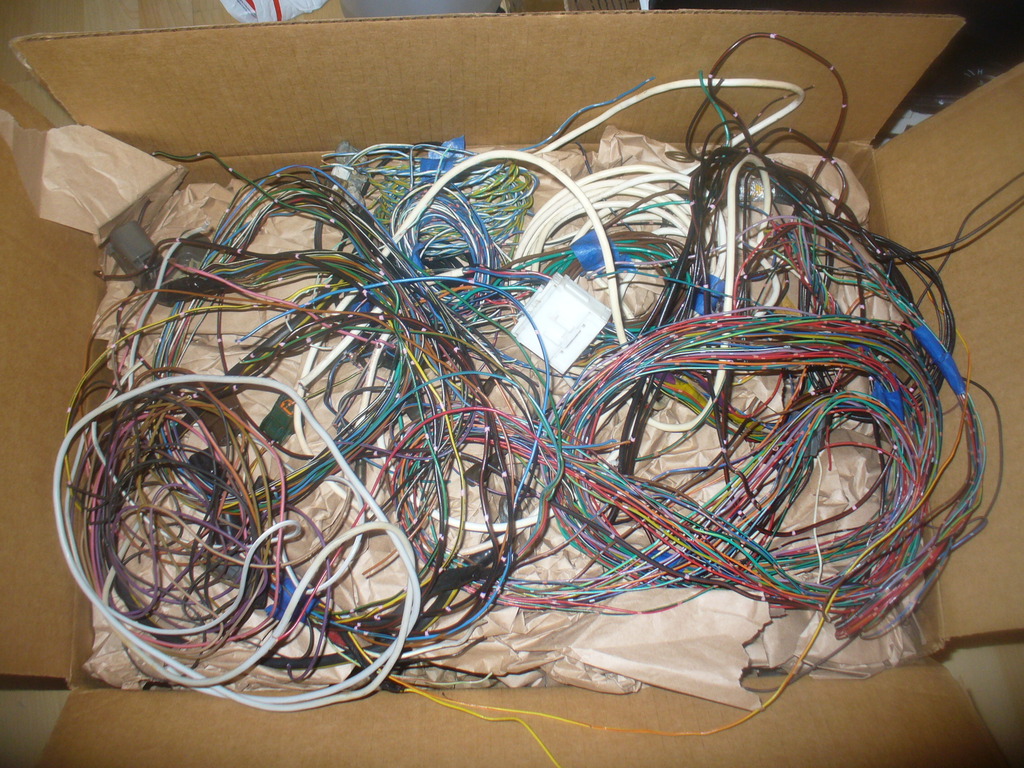
I pulled apart a couple of spare harnesses I had laying around to get their shielded cable out, and also any good lengths of wire handy. Now I have shielded wires for the TPS and twisted pairs for the IACV, you will see it up close later once I finalize the wiring on the actual engine.
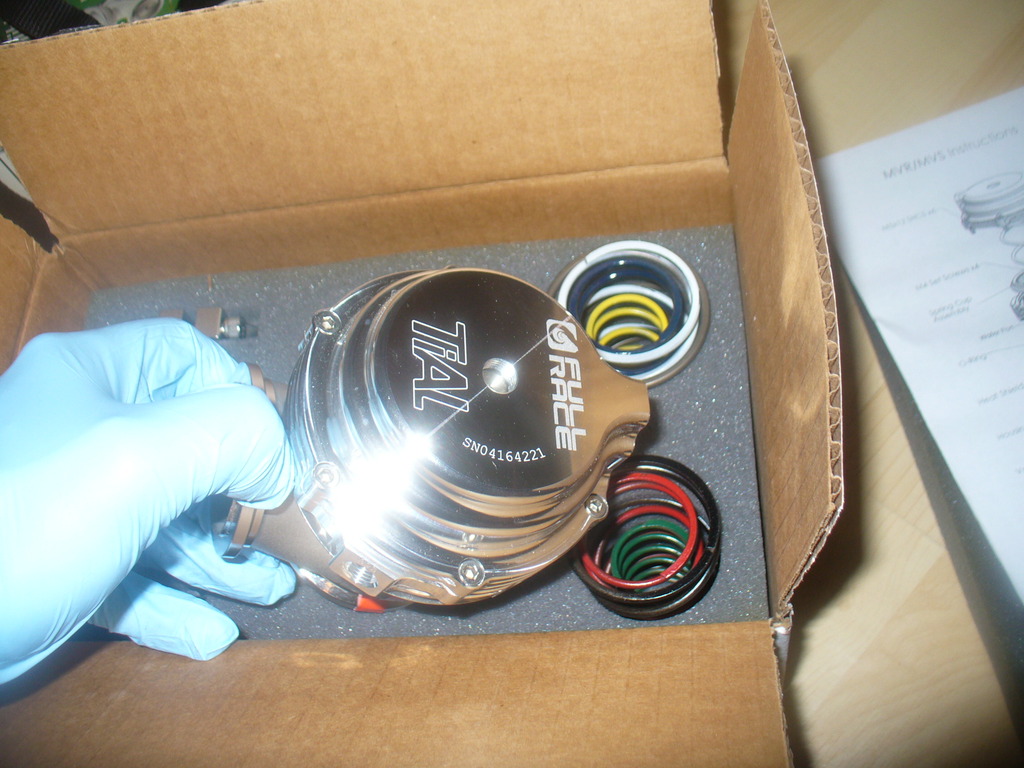
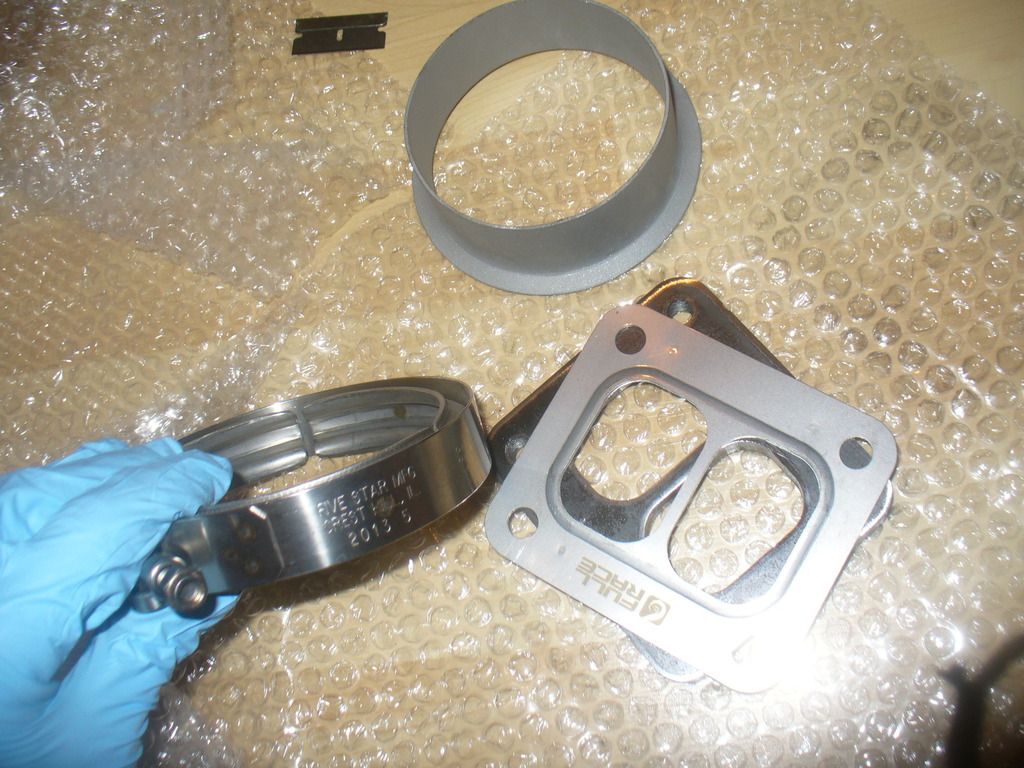
Here is the turbo I am running, Geoff helped me as usual to confirm my suspicions that this is the best mate for what I plan.
http://www.full-race.com/store/turbo...64-5mm-1.html/
A shot of the gate and some of the hardware, notice everything says "full race" wherever possible
So, Almost time for vroom vroom, looks like the hardest part of this build is finding a good original engine and transmission, that has been the major holdup so far.
First thing to note is, If you haven't heard, I am having bad luck finding an engine.
https://ls1tech.com/forums/generatio...3l-engine.html
Today I received my third 5.3L Engine and its been raining all day so I could not check it out yet. So this is where the engine situation is left off.
Next, here is a sneak preview of my engine bay

The 4l80e Transmission arrived today as well, at the trans shop. In a day or two I will know if it is any good...

I pulled apart a couple of spare harnesses I had laying around to get their shielded cable out, and also any good lengths of wire handy. Now I have shielded wires for the TPS and twisted pairs for the IACV, you will see it up close later once I finalize the wiring on the actual engine.

Here is the turbo I am running, Geoff helped me as usual to confirm my suspicions that this is the best mate for what I plan.
http://www.full-race.com/store/turbo...64-5mm-1.html/

A shot of the gate and some of the hardware, notice everything says "full race" wherever possible


So, Almost time for vroom vroom, looks like the hardest part of this build is finding a good original engine and transmission, that has been the major holdup so far.
Last edited by kingtal0n; 02-22-2017 at 05:23 PM.
01-31-2017, 08:31 PM
#27


Originally Posted by kingtal0n
vigilante says they can make the converter for the 4l80e to fit the OEM 4l60e flexplate and starter. Anybody see any reason not to go with that $900 converter?
I don't know a lot about converters but for $900 it better be a billet triple disc.
 02-02-2017, 01:06 PM
#29
Well I called the two places that make the kind of converter I want, a 9.5" Lockup, and those are yank and vigilante. Both have identical pricing. There must be a reason for that, a good one too. I know those companies are competetive and if there is any way to reduce the price they would. You guys might be thinking of larger diameter converters? Do you have any business website or names to follow up on? I won't use anything larger though.
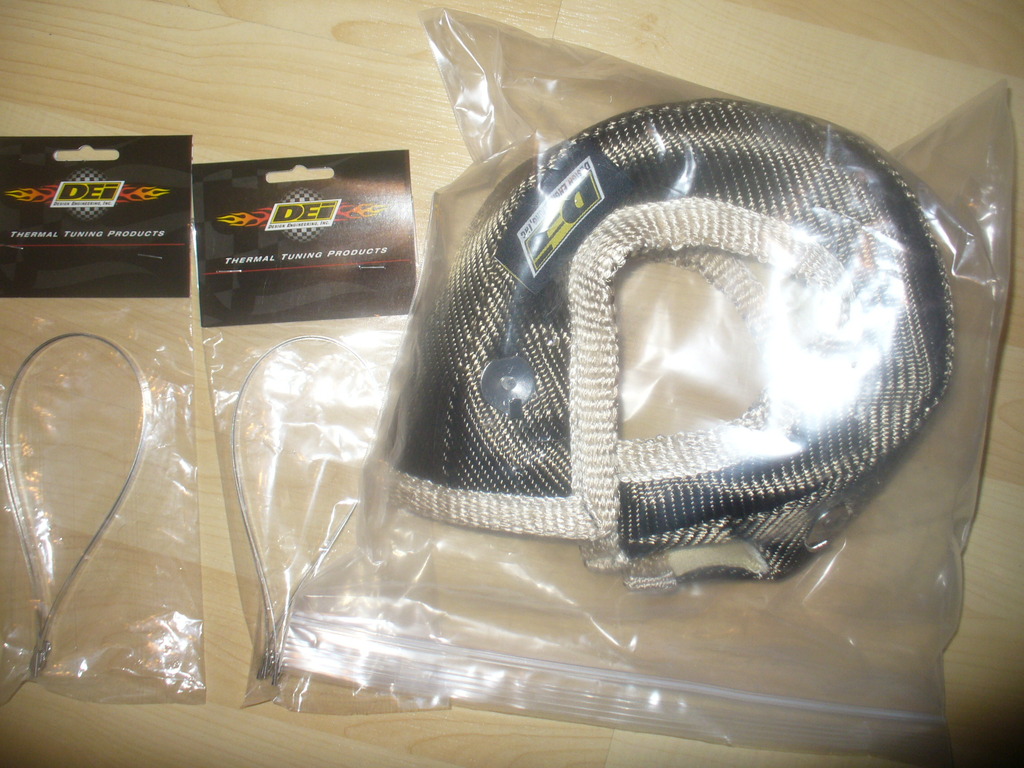
Just gathering parts and fixing up the wiring. Trying to figure out how am I going to get those ECU plugs into the car, stuff like that. Might have to cut a new hole in the firewall or something. Ordered the turbo from full race, I've known Geoff for 10+ years and always give him my business first. Its getting coated today, using a real DEI blanket and the highest quality v-bands I can find (full race only has 3" vbands and now i need some 2.5")
Found an F-body accessory setup, should be on the way shortly. Hoping to pick up the 4l80e tomorrow. Still need an engine... having second thoughts about ebay engines. sigh. but whatever... 160k miles on an 01 5.3L for 650 shipped... that can't be TOO bad. Hes got a picture of the truck and cluster, plus vin#, looks legit.
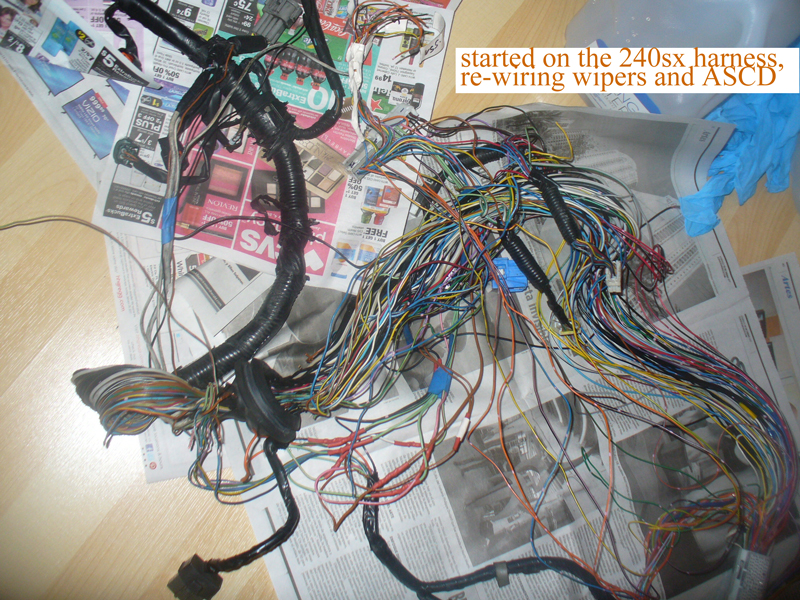
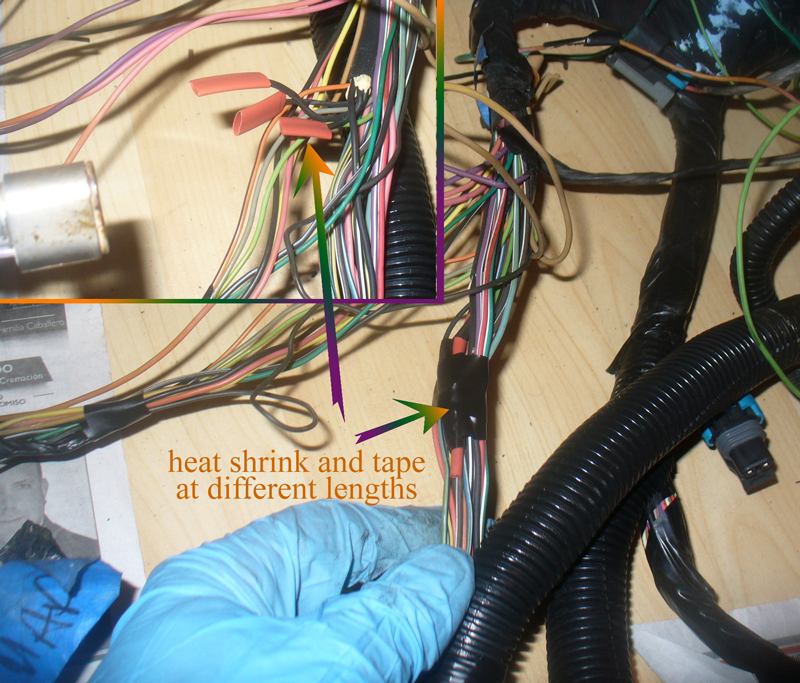
The 96 240sx harness is giving me the run around. Apparently in 96 they used some pins from the 95 and some from the 96, its a sort of hybrid. I spent almost 6 hours last night just sorting out where each wire actually goes, removing un-used wires from the 240's harness, and finding some wires where there shouldn't be any. I will have to actually plug it back into the car and measure what comes out before finishing the conversion with the LS harness.
update:
The truck harness passes through the OEM 240sx firewall hole without any issue. I just took the little plastic pieces off the plugs and it went right in like it was made for the car. One of the things I did (without realizing it until I did it) was I reversed the injectors/coils on the engine (I moved all #1,3,5,7 over to the other side) and had to lengthen the other 4 to reach back to the far side. Somehow or other I got them mixed up (it must be the way the OEM truck harness sits on the intake manifold, vs how it "sits" on the LS1 intake) but it turned out to be a really good thing because now with the extra length, the harness can reach into the car like a stock 240sx harness (its sitting on the passenger side floor board with plenty of length).
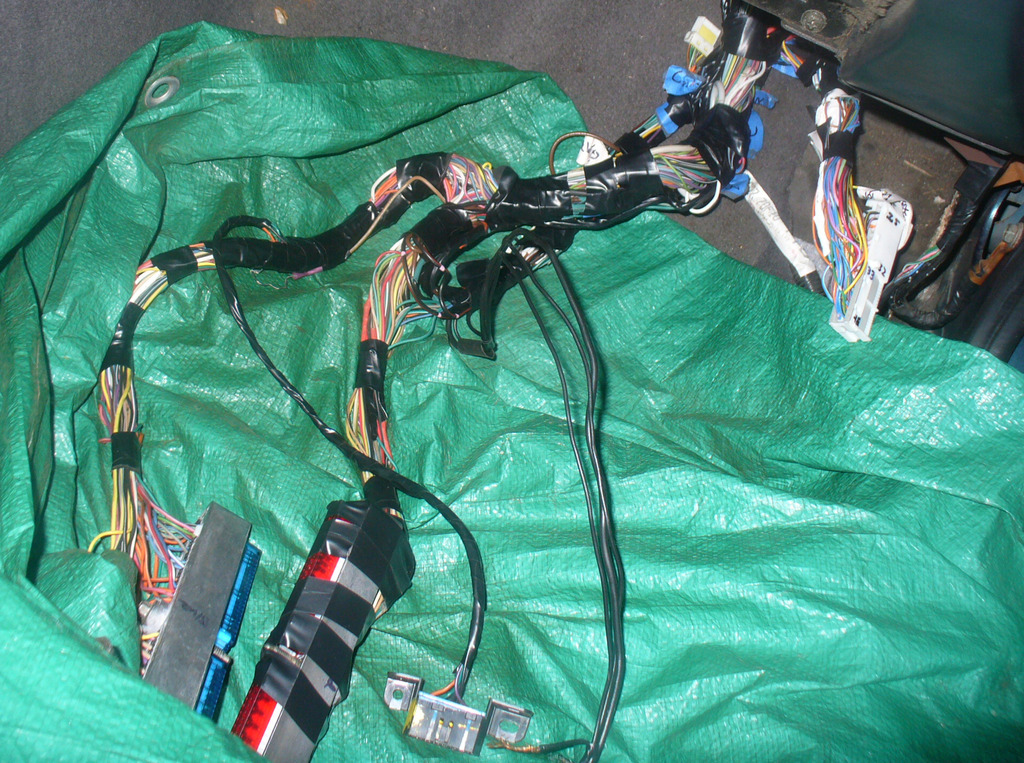
There it is after just passing through. I taped it up to reduce the size. I still have labels on many wires that I haven't put to use yet (like A/C wires).
Just gathering parts and fixing up the wiring. Trying to figure out how am I going to get those ECU plugs into the car, stuff like that. Might have to cut a new hole in the firewall or something. Ordered the turbo from full race, I've known Geoff for 10+ years and always give him my business first. Its getting coated today, using a real DEI blanket and the highest quality v-bands I can find (full race only has 3" vbands and now i need some 2.5")
Found an F-body accessory setup, should be on the way shortly. Hoping to pick up the 4l80e tomorrow. Still need an engine... having second thoughts about ebay engines. sigh. but whatever... 160k miles on an 01 5.3L for 650 shipped... that can't be TOO bad. Hes got a picture of the truck and cluster, plus vin#, looks legit.
The 96 240sx harness is giving me the run around. Apparently in 96 they used some pins from the 95 and some from the 96, its a sort of hybrid. I spent almost 6 hours last night just sorting out where each wire actually goes, removing un-used wires from the 240's harness, and finding some wires where there shouldn't be any. I will have to actually plug it back into the car and measure what comes out before finishing the conversion with the LS harness.
update:
The truck harness passes through the OEM 240sx firewall hole without any issue. I just took the little plastic pieces off the plugs and it went right in like it was made for the car. One of the things I did (without realizing it until I did it) was I reversed the injectors/coils on the engine (I moved all #1,3,5,7 over to the other side) and had to lengthen the other 4 to reach back to the far side. Somehow or other I got them mixed up (it must be the way the OEM truck harness sits on the intake manifold, vs how it "sits" on the LS1 intake) but it turned out to be a really good thing because now with the extra length, the harness can reach into the car like a stock 240sx harness (its sitting on the passenger side floor board with plenty of length).

There it is after just passing through. I taped it up to reduce the size. I still have labels on many wires that I haven't put to use yet (like A/C wires).
Last edited by kingtal0n; 05-04-2017 at 01:21 AM.
02-02-2017, 08:58 PM
#31
Awesome. So now a couple mundane questions about gaskets.
Will I be able to re-use the truck intake gasket? The exhaust gaskets? Anything?
Even if so, I'd like to be prepared of course. Any gasket recommendations? Grab an MLS exhaust gasket set? Any special intake gasket to desire? Any weaknesses in the OEM hardware I should be worried about? A couple of pictures of engines had broken exhaust bolts for example.
update:
The factory exhaust MLS gaskets seem to hold up very well.
The factory exhaust bolts are TERRIBLE and break/brittle just awful. Avoid at all costs. And if you see some broken off (most engines already do) plan to maybe have to swap the head (you can try, but do not expect 100% to be able to get them out, especially if there are a bunch).
The factory LS1 intake manifold gaskets with high mileage from an unknown source, even though they looked squished and "used to death" actually sealed up strongly against the truck heads. I pressure tested them to approx 5psi already (will try more when I get the intercooler mounted) and they didn't leak.
Last edited by kingtal0n; 05-04-2017 at 01:24 AM.
02-03-2017, 07:18 AM
#33
Restricted User
The truck intake gaskets are kind of like sandwich plates. Just a plastic plate that has O-rings on both sides, it clips onto the bottom of the manifold.
Replacing the plates can be expensive, they're $50-60 for a pair.
Replacement O-rings for the head side are only $10 or so.
If the truck has the MLS exhaust gaskets, you can reuse them as long as you don't bend them.
Soak the hell out of the exhaust manifold bolts before you remove them. Let them sit and soak again. Repeat a few times. 50/50 mix of ATF and Acetone works best.
02-03-2017, 03:44 PM
#34
thanks, lets keep going!
I am about to buy a 4l80E From a diesel truck, 2WD. Anyone see any issue with this? Is the wiring the same? I want to use LT1swap.com's guide for re-wiring it to the 4l60e harness, but it doesn't say anything about diesel vs gasoline wiring. So I guess that means its fine! No problems!
Dear joe,
50/50 mix of acetone and ATF huh? Never heard of that- what an odd combination. I draw acetone all the time, but I dont think anybody (local) really knows what ALL Ingredients are in ATF, I can not predict what may be perhaps important reactions without knowing that. Acetone is pretty lightweight, and looks reactive to me. I wonder if any heavy byproducts form? (heavy enough to stay in solution).
Second, I bought an LS1 intake manifold. It actually just arrived today I think (I didnt look in the box yet, doing lots of other things) does it also use a sandwhich plate? I will find out when I open the box I suppose. If I don't see one, I will wonder if it is simply missing. And then I will wonder if the truck sandwhich plate bolts to the LS1 intake manifold. So... in advance thinking I suppose
Dear My2kZ:
My plan as of right now is to compression test the truck engine, and if its good, rock it with the OEM gaskets wherever possible, including head, timing cover, rear cover. As long as I see no leak dribbles of course. I plan to drive it with little/no boost for the first 3-5k miles to work out all the bugs, like a regular "truck" and get some mileage out of all the parts and see how the equipment "weathers" before I turn up any power. When I am ready to turn it up, I will have a second engine on stand-by that I can upgrade slightly, LS6 cam, hard pushrods, new timing equipment and oil pump, head gaskets, that sort of stuff. The theme of the vehicle is "ez engine swap" i.e. removable core support and v-bands should make it a breeze to yank the engine and move on to the next one. Goal of course is to get at least 40-50k mileage out of a stock $600 engine around 450rwhp would be nice, with occasional blasts in the 500's. Should work out to about $120/year in engine cost.
update:
So Just now I came back from a local trans shop that said they had a 4l80e for sale. I saw the trans, and then I picked it up. That thing is light! It felt like maybe 80lbs at most... no way this thing is 100lbs+. I thought they were super heavy- like 250lbs or something. There was no fluid in it and no converter, maybe that is why it was so light.
So anyways, holding it my hands, suddenly everything became clear. It was like just being able to touch it, gave me the energy, the push to move forward and succeed with the next step. I was assured that the diesel trans are identical in wiring. Time to enable the next phase.... engine and trans
update:
Whatever that transmission was that I picked up, I don't know what it was but I am starting to think it wasn't a 4l80 or it was missing something inside. The real thing, the actual 4l80e that I received in the mail... is heavy as !@!(#@#. It feels like 250lbs, which is about my max safe deadlift, so it was basically almost too heavy to carry around for me. Was not expecting that. On the bright side, I hope it will add some belly weight to my light chassis, make it more "camaro/supra" like on the highway. I've always loved how heavy cars felt on the highway at high speeds.
Last edited by kingtal0n; 05-04-2017 at 01:27 AM.
02-04-2017, 01:25 AM
#35

I really like how you wrote this up, makes it easy to read and understand.
"Yesterday I grabbed a harness and PCM (ecu) from the junkyard from an 02 Tahoe. I Wonder was it the 4l60 or 4l80 in that truck? (wiki says 4l60e but i will double check the harness)"
The harness you grabbed was more than likely a 4L60E one. The 4L80E harness will be behind a 6.0 engine in a 2500 SUV or Pickup/GMC Denali SUV or Pickup/or Vortec Max Truck.
02-04-2017, 09:57 AM
#36
thanks, finally got some time to fix up the wiring images, wiring stage 1 at least


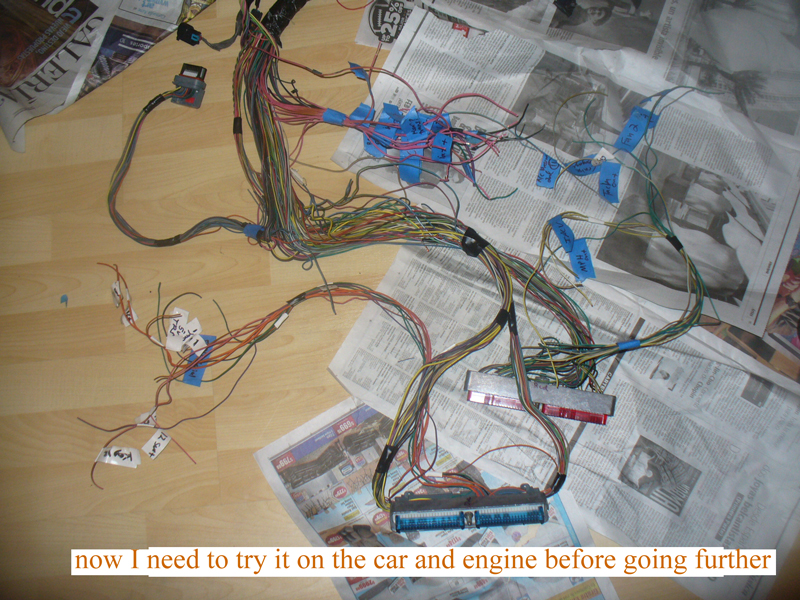
basically at this point, I need to see if those huge plugs fit through the fire wall of the 240sx, or is there some other way to get the harness through... I want the ECU Inside the car. Also, I need the engine so I can mock up the harness and remove un-needed length, and wire up the TPS and IACV sensors correct length and leg of the harness.
Wiring update (2-11-17) Last night I was going to wire in my TPS and IACV when I realized I would need a shielded cable for the TPS. So I spent quite a bit of time pulling the shielded wire from the KA24DE harness and getting it cleaned up and ready for the LS harness. Next I need to make a cable for the IACV. Will put the pics below here if they fit when finished.
update:
And everything seems to be working! I start the engine, got alternator voltage, wipers work, drive the car a little bit and pull the codes, failed the maf proper, no trans issues, pretty satisfied with what I see so far. I'm finishing the turbo plumbing this weekend so hopefully by next week it will be boost-tight and I can start economy tuning it.
Last edited by kingtal0n; 05-04-2017 at 01:29 AM.
02-05-2017, 02:42 PM
#37
Baby's first LS1
The first LS1 Intake I've ever seen in person It actually came with bolts, big sigh of relief there. A couple of ports I am trying to identify, catch me if anything is wrong!
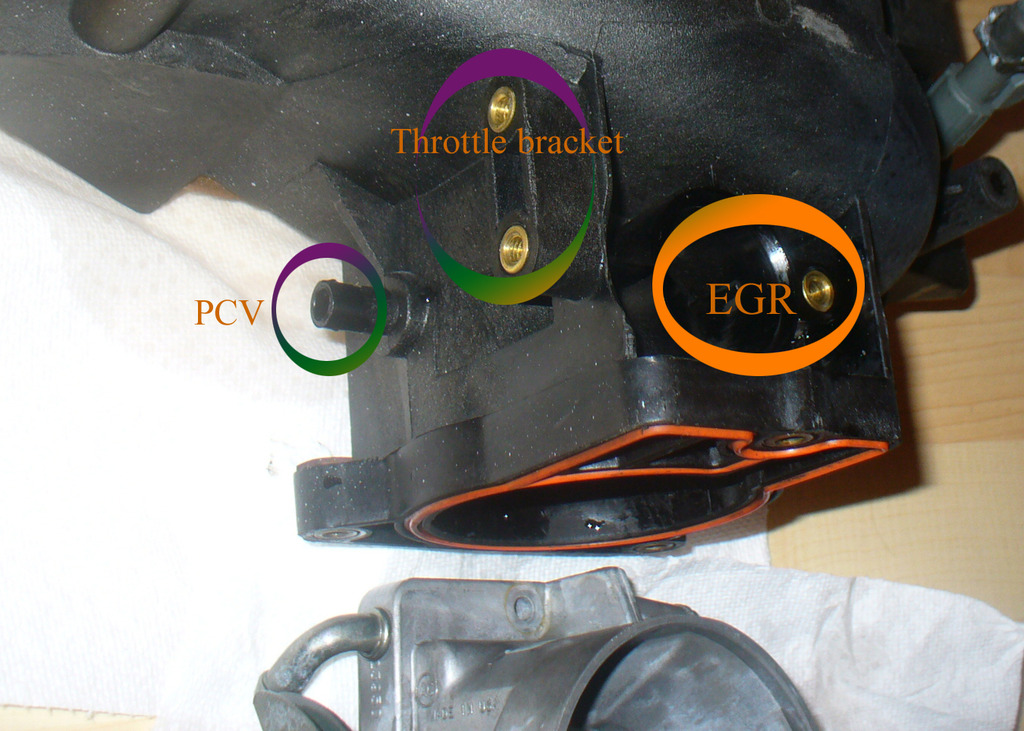
First thing I do is wash everything, I scrubbed out the ports with a nylon brush and some purple degreaser, I worked the throttle body and it felt a big "gritty" so I washed it with brake cleaner until it was smooth, then WD-40 basically everything to keep it from oxidizing. Usually Throttle body for fuel injected cars are water-tight, but this one has a small hole, I am guessing somebody drilled a hole in the blade for an idle related issue. I do not see any "sandwhich plate" so I hope one is not used/needed for this intake! Another thing I am going to ask, on some cars the throttle blade bolts back out and the engine eats them. The solution is loc-tite and stake them for those cars. I wonder if the LS1 has any history of this issue? Hope not, I want to just leave em be!
The first LS1 Intake I've ever seen in person It actually came with bolts, big sigh of relief there. A couple of ports I am trying to identify, catch me if anything is wrong!


First thing I do is wash everything, I scrubbed out the ports with a nylon brush and some purple degreaser, I worked the throttle body and it felt a big "gritty" so I washed it with brake cleaner until it was smooth, then WD-40 basically everything to keep it from oxidizing. Usually Throttle body for fuel injected cars are water-tight, but this one has a small hole, I am guessing somebody drilled a hole in the blade for an idle related issue. I do not see any "sandwhich plate" so I hope one is not used/needed for this intake! Another thing I am going to ask, on some cars the throttle blade bolts back out and the engine eats them. The solution is loc-tite and stake them for those cars. I wonder if the LS1 has any history of this issue? Hope not, I want to just leave em be!
02-07-2017, 12:11 AM
#38
This is the converter you want for a street car, it works with the 4l60e flexplate, its for a 4l80E, should drive like a stock vehicle and really get the go when you want it,
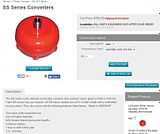
should have that in my hands within a week. I had one about 13 years ago when I built my first 700R4 transmission and it really was the heart of the vehicle, the centerpiece of the combination. I wouldn't run a serious street car without a 9.5" Lockup unit.
Heres a thumbnail of the 700R4 rebuild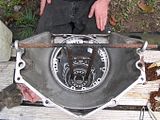
You can click for the album if curious. I was about 17 years old though, so it isnt clean like I am doing things these days. My father helped me make that special tool you see for the bottom of the transmission, there is some kind of piston down there, forgot what its called, he welded up that bar you see. We have all kinds of scrap in the backyard for making stuff like that, its what I will probably make my 4l80e crossmember adapter out of.
next up some goodies arriving today, bought a slightly used LSx swap kit from friend. Sikky makes the best, my research indicates.

couple other things came, ls6 valley cover, gaskets, couple v-bands.
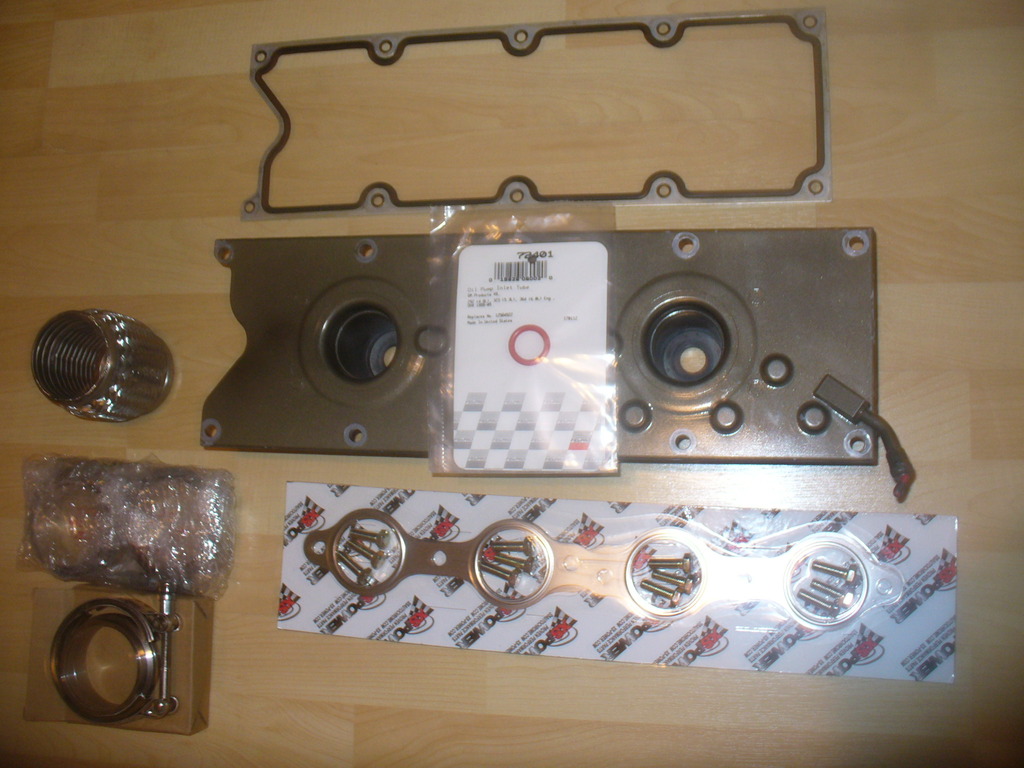
.
I could use a little help with the fuel system. I want to buy a regulator and stick some barb fittings in it and just go with OEM style fuel line, rubber stuff. However, I'd like to use pushloc or something a little more tech. Does anyone know if the pushloc stuff will hose clamp onto the factory 3/8" or 5/16" fuel line? Or how to make that work...
Also just to answer one of my previous questions, The truck IACV and TPS appear to bolt right onto the LS1 throttle body.
For now, I will use an aeromotive regulator, with some barb fittings and regular rubber efi hose. I also ordered some pushloc hose so I can play with it, figure out how to use it, Ive never seen the stuff before. Looks like regular hose to me, maybe just thicker? hopefully it clamps easy onto the oem line, then I would swap my barb fittings at the regulator for some pushloc AN fittings and push that hose onto them.
Usually I see everyone using the vette regulator for LS1 returnless fuel systems; I dislike the idea of locking the fuel pressure at 60psi constant, it is much harder on the fuel pump, and fuel system, to run at such high pressure all the time. In control systems, I typically like to use the lowest pressure possible to get the job done, whether we are discussing fuel, oil, water, air, or blood pressure. So my regulator will operate around 30~psi during normal driving, and manifold reference up to about 40~psi at 0psi of manifold pressure, +1psi per pound of boost. This way, during normal driving, it will keep fuel pump wear and tear to a minimum. And just because I was curious what aeromotive would say, I sent their tech an inquiry:
"from aeromotive tech:
"All testing on Aeromotive fuel pumps for durability is done at 60-PSI. We typically see 2,000 run hours from a 340 Stealth Pump at 60-PSI and 13.5 volts. That said, lower pressure and/or slower speed can extend pump life, but you would need to change injectors (possibly) and retune the ECU (certainly) if you plan to run lower pressure."
Hope that helps, let us know if you need further assistance and thanks for choosing Aeromotive!
Brett Clow
Tech Director

should have that in my hands within a week. I had one about 13 years ago when I built my first 700R4 transmission and it really was the heart of the vehicle, the centerpiece of the combination. I wouldn't run a serious street car without a 9.5" Lockup unit.
Heres a thumbnail of the 700R4 rebuild

You can click for the album if curious. I was about 17 years old though, so it isnt clean like I am doing things these days. My father helped me make that special tool you see for the bottom of the transmission, there is some kind of piston down there, forgot what its called, he welded up that bar you see. We have all kinds of scrap in the backyard for making stuff like that, its what I will probably make my 4l80e crossmember adapter out of.
next up some goodies arriving today, bought a slightly used LSx swap kit from friend. Sikky makes the best, my research indicates.

couple other things came, ls6 valley cover, gaskets, couple v-bands.

.
I could use a little help with the fuel system. I want to buy a regulator and stick some barb fittings in it and just go with OEM style fuel line, rubber stuff. However, I'd like to use pushloc or something a little more tech. Does anyone know if the pushloc stuff will hose clamp onto the factory 3/8" or 5/16" fuel line? Or how to make that work...
Also just to answer one of my previous questions, The truck IACV and TPS appear to bolt right onto the LS1 throttle body.
For now, I will use an aeromotive regulator, with some barb fittings and regular rubber efi hose. I also ordered some pushloc hose so I can play with it, figure out how to use it, Ive never seen the stuff before. Looks like regular hose to me, maybe just thicker? hopefully it clamps easy onto the oem line, then I would swap my barb fittings at the regulator for some pushloc AN fittings and push that hose onto them.
Usually I see everyone using the vette regulator for LS1 returnless fuel systems; I dislike the idea of locking the fuel pressure at 60psi constant, it is much harder on the fuel pump, and fuel system, to run at such high pressure all the time. In control systems, I typically like to use the lowest pressure possible to get the job done, whether we are discussing fuel, oil, water, air, or blood pressure. So my regulator will operate around 30~psi during normal driving, and manifold reference up to about 40~psi at 0psi of manifold pressure, +1psi per pound of boost. This way, during normal driving, it will keep fuel pump wear and tear to a minimum. And just because I was curious what aeromotive would say, I sent their tech an inquiry:
"from aeromotive tech:
"All testing on Aeromotive fuel pumps for durability is done at 60-PSI. We typically see 2,000 run hours from a 340 Stealth Pump at 60-PSI and 13.5 volts. That said, lower pressure and/or slower speed can extend pump life, but you would need to change injectors (possibly) and retune the ECU (certainly) if you plan to run lower pressure."
Hope that helps, let us know if you need further assistance and thanks for choosing Aeromotive!
Brett Clow
Tech Director
Last edited by kingtal0n; 02-07-2017 at 01:58 PM.
02-09-2017, 10:40 PM
#39
Updates?
Why yes, I think I will.
Today I saw the car for a few hours (its at my fathers house approx 65 miles south of where I live), and officially made the core support removable. I had to drill out about 12 spot welds for this to happen. It was harder than I thought, but still pretty easy. I pressure washed the engine bay, and removed any unnecessary components to clear the way for the big engine. I started hammering out the transmission tunnel, but the hammer I was using was just not going to cut it. I decided to come back next time with a bigger hammer. I didn't bring my camera, I literally had a car load full of items (intake, oil pan, mounts, fans, various smaller sundries, tools, etc) so I had a huge list of things to remember to take, and my camera just wasn't on the list unfortunately. Ever since I got some brake cleaner on the camera lens it just hasn't been the same, I stopped carrying it everywhere. getting a clear picture is almost impossible now. The lens is made of plastic and brakecleen likes to melt plastic.
Next time I see the car, I will be seeing the engine as well, and sure the bring the camera, clean the engine, install all the parts, look for clearance issues, test the engine, and get it ready for the transmission. Then, the next NEXT time I see the car, trans will mate, and the engine will go into the car and fire up briefly to check for noise (I hope there is plenty of noise!)
In other news, HP tuners arrived today! I just got my hands on it since I got home, it was on the door step at 10pm. I wonder how long that $500 package sat there through the day? Oh well. So I will boot the ECU soon, maybe tonight even, and fiddle around with the computer some.
Couple more staples arrived as well
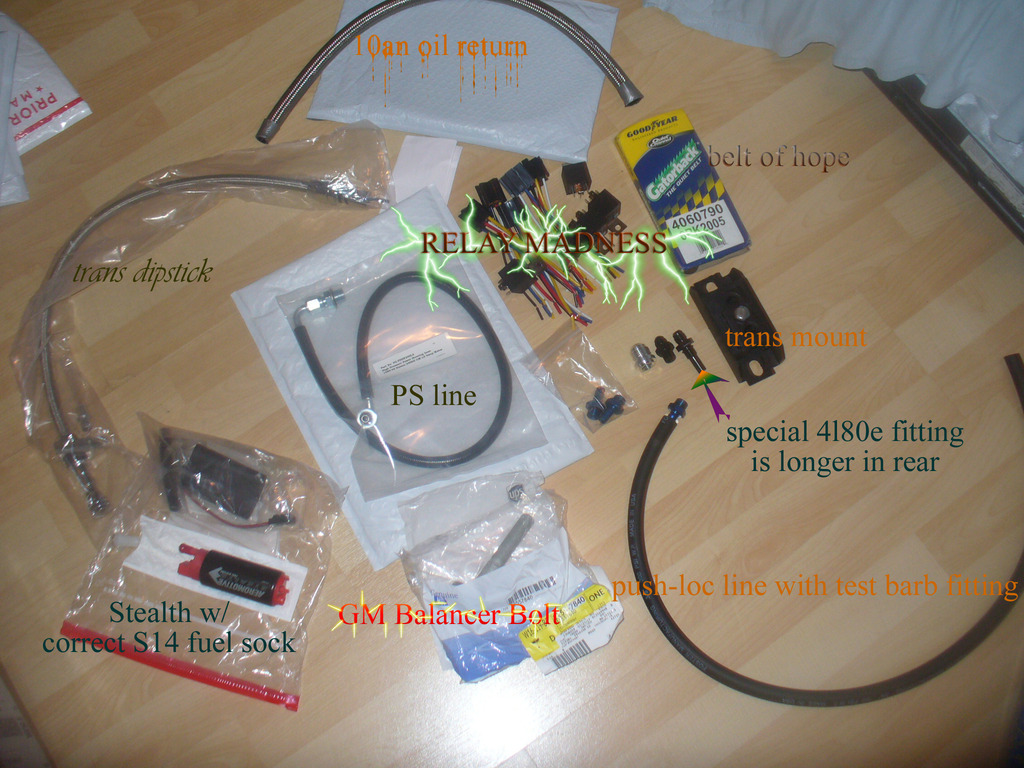
Motor should be here in a day or two (2-15 or 2-16), trans is taking longer, it isnt even shipped yet. It will give me plenty of time to sort out the engine at least...
Got the engine today,
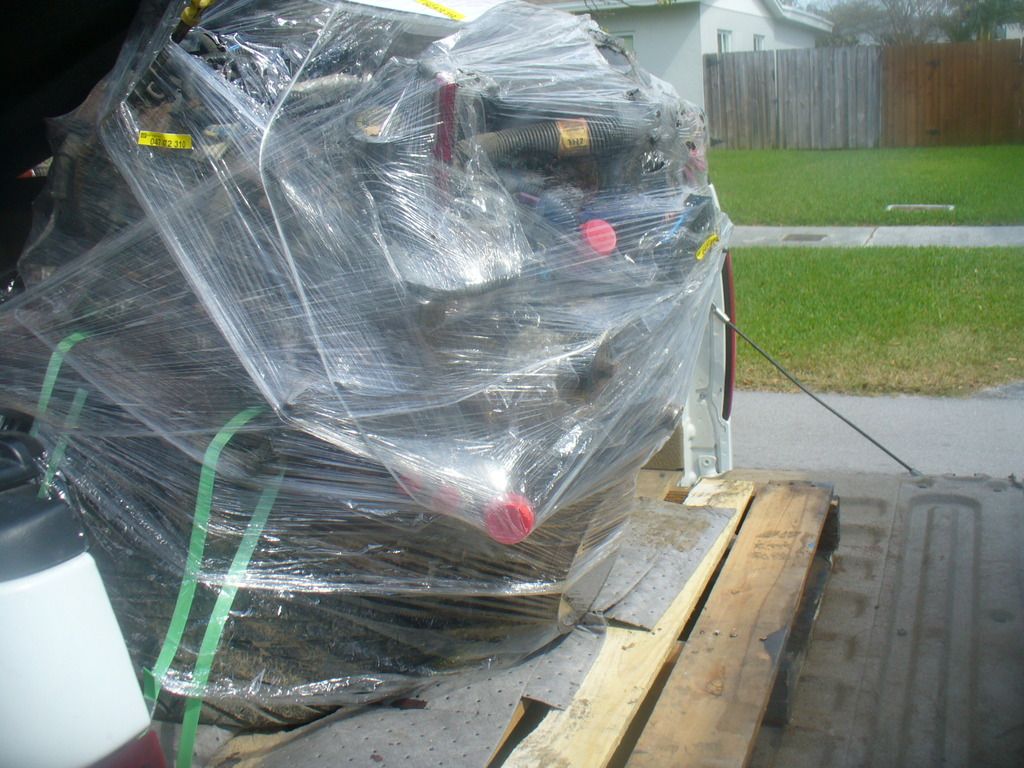
put it on a stand.
chased a couple threads
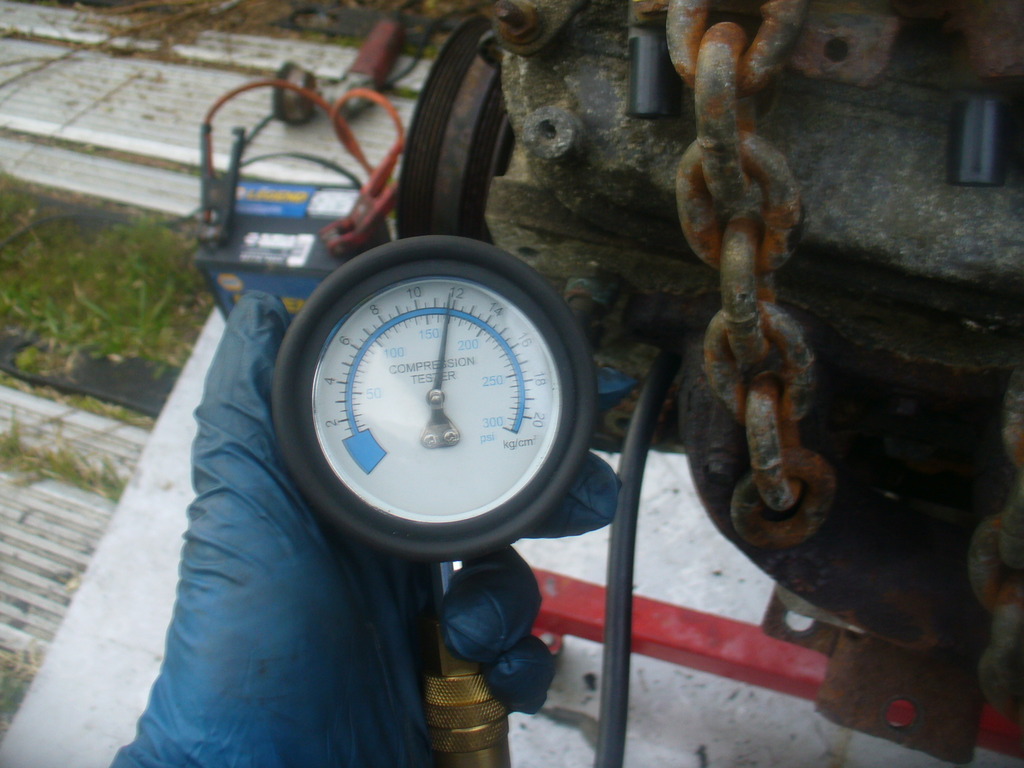
and did a compression test... no bueno. 100psi on cylinders 1 and 3. I emailed the seller and waiting to hear back now...
update: On my third engine now, in a day or two will know if it is good or not, just got the trans also and will know in a day or two as well, and then hopefully I will be able to actually make real progress bolting things down where they go!
Log date: 3/1/17 "A visitor approaches"
Knee deep in the jungle soil, I make my way to the forefront of the sideways sunken monument, a stone facade wrought of iron and nickel. Aged sand and vines climb the sides of the twelve foot tall structure, the ground was soft and moist and I wondered what kept it from sinking further, the way I seemed to get deeper and deeper the closer I got to it, for a moment my step faltered as I imagined myself sinking completely. I pushed back the thought and took a deep breath, and another step. The closer I get, the taller it seemed to loom before my eyes, was it growing? Or was I shrinking?
Transmission is ready. Tomorrow I will be selecting the engine as necessary; thread will update once these things are settled.
Why yes, I think I will.
Today I saw the car for a few hours (its at my fathers house approx 65 miles south of where I live), and officially made the core support removable. I had to drill out about 12 spot welds for this to happen. It was harder than I thought, but still pretty easy. I pressure washed the engine bay, and removed any unnecessary components to clear the way for the big engine. I started hammering out the transmission tunnel, but the hammer I was using was just not going to cut it. I decided to come back next time with a bigger hammer. I didn't bring my camera, I literally had a car load full of items (intake, oil pan, mounts, fans, various smaller sundries, tools, etc) so I had a huge list of things to remember to take, and my camera just wasn't on the list unfortunately. Ever since I got some brake cleaner on the camera lens it just hasn't been the same, I stopped carrying it everywhere. getting a clear picture is almost impossible now. The lens is made of plastic and brakecleen likes to melt plastic.
Next time I see the car, I will be seeing the engine as well, and sure the bring the camera, clean the engine, install all the parts, look for clearance issues, test the engine, and get it ready for the transmission. Then, the next NEXT time I see the car, trans will mate, and the engine will go into the car and fire up briefly to check for noise (I hope there is plenty of noise!)
In other news, HP tuners arrived today! I just got my hands on it since I got home, it was on the door step at 10pm. I wonder how long that $500 package sat there through the day? Oh well. So I will boot the ECU soon, maybe tonight even, and fiddle around with the computer some.
Couple more staples arrived as well


Motor should be here in a day or two (2-15 or 2-16), trans is taking longer, it isnt even shipped yet. It will give me plenty of time to sort out the engine at least...
Got the engine today,

put it on a stand.

chased a couple threads

and did a compression test... no bueno. 100psi on cylinders 1 and 3. I emailed the seller and waiting to hear back now...

update: On my third engine now, in a day or two will know if it is good or not, just got the trans also and will know in a day or two as well, and then hopefully I will be able to actually make real progress bolting things down where they go!
Log date: 3/1/17 "A visitor approaches"
Knee deep in the jungle soil, I make my way to the forefront of the sideways sunken monument, a stone facade wrought of iron and nickel. Aged sand and vines climb the sides of the twelve foot tall structure, the ground was soft and moist and I wondered what kept it from sinking further, the way I seemed to get deeper and deeper the closer I got to it, for a moment my step faltered as I imagined myself sinking completely. I pushed back the thought and took a deep breath, and another step. The closer I get, the taller it seemed to loom before my eyes, was it growing? Or was I shrinking?
Transmission is ready. Tomorrow I will be selecting the engine as necessary; thread will update once these things are settled.
Last edited by kingtal0n; 03-02-2017 at 08:12 PM.
03-02-2017, 08:12 PM
#40
3/2/17
Today I went to homestead!
I went there to personally check each engine in the salvage yard, until I find a good one!
I get there, and he hands me a list of all the 5.3's in the yard, the years and details, what vehicle and so forth. We handled a few with the forklift, and I found quite a few in the back containers, a couple interesting results too- some of the 4x4 versions had some 200psi of compression! All in all, I checked 7 different engines in approx 2.5 hours, lugging a battery, starter, impact, and a couple other tools through the yard, navigating the cars to where the engines lay spread out on little rolling carts throughout.
Ironically, the first engine I checked turned out the be the best one of all, and the one I selected to take home with me. The only reason I kept going and checking the rest was- well, I was curious what else I could find, if I could do any better
Nay, none of the other engines I checked were showing solid compression across the board.
So tomorrow will be a fun day, I finally get to play with accessories, pulleys, steam ports, intakes, pressure tests, and of course- do a final compression test just to ease my mind.
I also pulled the pan off the transmission I got back from the shop to take a couple pics,
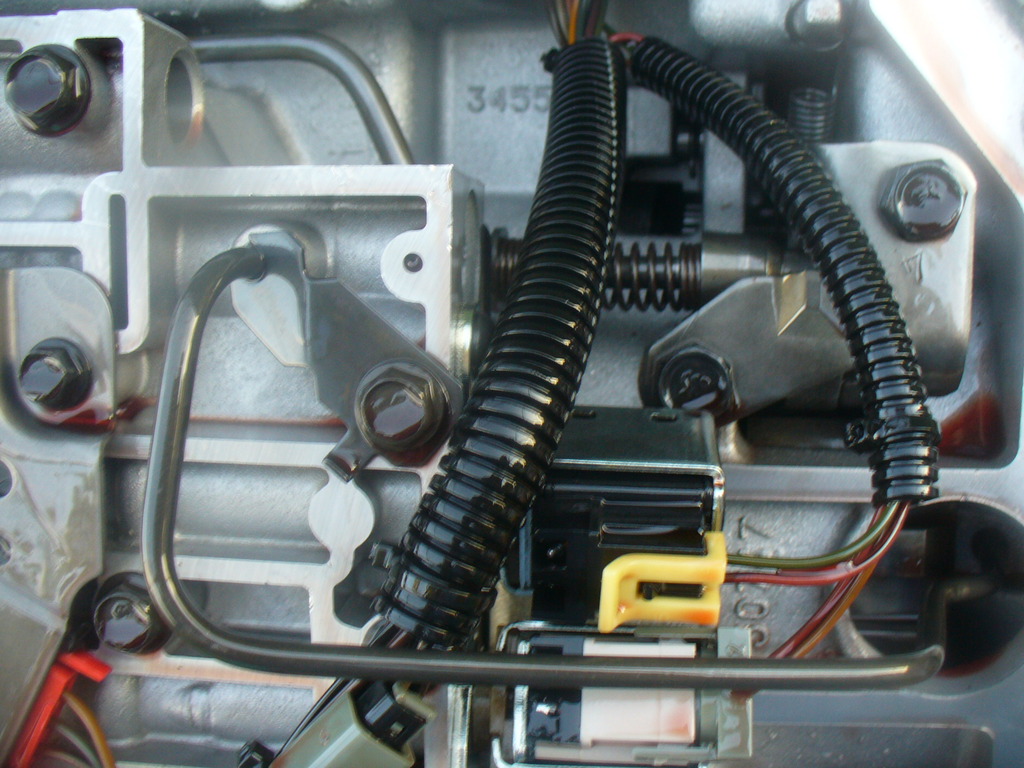
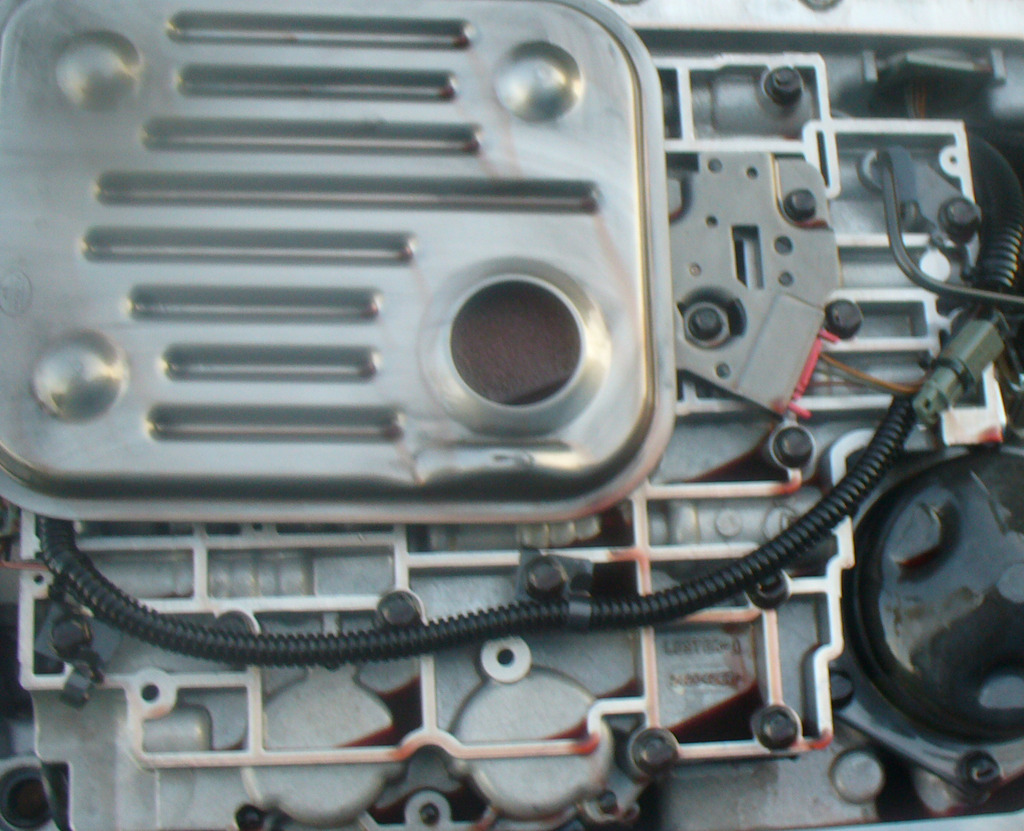
I love shift kits, automatic transmissions, and the way it feels when it kicks your car sideways slightly. This transmission shows minimal wear- it was very clean and cherry, the transmission guy confirmed it probably has about 100k just like the cluster in the auction shows. It was FREAKIN HEAVY though, I mean WOW, I could barely carry this thing into the backyard, probably 200lbs~ if I had to guess. I do not think my engine hoist is up the job of engine+trans so this might be very interesting when it comes time to install these things.
My list for tomorrow:
1. clean both engines and transmission free of dirt/grease (remember I got a free engine thanks to ebay) and chase applicable threads
2. replace accessories & intake on the LS engine I've selected for the swap so it will fit my vehicle
3. deal with steam ports (I have a couple ideas and parts to try)
4. cut the ears from the 4l80e
5. fit, cut, and measure the remaining portions of the wiring harness so it looks tidy when plugged in
6. check oilpan fitment to decide where my oil drain-back bung will be installed. I was leaning towards passenger side rear of the pan, for some reason Sikky recommended it go there, in the rear, although common sense is telling me the front of the pan is where I want to be...
This should take the day, most of it.
Today I went to homestead!

I went there to personally check each engine in the salvage yard, until I find a good one!
I get there, and he hands me a list of all the 5.3's in the yard, the years and details, what vehicle and so forth. We handled a few with the forklift, and I found quite a few in the back containers, a couple interesting results too- some of the 4x4 versions had some 200psi of compression! All in all, I checked 7 different engines in approx 2.5 hours, lugging a battery, starter, impact, and a couple other tools through the yard, navigating the cars to where the engines lay spread out on little rolling carts throughout.
Ironically, the first engine I checked turned out the be the best one of all, and the one I selected to take home with me. The only reason I kept going and checking the rest was- well, I was curious what else I could find, if I could do any better
Nay, none of the other engines I checked were showing solid compression across the board.
So tomorrow will be a fun day, I finally get to play with accessories, pulleys, steam ports, intakes, pressure tests, and of course- do a final compression test just to ease my mind.
I also pulled the pan off the transmission I got back from the shop to take a couple pics,


I love shift kits, automatic transmissions, and the way it feels when it kicks your car sideways slightly. This transmission shows minimal wear- it was very clean and cherry, the transmission guy confirmed it probably has about 100k just like the cluster in the auction shows. It was FREAKIN HEAVY though, I mean WOW, I could barely carry this thing into the backyard, probably 200lbs~ if I had to guess. I do not think my engine hoist is up the job of engine+trans so this might be very interesting when it comes time to install these things.
My list for tomorrow:
1. clean both engines and transmission free of dirt/grease (remember I got a free engine thanks to ebay) and chase applicable threads
2. replace accessories & intake on the LS engine I've selected for the swap so it will fit my vehicle
3. deal with steam ports (I have a couple ideas and parts to try)
4. cut the ears from the 4l80e
5. fit, cut, and measure the remaining portions of the wiring harness so it looks tidy when plugged in
6. check oilpan fitment to decide where my oil drain-back bung will be installed. I was leaning towards passenger side rear of the pan, for some reason Sikky recommended it go there, in the rear, although common sense is telling me the front of the pan is where I want to be...
This should take the day, most of it.
Last edited by kingtal0n; 03-02-2017 at 08:20 PM.