


Just did Prothane (poly) Motor mounts
Well finally decided to go ahead and do poly motor mounts. When you rev the motor now it only moves slightly under full throtle. Anything less than extremely high revs the motor stands perfectly still. You can feel a little more vibrations in the cabin but its not really that big of a deal. The total install of the driver/pass side took about 6.5 hours. Had to remove the alt, ac, and starter to get full access to the motor mounts. A buddy of mine took a bunch of pics so I'll try to get those up by tommorow if anyone wants to see some of the install.
-William
-William
Last edited by SSDriver; Oct 2, 2005 at 11:23 PM.
The tranny mounts a breeze I think I have some pics of that as well. On both mounts you have to drill out some rivits. On the motor mounts you need a 3/8" drill bit and they say to torque the new bolts to 30 ft/lbs that replace the rivits. On three of the holes the rivits are hollow in the center and the 3/8" drill bit doesnt exactly get them out all the way. I ended up using a punch to knock the rest of the rivits out. Also when you go to align the motor mounts make sure you have all four bolts started a fair amount in before you tighten any of them. When I did mine I got all of them started (one wasn't started very far) and when I went to tighten the other bolts down I needed to lift the motor up slightly and it cocked one of the bolts and messed up the treads in the block(aluminum) so I had to run a tap through it, NOT FUN. I'd also make sure you have a wide aray of punch's and prybars to get the large cross bolt holes lined up. I used a piece of 2x6 wood to jack the motor up by the oil pan.
On my previous car, a turbo'ed rice rocket, poly mounts were one of the best things I added. Hardly any additional vibrations in cabin, and no movements under the hood. I definately will do this to the Camaro, and I'll be waiting for those pictures 

Staging Lane
Joined: Jun 2005
Posts: 84
Likes: 0
From: Burbank, CA
Hahah man well hey that was 6.5 hours of some hard work, glad we didn't start it the night before. My recomendations to anyone doing this is have the car level on 4 jack stands, we didn't do that but IMO I think it would have made a few things faster.
-Mark
-Mark
Trending Topics
Ok here's some pics, not a full install but kinda gives you an idea of what your looking at. Oh and your arms will need to rest, they start to get fatiqued while your holding them up for so long.
Special thanks to mark (mw2 performance) for all the help, things go a lot faster when you got 2 people. Ha ha never knew your ls1tech name before.
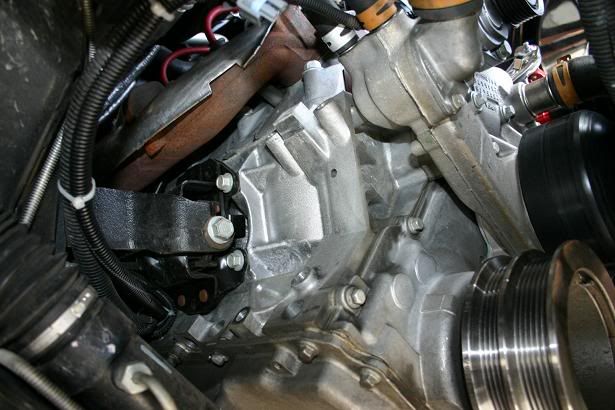
First thing I did was disconnect the battery. Then I went ahead and removed the the belt(15mm bolt on tensioner) and removed the alt. The alternator has 4 bolts three in the front and one in the back(13 mm bolts). The alt. also has 1 thicker guage read wire with a boot covering it. Remove the boot(just pull it off) and loosen up the 13mm nut and it comes off. If you don't disconnect the battery this wire will arc out on any ground. There is also a quick disconnect electrical connector on the top of the alt. Becarefull not to drop the alt before removing this connector it has 1 very thin wire on it and there isn't much slack. Once you remove the alt. here is what you will see on the drivers side.
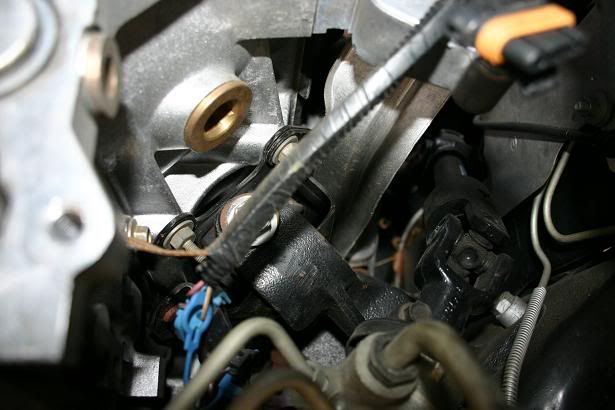
I then jacked up the motor (just enough to get wight off of the motor mount) using a piece of 2x6(wood) under the oil pan. Then I removed the large bolt going through the motormount(front to back). Once that was removed there are 4 bolts holding the mounts to the block. The top 2 on the drivers side have nuts on them that need to be removed first(holding a heat shield in place. Once all those bolts are free the mount is loose but it has 2 tabs on it so you remove it from the bottom it must come out from the top. You will then need to jack the motor up A LOT, becarefull that you don't jack it up too much. The mount will then lift up and can be pulled out towards the front of the motor.
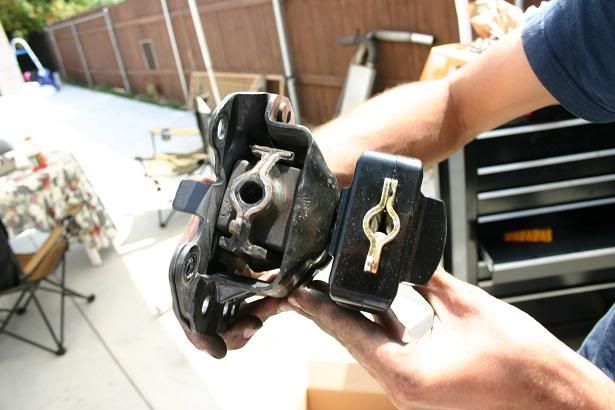
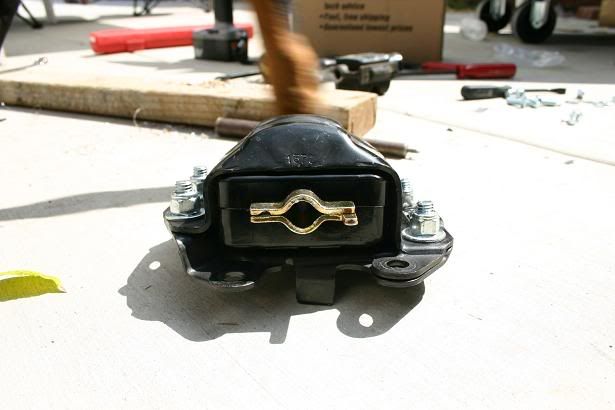
Here's the stock mount removed next to the new prothane mount. Notice how the new mount is a lot larger than the factory rubber one.
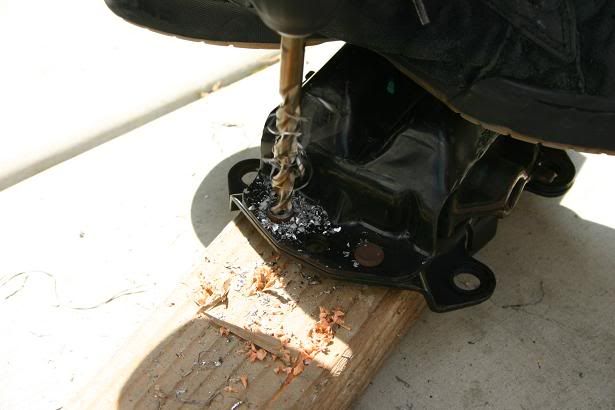
The clamshell on the stock mount is held together with 5 rivits you must drill out all of those with a 3/8" drill bit.
Once you drill those out you might have to tap out the remains of the 3 bottom rivits(these are hallow and slightly larger than 3/8". and the mount will seperate. The instructions tell you to heat the mounts up with a torch to get them seperated (witch will burn off the paint on the metal part of the mounts). I was able to just mearly pull on them and they came right off. There was a slight amount of rubber still on the mounts that I then needed to scrape off.
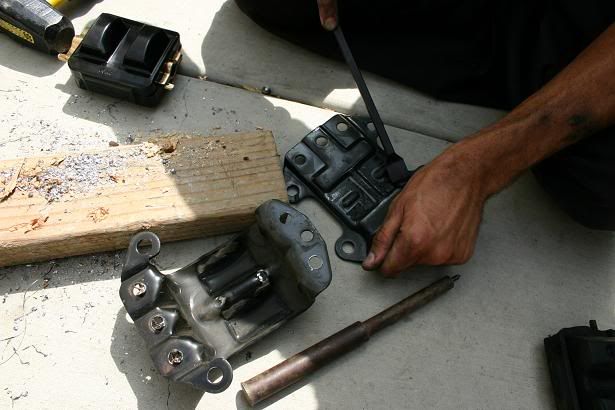
Once you get all the rubber off(big chuncks). You insert the new poly mounts into the stock clamshell and replace the rivits you drilled out with 5 bolts/nuts that are supplyed with the mounts. The bolts need to be torqued to 30 ft/lbs(per instructions). Once completly installed they will then look like this.
To install the new mounts I just repeated my uninstall procedure. Got the mount into position, bolted it to the block(4 bolts). Next comes the hard part. Lining up the mounts with the bracket that is bolted to the K-member. I had to raise and lower the motor and pry on the mount itself to get the hole to line up. I then had to beat the bolt through the hole with a hammer and thread on the nut. This part is very frustrating but it can be done.
Now that I had the drivers side completly done I moved on the the passenger side. The get access to the passenger side mount I had to remove the starter(2 bolts and 2 wires, very eas), and the ac compressor and the bracket holding it to the block. The ac is a lot easyer to remove than I would have expected. DO NOT remove the lines going to the ac unit or you will have to get it recharged. I just let it hang by the lines and supported the ac with a box to take stress off of the lines. once the ac is removed the mount is easily accessed.
Basically the passenger side is the same as the drivers. The passenger side seemed a lot easier for me to get on and off but took longer to line up the large bolt that goes from front to back. Once both mounts where installed I reinstalled the ac, starter, and alt. Put the two belts back on and connected the battery. Sorry I know this isn't a fully install(wasn't planning on doing one and didn't prepare for it at all) but hope this helps a little bit.
And a pic of me under the car while its up on ramps.
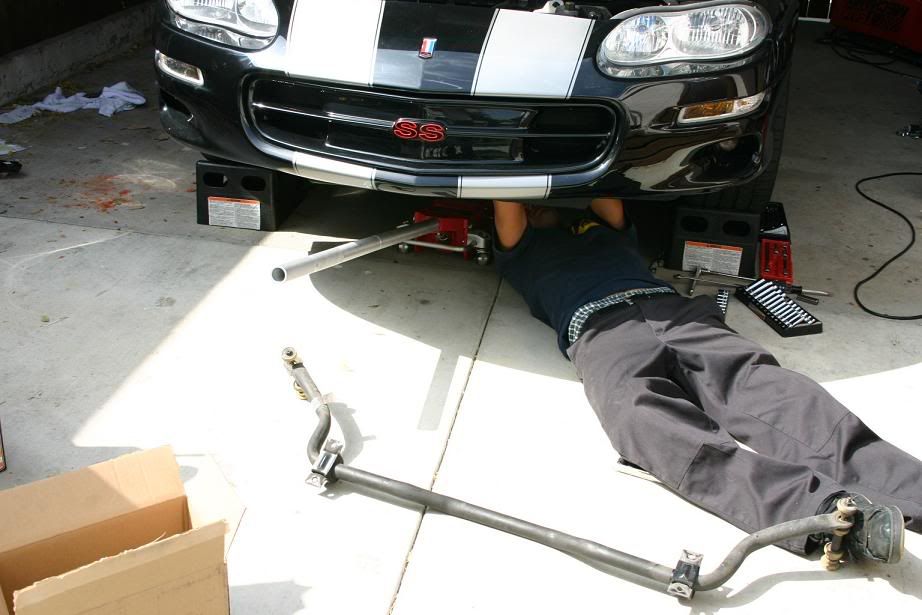
Oh yeah I also removed the front sway bar before doing the mounts. Not nessary(I don't think but might help on lowering the alt/ac.) I remember when I removed the alt before and I had to work it around the sway bar to get it out). I just removed it this time to help improve my launches.
-William
Special thanks to mark (mw2 performance) for all the help, things go a lot faster when you got 2 people. Ha ha never knew your ls1tech name before.
First thing I did was disconnect the battery. Then I went ahead and removed the the belt(15mm bolt on tensioner) and removed the alt. The alternator has 4 bolts three in the front and one in the back(13 mm bolts). The alt. also has 1 thicker guage read wire with a boot covering it. Remove the boot(just pull it off) and loosen up the 13mm nut and it comes off. If you don't disconnect the battery this wire will arc out on any ground. There is also a quick disconnect electrical connector on the top of the alt. Becarefull not to drop the alt before removing this connector it has 1 very thin wire on it and there isn't much slack. Once you remove the alt. here is what you will see on the drivers side.
I then jacked up the motor (just enough to get wight off of the motor mount) using a piece of 2x6(wood) under the oil pan. Then I removed the large bolt going through the motormount(front to back). Once that was removed there are 4 bolts holding the mounts to the block. The top 2 on the drivers side have nuts on them that need to be removed first(holding a heat shield in place. Once all those bolts are free the mount is loose but it has 2 tabs on it so you remove it from the bottom it must come out from the top. You will then need to jack the motor up A LOT, becarefull that you don't jack it up too much. The mount will then lift up and can be pulled out towards the front of the motor.
Here's the stock mount removed next to the new prothane mount. Notice how the new mount is a lot larger than the factory rubber one.
The clamshell on the stock mount is held together with 5 rivits you must drill out all of those with a 3/8" drill bit.
Once you drill those out you might have to tap out the remains of the 3 bottom rivits(these are hallow and slightly larger than 3/8". and the mount will seperate. The instructions tell you to heat the mounts up with a torch to get them seperated (witch will burn off the paint on the metal part of the mounts). I was able to just mearly pull on them and they came right off. There was a slight amount of rubber still on the mounts that I then needed to scrape off.
Once you get all the rubber off(big chuncks). You insert the new poly mounts into the stock clamshell and replace the rivits you drilled out with 5 bolts/nuts that are supplyed with the mounts. The bolts need to be torqued to 30 ft/lbs(per instructions). Once completly installed they will then look like this.
To install the new mounts I just repeated my uninstall procedure. Got the mount into position, bolted it to the block(4 bolts). Next comes the hard part. Lining up the mounts with the bracket that is bolted to the K-member. I had to raise and lower the motor and pry on the mount itself to get the hole to line up. I then had to beat the bolt through the hole with a hammer and thread on the nut. This part is very frustrating but it can be done.
Now that I had the drivers side completly done I moved on the the passenger side. The get access to the passenger side mount I had to remove the starter(2 bolts and 2 wires, very eas), and the ac compressor and the bracket holding it to the block. The ac is a lot easyer to remove than I would have expected. DO NOT remove the lines going to the ac unit or you will have to get it recharged. I just let it hang by the lines and supported the ac with a box to take stress off of the lines. once the ac is removed the mount is easily accessed.
Basically the passenger side is the same as the drivers. The passenger side seemed a lot easier for me to get on and off but took longer to line up the large bolt that goes from front to back. Once both mounts where installed I reinstalled the ac, starter, and alt. Put the two belts back on and connected the battery. Sorry I know this isn't a fully install(wasn't planning on doing one and didn't prepare for it at all) but hope this helps a little bit.
And a pic of me under the car while its up on ramps.
Oh yeah I also removed the front sway bar before doing the mounts. Not nessary(I don't think but might help on lowering the alt/ac.) I remember when I removed the alt before and I had to work it around the sway bar to get it out). I just removed it this time to help improve my launches.
-William
LS1 Tech Stories
The Best V8 Stories One Small Block at Time

Gas Monkey Built a 6-Wheel Ferrari Testarossa With a Corvette LT4 Engine
Verdad Gallardo
7 Most Reliable High-Performance Engines GM Has Ever Built
Verdad Gallardo
Amazing '71 Camaro Restomod Is Modern Muscle Car Under the Skin
Verdad Gallardo
6 Common C5 Corvette Failures and What's Involved In Repairing Them
Pouria Savadkouei
Retro Modern Bandit Pontiac Trans AM Comes With Burt Reynolds' Autograph
Verdad Gallardo
Top 10 Greatest Cadillac V Series Performance Models Ever, Ranked
Pouria Savadkouei
Top 10 Most Powerful Chevy Trucks Ever Made!

Hennessey's New Supercharged Silverado ZR2 Has 700 HP
Verdad Gallardo
Coachbuilt N2A Anteros Is an LS2-Powered C6 Corvette In Italian Clothes
Verdad Gallardo

TECH Veteran
Joined: Aug 2002
Posts: 4,055
Likes: 1
From: Hartsdale, NY
I have a set of poly motor mounts from Thunder that I have been meaning to install for over one year! I put the poly tranny mount in and it stopped the LT header banging so I have been reluctant to do the motor....
Do you think I could do the passenger side only in a few hours? 6 1/2 hours seems like a pain...
Do you think I could do the passenger side only in a few hours? 6 1/2 hours seems like a pain...
yeah I'm sure you could, the passenger side seems to be a lot easier to get to once the ac is removed. However I've noticed people only doing one side seem to do the drivers side. When I took mine off the drivers side was noticably more worn than the passenger side(also came off the clamshell a lot easier). Also like mark said if I were to do it again I would lift and support the rear of the car. Both motor mounts seemed to want the motor more forward when lining up and I think it was partial due to the front(only) being lifted and motor wanted to slide back a touch(not much) but enough to make it more difficult. We spent a lot of time just trying to line them up for the larger bolt to slip in.
-William
-William
 to SSDriver, hopefully my install will go this smooth when I begin this weekend. Thanks for the pics
Teching In
Joined: May 2004
Posts: 20
Likes: 0
Thanks for the pics!
I have a 02 Z06 that I have already bought the new mounts for. My mounts are round and look altogether different than these.
I haven,t had the time to do any work yet but this looks like a hand full.
Anyone else out there doing a vette? It looks like it could be even more fun!
I have a 02 Z06 that I have already bought the new mounts for. My mounts are round and look altogether different than these.
I haven,t had the time to do any work yet but this looks like a hand full.
Anyone else out there doing a vette? It looks like it could be even more fun!
Originally Posted by MW2 Performance
Next Billy (ssdriver) gets to help me throw them in my car! You're not gettin outa this one sucker hahaha
Huh!!! who are you???? Have I met you before?
lol j/k, I first have to get my car out of your driveway.
I did my prothane motor mounts about 3 weeks ago.. I am very pleased with the results. To give you all a better I dea of how much the motor doesnt move with these mounts>> I am running a TSP ORY tucked to less than One 1/4" off the bottom of my car in an M6 car.. I had to do It because I am running sortline springs. With the ORY tucked that close I have about 3" ground clearance and have scarping pipe issues. Of all the abuse I have had this car through, I havent heard the pipe hit the bottom of the car once. I did my prothane mounst during my header install.. I didnt take off anything but the stock manifolds and cats. Took me a little longer (9.5 hrs) but I didnt want to mess with the ac, sway bar, alt, ect ect.. I also took both of my mounts out trough the bottom.. IMO one of the better mods I have seen.
Great thread by the way.
Kenny
Great thread by the way.
Kenny