


ASP Pulley Gap
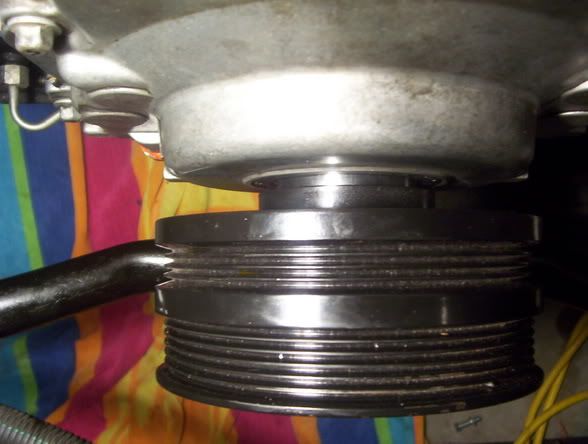
Installed the ASP pulley and I now have this gap. Got it torqued down to 240 lb ft. Then pushed it onto the block a little bit with the longer crank bolt. Then proceeded to get it as far back as it would go.
I installed a double roller chain as well. The ASP pulley is the new SFI approved one so I am almost certain it works with the double roller.
Anyway here is the pic :
Also when I took out the old crank bolt that I used to push the pulley on to the snout. A decent size of metal flakes came with it. But when I went to install the new bolt it threaded in perfectly. I am ok right? I did not **** the threads up then?
Looks ok to me. The instructions call for a 3/32" gap or so to the crankshaft from the face of the pulley if I remember correctly. Do you have such a gap? Do the belts look as though they are aligned? Were the flakes on the threads or just in the area. The ID of the pulley will flake as a result of being pressed onto the crank shaft. If you know that they came from threads, then do they look like the bolt material? If so, they may be from the old crank bolt. It looks like a good installation.
The belts do look like they will align just fine. Seem to be atleast.
Flakes came out on the old crank bolt mostly. I dont know really, doesnt look like bolt material to me. They are just really shinny. There not a ton of flakes, but it was enough to make me worry a bit. I mean the new crank bolt threaded without a single problem, tightened up perfect as well. So I am guessing the threads in the crank snout are fine.
Thanks for the help.
Looks good to me too, that's how mine looks. I would't worry about the flakes too much if the new bolt went in without a problem. It looks like you have your hands full with a heads/cam and exhaust install going on. Just take it slow and it will all go fine. 
I see the timing cover is already bolted down to the block. I hope you seated the pulley before torquing down the bolts for the timing cover, if not the pulley might not be centered in the front main seal and it could cause you to leak oil once the car is running. Since it's all done, just keep an eye on that spot once you start her up again.
I see the timing cover is already bolted down to the block. I hope you seated the pulley before torquing down the bolts for the timing cover, if not the pulley might not be centered in the front main seal and it could cause you to leak oil once the car is running. Since it's all done, just keep an eye on that spot once you start her up again.
Hey! whats up?
Yeah I left them all loose. I got them torqued down after I was done scewing around with the pulley.
Yeah so far everything is going really good. Just finishing up bolting down the heads right now. It should be done by the end of the week. Mostly cause I am missing some stuff and still wating on some stuff to get here.
But yeah I know I could of never of done with this without LS1howto's instructions and yours guys help.
Hopefully she starts up and nothing blows up
Trending Topics
i just put mine on last week and looks the same also. i found the perfect balancer puller=the chrysler one worked perfect.5 minutes and it was off,heated the new one up and 5 more minutes the new one was on.atleast one thing i've done so far has went easy,my fast 90/90 combo was alittle rougher,i broke the coolant block off plate bolt behind the intake,no fun whatsoever.
LS1 Tech Stories
The Best V8 Stories One Small Block at Time

6 Common C5 Corvette Failures and What's Involved In Repairing Them
Pouria Savadkouei
Retro Modern Bandit Pontiac Trans AM Comes With Burt Reynolds' Autograph
Verdad Gallardo
Top 10 Greatest Cadillac V Series Performance Models Ever, Ranked
Pouria Savadkouei
Top 10 Most Powerful Chevy Trucks Ever Made!

Hennessey's New Supercharged Silverado ZR2 Has 700 HP
Verdad Gallardo
Coachbuilt N2A Anteros Is an LS2-Powered C6 Corvette In Italian Clothes
Verdad Gallardo
Awesome K5 Blazer Restomod Comes With C7 Corvette Power
Verdad Gallardo
10 Camaros You Should Never Buy

10 LS Engine Myths That Refuse to Die
Verdad Gallardo I have the same gap on mine. I to was worried about it when i first put it on. All the belts lined up perfect and have not had any come off. I've had it on for about 8 months now with many WOT's and 2 autocross events so it must be right.