

KRC Power Steering Pump Installation

Though this is on a 3rd Gen RX7 I figured that most of the steps will apply none the less.
Make sure that you remove the alternator as well so that you can have better access to the steering rack if you are doing this from above. Sorry about the crappy pictures but my friend has my digital camera so I was relegated to my phone�s camera.
The first thing that I did was to test fit the pump.

You will be using the long mounting screw from your stock LS1 pump on the passenger side and the short mounting screw on the driver side. You will not be using the extended mounting point on the GM bracket.
High Pressure Line Assembly:
With the pump mounted, measure out the length that you will need for the high pressure side power steering line. Once done, you will cut the line down to the appropriate length.
To put the hose ends on, the first thing you will need to do is slide the hose side of the fitting onto the line.
Next, you will separate the steel braids from the Teflon tubing.

After this you will need to push on the collar over the Teflon tube. Be careful not to crush the tubing because it can be a pain in the butt afterwards. The best way to do this is to push it against a flat surface such as a counter or wall.

Make sure that the Teflon tube is evenly pushed into the collar.
Next, slide the rest of the fitting into the Teflon hose.

Bring up the hose side of the fitting and begin assembly first using your hands and then moving to wrenches. Make sure that there is no more than 1/16 of an inch gap left.

Installation of Line & Pump
Next, remove the pump so that you have more room to play with in the engine bay.
Install the adapter onto the rack opening.

Once that has been accomplished, install the line and tighten accordingly.
After that has been completed you will re-install the alternator and KRC pump.
You can either loop the high pressure line over or under the pump. I chose to follow the stock line and go underneath the pump. The best way to tighten down the line on the pump is to use a ratchet and a crowfoot wrench end.

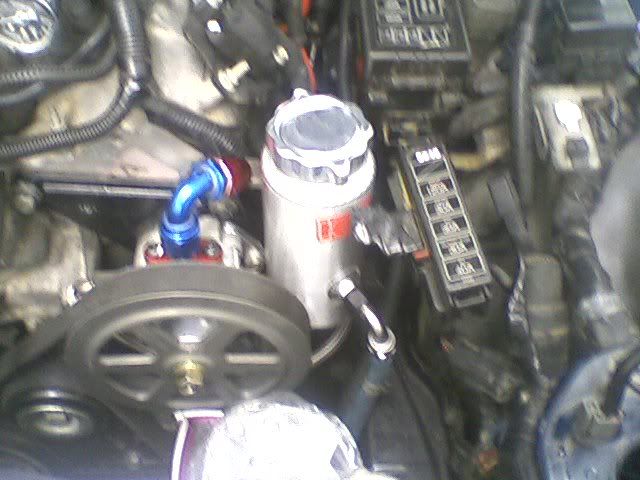
Reservoir Installation :
After you have installed the pump and high pressure line, it is time to mock up the location for the reservoir. I chose the universal reservoir for my application. Make sure that the level of the fluid will be at least 2 inches above the pump inlet.

After you are comfortable with the location, cut your line and install your hose ends.


Once done, install the line and reservoir onto the pump and secure the reservoir how you see fit.
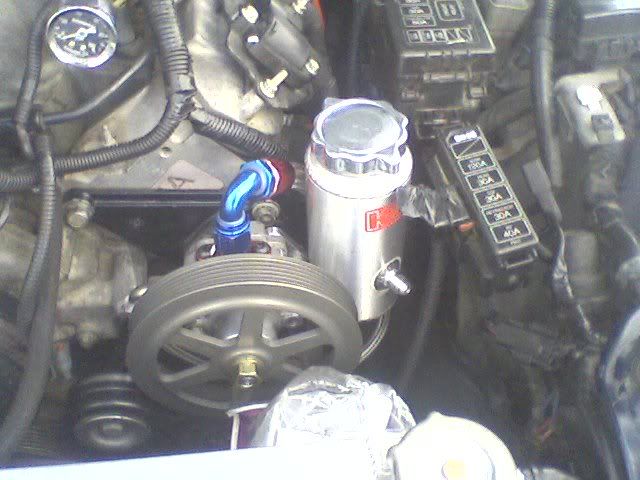
Finally,
Attach the return hose to the reservoir and fill. I had already installed my return hose from the stock LS1 pump and the length was fine for this one.
Make sure that you remove the alternator as well so that you can have better access to the steering rack if you are doing this from above. Sorry about the crappy pictures but my friend has my digital camera so I was relegated to my phone�s camera.
The first thing that I did was to test fit the pump.
You will be using the long mounting screw from your stock LS1 pump on the passenger side and the short mounting screw on the driver side. You will not be using the extended mounting point on the GM bracket.
High Pressure Line Assembly:
With the pump mounted, measure out the length that you will need for the high pressure side power steering line. Once done, you will cut the line down to the appropriate length.
To put the hose ends on, the first thing you will need to do is slide the hose side of the fitting onto the line.
Next, you will separate the steel braids from the Teflon tubing.
After this you will need to push on the collar over the Teflon tube. Be careful not to crush the tubing because it can be a pain in the butt afterwards. The best way to do this is to push it against a flat surface such as a counter or wall.
Make sure that the Teflon tube is evenly pushed into the collar.
Next, slide the rest of the fitting into the Teflon hose.
Bring up the hose side of the fitting and begin assembly first using your hands and then moving to wrenches. Make sure that there is no more than 1/16 of an inch gap left.
Installation of Line & Pump
Next, remove the pump so that you have more room to play with in the engine bay.
Install the adapter onto the rack opening.
Once that has been accomplished, install the line and tighten accordingly.
After that has been completed you will re-install the alternator and KRC pump.
You can either loop the high pressure line over or under the pump. I chose to follow the stock line and go underneath the pump. The best way to tighten down the line on the pump is to use a ratchet and a crowfoot wrench end.
Reservoir Installation :
After you have installed the pump and high pressure line, it is time to mock up the location for the reservoir. I chose the universal reservoir for my application. Make sure that the level of the fluid will be at least 2 inches above the pump inlet.
After you are comfortable with the location, cut your line and install your hose ends.
Once done, install the line and reservoir onto the pump and secure the reservoir how you see fit.
Finally,
Attach the return hose to the reservoir and fill. I had already installed my return hose from the stock LS1 pump and the length was fine for this one.


I've got a leak with my pump.. think that the nut that goes into the top of the pump needs to be tightened.. either that or its blown the tub off the bottom..
I'm trying to avoid taking my pump off because I'm away from home and have absolutely no tools here..
Can you tell me what size nut that is going from the top of the pump down to the rack?? Thanks
EDIT: Very nice setup by the way... Love your car
I'm trying to avoid taking my pump off because I'm away from home and have absolutely no tools here..
Can you tell me what size nut that is going from the top of the pump down to the rack?? Thanks
EDIT: Very nice setup by the way... Love your car
Total for everything you are looking at about $470.00 but I think it is well worth it.
Not sure what you are talking about in terms of the size of the nut?
The feed line is -10AN
The pressure line is -6AN
The only other thing is the adapter from -6AN to the Mazda rack.
I've got a leak with my pump.. think that the nut that goes into the top of the pump needs to be tightened.. either that or its blown the tub off the bottom..
I'm trying to avoid taking my pump off because I'm away from home and have absolutely no tools here..
Can you tell me what size nut that is going from the top of the pump down to the rack?? Thanks
EDIT: Very nice setup by the way... Love your car
I'm trying to avoid taking my pump off because I'm away from home and have absolutely no tools here..
Can you tell me what size nut that is going from the top of the pump down to the rack?? Thanks
EDIT: Very nice setup by the way... Love your car
Not sure what you are talking about in terms of the size of the nut?
The feed line is -10AN
The pressure line is -6AN
The only other thing is the adapter from -6AN to the Mazda rack.


