


How clean does head gasket surface need to be?
Thread Starter
TECH Apprentice
iTrader: (24)
Joined: Dec 2008
Posts: 315
Likes: 1
From: Fort Wayne, Indiana
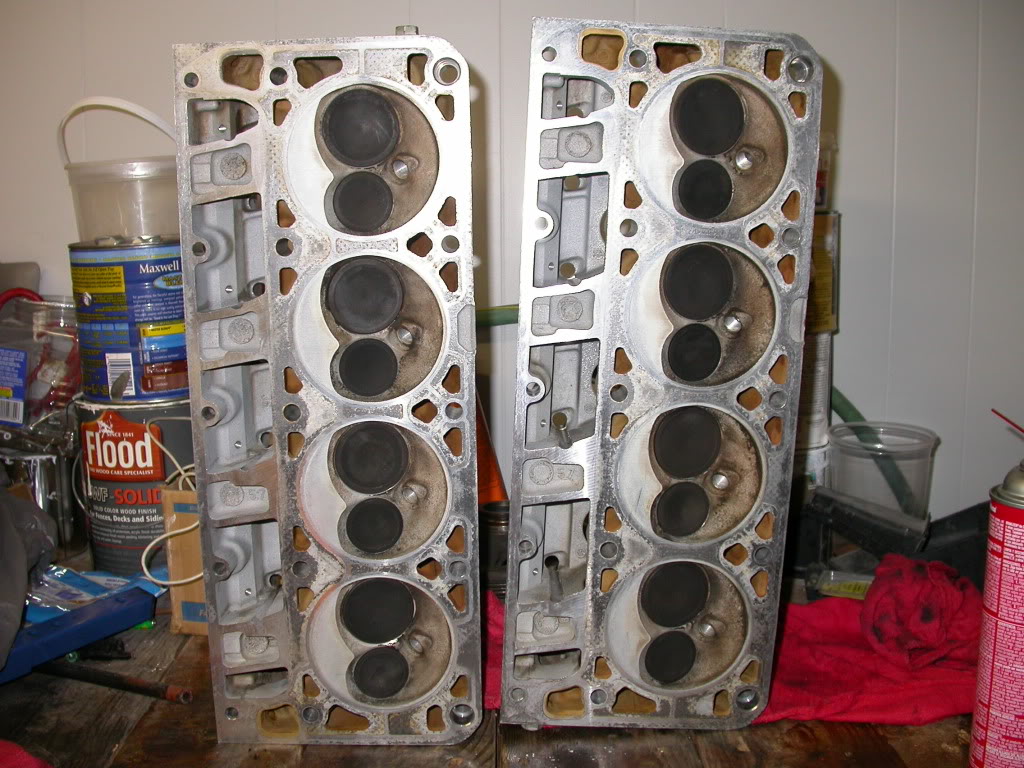
I'm cleaning my heads/block where the gaskets go and I'm wondering how clean it has to be. I've been at it for about an hour now on only the heads, and am wondering if this is enough. I used a plastic ice scraper and brake cleaner. If it needs to be cleaner, any tips on how to do it? Nothing more is comming off with the scraper and cleaner and it is smooth to the touch.
Trending Topics
Thread Starter
TECH Apprentice
iTrader: (24)
Joined: Dec 2008
Posts: 315
Likes: 1
From: Fort Wayne, Indiana
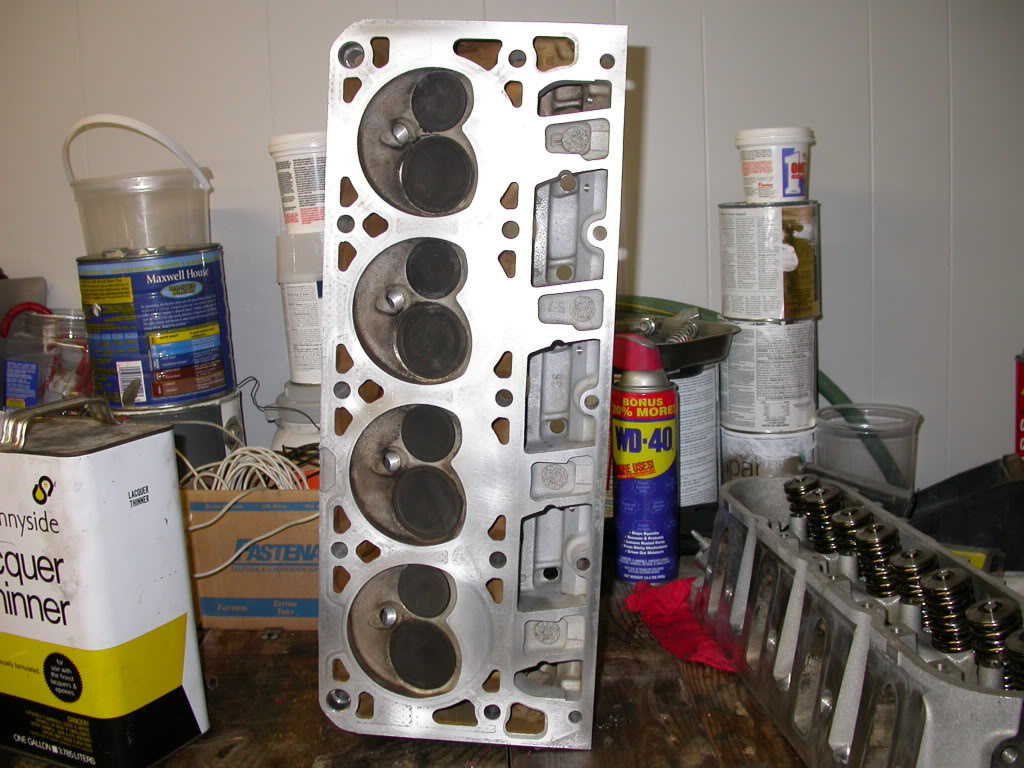
Alright, I went back out there with a razor blade, scotchbrite pad, lacquer thinner, and patience and was able to get one of the heads this clean. If this isn't good enough then I don't know what could be short of getting them decked. Thanks for your help guys, Happy New Years!
LS1 Tech Stories
The Best V8 Stories One Small Block at Time

6 Common C5 Corvette Failures and What's Involved In Repairing Them
Pouria Savadkouei
Retro Modern Bandit Pontiac Trans AM Comes With Burt Reynolds' Autograph
Verdad Gallardo
Top 10 Greatest Cadillac V Series Performance Models Ever, Ranked
Pouria Savadkouei
Top 10 Most Powerful Chevy Trucks Ever Made!

Hennessey's New Supercharged Silverado ZR2 Has 700 HP
Verdad Gallardo
Coachbuilt N2A Anteros Is an LS2-Powered C6 Corvette In Italian Clothes
Verdad Gallardo
Awesome K5 Blazer Restomod Comes With C7 Corvette Power
Verdad Gallardo
10 Camaros You Should Never Buy

10 LS Engine Myths That Refuse to Die
Verdad Gallardo
That looks great!
Most folks dont have the patience to get them to that level.
Now on the bad side of things.....
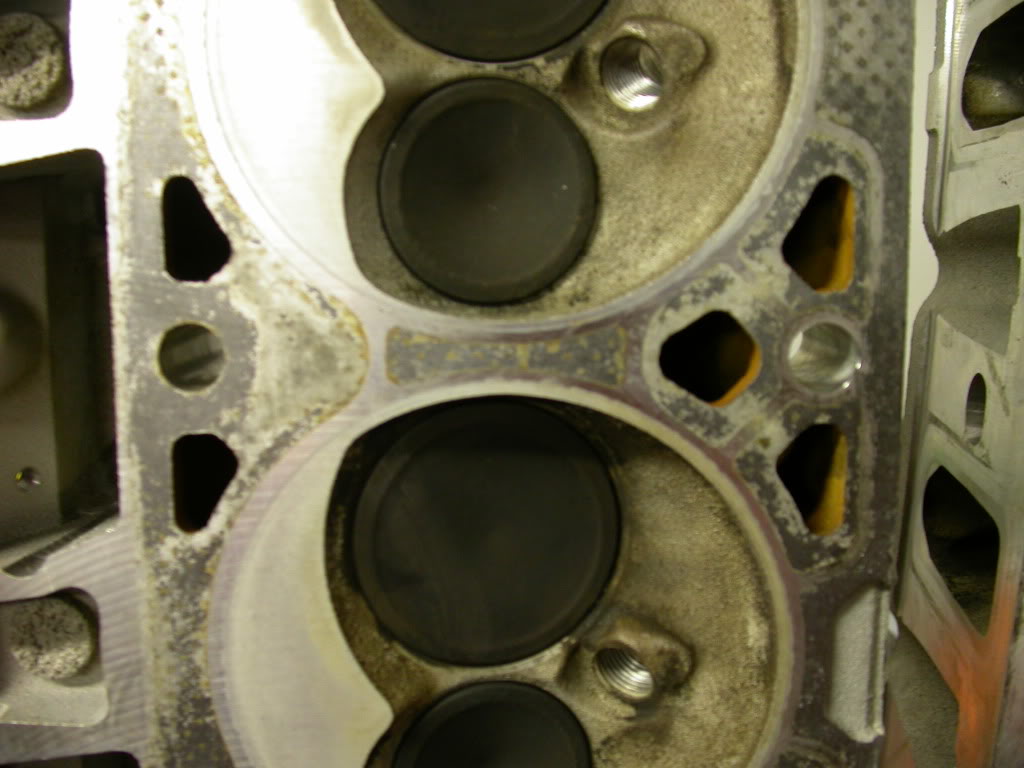
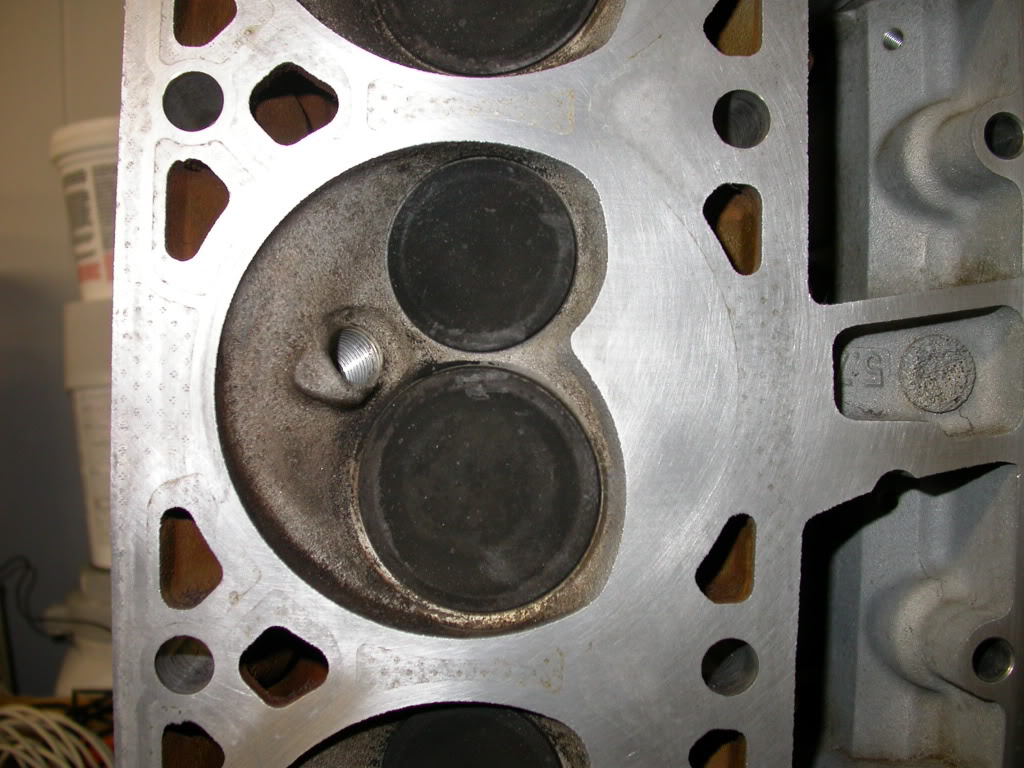
A properly surfaced aluminum head had a "tooth" to the finish to assist in head gasket retention. You can usually "feel" this with your fingernails.
The very best head gasket sealing situation is a freshly decked block with freshly milled heads.
You've polished the head surface a bit. you will also polish the block surface by doing this same level of clean up to the block.
However, you have gotten it DAMN clean without seriously degrading the surface (some original machining marks are still evident). Finish up the carbon on and around the valves and that head looks ready to install.
Nice work!
Suggestion for retaining as much of the original surface tooth as possible.
Drag the razor backwards holding the blade almost upright. Change blades OFTEN. I'd burn up 5-8 blades per head. As soon as the razor gets "nicked" it will start to leave it's own scratches in the surface. Lite use of WD40 works nicely for a "cutting" lubrucant.
Anything that uses a "sanding" motion degrades the surface. Often you have no choice and have to use this method on sections. Use it as little as possible.
If you do end up using a powered sander you have to keep it perfectly level on the surface. Not a good idea and not easy IMO. (It is fast)
Do you have a really accurate straight edge? You need one (or take it to a machine shop and have straightness checked).
And finally, having a fresh mill on the head certainly is the better choice and it's a buttload easier to do.
Most folks dont have the patience to get them to that level.
Now on the bad side of things.....
A properly surfaced aluminum head had a "tooth" to the finish to assist in head gasket retention. You can usually "feel" this with your fingernails.
The very best head gasket sealing situation is a freshly decked block with freshly milled heads.
You've polished the head surface a bit. you will also polish the block surface by doing this same level of clean up to the block.
However, you have gotten it DAMN clean without seriously degrading the surface (some original machining marks are still evident). Finish up the carbon on and around the valves and that head looks ready to install.
Nice work!
Suggestion for retaining as much of the original surface tooth as possible.
Drag the razor backwards holding the blade almost upright. Change blades OFTEN. I'd burn up 5-8 blades per head. As soon as the razor gets "nicked" it will start to leave it's own scratches in the surface. Lite use of WD40 works nicely for a "cutting" lubrucant.
Anything that uses a "sanding" motion degrades the surface. Often you have no choice and have to use this method on sections. Use it as little as possible.
If you do end up using a powered sander you have to keep it perfectly level on the surface. Not a good idea and not easy IMO. (It is fast)
Do you have a really accurate straight edge? You need one (or take it to a machine shop and have straightness checked).
And finally, having a fresh mill on the head certainly is the better choice and it's a buttload easier to do.

Dremel makes a plastic wire wheel now that will work wonders especially with a variable speed Dremel. I used a angle grinder with a roloc disk. Some people say you can eat up the aluminum with those but I will say from personal experience you would have to be a ra-tard and holding it in one spot for about 1 hour. It's going to take some work to get plastic to gouge aluminum any day of the week. It is a messy process but your heads and your block will be spotless and flat in about 10 minutes total time. BTW those heads look good for doing it by hand good job!
Careful with acetone, it is easily absorbed through the skin and can cause some serious health issues. Were gloves. Gasket remover is an acid, you are well beyond its use now.

Be extremely careful if your using roloc stuff.
In a production enviroment (ie: wrenching for a living which I did for 20+ years) roloc is a LIFESAVER regarding time. I bet I've burned up 500+ fiber discs and 10+ of the rubber finger style (both the greens and the yellows, they used to be sort of expensive). Only way to go if speed is your main concern. Works great for wrenching on grocery getters. I've used them for years. Discs were a bi-weekly purchase when the wallet-vampire (tool dealer) showed up.
However I've also proven to myself that it is easy to screw up an aluminum surface using a high-speed rotating tool. The problem comes from the fact that you need to keep the cutting surface parallel to the surface being cleaned and if you don't give the disc some "lead" angle it will chatter. The normal "screw up" is that the edges of your casting receive more material removal than the centers. This means that the critical fire ring area of a cylinder head has less "crush" than the surrounding areas. This is not good for the long run.
If the tool you are using ends up smoothing the original (almost microscopic) toothed surface it is removing aluminum from the head.
The plastic finger discs remove less material than the fiber discs but they all remove some aluminum.
You can screw up an aluminum casting in seconds using the fiber discs incorrectly. The plastic finger style reduce this tendancy but doesn't eliminate it.
On iron/steel the discs are far less of an issue.
Another note is that the discs quicky erase the gasket print on the cylinder head. I look at this closely after cleaning. Sometimes you can "see" problems in this print that cause you to have the head surfaced.
I've tried chemical gasket remover but it was not worth the mess IMO and some (maybe most) removers are corrosive to the aluminum.
When quality of repair is more important than speed of repair I try not to use power tools.
Proper surface finish feels more like a chalk board using your fingernails.
Too smooth feels like glass.

Make sure you take a an old head bolt and grind two or three slots all the way donw the threads. Kinda like a thread tap. Take that bolt and run it all te way down into the bolt holes in the block. To this a couple times for each hole. Then take long q-tips and get all the fluid out of them two. Make sure you do this real good. Torque to yield bolt have funky torque procedures that can make this step a real nightmare if those bolt holes are not real clean. Every thing has to be super clean in there. I am using cometic gaskets and it says to install on freshly surfaced decks only. I used a razor scraper " very, very carefully. And just some chemicals to wipe it down. They have been on a year with no prolems. Even with a 125 shot. As far as the heads go they look pristine. Excellent work on those. DONE!!

Staging Lane
Joined: Sep 2005
Posts: 54
Likes: 0
What if the surface is still gasket colored but feels flat and smooth everywhere? That is where I am at with mine! I have probably 3 to 4+ hours in my deck surface, started with a scraper then razor blade and brake clean.
Make sure you take a an old head bolt and grind two or three slots all the way donw the threads. Kinda like a thread tap. Take that bolt and run it all te way down into the bolt holes in the block. To this a couple times for each hole. Then take long q-tips and get all the fluid out of them two. Make sure you do this real good. Torque to yield bolt have funky torque procedures that can make this step a real nightmare if those bolt holes are not real clean. Every thing has to be super clean in there. I am using cometic gaskets and it says to install on freshly surfaced decks only. I used a razor scraper " very, very carefully. And just some chemicals to wipe it down. They have been on a year with no prolems. Even with a 125 shot. As far as the heads go they look pristine. Excellent work on those. DONE!!
Your making a poor mans "thread chaser" that way.
It is imperative to have perfectly clean threads on any fastener that is set to a specific torque.
Use the afore mentioned dremel with one of the cutoff wheels. Make the slots so the walls of the slot are at 90 degrees to the surface of the bolt, Your making a set of "scrapers" out of the threads themselves. Nice sharp tips are better.
Leave nothing in the bolt holes. Air blow tip is the easiest way to get remnents out.
You can use any chemical you want for cleaning, most are not good for your skin. Nitrile gloves are what I use, the blue ones.
For the final cleaning just moments before installing the head I'll apply rubbing alcohol and blow tip it dry. Leaves no residue.
Be extremely careful if your using roloc stuff.
In a production enviroment (ie: wrenching for a living which I did for 20+ years) roloc is a LIFESAVER regarding time. I bet I've burned up 500+ fiber discs and 10+ of the rubber finger style (both the greens and the yellows, they used to be sort of expensive). Only way to go if speed is your main concern. Works great for wrenching on grocery getters. I've used them for years. Discs were a bi-weekly purchase when the wallet-vampire (tool dealer) showed up.
However I've also proven to myself that it is easy to screw up an aluminum surface using a high-speed rotating tool. The problem comes from the fact that you need to keep the cutting surface parallel to the surface being cleaned and if you don't give the disc some "lead" angle it will chatter. The normal "screw up" is that the edges of your casting receive more material removal than the centers. This means that the critical fire ring area of a cylinder head has less "crush" than the surrounding areas. This is not good for the long run.
If the tool you are using ends up smoothing the original (almost microscopic) toothed surface it is removing aluminum from the head.
The plastic finger discs remove less material than the fiber discs but they all remove some aluminum.
You can screw up an aluminum casting in seconds using the fiber discs incorrectly. The plastic finger style reduce this tendancy but doesn't eliminate it.
On iron/steel the discs are far less of an issue.
Another note is that the discs quicky erase the gasket print on the cylinder head. I look at this closely after cleaning. Sometimes you can "see" problems in this print that cause you to have the head surfaced.
I've tried chemical gasket remover but it was not worth the mess IMO and some (maybe most) removers are corrosive to the aluminum.
When quality of repair is more important than speed of repair I try not to use power tools.
Proper surface finish feels more like a chalk board using your fingernails.
Too smooth feels like glass.
In a production enviroment (ie: wrenching for a living which I did for 20+ years) roloc is a LIFESAVER regarding time. I bet I've burned up 500+ fiber discs and 10+ of the rubber finger style (both the greens and the yellows, they used to be sort of expensive). Only way to go if speed is your main concern. Works great for wrenching on grocery getters. I've used them for years. Discs were a bi-weekly purchase when the wallet-vampire (tool dealer) showed up.
However I've also proven to myself that it is easy to screw up an aluminum surface using a high-speed rotating tool. The problem comes from the fact that you need to keep the cutting surface parallel to the surface being cleaned and if you don't give the disc some "lead" angle it will chatter. The normal "screw up" is that the edges of your casting receive more material removal than the centers. This means that the critical fire ring area of a cylinder head has less "crush" than the surrounding areas. This is not good for the long run.
If the tool you are using ends up smoothing the original (almost microscopic) toothed surface it is removing aluminum from the head.
The plastic finger discs remove less material than the fiber discs but they all remove some aluminum.
You can screw up an aluminum casting in seconds using the fiber discs incorrectly. The plastic finger style reduce this tendancy but doesn't eliminate it.
On iron/steel the discs are far less of an issue.
Another note is that the discs quicky erase the gasket print on the cylinder head. I look at this closely after cleaning. Sometimes you can "see" problems in this print that cause you to have the head surfaced.
I've tried chemical gasket remover but it was not worth the mess IMO and some (maybe most) removers are corrosive to the aluminum.
When quality of repair is more important than speed of repair I try not to use power tools.
Proper surface finish feels more like a chalk board using your fingernails.
Too smooth feels like glass.
I would look into the Dremel option the discs are cheaper and smaller than Roloc(1.5 inches diameter with two rows of plastic bristles) With a variable speed Dremel you can better control how much material you are removing. Setting the tool on 4 or 5 should get enough rpm to remove gunk or any leftover graphite but soft enough to not gouge the aluminum even with extended time in one spot.
I bought two white Roloc discs for $30 at Napa with the other needed hardware. You can get away with one disc for both heads and the block on maybe 2 or 3 cars in reality. I got two because I always like having extra crap just in case.
Also make damn sure your bolt holes are cleaned out otherwise you'll crack the block when you torque them down. I usually just hold a rag over the hole and blow it out with compressed air