


Build Thread: 376ci Iron Block
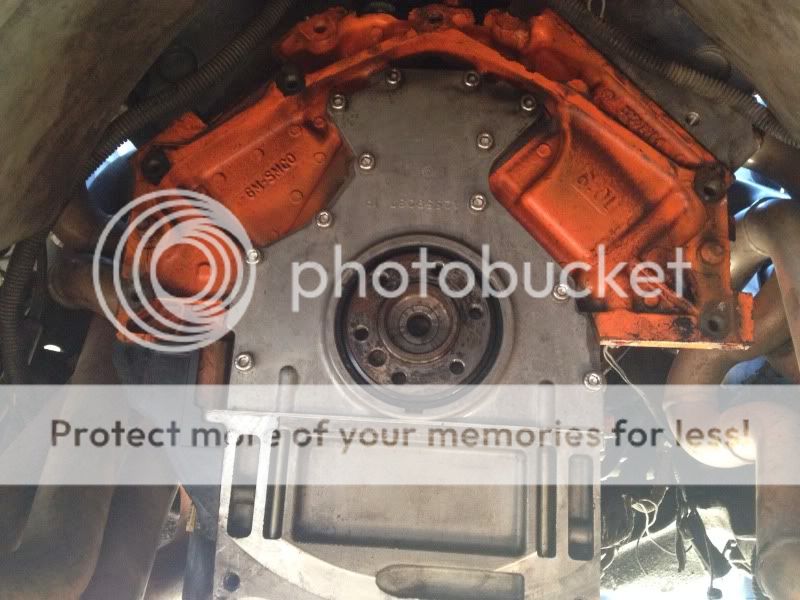
Finally got the time to get the clutch out. The flywheel doesn't look too bad, but the pressure plate definitely looks smoked. Nice ring of clutch dust on the block too.


Last edited by KCS; Oct 23, 2014 at 04:22 PM.

TECH Regular
Joined: Feb 2012
Posts: 442
Likes: 0
Great build. Similar to the setup I'm building now. I have a bored over 6.0 block with ls 3 pistons also. Instead of the 24 heads I'm doing the ls 3 heads and custom cam from Brian tooley. Should never a beast like yours :-)
I changed the oil and filter a couple times and it didn't really look like there was anything in the filter. I used a magnet and got all the large pieces out of the oil pan, so I think it's actually going to be okay. I'm just going to roll with it and see what happens.
We did a pull in another gear and the torque held out to 5500, but it was lower across the board since it wasn't 1:1 anymore. 430ft-lbs at 5500 RPM would be 450whp, so depending on how the torque falls off after that will determine if peak power is actually any higher than that or not.
Honestly, I'd the thrilled with 450whp through the LS1 intake. I have a FAST 78mm intake and throttle body I got for stupid cheap, so that will go on eventually.
Honestly, I'd the thrilled with 450whp through the LS1 intake. I have a FAST 78mm intake and throttle body I got for stupid cheap, so that will go on eventually.
LS1 Tech Stories
The Best V8 Stories One Small Block at Time

6 Common C5 Corvette Failures and What's Involved In Repairing Them
Pouria Savadkouei
Retro Modern Bandit Pontiac Trans AM Comes With Burt Reynolds' Autograph
Verdad Gallardo
Top 10 Greatest Cadillac V Series Performance Models Ever, Ranked
Pouria Savadkouei
Top 10 Most Powerful Chevy Trucks Ever Made!

Hennessey's New Supercharged Silverado ZR2 Has 700 HP
Verdad Gallardo
Coachbuilt N2A Anteros Is an LS2-Powered C6 Corvette In Italian Clothes
Verdad Gallardo
Awesome K5 Blazer Restomod Comes With C7 Corvette Power
Verdad Gallardo
10 Camaros You Should Never Buy

10 LS Engine Myths That Refuse to Die
Verdad Gallardo I had the SLP 1-3/4" headers, y-pipe, and Loudmouth exhaust, but I'm swapping the headers and y-pipe out for OBX. The SLP's had horrible ground clearance and were getting beat up pretty bad, so I'm hoping the OBX's are better.
I've finally started to make time to work on the car again. I was working on replacing the 241 heads that are on there now with a big valve 243 head, but have since shelved that idea and just decided to go with a cleaned up 243 head. I have a lot of work to do to get the car running again, so I farmed out the machine work to a local machine shop that has always done pretty well by my standards. When I dropped off the heads, we went over what I wanted done, which was a three angle valvejob with an additional 75 degree bowl cut, grind the valves with a 30 degree backcut, and skim cut the heads for flatness. This update will show what's new with my build, but also show a little bit about how to check a set of heads whether they're new, refurbished, or right from a junkyard.
When I got my cleaned and freshly machined cylinder heads back, the first thing I did was disassemble them. I didn't ask them to assemble the heads, so I was curious why they assembled them since they knew I was going to clean up the ports and use different springs. It didn't take long to realize I did not get what I asked for. This is what the valve job looks like on the 243 heads I just got back:

This is what it should have looked like, as seen on the 241 heads on my car now:
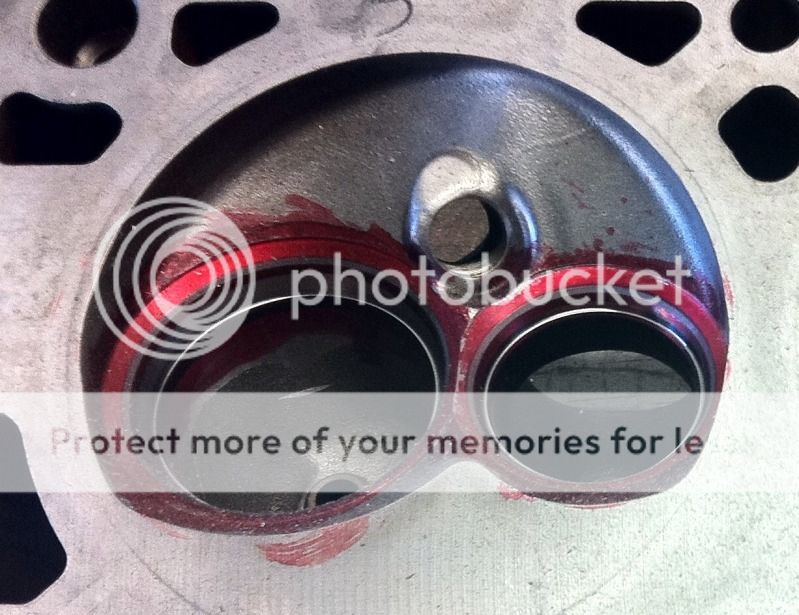
It may be hard to tell from the pictures, but there are only three angles to the valve job and no 75 degree bowl cut like I had asked for. The valve job I asked for are actually two different specific profiles, one for the exhaust and one for the intake, but they both have the same seat width of .040". The seat width of the exhaust is obviously much larger than the intake as seen by the ring from lapping the valves. The top cut is not as wide as it should have been either, and there is no backcut to the valves. I'm just going to move forward with it anyways, rather than to hassle with having it redone correctly.
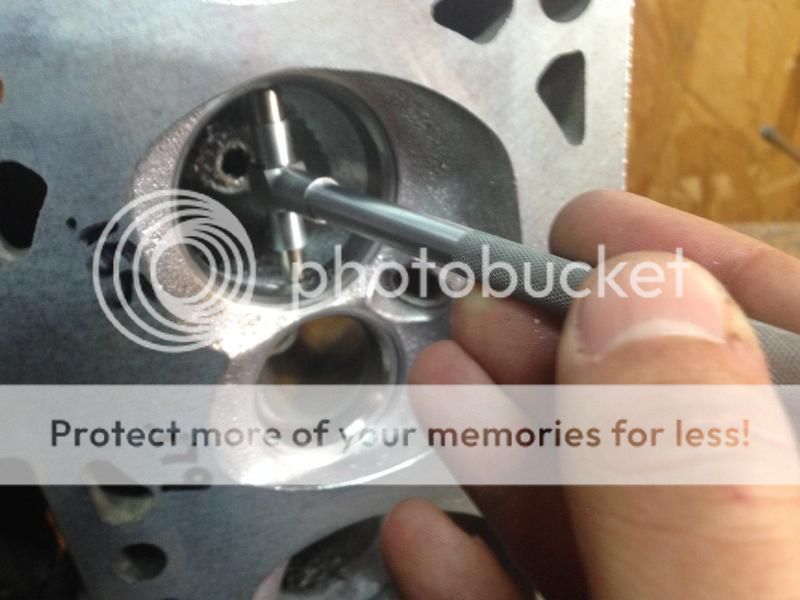
This finding ruined my confidence with the shop that did the work, so the next thing was to check the valve drop. I've seen a few different definitions of valve drop and how to measure it, so this is how I learned to check it. This should be pretty close from one valve to another, but the intakes and exhausts should differ since the valves are different sizes and often have different thicknesses or margins. I use a deck bridge with an indicator installed and zero it out on the deck surface of the head.
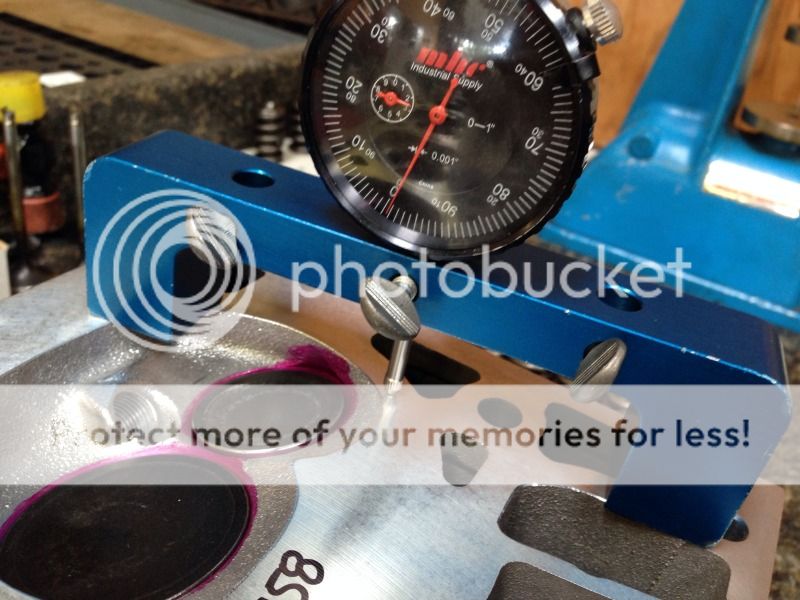
Then I run the indicator over the valve and sweep around the OD until I find the break over which should give you the shortest measurement. In this picture you can see I'm getting .173" on the exhaust and .158" on the intake.
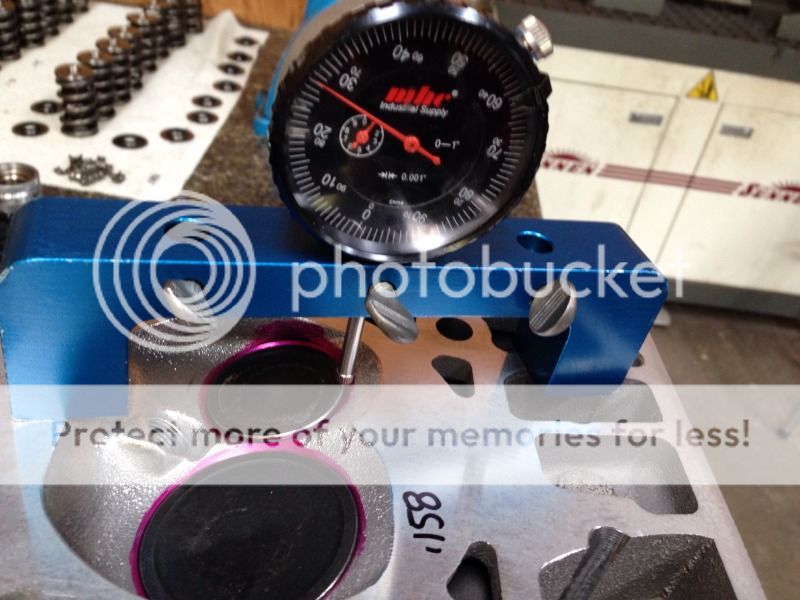
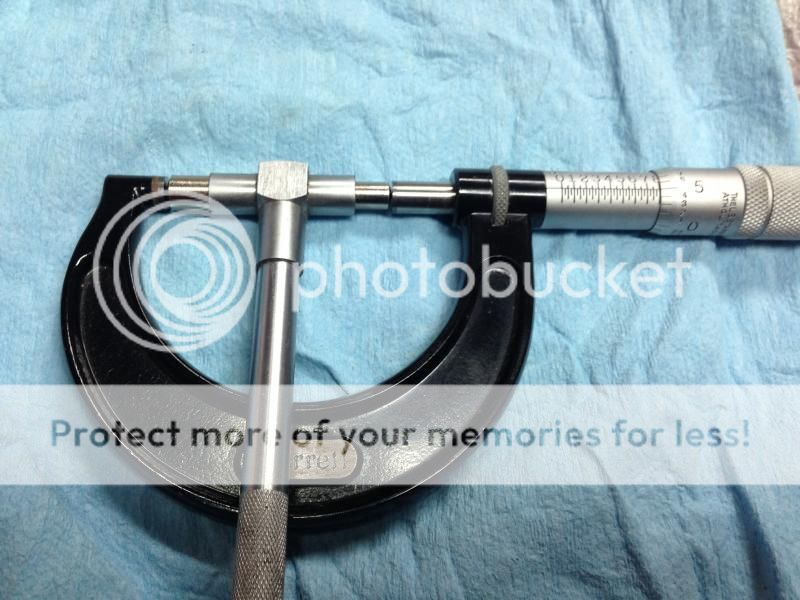
Moving on, I needed to check the installed heights. Most people won't check every single valve, but I do. I plan on using a conical spring with the original retainer, so I had to make sure to use an Installed Height Micrometer that was compatible with the super small retainers. The one I use is a normal mic for larger springs, however a machined ring has been installed to reduce the ID of the mic to fit the smaller retainer:
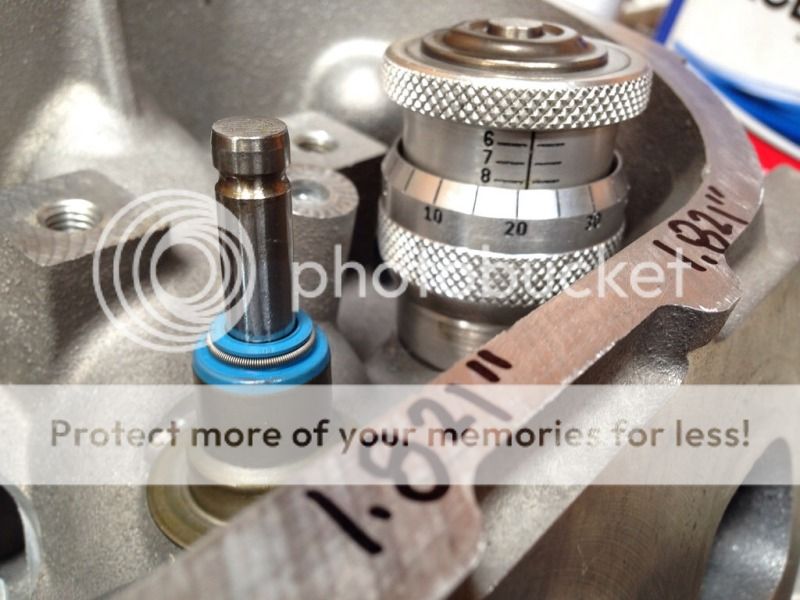
As you can see, the installed heights are a little over 1.82", which in my instance and with the springs I'm using, I'm okay with that. If I wanted to shim the springs up and get the spring closer to coil bind at full lift, I would have to remove the seals and seats (which the machine shop installed), add shim under the seats, and reinstall and recheck everything. This would also increase spring pressure at the closed and open positions, which I don't really need anyways.
The last thing I'm going to measure is chamber volume. I figured that cutting the valve job would increase the chamber volume a little bit, but cutting the deck would bring it back down at least close to what it was. The only way I'd know for sure, however, is to check it. For this I set the heads upside down on a cylinder head stand and install the valves and retainers with checker springs and also install a spark plug. A plexiglass plate is placed over the chamber, sealed with a grease to prevent leaks, and a small hole drilled for the water to be delivered from the burette into the chamber:

Once the chamber is full of water and all of the air bubbles are out, the burette will show how much water was displaced from the 100cc starting point. In this chamber, it took 65.2cc, which will bump my compression up from 11:1 to 11.5:1.
My next step is to work on the bowls and open up the throats like I did the old 241's that are on there now. I'll be working on that throughout this weekend with a goal to have these heads back together and on the car before November, at which point I can start breaking in the new clutch in preparation for a return trip to the dyno.
When I got my cleaned and freshly machined cylinder heads back, the first thing I did was disassemble them. I didn't ask them to assemble the heads, so I was curious why they assembled them since they knew I was going to clean up the ports and use different springs. It didn't take long to realize I did not get what I asked for. This is what the valve job looks like on the 243 heads I just got back:
This is what it should have looked like, as seen on the 241 heads on my car now:
It may be hard to tell from the pictures, but there are only three angles to the valve job and no 75 degree bowl cut like I had asked for. The valve job I asked for are actually two different specific profiles, one for the exhaust and one for the intake, but they both have the same seat width of .040". The seat width of the exhaust is obviously much larger than the intake as seen by the ring from lapping the valves. The top cut is not as wide as it should have been either, and there is no backcut to the valves. I'm just going to move forward with it anyways, rather than to hassle with having it redone correctly.
This finding ruined my confidence with the shop that did the work, so the next thing was to check the valve drop. I've seen a few different definitions of valve drop and how to measure it, so this is how I learned to check it. This should be pretty close from one valve to another, but the intakes and exhausts should differ since the valves are different sizes and often have different thicknesses or margins. I use a deck bridge with an indicator installed and zero it out on the deck surface of the head.
Then I run the indicator over the valve and sweep around the OD until I find the break over which should give you the shortest measurement. In this picture you can see I'm getting .173" on the exhaust and .158" on the intake.
Moving on, I needed to check the installed heights. Most people won't check every single valve, but I do. I plan on using a conical spring with the original retainer, so I had to make sure to use an Installed Height Micrometer that was compatible with the super small retainers. The one I use is a normal mic for larger springs, however a machined ring has been installed to reduce the ID of the mic to fit the smaller retainer:
As you can see, the installed heights are a little over 1.82", which in my instance and with the springs I'm using, I'm okay with that. If I wanted to shim the springs up and get the spring closer to coil bind at full lift, I would have to remove the seals and seats (which the machine shop installed), add shim under the seats, and reinstall and recheck everything. This would also increase spring pressure at the closed and open positions, which I don't really need anyways.
The last thing I'm going to measure is chamber volume. I figured that cutting the valve job would increase the chamber volume a little bit, but cutting the deck would bring it back down at least close to what it was. The only way I'd know for sure, however, is to check it. For this I set the heads upside down on a cylinder head stand and install the valves and retainers with checker springs and also install a spark plug. A plexiglass plate is placed over the chamber, sealed with a grease to prevent leaks, and a small hole drilled for the water to be delivered from the burette into the chamber:
Once the chamber is full of water and all of the air bubbles are out, the burette will show how much water was displaced from the 100cc starting point. In this chamber, it took 65.2cc, which will bump my compression up from 11:1 to 11.5:1.
My next step is to work on the bowls and open up the throats like I did the old 241's that are on there now. I'll be working on that throughout this weekend with a goal to have these heads back together and on the car before November, at which point I can start breaking in the new clutch in preparation for a return trip to the dyno.
Last edited by KCS; Oct 23, 2014 at 04:03 PM.

I would if I gave them a chance to fix it and they wouldn't. I understand things happen and can be miscommunicated within a shop, it happens all the time. I'm sure if I did bring the heads back, they would fix it without hesitating. I just have so little free time with work, driving back there to drop them off and pick them up again could be a big set back. I'm not even going to mess with it myself, I just want to get the car back together.
That's exactly my issue. If it's not their motor, very rarely will they do an exceptional job. Merely adequate or just good enough is the top level you can expect most of the time.

Exactly why I'm just going to go with a quality online builder like. TMS or TSP. Also why I want to learn how to build my own motors to this degree.
It's been a few months and I was curious how your build is progressing, especially since your using Comp 7228 conical springs . What is the lift on your 235/235 111+2 cam (or was it a 110 LSA) ? The 243s at the beginning of your thread; was that a broken guide ? How loose can a valve stem be in a PM guide before you would not run it ? Do you just pull the valve out 1/2", put a dial indicator on the margin and rock the valve back & forth ?
You said, " Melling M10296 oil pump was installed with the blue spring", what does the blue spring change ? Does the N-Motion single chain have the Torrington bearing behind the cam gear; I was thinking of using the Hex-a-Just 9-3153a without the bearing because of the low cost instead of the 9-3158A. Is this cheaping out in the wrong place ? What made you choose the Powerbond 25% underdrive pulley ?
What preload do you like to run with the LS7 lifter ?
Sorry for all the questions. Thank you for sharing with us and all the great pictures you posted. Looking forward to your numbers.
Oh no, I wish. A VGS-20 is like the industry standard for a seat and guide machine. You set up a head on there and you can perform a wide variety of different machining operations on it, most commonly valve jobs.
The lift is .598" on both the intake and exhaust.
Yep, the valve was bent and it broke three guides. I had to cut the valve in half to get them out. I think GM has a procedure to check since the issue with the LS7's became prevalent. IIRC, if the guide wiggles less than .0035", it's ok. Any more and it needs to be fixed.
The blue spring is the lower pressure spring, it allows the bypass to open at a lower pressure so I don't get such high oil pressure at higher RPM.
Yeah, the N-Motion set does have the torrington bearing. I personally would never use the Hex-a-Just. I've actually seen the little bushing get crushed so it seems to me to be a little more risky than I'd like.
I've seen them used a lot and never did anyone have a problem with them. The stock balancer broke so I had to replace it anyways and going with an underdrive is just easy power.
I think it was .060"-.080" IIRC. I'd have to look at my notes.
Thanks. I've made a little bit of progress grinding on the new heads. I've opened up the intake throats to 1.805" and just need to polish them a little with the cartridge rolls. I'm leaving the rest of the ports alone just like the 241 heads that are on there now.
Grinding away area below the valvejob.

Setting my snap gauge to 1.805"
Checking my progress as I remove material.
I've seen them used a lot and never did anyone have a problem with them. The stock balancer broke so I had to replace it anyways and going with an underdrive is just easy power.
I think it was .060"-.080" IIRC. I'd have to look at my notes.
Grinding away area below the valvejob.
Setting my snap gauge to 1.805"
Checking my progress as I remove material.

Staging Lane
Joined: May 2012
Posts: 52
Likes: 0
From: illinois
Great attention to detail I wish I had the knowledge to do my own machine work. Did you grind on the combustion chamber to deshroud the valves? I noticed in one of the pics a small area next to the valve it looks to have been machined. I am installing 243 heads on a sbe lq4 now and im curious if larger valves, or cutting the cumbustion chamber to deshroud the valves would be worth doing before i install them. It seems everyone has a different opinion on valve shrouding. I enjoy reading your build great job!
Great attention to detail I wish I had the knowledge to do my own machine work. Did you grind on the combustion chamber to deshroud the valves? I noticed in one of the pics a small area next to the valve it looks to have been machined. I am installing 243 heads on a sbe lq4 now and im curious if larger valves, or cutting the cumbustion chamber to deshroud the valves would be worth doing before i install them. It seems everyone has a different opinion on valve shrouding. I enjoy reading your build great job!
I like larger valves. The bigger the better. Some people don't agree with that and well, agree to disagree I guess. If you're wanting the most power for the dollar, I think a 2.02" intake valve is a good investment. I'm reusing the stock valves in the new heads only because I just want to get the Trans Am back together so I can focus on my other car. My other car is getting a set of Trickflows with a 2.165"/1.57" valve combo.
