


Oil Priming

On The Tree
Joined: Jul 2013
Posts: 132
Likes: 0
From: Augusta, GA
Fair enough, but most people really don't want to go chasing parts down to rig something up, and after you spend five to ten grand building an engine, what's another 79 bucks. And hey, you can get it and use it once then throw it on ebay, Ive done that plenty with tools.
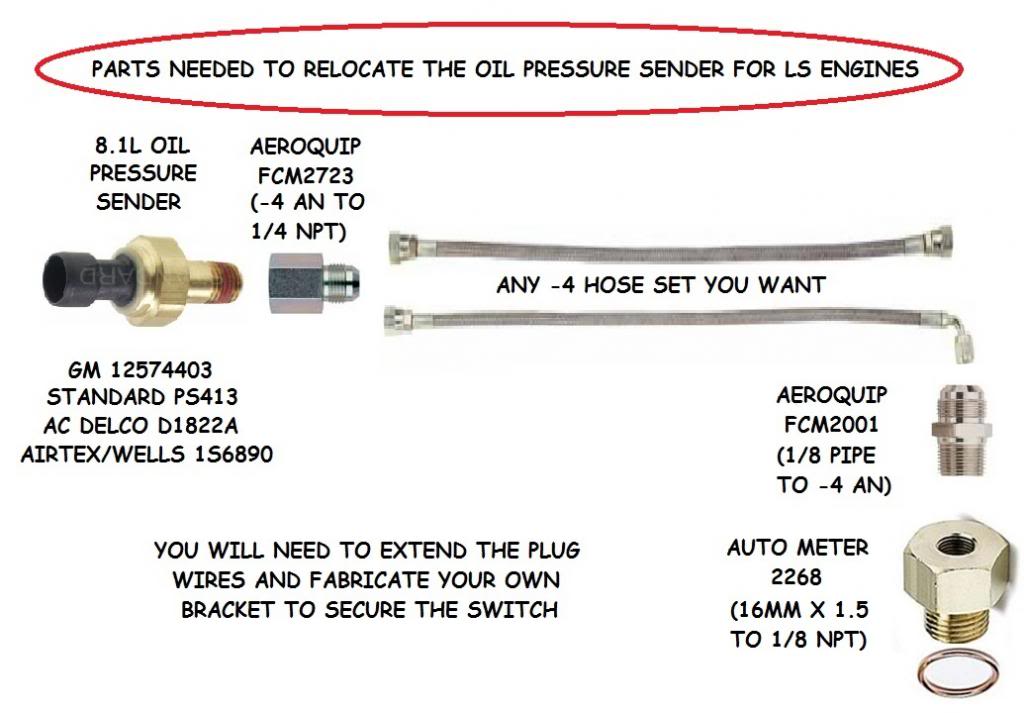
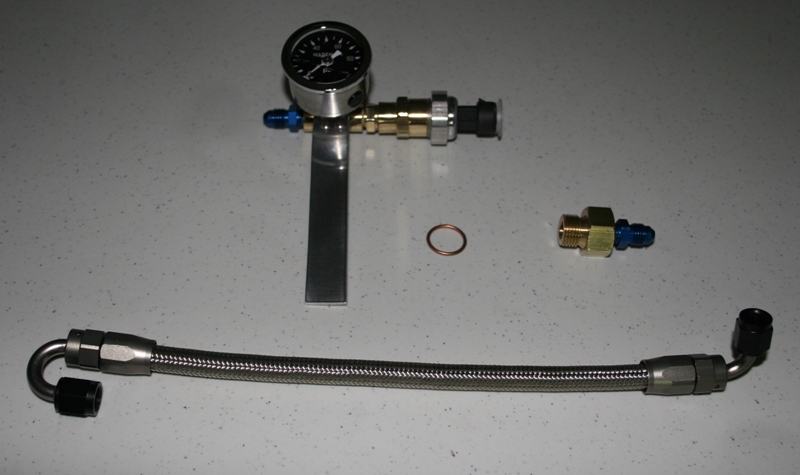
To re-locate your OPSU, you need to setup a kit like this. It's from a non-sponsor so I won't say who. You need an adapter from whatever the thread on the OPSU is to like -4 AN, a length of hose and an adapter back. The gauge shown is optional and not needed-unless you want it.
Mike Noonan's (the owner of EFI Connections) book about EFI stuff has a listing of oild pressure sending units and their thread sizes. I'll look up what's needed later after ''work''.
If there's a -4 socket to 16MM x 1.5 female adapter out there, this could be done using the original LS metric OPSU. That would save the 55 + bucks on the 8.1L unit.
If anybody finds this fitting, let me know.
If anybody finds this fitting, let me know.
LS1 Tech Stories
The Best V8 Stories One Small Block at Time

Topdon ONE vs. Artidiag 800 BT2: Which is the Diagnostic Tablet For You?
Pouria Savadkouei
Gas Monkey Built a 6-Wheel Ferrari Testarossa With a Corvette LT4 Engine
Verdad Gallardo
7 Most Reliable High-Performance Engines GM Has Ever Built
Verdad Gallardo
Amazing '71 Camaro Restomod Is Modern Muscle Car Under the Skin
Verdad Gallardo
6 Common C5 Corvette Failures and What's Involved In Repairing Them
Pouria Savadkouei
Retro Modern Bandit Pontiac Trans AM Comes With Burt Reynolds' Autograph
Verdad Gallardo
Top 10 Greatest Cadillac V Series Performance Models Ever, Ranked
Pouria Savadkouei
Top 10 Most Powerful Chevy Trucks Ever Made!

Hennessey's New Supercharged Silverado ZR2 Has 700 HP
Verdad Gallardo Very Interesting info here guys. My short block was assembled with moly lube, however I think that I will be going the hand pump route. Dont want a dry start up!!!
Last edited by Bama99z; Nov 17, 2013 at 01:10 PM.

Staging Lane
Joined: Dec 2013
Posts: 62
Likes: 0
For anyone that stumbles on this... On my LQ9, the port on the drivers side front of the block is a M16-1.5 thread. Just a FYI... This isn't a "I think mine is..." post, it literally is... I bought the part today and threaded it in by hand fully seated.
Going to pull the valve covers probably this weekend and give this a shot, I've got all the fittings in hand to knock it out...
Going to pull the valve covers probably this weekend and give this a shot, I've got all the fittings in hand to knock it out...
Last edited by sirhk100; Jul 30, 2014 at 09:41 AM.


you can turn it over with the starter for a few seconds at a time (ignition and fuel system disabled of course) until you get pressure then fire it up. Best is to use a pre lubber though. The one in the picture would work great and I like the inventiveness. I personally use the Kentmoore Pre Lubber (looks a lot like the one a few posts above).


TECH Addict
Joined: Mar 2013
Posts: 2,628
Likes: 30
I wnt to add a warning to this thread. If you build this DO NOT USE Teflon thread tape on the fitting. Go buy the liquid thread sealer or use nothing. That thread tape can cause ALOT of problems if even a tiny piece gets into the engine oil system. It is only for water systems.....don't say no one ever 4 warned you.

Old thread but good info here. Do you rotate the crank shaft during the priming process to lub all bearings for rod, crank, and cam? Im also assuming that the lifters will bleed oil onto the cam lobs as well.
I used the garden sprayer technique. I highly suggest using the port by the timing chain. If you dump oil into the oil pressure port, you are bypassing the filter (bad if there is a contaminate in your oil or pressure device.
The AN fitting and reducers are about $20 from Summit. M10-1.5 and -4 and -6 AN
Attachment 609367
Attachment 609368
The AN fitting and reducers are about $20 from Summit. M10-1.5 and -4 and -6 AN
Attachment 609367
Attachment 609368