
Wrong size bearings
 03-18-2014, 09:04 PM
#21
On The Tree
Join Date: Nov 2013
Location: Waterford, MI
Posts: 193
Likes: 0
Received 0 Likes
on
0 Posts
Interesting that this has come up, I'm using the same bearings but I'm having an issue with the ID being wrong, the Id on the bearing is .01 smaller on the bearing than the cam so the cam wont even fit inside the bearing
Edit I'm actually using clevite
SH1814S
Edit I'm actually using clevite
SH1814S
Last edited by I-H8-RICE; 03-18-2014 at 09:10 PM.

 03-21-2014, 09:45 AM
#23

Yep, bizarre indeed. My local machinist didn't order any Clevite SH1814S, just another damn set of CH-10s. The other set is still too large. My theory is that these are for the 5.3 cast iron blocks, not the aluminum 5.7s......
I have an order in for some Federal Mogul (aka Sealed Power) 1888M bearings and I'll get them tomorrow morning. I'll measure them when I pick them up to be sure and I'll let y'all know.
I have an order in for some Federal Mogul (aka Sealed Power) 1888M bearings and I'll get them tomorrow morning. I'll measure them when I pick them up to be sure and I'll let y'all know.
03-21-2014, 11:10 AM
#24

CH-10's are for the 1st gen LS1 blocks and CH-23's are for the LS2, 2nd gen LS1 blocks and iron blocks. You have the correct bearings for your motor. The aluminum motors do take a little more work. You need to lightly sand the inside of the block with 600 grit wet/dry sand sandpaper and also the edges of cam bearing itself to deburr the edges. Make sure that the oiling holes are lined up properly (Very important!) and pound it in. Once it's in slide the cam in. If you fill it drag, and this is common, pull the cam back out and see where it's dragging. You should clearly see this on the cam bearing. You'll then have to take 800 grit wet sand paper and lightly sand the bearing so that the cam will slide through without dragging. It's a bit of a process on an aluminum block, even more so being in the car still. It will just take a little time and patience but you should get it to work.
Lonnie
Lonnie
03-21-2014, 12:06 PM
#25
On The Tree
Join Date: Nov 2013
Location: Waterford, MI
Posts: 193
Likes: 0
Received 0 Likes
on
0 Posts
I'm actually getting ready to pick up a set of the 1888m now everything I've read the 5.7 and 5.3 appear to be the same bearing.. What's weird to be is the size difference in 1&5 but they call for the same bearing.. Called the dealer 160$! For a set F THAT I'll buy a couple sets before that happens
03-21-2014, 10:21 PM
#26
TECH Addict
Join Date: Aug 2002
Location: N. FL
Posts: 2,708
Likes: 0
Received 0 Likes
on
0 Posts

I would think those should be the same set.
If the 1888m doesn't fit, I'd sand it down, but I'd be kinda pissed about it. My only surprise there is any need to order. I'd expect those on the shelf at a parts store like NAPA or O'reilly. Then again, they may simply stock a different brand for that engine.
If the 1888m doesn't fit, I'd sand it down, but I'd be kinda pissed about it. My only surprise there is any need to order. I'd expect those on the shelf at a parts store like NAPA or O'reilly. Then again, they may simply stock a different brand for that engine.
03-22-2014, 06:11 PM
#28
TECH Fanatic
you may have to sand the ID as well. Considering the OEM bearings are line honed in the factory, it is really unlikely that DIY'ers like us can make them line up perfectly.
03-22-2014, 06:28 PM
#29
I now have another theory. These bearings aren't sold at factory sizes because the manufacturers intend the blocks to get honed again before new bearings are installed. I've been doing some sanding today with some 400 grit wet-dry paper. I have a long way to go until I'm within at least .003".
03-22-2014, 09:11 PM
#30
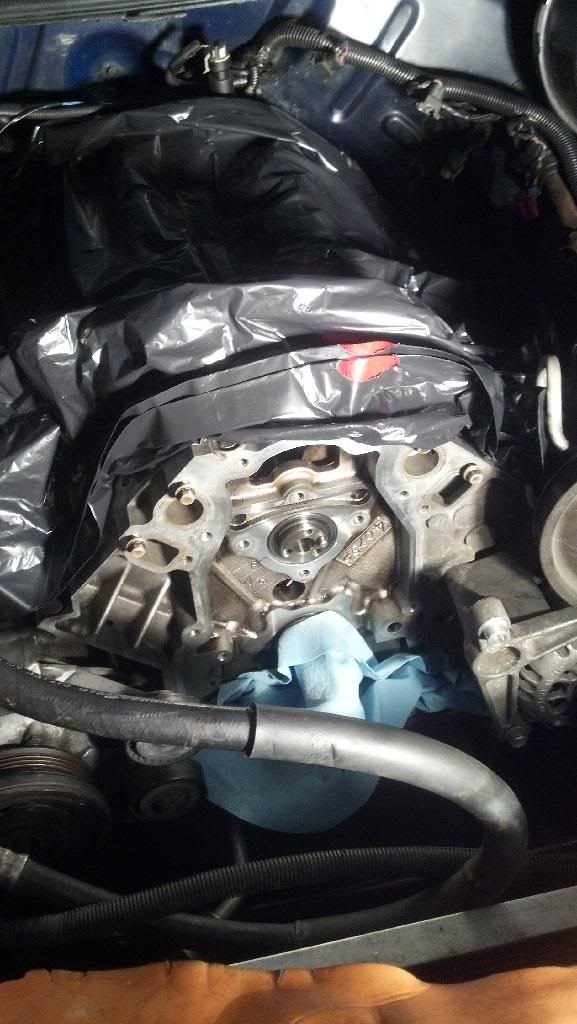
Finally in!!!!!! After a lot of sanding and measuring she's in. I wound up getting the bearing down to 2.3295" & said, **** it, let's see if she'll go in. It did with some persuasion and some patience. I was able to get it within .005" of the original measurement on depth in the block. I grabbed my cam, oiled her up, and she slid right in without any abrasion. I can spin it about 3/4 of a turn by hand.
So for anyone ever needing to do this in the car and on just position #1, it can be done (with the proper tools, patience, & attention to detail).

So for anyone ever needing to do this in the car and on just position #1, it can be done (with the proper tools, patience, & attention to detail).
 03-26-2014, 04:37 PM
#35
Finally in!!!!!! After a lot of sanding and measuring she's in. I wound up getting the bearing down to 2.3295" & said, **** it, let's see if she'll go in. It did with some persuasion and some patience. I was able to get it within .005" of the original measurement on depth in the block. I grabbed my cam, oiled her up, and she slid right in without any abrasion. I can spin it about 3/4 of a turn by hand.
So for anyone ever needing to do this in the car and on just position #1, it can be done (with the proper tools, patience, & attention to detail).
So for anyone ever needing to do this in the car and on just position #1, it can be done (with the proper tools, patience, & attention to detail).
I will agree however that they are a ***** to put in often and it seems like they do have too much press but they still go in with the right tools. The cam bearing tool itself will often screw up the bearings on the edge you're pushing them in on and like the guy from TSP said you may have to deburr them there if that happens which it usually does. I usually use a carbide bearing knife and them some scotchbrite if I have to but that's on a bare block that's gonna be washed later. In an existing assemble engine I'd be wary of a lot of problems with even seeing what you are doing but at least yours is at the front.
Cam bearings aren't too critical as long as they have clearance and are in with the right press and the cam is straight. When I do see cam bearing problems it's usually after "new" ones have been installed FWIW.
03-27-2014, 05:11 AM
#37
I am not sure but it would be much better in an iron block than in an aluminum one that's for sure. Also like you said to check the actual oil clearance as well and if the cam spins freely and has .002-.006 it should be fine but I'd sure like all the press they put into that bearing as its usually for a reason.
03-27-2014, 05:52 AM
#38
I appreciate the input gents. 8088, do you think that the new bearings are over sized to compensate for cam bore honing? It only makes sense to do a cam bearing refresh after the motor has been honed and cleaned. In this case, unhoned my 1st bore diameter is 2.326". The new bearings are 2.334-336". Even if the honing process took out .002" that's still .006" of press.
I know I don't have the experience of any engine builder out there, but .006 is an awful lot. With it in there now I can get a .004" feeler gauge between the cam journal and the bearing. I know that's not precise, but it's a good reference.
I know I don't have the experience of any engine builder out there, but .006 is an awful lot. With it in there now I can get a .004" feeler gauge between the cam journal and the bearing. I know that's not precise, but it's a good reference.