

View Poll Results: How did you get your H/C in there?
did it myself


90
80.36%
took it to a shop


22
19.64%
Voters: 112. You may not vote on this poll
How did get your H/C in there?
 12-09-2005, 08:46 PM
#21
11 Second Club
iTrader: (5)

Join Date: Mar 2003
Location: CA
Posts: 199
Likes: 0
Received 0 Likes
on
0 Posts

I did Heads,cam,lifters,oil pump,and a slp LS6 w/EGR. Stuff like my N20 kit and my FTRA made it take a little longer. I worked on it for 3 days, and it was pretty tedious. Nothing hard about it, I'm just the impatient type. Its definitely worth it financially to do it yourself. Plus you know in the end that you did it. Like the others said, dont rush, take breaks, and realize beforehand its going to take a good amount of time.
 12-09-2005, 08:57 PM
#22
TECH Fanatic
di mine at a friends shop... (GEN3 performance)
i did 99% of all the work by myself. but had a pro to ask questions and used some of his tools..... but all in all, it was a blast.... took me about 18 hours over 3 days to swap the heads, cam, ls6 intake, pushrods, catch can, etc.....
here are a few pics .... maybe thay will help.
good luck!
i did 99% of all the work by myself. but had a pro to ask questions and used some of his tools..... but all in all, it was a blast.... took me about 18 hours over 3 days to swap the heads, cam, ls6 intake, pushrods, catch can, etc.....
here are a few pics .... maybe thay will help.
good luck!
12-10-2005, 09:53 AM
#25
12 Second Club
iTrader: (1)
Join Date: Apr 2004
Location: Clarksville, TN
Posts: 1,369
Likes: 0
Received 0 Likes
on
0 Posts
I'm doing mine in my friend's garage right now... I left the motor in the car though
EDIT: read as, she has a garage and I don't... all my own tools and she hasn't spent more than 10 minutes out there with me, haha
EDIT: read as, she has a garage and I don't... all my own tools and she hasn't spent more than 10 minutes out there with me, haha
12-10-2005, 12:20 PM
#26
On The Tree
iTrader: (1)
Join Date: May 2004
Location: Fort Lauderdale
Posts: 161
Likes: 0
Received 0 Likes
on
0 Posts
Did it my self. My second cam took 3hr 15Min from drive in to drive out. Heads a little longer. Once you've done it a couple of times it almost down to a science. If it weren't for the fact that we have our own shop I would say just pay someone. It saves alot of hassle. Plus knowing your in good hands takes some pressure off.
12-10-2005, 12:54 PM
#27
TECH Fanatic
iTrader: (7)
Join Date: Dec 2004
Location: pensacola, fl.
Posts: 1,555
Likes: 0
Received 0 Likes
on
0 Posts
Originally Posted by M6HuggerSS
di mine at a friends shop... (GEN3 performance)
i did 99% of all the work by myself. but had a pro to ask questions and used some of his tools..... but all in all, it was a blast.... took me about 18 hours over 3 days to swap the heads, cam, ls6 intake, pushrods, catch can, etc.....
here are a few pics .... maybe thay will help.
good luck!
i did 99% of all the work by myself. but had a pro to ask questions and used some of his tools..... but all in all, it was a blast.... took me about 18 hours over 3 days to swap the heads, cam, ls6 intake, pushrods, catch can, etc.....
here are a few pics .... maybe thay will help.
good luck!
what kinda heads are thows and what did you do to them..them damn thangs look good.. clean and shinny..bood job and nice pics..
 12-10-2005, 01:20 PM
#28
TECH Senior Member
Can do cam swap in about 4 hours, heads in about 6>8.
Have all tool ready, organise your work area, plenty of zip lock bags, rags, extra locks, fluids etc...
Overall a weekend for H/C swap (unless something goes wrong)
Have all tool ready, organise your work area, plenty of zip lock bags, rags, extra locks, fluids etc...
Overall a weekend for H/C swap (unless something goes wrong)
 12-10-2005, 02:17 PM
#30
TECH Fanatic
what kinda heads are thows and what did you do to them..them damn thangs look good.. clean and shinny..bood job and nice pics..
there just a set of 5.7 ltr heads with a stage 2.5 cnc port job that didnt turn out that great. they have 2.05/1.60 rev valves, vition seals, comp dual springs, stock rockers.... 64cc chambers 230cfm in 88cc ex.
so whe nwe got them i did the dissasemble, about 40 hours in porting and polishing etc... evened all the CC's, checked the volume of ALL CC's, in&ex ports.... vacum tested each CC, and deburred both heads... then did final assem.
there big heads, but they worked well for me.....
i think they were going on a 383 stroker????
good luck to you.
12-11-2005, 05:58 AM
#32

You can use air tools to remove fasteners, but not such a good idea to put them back in.
Use paper towels to wick the water out of the block bolt holes and compressed air to be sure it's all gone.
Once you have the head bolts tightened to the GM ft/lb torque spec. you can put a line on the bolt heads using a sharpie going from 12 to 6 oclock or 3 to 9 oclock, it doesn't really matter. Then you add the needed amount of torque in degrees of rotation according to GM specs.
12-11-2005, 06:02 AM
#33
TECH Senior Member
Most of us follow the ls1howto.com (untill we devellop little trics of our own)
Ok, now for a GREAT tip from Scott99Z. Take a felt tip marker and draw a horizontal line on the head of each bolt. This is very important.
Ok, now for a GREAT tip from Scott99Z. Take a felt tip marker and draw a horizontal line on the head of each bolt. This is very important.
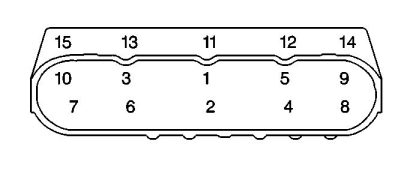
Originally Posted by jmx
Now, using the sequence illustrated below, turn all 10 15mm bolts an additional 90 degrees using a large socket wrench and a lot of muscle. Try to get as close to 90 degrees as possible...you may have to do multiple turns of 30 degrees or 2 turns of 45 degrees. When done all the lines on the bolt heads should be totally vertical.
Next, again using the sequence above, turn bolts 1 through 8 another 90 degrees. This will take an immense amount of effort...if you have a buddy helping both of you should turn the wrench simultaniously. These 8 bolts will now all have horizontal lines on them
Using the sequence above, turn bolts 9 and 10 an additional 50 degrees. Again, this will take a lot of effort. 50 degrees should result in a diagonal line on the bolts
Finally, using the sequence above, torque bolts 11 through 15 to 22 lb-ft.
12-14-2005, 07:27 AM
#34
12 Second Club
iTrader: (1)

Join Date: May 2005
Location: Bradenton, FL
Posts: 684
Likes: 0
Received 0 Likes
on
0 Posts
It took about 20 hours with a buddy. We did it in my garage. No need for a shop.
But, that includes a lot of time fixing a cracked oil pan. Had to lift the motor up to fix that one.
But, that includes a lot of time fixing a cracked oil pan. Had to lift the motor up to fix that one.
12-14-2005, 11:05 AM
#35
Originally Posted by VTC_WS6
For those of you who said you didn't use specialy tools, how did you get the fuel line seperated, and what did you use to give te bolts the proper angle stretch?
12-14-2005, 01:35 PM
#36


The fuel line will pop off with a pair of pliers, no real need for a tool for that. I did a head swap only ( cam was already in ) 2 weekends, ago, buddy of mine came down to help on the assembly. The lift was ehlpful, as it's alot easier to get to stuff that way, but all in all, I think it could have been done without it, had I not needed to remove my headers to get to the bottom head bolts.
A few things that I learned:
Head edges are very sharp, you will rip up your knuckles on those if not careful.
A whirley bird with a lastic buffer works great for cleaning block surface
A very small short ratchet could save you the trouble of pulling the pulley on teh power steering pump.. but I didn't take that route, I pulled off the pulley
Watch out for the oil pressure sending unit, that is easy to break, and is 38 bucks to replace it.
Do not reinstall every bolt holding the coil pack trays on, I think I used 3 per side
Do not reinstall every ground on the back of the heads with it's own bolt like GM did, I used one bolt for all 3, and it is fine, those are a real pain to put back in... one bolt per side will suffice.
Working on exhaust sucks period.. I'd love it if just once I saw na exhaust setup that was acutally FLARED properly to slide over itself the way it's supposed to....
The edges of the lifter trays are VERY sharp as well... be aware.
Bolt holes clean out alot easier then everyone makes it out like. Take a can of carb clean, spray it inside the holes until they are full.. then let it sit and evaporate out. An air hose with a piece of fuel line on it will get all teh flud out of the hole very easy, but makes a huge *** mess. My engine bay looks like a bomb went off.. a day of cleaning is in order to restore it back to a respectable state.
I have a good understanding as to why people remove the a/c it is a ain in the *** to work around.. that being said, mine is gonna take a permanent vacation.... very soon.
The cover on the heater box, is most likly gonna get a hole punched in it to get a urque wrench on the studs ( if you opted to use them, like I did ) in the back on the passengers side. Do not worry about this, as there is no ill effects to this, it is mearly an external dust shield, and the hole is so far back, that once the coil packs are back on, you will never see it. Personally, I'll most likly be removing the heater and all that crap eventually, so I really didn't care about the hole. if it' somethign that you don't want to happen, I don't know what to tell you.. a hole saw could make a nice looking hole, if the punched in look doesn't do it for you. There is probably a way to avoid this, but it was a hell of alot easier to do it this way.
did I mention the heads are sharp?
Pour oil over the rockers when you reassemble, so it's not dry when you start the car.
Be ready to go thru a fun bleeding process... the temp guage is gonna shoot up to the 260 mark.. it has to I think before the t-stat will open. Remove TB coolant hose ( or bypass, whatever ) to bleed air. This can take a while.. as my car took what seemed like forever, and ended up getting finished the next day.
This was the first head swap I have ever done, and it took a long time, as I really didn't know the ins and outs. I spent a good 10 hours on it on the dissassembly, and the reassembly took about 8. I think now I could probably pull it off in considerably less time, but I don't think I'll find out anytime soon to prove it.
12-14-2005, 02:29 PM
#37
TECH Regular
iTrader: (2)

Join Date: Oct 2003
Location: REDFORD,MI
Posts: 438
Likes: 0
Received 0 Likes
on
0 Posts
horror story.
labor to take apart and put back together.. about 20 hrs
my car is a 98. so, i had to change cam,intake,heads,tb,valve covers, pcv tubing.
started in april. still not driveable. still have codes for no reason, still runs like crap. nobody can figure out whats wrong with it. this is my play car. after 2 months of chasing my tail, i gave up on it, and tried to forget about the car.
in the spring i'm putting it back to stock and selling the car.
i hate working on this p.o.s.
if your wondering. i have had plenty of back yard engine building experience.
tons of 5.0 stuff along with others as well...