

DIY Head Porting Project (5.3 Heads) Lots-O-Pics 56k Beware
 12-19-2006, 02:52 PM
#21

Originally Posted by V6 Bird
I dont port heads for a living. I have friends that do, and I do my own stuff and use their tips. The ridges are backed up by flowbench data. My friends do R&D for Nascar and I mentor their work. Im not new to the LS1 scene and neither are they. They graduated from SAM. That should be the credentials you were asking for. 
A flowbench is used as a measuring device. if you want to see some really trick **** going on in the ports, put them on a wetflow bench and then fix the issues.
A flowbench is used as a measuring device. if you want to see some really trick **** going on in the ports, put them on a wetflow bench and then fix the issues.
Anyone got an extra 4.8/5.3 head they want to sell me for cheap lol?
I'd love to see a wetflow bench in action!!
Mike
 12-19-2006, 06:22 PM
#22
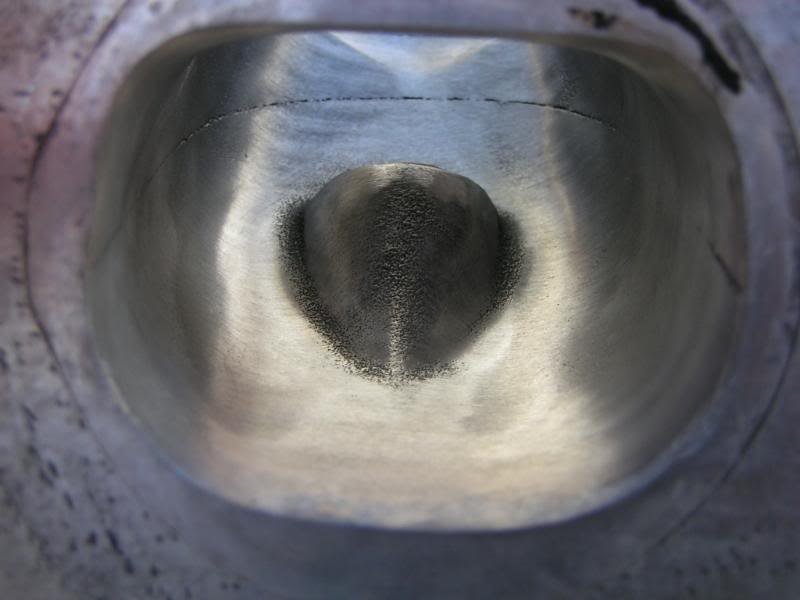
yeah I was goin to say the same thing about the ridge. my first attempt had the ridge too, its easy to take it out now, just go back in and take it down. I was told sharp edges will create turbulance. Im thinking that it wont have much affect on the #s, but its prolly one of those quality issues, not quantity. make it round and way less pronounced.
and your right, I didnt mean turbulance before, I did mean swirl.
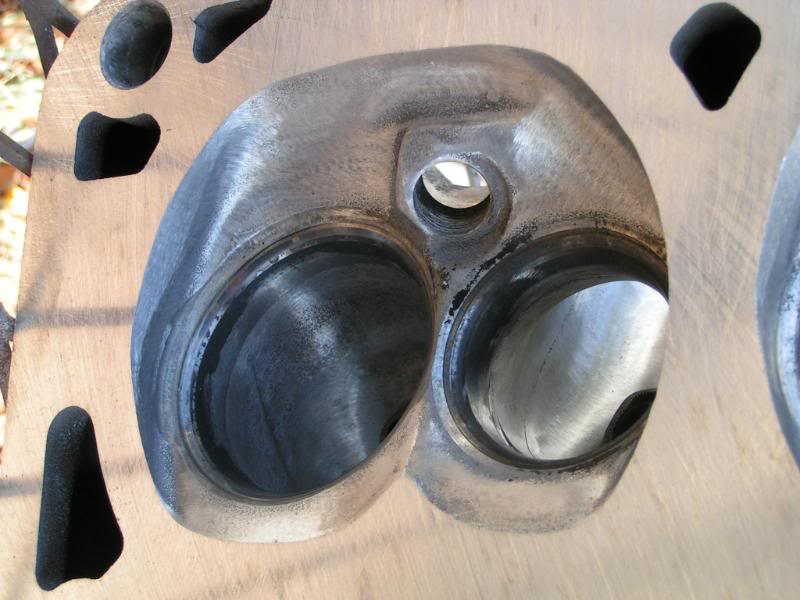
that is my chamber, and I did do some unshrouding, mostly around the exh. valve. didnt want to open up the chamber too much. I really want the smallest chamber possible.
what do you mean about the sp. plug boss? again thats one of those things I was told not to mess with. Ive seen it in other pics of pro ported heads on here before, so I didnt worry bout it exc. to take the edges off and smooth it best as I could w/o removing it.
I started my next set of heads today. the first set of int./exh. ports and complete chamber cleaning/polishing took just under 2.5 hours after I got done cleaning the head off to bring home. this one came out awesome, and I cant wait to get it flow tested (along with retesting my orig. port in the other head). I bought a bunch more select sand paper rolls and have figured out that it goes way easier with the right shape rolls for the job. I mostly use the flat roll and only fill in the corners with the tapered rolls now. easier to keep it smooth/flat walls that way. this next port is a little bigger also, my first attempt was kept small on purpose to make sure it didnt get too big and I want this engine to peak around 6300rpm.
I look forward to reading your intructional write up and seeing all the pics along the way. I had that exact thought, but figured Id wait till a get a bit more exp. before I bothered with anything like that.
good luck man.
and your right, I didnt mean turbulance before, I did mean swirl.
that is my chamber, and I did do some unshrouding, mostly around the exh. valve. didnt want to open up the chamber too much. I really want the smallest chamber possible.
what do you mean about the sp. plug boss? again thats one of those things I was told not to mess with. Ive seen it in other pics of pro ported heads on here before, so I didnt worry bout it exc. to take the edges off and smooth it best as I could w/o removing it.
I started my next set of heads today. the first set of int./exh. ports and complete chamber cleaning/polishing took just under 2.5 hours after I got done cleaning the head off to bring home. this one came out awesome, and I cant wait to get it flow tested (along with retesting my orig. port in the other head). I bought a bunch more select sand paper rolls and have figured out that it goes way easier with the right shape rolls for the job. I mostly use the flat roll and only fill in the corners with the tapered rolls now. easier to keep it smooth/flat walls that way. this next port is a little bigger also, my first attempt was kept small on purpose to make sure it didnt get too big and I want this engine to peak around 6300rpm.
I look forward to reading your intructional write up and seeing all the pics along the way. I had that exact thought, but figured Id wait till a get a bit more exp. before I bothered with anything like that.
good luck man.
12-13-2010, 09:16 AM
#23
Registered User

Join Date: Dec 2010
Posts: 4
Likes: 0
Received 0 Likes
on
0 Posts
ALWAYS keep in mind that a hole that passes a lot of flow doesn't mean power. Max power is made by highest flow with the smallest hole. The most critical areas are intake short side and the bowls. NO bumps on short side, FLAT walls leading to the bowl. I learned with Jeff from modern. He's one of the best i've seen. His power proves it.
 07-25-2011, 12:09 AM
#28
TECH Enthusiast
iTrader: (5)
Join Date: Jan 2010
Location: Huntsville, Alabama - SA, TX is home
Posts: 676
Likes: 0
Received 1 Like
on
1 Post
Thank you Mikey for this great detailed information! And thank you LS1Tech for keeping it on the site for so many years!
I feel I owe many thanks to Mikey. I have wanted someone who could guide me into this project for a while now and this thread has done it. I have started on my first pair of 853 heads and will be posting pics soon for further suggestions and guidance.
I feel I owe many thanks to Mikey. I have wanted someone who could guide me into this project for a while now and this thread has done it. I have started on my first pair of 853 heads and will be posting pics soon for further suggestions and guidance.
07-25-2011, 12:40 PM
#29
Registered User

Join Date: Jun 2011
Posts: 46
Likes: 0
Received 0 Likes
on
0 Posts
I did my own #706 heads. I don't think I really hurt anything, but I worry that I perhaps took a bit much from my exhaust ports. Not like dangerously thin, not even close. But like I could have however much flow I now have, even with removing a bit less aluminum in a few areas. In no place did I remove anywhere near as much as the OP, but he only gained 15 cfm = 7% at 0.550"
It's bothering me, and I've begun calling around to find a flow bench. There's a shop about 130 miles from me, with an old SF600.
They don't have a radius plate for the LSx cathedrals, so it'll be clay.
If my numbers are decent, I'll add post them, with some good pics of my porting. If not, I'll have to decide between porting out the swirl shelf, or a 2.00" valve.
Last edited by ronnjonn; 07-25-2011 at 01:05 PM.
07-31-2011, 01:34 PM
#30
TECH Enthusiast
iTrader: (5)
Join Date: Jan 2010
Location: Huntsville, Alabama - SA, TX is home
Posts: 676
Likes: 0
Received 1 Like
on
1 Post
Be careful with those 706 heads. There are known for cracking on the coolant ports. They were made at a couple different factories, but one of those factories produced the heads that commonly cracked. I found out the hard way after purchasing a used set off of Craigslist and then took them in to be cleaned. They suggested I have them pressure tested sense they were known for cracking. So i did and then found out i was out of a total of $250 after the purchase and machine shop fees. The good side is that al least i didnt spend al my time porting them to find out they were cracked afterwards. GOOD LUCK!
07-31-2011, 02:51 PM
#31
Teching In

Join Date: Apr 2011
Posts: 1
Likes: 0
Received 0 Likes
on
0 Posts
Are you measuring each port with a micrometer to make sure they are even? If one port is larger than another port thats going to lean out your cylinder and your afr could fluctuate slightly at idle or WOT.
Or this does not matter with ls heads?
*Edit* Might not be a micrometer, but something of that accuracy
Or this does not matter with ls heads?
*Edit* Might not be a micrometer, but something of that accuracy
11-27-2011, 12:54 PM
#32
Teching In

Join Date: Dec 2008
Location: Metro Detroit
Posts: 28
Likes: 0
Received 0 Likes
on
0 Posts

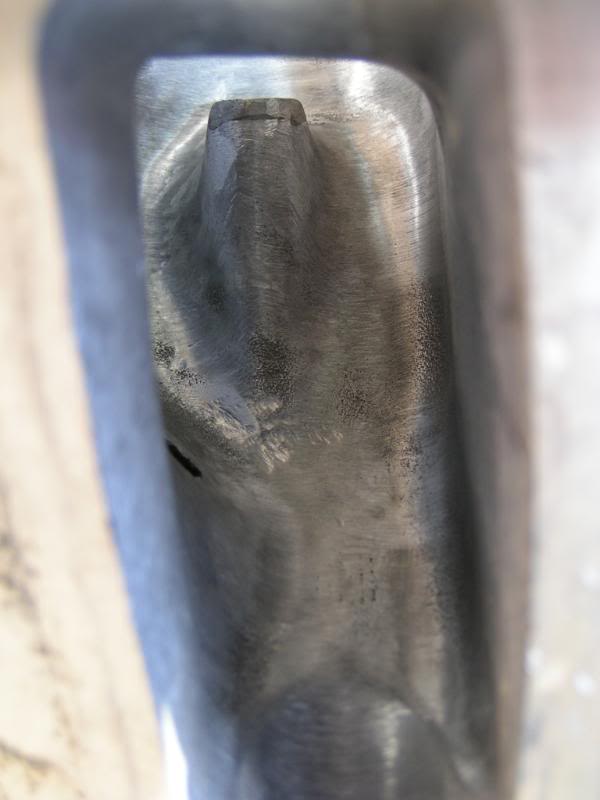
Oh that thing,,, I think it's original intent is to promote swirl, not turbulence. I think if you've been talking to professional porters, their definition of the "ramp" is probably the port floor. I don't know of ANY porters <that would consider themselves "pros"> that would leave that swirl promoter thing in the port when shooting for numbers over 280cfm. The LS6 heads seem to do ok with it, but those heads also have a raisded port floor, and a much better short side radius to start with. When I started porting these heads, there was no question in my mind that that was going to be completely removed.  Did I say completely, oh ya,,, COMPLETELY.
Did I say completely, oh ya,,, COMPLETELY. Side note,, I started doing this porting with intentions of just doing a "little clean up on the high spots and not letting myself spend more than 2 hours working on them because I'd send them to AI for real work".... ha! I got cought caught up in it and couldn't set the grinder down or stop searching this sight for other tips. Likely have 12 hours in them now.
Last edited by StanIROCZ; 11-27-2011 at 12:59 PM.
11-27-2011, 01:17 PM
#33
I'm porting 799's right now, and I've pretty much finished everything that I'm going to do except I'm still debating on taking out this ramp or not. Every picture I've seen of aftermarket heads has it removed which should be reason enough for me to do it, but there must be a reason the factory has it in there.
Side note,, I started doing this porting with intentions of just doing a "little clean up on the high spots and not letting myself spend more than 2 hours working on them because I'd send them to AI for real work".... ha! I got cought caught up in it and couldn't set the grinder down or stop searching this sight for other tips. Likely have 12 hours in them now.
Side note,, I started doing this porting with intentions of just doing a "little clean up on the high spots and not letting myself spend more than 2 hours working on them because I'd send them to AI for real work".... ha! I got cought caught up in it and couldn't set the grinder down or stop searching this sight for other tips. Likely have 12 hours in them now.
12-01-2011, 09:41 AM
#35
This post was one that helped me decide to do my own 799s. Had some help from a friend who did the carbide cuts on the intake for me.
I think they came out pretty decent. I have around 14 hours in the cartridge roll work alone (start and stop to let air compressor catch up and cool).

No flow numbers or dyno numbers, but the car seems to love them. I had them shaved .010", lapped the valves, and put them in with a new cam and the seat of the pants difference is HUGE. The whole power band is improved off idle to red line.
I think they came out pretty decent. I have around 14 hours in the cartridge roll work alone (start and stop to let air compressor catch up and cool).
No flow numbers or dyno numbers, but the car seems to love them. I had them shaved .010", lapped the valves, and put them in with a new cam and the seat of the pants difference is HUGE. The whole power band is improved off idle to red line.

 05-26-2012, 08:37 PM
#38
TECH Enthusiast
iTrader: (5)
Join Date: Jan 2010
Location: Huntsville, Alabama - SA, TX is home
Posts: 676
Likes: 0
Received 1 Like
on
1 Post
Heres the link to the vids:
http://www.youtube.com/playlist?list...D&feature=plcp
My flow results are in the pic attached.
05-26-2012, 11:42 PM
#39
Launching!
Join Date: Jun 2008
Location: Maine
Posts: 254
Likes: 0
Received 0 Likes
on
0 Posts
Thanks to all Mikeys help I've done a pair and am working on my second. Great flow improvements on the bench. I've posted a couple videos on youtube also.
Heres the link to the vids:
http://www.youtube.com/playlist?list...D&feature=plcp
My flow results are in the pic attached.
Heres the link to the vids:
http://www.youtube.com/playlist?list...D&feature=plcp
My flow results are in the pic attached.