


Head removal question
Thread Starter
TECH Addict
Joined: Jun 2002
Posts: 2,428
Likes: 0
From: Las Vegas, NV
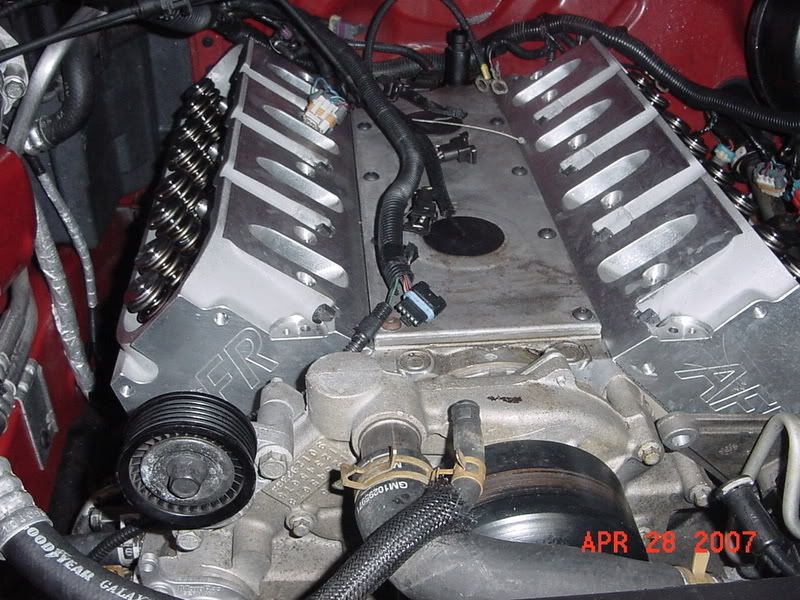
Driver's Side Head:
I removed all 3 bolts (1 bolt with 2 ground wires; 1 bolt with 1 ground wire; and 1 bolt holding the bracket behind the fuel rail) from the top.
For the inboard 15mm bolt with 2 ground wires, I used a regular gear wrench, and laying in the center of the engine compartment, I used a hammer to break it loose, then just loosened it all the way using my fingers.
For the outboard 15mm bolt with one ground wire, I used a 15mm stubby gear wrench and broke it loose with a hammer, then used my fingers to remove it all the way, also laying myself into the front of the engine compartment.
The 15mm bolt holding the fuel rail bracket I removed it with a regular 15mm gear wrench, laying myself into the engine compartment and using a hammer to break it loose.
Passenger Side Head:
On this side there's just one 15mm bolt holding a round bracket that captures the wiring harness inside it. I tried getting it from the top but it was very difficult, so I crawled under the car and was happy to see that it was super easy to reach putting my arm through where the header feeds down. Keep in mind that I removed my headers completely so it was easy to get at that bolt. It might a problem, or maybe impossible, if you have your header resting inside the engine compartment. I just used a 15mm gear wrench and broke it loose using arm strength, and then finished removing it using my fingers. It's probably possible to remove it from the top but I wouldn't want to try to do it. There's so much stuff in the way on the passenger's side.
So finally I'm ready to remove my heads. Yippee! Later.
Last edited by Predator; Sep 5, 2008 at 08:22 AM.
Predator I just took my heads off along with everything else. I was able to get a regular sized craftsman wrench back there to break loose all of those bolts on the back of the head. It wasnt all that bad honestly.
Thread Starter
TECH Addict
Joined: Jun 2002
Posts: 2,428
Likes: 0
From: Las Vegas, NV
Congrats! These cars differ from year to year too, as explained by Jmx. It was a challenge for me. Good work!
Staging Lane
Joined: Dec 2007
Posts: 99
Likes: 0
From: Cleveland, OH
I just did it too. I had to get a wrench on the bolts and use a rubber mallet in order to get it to budge.
LS1 Tech Stories
The Best V8 Stories One Small Block at Time

Gas Monkey Built a 6-Wheel Ferrari Testarossa With a Corvette LT4 Engine
Verdad Gallardo
7 Most Reliable High-Performance Engines GM Has Ever Built
Verdad Gallardo
Amazing '71 Camaro Restomod Is Modern Muscle Car Under the Skin
Verdad Gallardo
6 Common C5 Corvette Failures and What's Involved In Repairing Them
Pouria Savadkouei
Retro Modern Bandit Pontiac Trans AM Comes With Burt Reynolds' Autograph
Verdad Gallardo
Top 10 Greatest Cadillac V Series Performance Models Ever, Ranked
Pouria Savadkouei
Top 10 Most Powerful Chevy Trucks Ever Made!

Hennessey's New Supercharged Silverado ZR2 Has 700 HP
Verdad Gallardo
Coachbuilt N2A Anteros Is an LS2-Powered C6 Corvette In Italian Clothes
Verdad Gallardo


Thread Starter
TECH Addict
Joined: Jun 2002
Posts: 2,428
Likes: 0
From: Las Vegas, NV
Thread Starter
TECH Addict
Joined: Jun 2002
Posts: 2,428
Likes: 0
From: Las Vegas, NV
 I think it's gonna work out fine though.
 TECH Resident
Joined: Oct 2005
Posts: 781
Likes: 0
From: Taxme, Ohio
The problem with putting them back on is that I worried I wasn't getting them to the proper torque value. I did the best I could but I don't think the ground wire is fastened as tightly as it was from the factory. As for the other bolts back there, I think JMX just leaves them unfastened.
Thread Starter
TECH Addict
Joined: Jun 2002
Posts: 2,428
Likes: 0
From: Las Vegas, NV
The problem with putting them back on is that I worried I wasn't getting them to the proper torque value. I did the best I could but I don't think the ground wire is fastened as tightly as it was from the factory. As for the other bolts back there, I think JMX just leaves them unfastened.
The torquing the heads stuff seems difficult because of the location of the bolts closest to the firewall, but we'll see. Thanks.
Thread Starter
TECH Addict
Joined: Jun 2002
Posts: 2,428
Likes: 0
From: Las Vegas, NV
Thanks for the moral support! It really helps. Thanks.
TECH Resident
Joined: Oct 2005
Posts: 781
Likes: 0
From: Taxme, Ohio
If I remember, I couldn't get my torque wrench on the back bolt(s) on the passenger side. But I think I had a good feel for it and got the initial torque close. Then it's two more passes in clocking the bolt in degrees. That too was a problem as I don't think I could turn the required amount all at once. I think JMX has us marking the bolt head with a marker if I remember.
Just a thought when you wrap this up; filling the radiator and block with coolant has its own problem too. The thermostat doesn't open soon enough to get coolant flowing through the engine. Because the thermostat has trapped air under it, the engine temp is higher than the sensor reads because the fluid is what transfers the heat. No fluid and little heat is registered so the engine block gets too hot before the thermostat opens.
Because my water pump (or gasket) began to fail sometime after the HC exchange, I drilled two 1/8" holes in the thermostat valve blade. This allowed the trapped air to be released and adding coolant to an empty block happens much more quickly and the temp sensor is accurate sooner.

TECH Addict
Joined: Dec 2001
Posts: 2,907
Likes: 1
From: Bergen County, NJ
I laid a heavy piece of cardboard on the valley cover - rested the head on it, attached the wires in the back and left the bracket bolt loose to slide the bracket on after the head was in place. Then put the head in place, torqued it down.
Thread Starter
TECH Addict
Joined: Jun 2002
Posts: 2,428
Likes: 0
From: Las Vegas, NV
Thanks for the other tips though, 01Z28M6 too.