How - To : Manley Double Roller Timing Set LS3/L92/LY6
#1
I haven't really done that many how-to write ups but since I had a few little issues doing the install on my timing set tonight I figured I would post up some info about it.
I have a 09 LY6 which is the same as the L92/LS3 motors for the most part. I got a three bolt cam, the LS3 chain damper, and the Manley double roller timing set for the LS3's with three bolt cams. Also, I bought the LS2/3 front cover since I did the VVT delete.
Basically, here's how it went:
I did the swap with the motor on the engine stand which I highly recommend. I couldn't imagine doing this in a truck let alone a car with the motor still in there.
1. Remove the timing cover, and oil pan. Oil pan removal may not be necessary, but in my case it made it way easier to adjust the pickup tube a little for oil pump install.
2. Remove vvt cam sprocket (or existing LS2/LS3 non vvt sprocket)
3. Undo the bolt attaching the pickup tube to the oil pump
4. Loosen pickup tube retainer nut on windage tray to allow some room for movement when removing oil pump.
5. Remove oil pump bolts, then remove oil pump. Be careful not to damage o ring in pickup tube.
6. Remove stock timing chain. Also, remove stock damper if it's the cheap metal/plastic damper that always brakes.
7. Use simple three jaw puller to remove existing crank sprocket. If you stick a water pump bolt into the crank snout, the three jaw puller bolt can push against that and pull off the sprocket.
8. Once sprocket is removed, install new Manley sprocket onto crank. Mine was a pretty tight fit and just needed some tapping with a mallet to get into position properly against the crank seat. Be careful using mallet.
- Note: At this time you can set advance or retard with the crank keyway. I'm no cam specialist and my cam was setup for "straight-up" degree. I installed it "dot to dot", and please don't ask me how to degree a cam or why you should/shouldn't advance/retard a cam.
9. Once crank sprocket is installed. Proceed to swap cams (if needed). Once cam swap is done, place chain on cam sprocket and carefully work the chain over the crank sprocket. It's a little tight, but it'll slide over.
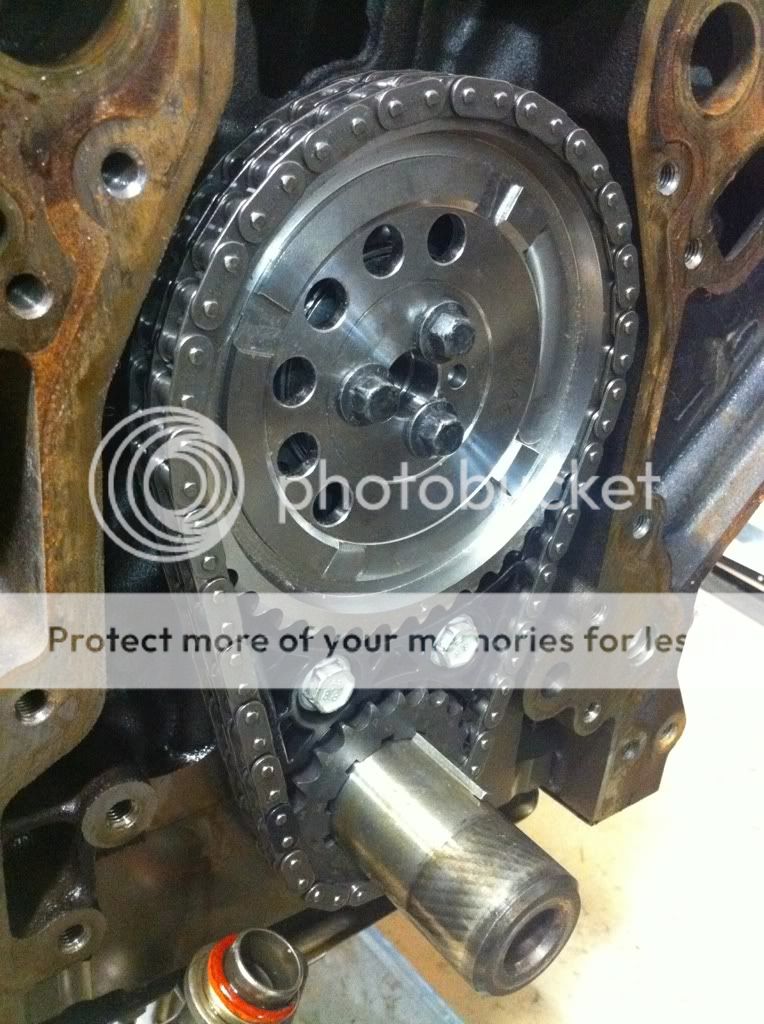
10. Once cam sprocket is in place and lined up "dot to dot", proceed to bolt in cam. You'll need to thread in the bolts a little, then tighten each in sequence.
11. If upgrading to the LS3 damper, install is now as shown. You can't install it later or before this step. I tried, lol.

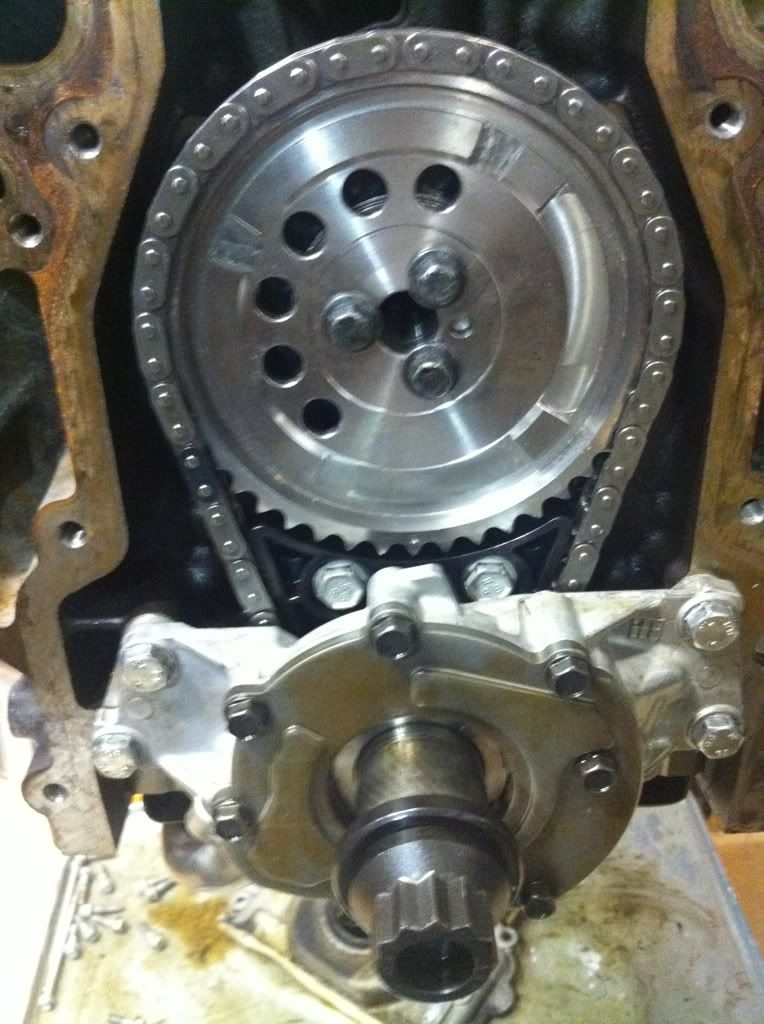
12. Install sprocket hub into oil pump drive, and then slide onto crankshaft keyway. It's easier to do in this sequence, it's a bitch to get the pump lined up when the hub is already on the crank. You'll have to push the pickup tube a little out of the way for this step to install it properly into the pump. Be safe not to damage o ring again.

13. Tighten up pickup tube into pump before tightening the pickup tube nut on the windage tray. Once this is done, you can proceed to put the shims behind the pump as illustrated/explained in the Manley instructions. They only go in one way.
14. They don't give torque specs for torque, but I would say I tightened mine to about 50ftlbs. or so. They're good and tight, and aren't coming out. Once you have the pump, pickup tube, and cam sprocket all torqued down then you're ready to scratch your head with the timing cover.
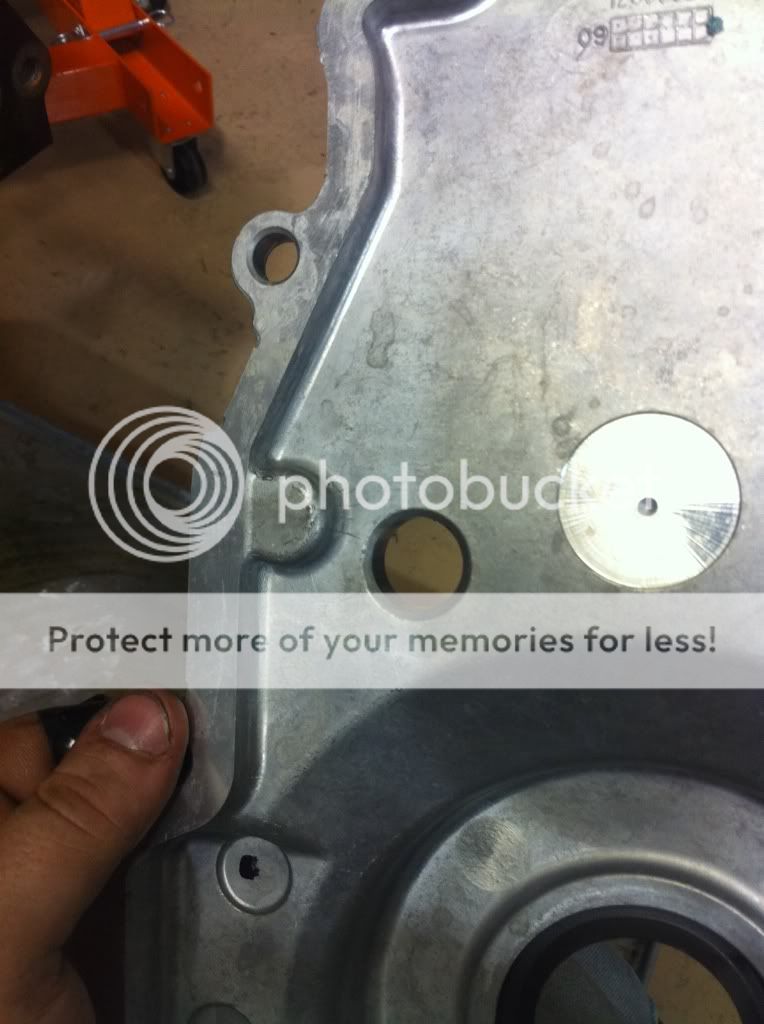
15. The front timing cover for the LS2/3 motors have a little nub on the back where the thread plunges into the casting for the cam sensor bolt. Basically, you'll have to grind down this nub. It was too late tonight to grind down the nub, but will have pics of finished product tomorrow.

If anyone has questions just ask. A few steps I did *** backwards at first and figured out the "right" way to do it. Manley's instructions pretty much suck and leave a lot of loose ends.
I have a 09 LY6 which is the same as the L92/LS3 motors for the most part. I got a three bolt cam, the LS3 chain damper, and the Manley double roller timing set for the LS3's with three bolt cams. Also, I bought the LS2/3 front cover since I did the VVT delete.
Basically, here's how it went:
I did the swap with the motor on the engine stand which I highly recommend. I couldn't imagine doing this in a truck let alone a car with the motor still in there.
1. Remove the timing cover, and oil pan. Oil pan removal may not be necessary, but in my case it made it way easier to adjust the pickup tube a little for oil pump install.
2. Remove vvt cam sprocket (or existing LS2/LS3 non vvt sprocket)
3. Undo the bolt attaching the pickup tube to the oil pump
4. Loosen pickup tube retainer nut on windage tray to allow some room for movement when removing oil pump.
5. Remove oil pump bolts, then remove oil pump. Be careful not to damage o ring in pickup tube.
6. Remove stock timing chain. Also, remove stock damper if it's the cheap metal/plastic damper that always brakes.
7. Use simple three jaw puller to remove existing crank sprocket. If you stick a water pump bolt into the crank snout, the three jaw puller bolt can push against that and pull off the sprocket.
8. Once sprocket is removed, install new Manley sprocket onto crank. Mine was a pretty tight fit and just needed some tapping with a mallet to get into position properly against the crank seat. Be careful using mallet.
- Note: At this time you can set advance or retard with the crank keyway. I'm no cam specialist and my cam was setup for "straight-up" degree. I installed it "dot to dot", and please don't ask me how to degree a cam or why you should/shouldn't advance/retard a cam.
9. Once crank sprocket is installed. Proceed to swap cams (if needed). Once cam swap is done, place chain on cam sprocket and carefully work the chain over the crank sprocket. It's a little tight, but it'll slide over.
10. Once cam sprocket is in place and lined up "dot to dot", proceed to bolt in cam. You'll need to thread in the bolts a little, then tighten each in sequence.
11. If upgrading to the LS3 damper, install is now as shown. You can't install it later or before this step. I tried, lol.

12. Install sprocket hub into oil pump drive, and then slide onto crankshaft keyway. It's easier to do in this sequence, it's a bitch to get the pump lined up when the hub is already on the crank. You'll have to push the pickup tube a little out of the way for this step to install it properly into the pump. Be safe not to damage o ring again.

13. Tighten up pickup tube into pump before tightening the pickup tube nut on the windage tray. Once this is done, you can proceed to put the shims behind the pump as illustrated/explained in the Manley instructions. They only go in one way.
14. They don't give torque specs for torque, but I would say I tightened mine to about 50ftlbs. or so. They're good and tight, and aren't coming out. Once you have the pump, pickup tube, and cam sprocket all torqued down then you're ready to scratch your head with the timing cover.
15. The front timing cover for the LS2/3 motors have a little nub on the back where the thread plunges into the casting for the cam sensor bolt. Basically, you'll have to grind down this nub. It was too late tonight to grind down the nub, but will have pics of finished product tomorrow.

If anyone has questions just ask. A few steps I did *** backwards at first and figured out the "right" way to do it. Manley's instructions pretty much suck and leave a lot of loose ends.
#2
I haven't really done that many how-to write ups but since I had a few little issues doing the install on my timing set tonight I figured I would post up some info about it.
I have a 09 LY6 which is the same as the L92/LS3 motors for the most part. I got a three bolt cam, the LS3 chain damper, and the Manley double roller timing set for the LS3's with three bolt cams. Also, I bought the LS2/3 front cover since I did the VVT delete.
Basically, here's how it went:
I did the swap with the motor on the engine stand which I highly recommend. I couldn't imagine doing this in a truck let alone a car with the motor still in there.
1. Remove the timing cover, and oil pan. Oil pan removal may not be necessary, but in my case it made it way easier to adjust the pickup tube a little for oil pump install.
2. Remove vvt cam sprocket (or existing LS2/LS3 non vvt sprocket)
3. Undo the bolt attaching the pickup tube to the oil pump
4. Loosen pickup tube retainer nut on windage tray to allow some room for movement when removing oil pump.
5. Remove oil pump bolts, then remove oil pump. Be careful not to damage o ring in pickup tube.
6. Remove stock timing chain. Also, remove stock damper if it's the cheap metal/plastic damper that always brakes.
7. Use simple three jaw puller to remove existing crank sprocket. If you stick a water pump bolt into the crank snout, the three jaw puller bolt can push against that and pull off the sprocket.
8. Once sprocket is removed, install new Manley sprocket onto crank. Mine was a pretty tight fit and just needed some tapping with a mallet to get into position properly against the crank seat. Be careful using mallet.
- Note: At this time you can set advance or retard with the crank keyway. I'm no cam specialist and my cam was setup for "straight-up" degree. I installed it "dot to dot", and please don't ask me how to degree a cam or why you should/shouldn't advance/retard a cam.
9. Once crank sprocket is installed. Proceed to swap cams (if needed). Once cam swap is done, place chain on cam sprocket and carefully work the chain over the crank sprocket. It's a little tight, but it'll slide over.
10. Once cam sprocket is in place and lined up "dot to dot", proceed to bolt in cam. You'll need to thread in the bolts a little, then tighten each in sequence.
11. If upgrading to the LS3 damper, install is now as shown. You can't install it later or before this step. I tried, lol.

12. Install sprocket hub into oil pump drive, and then slide onto crankshaft keyway. It's easier to do in this sequence, it's a bitch to get the pump lined up when the hub is already on the crank. You'll have to push the pickup tube a little out of the way for this step to install it properly into the pump. Be safe not to damage o ring again.

13. Tighten up pickup tube into pump before tightening the pickup tube nut on the windage tray. Once this is done, you can proceed to put the shims behind the pump as illustrated/explained in the Manley instructions. They only go in one way.
14. They don't give torque specs for torque, but I would say I tightened mine to about 50ftlbs. or so. They're good and tight, and aren't coming out. Once you have the pump, pickup tube, and cam sprocket all torqued down then you're ready to scratch your head with the timing cover.
15. The front timing cover for the LS2/3 motors have a little nub on the back where the thread plunges into the casting for the cam sensor bolt. Basically, you'll have to grind down this nub. It was too late tonight to grind down the nub, but will have pics of finished product tomorrow.

If anyone has questions just ask. A few steps I did *** backwards at first and figured out the "right" way to do it. Manley's instructions pretty much suck and gearleave a lot of loose ends.
I have a 09 LY6 which is the same as the L92/LS3 motors for the most part. I got a three bolt cam, the LS3 chain damper, and the Manley double roller timing set for the LS3's with three bolt cams. Also, I bought the LS2/3 front cover since I did the VVT delete.
Basically, here's how it went:
I did the swap with the motor on the engine stand which I highly recommend. I couldn't imagine doing this in a truck let alone a car with the motor still in there.
1. Remove the timing cover, and oil pan. Oil pan removal may not be necessary, but in my case it made it way easier to adjust the pickup tube a little for oil pump install.
2. Remove vvt cam sprocket (or existing LS2/LS3 non vvt sprocket)
3. Undo the bolt attaching the pickup tube to the oil pump
4. Loosen pickup tube retainer nut on windage tray to allow some room for movement when removing oil pump.
5. Remove oil pump bolts, then remove oil pump. Be careful not to damage o ring in pickup tube.
6. Remove stock timing chain. Also, remove stock damper if it's the cheap metal/plastic damper that always brakes.
7. Use simple three jaw puller to remove existing crank sprocket. If you stick a water pump bolt into the crank snout, the three jaw puller bolt can push against that and pull off the sprocket.
8. Once sprocket is removed, install new Manley sprocket onto crank. Mine was a pretty tight fit and just needed some tapping with a mallet to get into position properly against the crank seat. Be careful using mallet.
- Note: At this time you can set advance or retard with the crank keyway. I'm no cam specialist and my cam was setup for "straight-up" degree. I installed it "dot to dot", and please don't ask me how to degree a cam or why you should/shouldn't advance/retard a cam.
9. Once crank sprocket is installed. Proceed to swap cams (if needed). Once cam swap is done, place chain on cam sprocket and carefully work the chain over the crank sprocket. It's a little tight, but it'll slide over.
10. Once cam sprocket is in place and lined up "dot to dot", proceed to bolt in cam. You'll need to thread in the bolts a little, then tighten each in sequence.
11. If upgrading to the LS3 damper, install is now as shown. You can't install it later or before this step. I tried, lol.

12. Install sprocket hub into oil pump drive, and then slide onto crankshaft keyway. It's easier to do in this sequence, it's a bitch to get the pump lined up when the hub is already on the crank. You'll have to push the pickup tube a little out of the way for this step to install it properly into the pump. Be safe not to damage o ring again.

13. Tighten up pickup tube into pump before tightening the pickup tube nut on the windage tray. Once this is done, you can proceed to put the shims behind the pump as illustrated/explained in the Manley instructions. They only go in one way.
14. They don't give torque specs for torque, but I would say I tightened mine to about 50ftlbs. or so. They're good and tight, and aren't coming out. Once you have the pump, pickup tube, and cam sprocket all torqued down then you're ready to scratch your head with the timing cover.
15. The front timing cover for the LS2/3 motors have a little nub on the back where the thread plunges into the casting for the cam sensor bolt. Basically, you'll have to grind down this nub. It was too late tonight to grind down the nub, but will have pics of finished product tomorrow.

If anyone has questions just ask. A few steps I did *** backwards at first and figured out the "right" way to do it. Manley's instructions pretty much suck and gearleave a lot of loose ends.
#4


