





Battery saver active

I'm looking at it now and there's no way to get the sensor off of the negative terminal without some cutting. I'm talking about the end where the negative terminal attaches to the battery.
The service manual states:
3. Cut the tie straps and electrical tape attaching the battery current sensor to the battery cable.
4. Squeeze the negative battery cable branches together.
Important: Note the position of the battery current sensor prior to removal.
5. Slide the battery current sensor (1) off of the negative battery cable.
4. Squeeze the negative battery cable branches together.
Important: Note the position of the battery current sensor prior to removal.
5. Slide the battery current sensor (1) off of the negative battery cable.
You have to cut the negative cable. You could just get a copper crimp from ace hardware. And re splice the wire together or buy a battery terminal and cut your negative at the terminal.
I could try to follow it all the way to the starter. What a pain in the *** that'd be.

A new negative cable (~$53) happens to come with the sensor already installed. Who the hell wants to deal with all that routing?
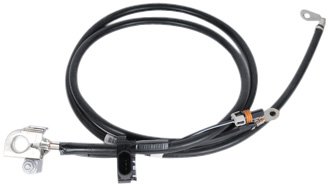
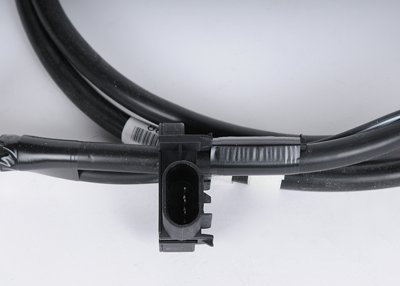
A new negative cable (~$53) happens to come with the sensor already installed. Who the hell wants to deal with all that routing?
. All you have to do is cut the cable get the sensor off replace with new sensor and re solder /crimp/ re join the negative cable. If you're to simple to do that you should just go to the dealer and get raped
Last edited by 91parkave; Jan 12, 2014 at 02:43 PM. Reason: taking back the idiot portion
At any rate, the service manual mentions nothing about cutting the cable nor do I think should have to cut a cable to change a simple sensor.
If you are unsure about what the term "asinine" means, then allow me to guide you to it.
Coming from the guy whose posts are illegible 100% of the time. Those in glass houses...
At any rate, the service manual mentions nothing about cutting the cable nor do I think should have to cut a cable to change a simple sensor.
If you are unsure about what the term "asinine" means, then allow me to guide you to it.
At any rate, the service manual mentions nothing about cutting the cable nor do I think should have to cut a cable to change a simple sensor.
If you are unsure about what the term "asinine" means, then allow me to guide you to it.
As for my posts...you're in no place to judge when you can't even look the page before to see the solution.

TECH Enthusiast
Joined: Nov 2008
Posts: 622
Likes: 1
GXP25, yes the book says to remove the harness/neg. cable assy. and to feed the sensor off the end. (done it a few times... more of a pain than hard) But for customers that are out of warranty and paying out of pocket we just cut the the neg. terminal off and install the new sensor and a new battery terminal. I prefer this method as the wire inside the old terminal usually has corrosion of some sort.
LS1 Tech Stories
The Best V8 Stories One Small Block at Time

Gas Monkey Built a 6-Wheel Ferrari Testarossa With a Corvette LT4 Engine
Verdad Gallardo
7 Most Reliable High-Performance Engines GM Has Ever Built
Verdad Gallardo
Amazing '71 Camaro Restomod Is Modern Muscle Car Under the Skin
Verdad Gallardo
6 Common C5 Corvette Failures and What's Involved In Repairing Them
Pouria Savadkouei
Retro Modern Bandit Pontiac Trans AM Comes With Burt Reynolds' Autograph
Verdad Gallardo
Top 10 Greatest Cadillac V Series Performance Models Ever, Ranked
Pouria Savadkouei
Top 10 Most Powerful Chevy Trucks Ever Made!

Hennessey's New Supercharged Silverado ZR2 Has 700 HP
Verdad Gallardo
Coachbuilt N2A Anteros Is an LS2-Powered C6 Corvette In Italian Clothes
Verdad Gallardo I changed out the sensor the other day and instead of my voltage being in the 11.6-11.9 range on start up, they're now in the 13.8 volt range.
I replaced my old one (10 volts) with the newer part number (5 volts).
I also cut the ground wire (circled in red in the diagram) and installed some quick disconnects in case this sensor decides to go out any time soon.

I bought some 4 gauge terminals but I think 2 gauge terminals would have been better. With the 4 gauge terminals, I had to cut off ~6-8 strands around the negative cable so that it'd fit inside of the terminal. Then I used a vice to crimp them.
The plastic terminals are unfortunately too large for the sensor to slip over. However, the terminals can be easily removed (they're spring-loaded) and the sensor can easily slide off of them.
I bought two black connectors (they're genderless) and two 4 gauge terminals. I recommend 2 gauge if anything.


I'm going to head over to the dealer and have them clear the B1390 diagnostic trouble code (DTC) and been done with that annoying "Service Vehicle Soon" message once and for all.
My point proven.
I replaced my old one (10 volts) with the newer part number (5 volts).
I also cut the ground wire (circled in red in the diagram) and installed some quick disconnects in case this sensor decides to go out any time soon.
I bought some 4 gauge terminals but I think 2 gauge terminals would have been better. With the 4 gauge terminals, I had to cut off ~6-8 strands around the negative cable so that it'd fit inside of the terminal. Then I used a vice to crimp them.
The plastic terminals are unfortunately too large for the sensor to slip over. However, the terminals can be easily removed (they're spring-loaded) and the sensor can easily slide off of them.
I bought two black connectors (they're genderless) and two 4 gauge terminals. I recommend 2 gauge if anything.
I'm going to head over to the dealer and have them clear the B1390 diagnostic trouble code (DTC) and been done with that annoying "Service Vehicle Soon" message once and for all.
My point proven.
Well today, I noticed that my voltage would stay barely below 13 volts. It was sitting in the 12.7-12.9 volt range according to the DIC. The "SERVICE VEHICLE SOON" message remained.
So I took the car to the dealer and had them clear the B1390 code. They also found another code: B1516.
So they cleared all the codes. Started the car up and the "SERVICE VEHICLE SOON" light went off. Then about 20 seconds later, it came back on and that new B1516 code was set again.
A quick search in the service manual explains the DTC B1516. This is related to the current sensor.
So I just came from my friend's place to see if he could clear the code with his Android diagnostic app (~$6). He was able to so I decide to change the sensor back to my original one. Except this time, I taped it closer to how it is installed in the picture (the real picture) of the entire harness above.
Started the car up and the "SERVICE VEHICLE SOON" message was gone. My friend cleared any remaining codes again and I drove home without that annoying message show up. I've had that stupid message for about 2-3 years now.
I'll post some information about B1516 tomorrow since I'm currently on my phone.
So I took the car to the dealer and had them clear the B1390 code. They also found another code: B1516.
So they cleared all the codes. Started the car up and the "SERVICE VEHICLE SOON" light went off. Then about 20 seconds later, it came back on and that new B1516 code was set again.
A quick search in the service manual explains the DTC B1516. This is related to the current sensor.
So I just came from my friend's place to see if he could clear the code with his Android diagnostic app (~$6). He was able to so I decide to change the sensor back to my original one. Except this time, I taped it closer to how it is installed in the picture (the real picture) of the entire harness above.
Started the car up and the "SERVICE VEHICLE SOON" message was gone. My friend cleared any remaining codes again and I drove home without that annoying message show up. I've had that stupid message for about 2-3 years now.
I'll post some information about B1516 tomorrow since I'm currently on my phone.

TECH Fanatic

Joined: Oct 2003
Posts: 1,101
Likes: 0
same with mine, i ended up putting the old sensor back on and it cleared my body code.
my voltage still shows all over the place but i havent had an issue starting yet.
just wonder if our cars dont work well with the new sensors.
my voltage still shows all over the place but i havent had an issue starting yet.
just wonder if our cars dont work well with the new sensors.
And no, I think our cars work fine with the 5V sensor. I say this because this is the superceded part for the old 10V part. I just think we didn't install it correctly.
The reason I beleive that this all started about 2-3 years ago has to do with my battery. As we all know, the battery in these cars sucks. I ended up taking my car, multiple times, to Pep Boys for their Bosch battery.
I've had an issue before where after my battery was installed by them, my HIDs stopped working. I pulled over and inspected the under hood damage. Let's just say that the mechanic didn't take too much pride in his work. I can only assume that with the wire pulling [and hair pulling], my sensor got loosended and/or moved around quite a bit.
My solution to this was to tape the current sensor a good 2" away from the negative terminal. Also, ensure that the three wires are on the tape tab and get them nice and tight with some black electrical tape.
There is no need to clear the code as it should go away once everything functions correctly. But it can be cleared as there will be a history of codes set.
Here's some info on DTC B1516:


I have been without the "SERVICE VEHICLE SOON" message since 2/4/2014.

