


alternator relocation write-up
I've been asked for this about 20 times altogether since I did this back in 06 so here is a write-up.
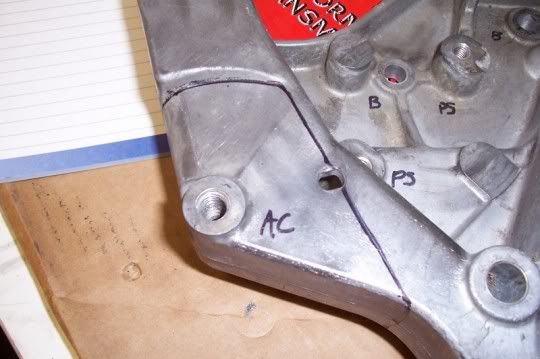
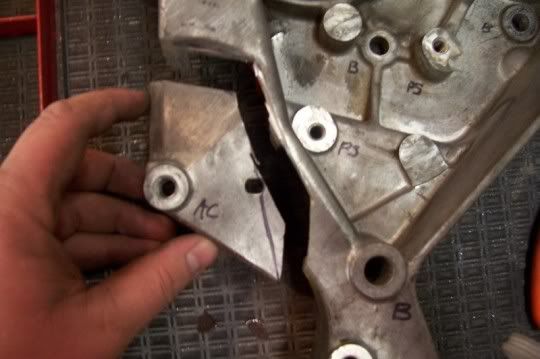
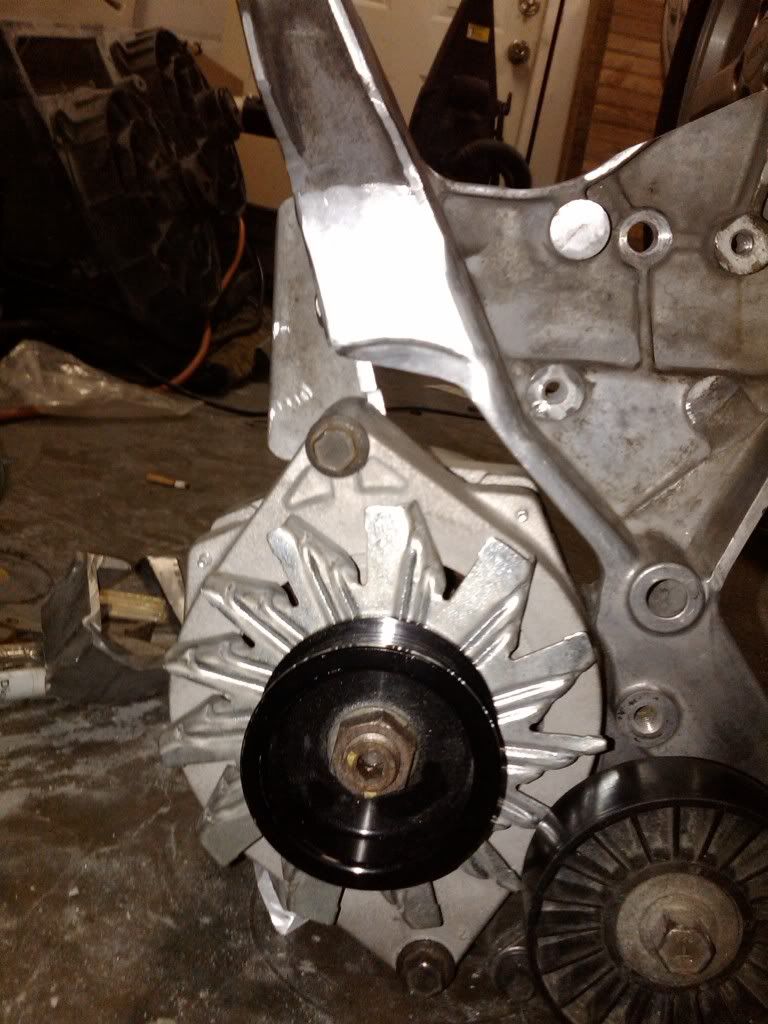
Here are some pictures of how to do everything. The tensioner pulley stays in it factory location. You should have no issue with it at all. As you can see the only cutting needed on the bracket itself is the middle bolt ear for the A/C compressor needs to be removed. You will have to grind the ear on the back on the alternator on the bottom bolt hole so that it will line up with the other pulley system. The grinding is very minimal. It sticks up just a little more than the rest of the housing itself. All that is needed is to be even with the rest of the housing. The bracket pictured was made from the amount of material that was removed from the upper ear that the alternator used to be attached to. I used this piece because it is aluminum and wanted to keep it all the same. Other people have used a piece of angle iron. Once the material has been removed from the original A/C bolt location, your new bracket can easily be bolted on here (as pictured). I completely cut the upper (original) alternator ear off even with the mating surface of where the head and the valve cover come together. That part is up to you as to where you want to do this. Then you will have to install a free rolling pulley to the other (factory alternator mount) ear. This will need to be ground down enough to align the pulley with the rest of the pulley system. All you have to do then is measure out you belt size and bolt it all together. I might have missed a thing or two so if you have any other questions feel free to email me or send me a PM.
This image shows you what needs to be cut off to make room for the alternator:
This shwos the alternator bolted on with the new bracket made from original alternator upper mount:

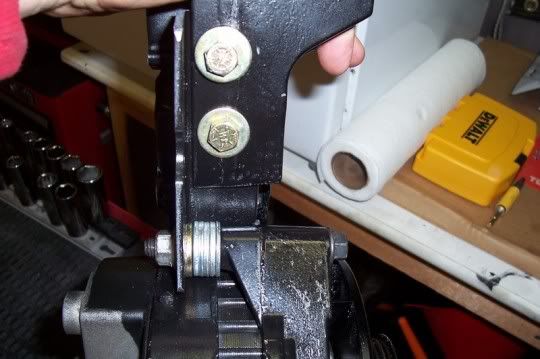
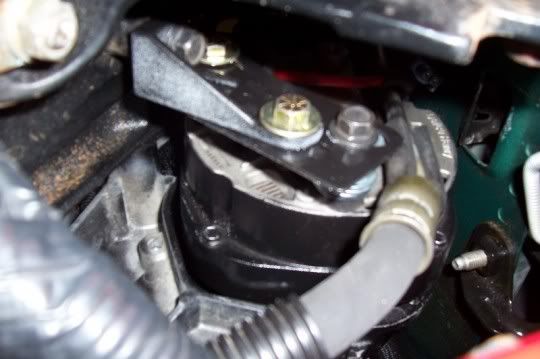
This shows how the bracket for the upper bolt of the alternator is attached with the washers as the spacer (for reference from another persons vehicle):
This piece is optional. The A/C compressor has a bracket that bolted to this location on the block. It also acts as a ground for the alternator. (Recommended but not required):
And this shows the bottom of the alternator where it bolts to the original bolt hole for the A/C compressor. This ear on the alternator might need to be ground a little to align the belt assembly:

Final product:

Here are some pictures of how to do everything. The tensioner pulley stays in it factory location. You should have no issue with it at all. As you can see the only cutting needed on the bracket itself is the middle bolt ear for the A/C compressor needs to be removed. You will have to grind the ear on the back on the alternator on the bottom bolt hole so that it will line up with the other pulley system. The grinding is very minimal. It sticks up just a little more than the rest of the housing itself. All that is needed is to be even with the rest of the housing. The bracket pictured was made from the amount of material that was removed from the upper ear that the alternator used to be attached to. I used this piece because it is aluminum and wanted to keep it all the same. Other people have used a piece of angle iron. Once the material has been removed from the original A/C bolt location, your new bracket can easily be bolted on here (as pictured). I completely cut the upper (original) alternator ear off even with the mating surface of where the head and the valve cover come together. That part is up to you as to where you want to do this. Then you will have to install a free rolling pulley to the other (factory alternator mount) ear. This will need to be ground down enough to align the pulley with the rest of the pulley system. All you have to do then is measure out you belt size and bolt it all together. I might have missed a thing or two so if you have any other questions feel free to email me or send me a PM.
This image shows you what needs to be cut off to make room for the alternator:
This shwos the alternator bolted on with the new bracket made from original alternator upper mount:
This shows how the bracket for the upper bolt of the alternator is attached with the washers as the spacer (for reference from another persons vehicle):
This piece is optional. The A/C compressor has a bracket that bolted to this location on the block. It also acts as a ground for the alternator. (Recommended but not required):
And this shows the bottom of the alternator where it bolts to the original bolt hole for the A/C compressor. This ear on the alternator might need to be ground a little to align the belt assembly:
Final product:
I did this write-up for another member about 2 years ago and saved it in my outbox. Figured others would want this info eventually. Many have asked me to make it for them but without time or the brackets to do it it just isn't feasible especially when it is pretty easy. Thanks for the comment though.
Trending Topics
Thanks for the write up, been wanting to do this for some time.
what size pulley did you use? where did you purchase it?
Anyway to get a better picture of the bracket used to hold up the alternator
what size pulley did you use? where did you purchase it?
Anyway to get a better picture of the bracket used to hold up the alternator
LS1 Tech Stories
The Best V8 Stories One Small Block at Time

Gas Monkey Built a 6-Wheel Ferrari Testarossa With a Corvette LT4 Engine
Verdad Gallardo
7 Most Reliable High-Performance Engines GM Has Ever Built
Verdad Gallardo
Amazing '71 Camaro Restomod Is Modern Muscle Car Under the Skin
Verdad Gallardo
6 Common C5 Corvette Failures and What's Involved In Repairing Them
Pouria Savadkouei
Retro Modern Bandit Pontiac Trans AM Comes With Burt Reynolds' Autograph
Verdad Gallardo
Top 10 Greatest Cadillac V Series Performance Models Ever, Ranked
Pouria Savadkouei
Top 10 Most Powerful Chevy Trucks Ever Made!

Hennessey's New Supercharged Silverado ZR2 Has 700 HP
Verdad Gallardo
Coachbuilt N2A Anteros Is an LS2-Powered C6 Corvette In Italian Clothes
Verdad Gallardo All the bracket is is just the original upper alternator ear that was cut off and trimmed to fit I can try to get some more pics but its bolted into my car so no guarantees. The pulley is just a 6 groove idler from autozone.
The bushing is already installed into the pulley itself. The shim, I guess you can call it that, is nothing more that a piece of stainless steel tubing that I welded a washer on to. Ground it smooth and slip it inside of the pulley until the washer bottomed out on to the pulley. Trimmed it down to the length of the is thickness of the pulley. This gives it a nice surface to tighten down the bolt head on.
reason for doing it this way is I didn't want to drill the bracket for a larger bolt (id of pulley is larger than factory bolt) and risk it becoming weak.
reason for doing it this way is I didn't want to drill the bracket for a larger bolt (id of pulley is larger than factory bolt) and risk it becoming weak.


1993, air, alternater, alternator, bolt, compressor, conditioning, ear, free, grind, lined, lt1, pulley, relocation, system, trans, writeup