LT1-LT4 Modifications 1993-97 Gen II Small Block V8

OPTI replacement write-up

Thread Tools
 
Search this Thread
 
Old 02-25-2008, 03:18 PM
  #21  
TECH Enthusiast
iTrader: (19)
 
ZeeTwentyFate's Avatar
 
Join Date: Dec 2006
Location: Lynchburg, Va
Posts: 516
Likes: 0
Received 0 Likes on 0 Posts

Default

i got a sticky for ya, go out pop the hood, remove everythnig in the way of removing the opti, R&R the opti and replace everything back. lol
Old 04-06-2008, 04:26 PM
  #22  
TECH Junkie
Thread Starter
iTrader: (12)
 
1badzee's Avatar
 
Join Date: Sep 2007
Location: SFL
Posts: 3,012
Likes: 0
Received 0 Likes on 0 Posts
Default

someone send me their opti install pics so we can get a sticky.. the LTx section needs one like this lol
Old 04-06-2008, 06:56 PM
  #23  
Staging Lane
 
Comegetusome's Avatar
 
Join Date: Dec 2007
Posts: 77
Likes: 0
Received 0 Likes on 0 Posts
Default

Originally Posted by 1badzee
someone send me their opti install pics so we can get a sticky.. the LTx section needs one like this lol
YEAH! your right, pictures will secure this as one of the most important post in the LT1 section for LIFE!
Old 04-06-2008, 07:02 PM
  #24  
TECH Veteran
iTrader: (10)
 
Revelation Z28's Avatar
 
Join Date: Jul 2006
Location: Rialto CA
Posts: 4,770
Likes: 0
Received 0 Likes on 0 Posts

Default

i have pictures of my timing cover without the old one on, and the new one on/de greased cover.
Old 04-06-2008, 08:28 PM
  #25  
TECH Junkie
Thread Starter
iTrader: (12)
 
1badzee's Avatar
 
Join Date: Sep 2007
Location: SFL
Posts: 3,012
Likes: 0
Received 0 Likes on 0 Posts
Default

Someone contact a moderator and see if we can sticky this! pics will be posted as soon as i can get ahold of some
Old 04-06-2008, 09:03 PM
  #26  
TECH Regular
 
94m6Z28's Avatar
 
Join Date: Dec 2006
Location: Canada
Posts: 419
Received 1 Like on 1 Post

Default

i dont have step by step pictures, but i doo have some

i followed the chilton book and took out the rad/condencer as well , what a big effing wasit. oh well

heres what i got


air intake ducting, fans and all hoses undone. rad drained out, belt off


close up of water pump,, crank pully off, rad/condeser out


coil and smog pump removed *found that a shallow 9/16's and an extention worked really well to get at the bolt behind/beside the a/c, worked soo well the socket is still on the bolt as u can see*


water pump off, dirty failed opti exposed


opti off *mines a 94 and it has the splined drive. if u look close u can see a yellow mark where the flat spot on the spline is. made it a lot easier when i put the new msd unit it. had an idea of where it should be and it just slid right into place. no force or love taps*

all ive got for now
Old 04-06-2008, 09:11 PM
  #27  
TECH Junkie
Thread Starter
iTrader: (12)
 
1badzee's Avatar
 
Join Date: Sep 2007
Location: SFL
Posts: 3,012
Likes: 0
Received 0 Likes on 0 Posts
Default

thanks for the pics.. im gonna try and edit these pics via MS PAINT and add them to the original post lol.. hopefully these and a few of my pics will be enough for a sticky
Old 04-06-2008, 09:15 PM
  #28  
TECH Fanatic
iTrader: (7)
 
Green3spd's Avatar
 
Join Date: Oct 2007
Location: Little Rock, Ar
Posts: 1,177
Likes: 0
Received 1 Like on 1 Post
Default

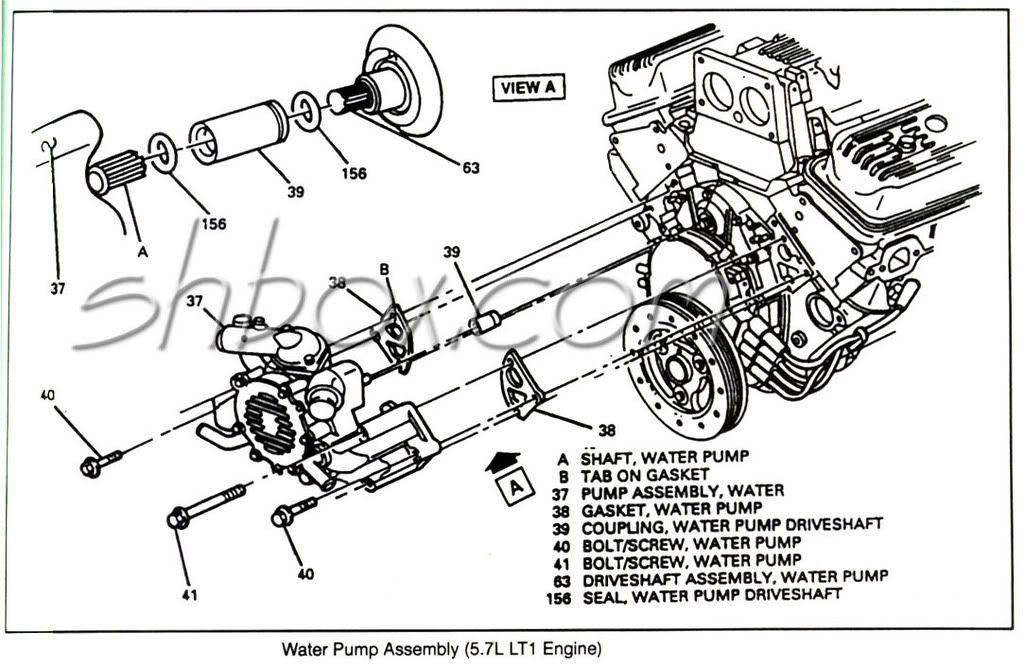
Here's a picture of the SLEEVE that connects the WATERPUMP DRIVE GEAR and DOWEL PIN....

Old 04-06-2008, 09:21 PM
  #29  
TECH Junkie
Thread Starter
iTrader: (12)
 
1badzee's Avatar
 
Join Date: Sep 2007
Location: SFL
Posts: 3,012
Likes: 0
Received 0 Likes on 0 Posts
Default

thank you sir
Old 04-06-2008, 09:56 PM
  #30  
Launching!
 
19mike84's Avatar
 
Join Date: Sep 2007
Location: tacoma, wa
Posts: 208
Likes: 0
Received 0 Likes on 0 Posts
Default

good info, im getting ready to do that when my msd unit arrives this week
Old 04-06-2008, 10:10 PM
  #31  
TECH Junkie
Thread Starter
iTrader: (12)
 
1badzee's Avatar
 
Join Date: Sep 2007
Location: SFL
Posts: 3,012
Likes: 0
Received 0 Likes on 0 Posts
Default

Some Guide Pics Are Up!! Sticky This!
Old 04-06-2008, 10:49 PM
  #32  
TECH Junkie
Thread Starter
iTrader: (12)
 
1badzee's Avatar
 
Join Date: Sep 2007
Location: SFL
Posts: 3,012
Likes: 0
Received 0 Likes on 0 Posts
Default

wooohooo
Old 04-07-2008, 02:18 PM
  #33  
Teching In
 
Nole Chick's Avatar
 
Join Date: Feb 2007
Location: Savannah (Rincon) GA
Posts: 39
Likes: 0
Received 0 Likes on 0 Posts
Default

Great write up, I'm sure I'll be referring to it sooner than later. Def "sticky" material.
Old 04-07-2008, 02:46 PM
  #34  
Banned
iTrader: (12)
 
Elliott's94Z's Avatar
 
Join Date: Mar 2008
Location: Oregon Grown
Posts: 4,370
Likes: 0
Received 1 Like on 1 Post
Default

This was much help..I hear those MSD opti units suck *****
Old 04-07-2008, 03:06 PM
  #35  
Teching In
 
Nole Chick's Avatar
 
Join Date: Feb 2007
Location: Savannah (Rincon) GA
Posts: 39
Likes: 0
Received 0 Likes on 0 Posts
Default

Originally Posted by Elliott's94Z
I hear those MSD opti units suck *****
From what I understand, MSD encountered an early "design flaw" with an o-ring. Newly redesigned and should be resolved now.
Old 04-07-2008, 03:35 PM
  #36  
TECH Junkie
Thread Starter
iTrader: (12)
 
1badzee's Avatar
 
Join Date: Sep 2007
Location: SFL
Posts: 3,012
Likes: 0
Received 0 Likes on 0 Posts
Default

Well I only used their cap+rotor.. the optical sensor/wheel are fine thank god [=
Old 04-07-2008, 03:37 PM
  #37  
TECH Junkie
Thread Starter
iTrader: (12)
 
1badzee's Avatar
 
Join Date: Sep 2007
Location: SFL
Posts: 3,012
Likes: 0
Received 0 Likes on 0 Posts
Default

Originally Posted by Nole Chick
Great write up, I'm sure I'll be referring to it sooner than later. Def "sticky" material.
Why thank you

Lets see if the mods can sticky this.
Old 04-08-2008, 12:22 AM
  #38  
On The Tree
 
alaureano's Avatar
 
Join Date: Mar 2008
Location: naples fl
Posts: 109
Likes: 0
Received 0 Likes on 0 Posts
Default

If You Guys Are Using Original Gm Or Aftermarket Optis, Take A Look At The Connector Housing On The Non Vented Versions. You See A Small Bead Of Sealant That Seals The Gaps In The Opti. This Small Amount Of Sealant Will
Fall Apart In Very Short Time. And Allow Them To Fail If Coolant And Oil Gets Inside. Its Always A Good Idea To Add More Sealant To Them In That Area Before You Install Them. And If You Are Doing The Vented Conversion
Dont Forget To Seal The Holes At The Bottom Of The Of The Opti Case. If Not
You Will Be Sucking In Water And Dirt If It Gets Around That Spot Since You Have To Hook Up Vacume Lines To The Cap.
Old 04-08-2008, 12:30 AM
  #39  
TECH Resident
iTrader: (13)
 
jester1614's Avatar
 
Join Date: Nov 2005
Location: west phx
Posts: 782
Likes: 0
Received 0 Likes on 0 Posts

Default

also i recomend (especially for us non vented guys) that a step be put in, that step consists of after attaching the opti plug in all wires and connections and start the car and rev it a few times to make sure that the opti is installed correctly. (just not for too long, you dont want to overheat)
Old 04-08-2008, 12:51 AM
  #40  
TECH Fanatic
iTrader: (5)
 
transamws6_97's Avatar
 
Join Date: Jun 2005
Location: Cincinnati, OH
Posts: 1,303
Likes: 0
Received 1 Like on 1 Post

Default

can you get the crank pulley off without using a puller?


Quick Reply: OPTI replacement write-up


All times are GMT -5. The time now is 04:32 PM.