
**Stock Adjustable Master Cylinder Writeup**
 08-19-2008, 11:17 PM
#61

I don't know if anyone would be interested but I bought a pack of 50 internal snap rings that are much easier to get back in than the factory spiral lock. The project I was working on went to a different direction.
 11-28-2008, 09:56 PM
#63
On The Tree
Join Date: Mar 2008
Location: Lincoln,NE
Posts: 175
Likes: 0
Received 0 Likes
on
0 Posts
the pice u cut on the inside what does that do i was going to just thread the rod so it will bring the pedal so it has minimal play that way i can get a little more disengaugement.
and are lte lt1 and ls1 masters the same rod diameter
and are lte lt1 and ls1 masters the same rod diameter
12-03-2008, 04:02 PM
#64
On The Tree
Join Date: Mar 2008
Location: Lincoln,NE
Posts: 175
Likes: 0
Received 0 Likes
on
0 Posts
done with the moding and i think gm already made the internal stop shorter when i got mine apart it was really short. so i didn't cut it. as well as this mod could use a smaller diameter die but this one works fine for this. havn't got it on the car yet but i'll see if this helps it go into gear.
01-24-2009, 08:52 PM
#65

Just got done and yes you must cut the travel limiter, I tried mine with out cutting first and with just a little adjustment I couldn't start the car as the pedal wouldn't make it to the floor where the clutch safety switch is. After cutting the limiter and rebleeding it seems to have helped tremendously.
03-03-2009, 04:49 PM
#66
Where can you get a seal kit now days? Also, are the seals the same in a Mcleod as they are in the stock unit? I have a high mile Mcleod and I'd love to rebuild it if seals are all you have to replace. It's leaking fluid. Oops, this one still works on Thunder 37-139011.
Last edited by edzsilverss; 03-03-2009 at 04:55 PM.
 10-08-2009, 08:14 AM
#70
heads up, beaucse mind broke last weekend after having it a few years.
You don't need to run the die way down the shaft. Its cuts metal away, and half of it is hollow for the gold plated rod to go far into. After you run the die over the shaft there only maybe .025 wall left inside, its very thin. Last year the crimp joint of the rod was loose, so I welded it. That helped, but with it loose and woobling like the stock crimp dose probally weakend it a bunch.
You don't need to run the die way down the shaft. Its cuts metal away, and half of it is hollow for the gold plated rod to go far into. After you run the die over the shaft there only maybe .025 wall left inside, its very thin. Last year the crimp joint of the rod was loose, so I welded it. That helped, but with it loose and woobling like the stock crimp dose probally weakend it a bunch.
10-08-2009, 09:39 AM
#71
On The Tree
iTrader: (5)
Join Date: Jun 2004
Location: Illinois
Posts: 141
Likes: 0
Received 0 Likes
on
0 Posts

heads up, beaucse mind broke last weekend after having it a few years.
You don't need to run the die way down the shaft. Its cuts metal away, and half of it is hollow for the gold plated rod to go far into. After you run the die over the shaft there only maybe .025 wall left inside, its very thin. Last year the crimp joint of the rod was loose, so I welded it. That helped, but with it loose and woobling like the stock crimp dose probally weakend it a bunch.
You don't need to run the die way down the shaft. Its cuts metal away, and half of it is hollow for the gold plated rod to go far into. After you run the die over the shaft there only maybe .025 wall left inside, its very thin. Last year the crimp joint of the rod was loose, so I welded it. That helped, but with it loose and woobling like the stock crimp dose probally weakend it a bunch.
10-09-2009, 12:08 AM
#72
stock unmodded top. and the threaded and cut down one (broke)
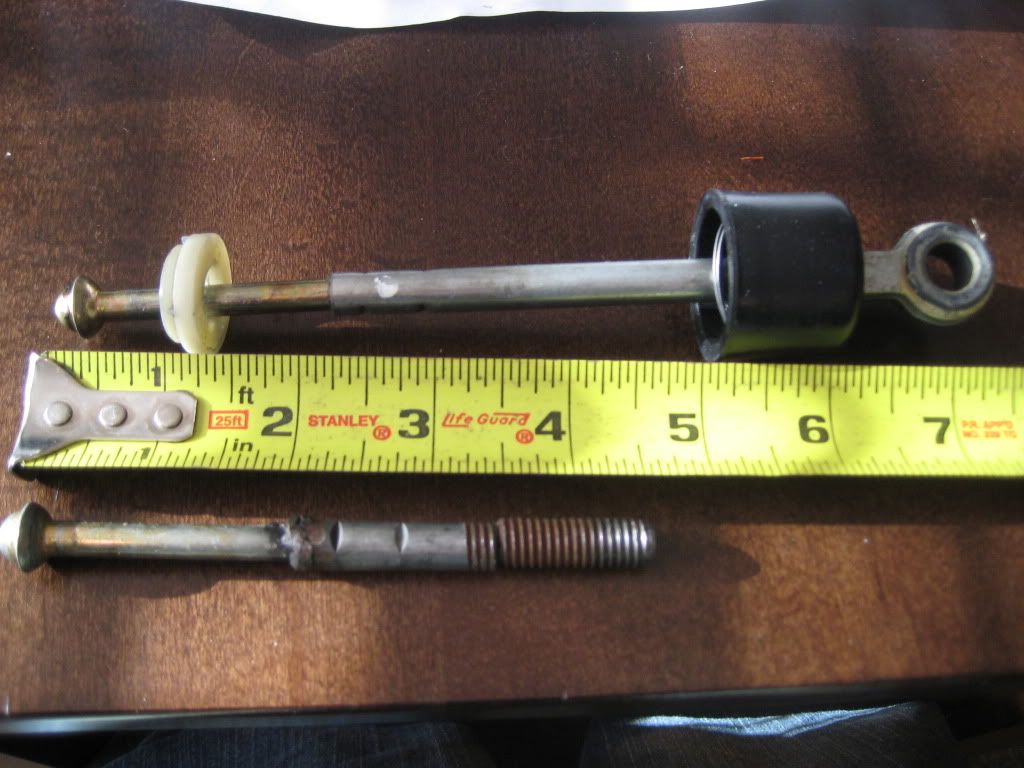
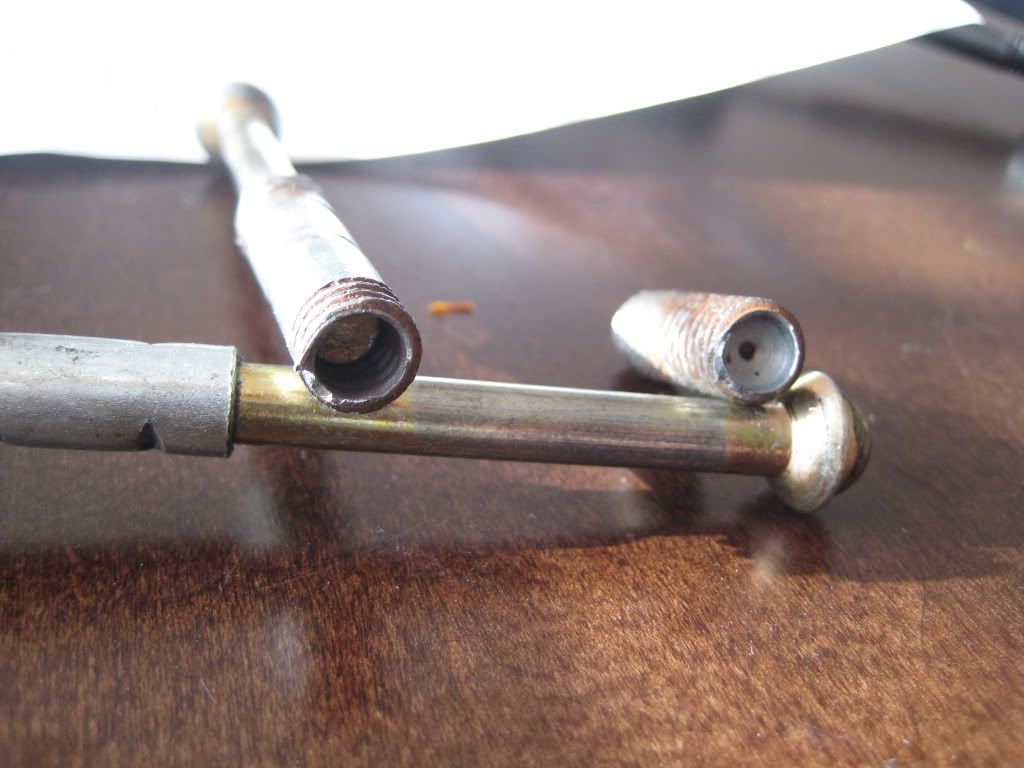
Hole is drilled to about 3 5/8th form the ball end. From there it it soild. (note not moved for it postion in the above pic)
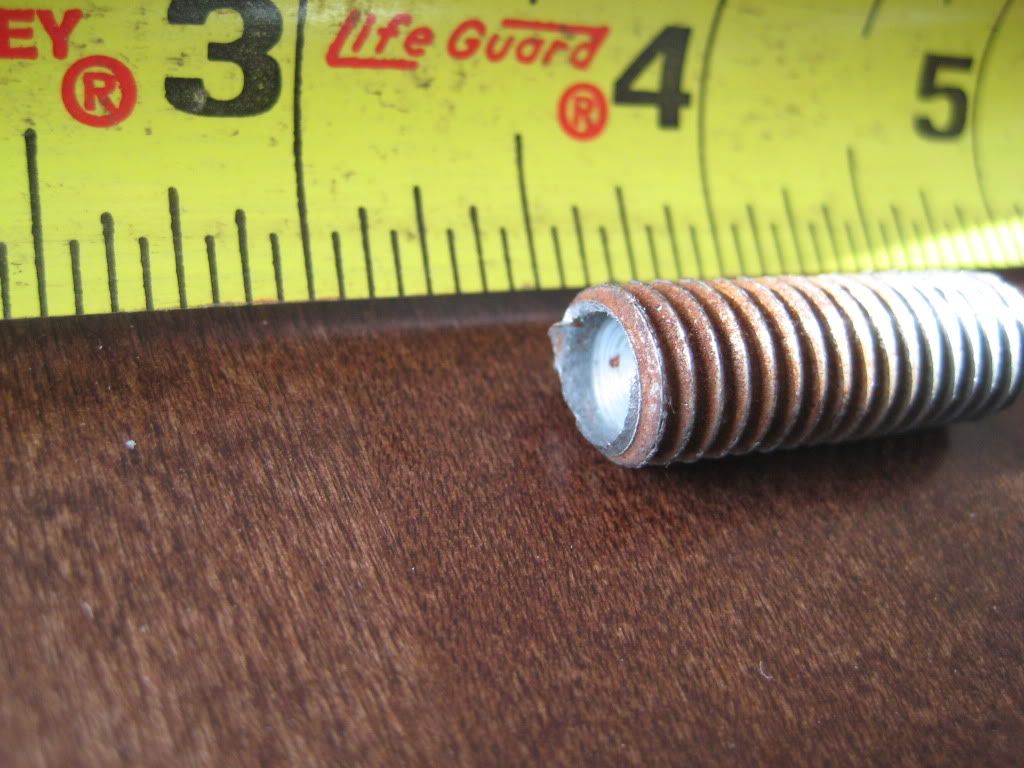
Pic of how thin the wall is if I cut threads with the die over the hollow section.
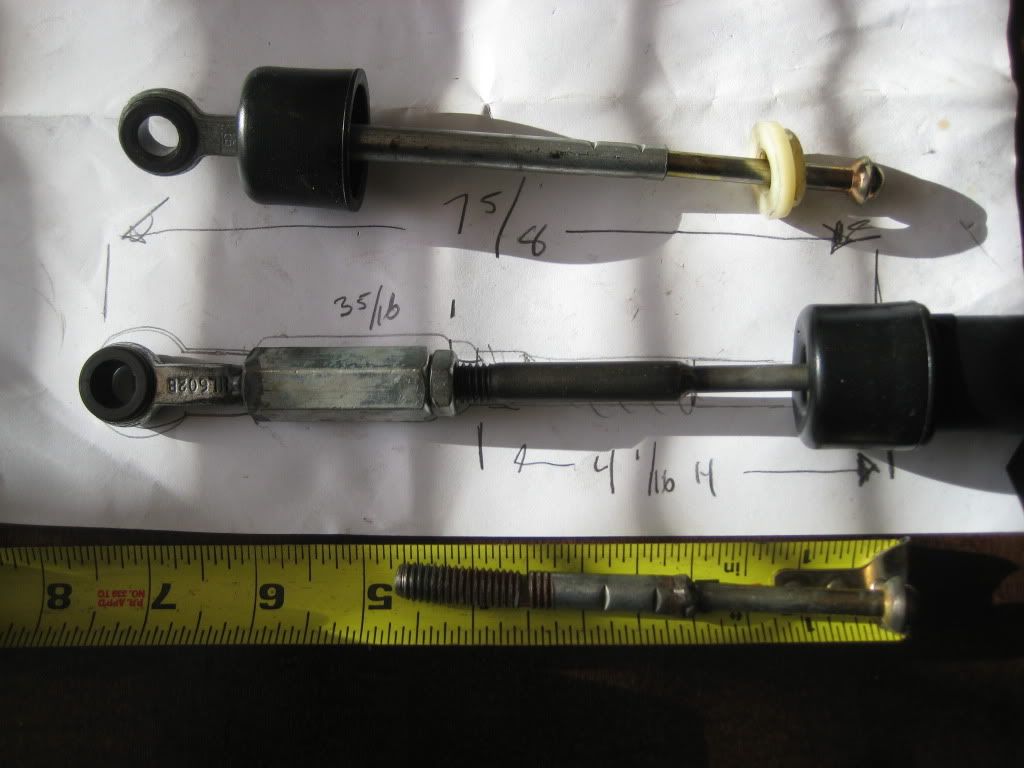
7 5/8 is just a refrance of what the lenght was set to running good on my car beofre the shaft broke. Also not that only left about 3/8 -1/4 (3-4 threads) enguaging into the cuplar nut. That was it cut down as listed in this thread. The middle in I took a long 3/8 cap head bolt, cut the head off and TIG welded it to the shaft. No crimp, and soild inside, I also made it longer then beofre for more thread going into the cuplar nut.
Hole is drilled to about 3 5/8th form the ball end. From there it it soild. (note not moved for it postion in the above pic)
Pic of how thin the wall is if I cut threads with the die over the hollow section.
7 5/8 is just a refrance of what the lenght was set to running good on my car beofre the shaft broke. Also not that only left about 3/8 -1/4 (3-4 threads) enguaging into the cuplar nut. That was it cut down as listed in this thread. The middle in I took a long 3/8 cap head bolt, cut the head off and TIG welded it to the shaft. No crimp, and soild inside, I also made it longer then beofre for more thread going into the cuplar nut.
Last edited by studderin; 10-09-2009 at 12:21 AM.
10-11-2009, 11:24 PM
#74
yup.
oh, becarfull how long you use for the 3/8 bolt. Check out mine, it really close to botteming out. The welded step just touches that rubber boot, so keep it that lenght or move it 1/4 more form the ball end if anything. I think I cut it with a cutoff wheel right along the side of the silver part (looks like 2 1/4 in the 1st pic I posted). Maybe cut it between the end and were the 1st crimp is (2 3/8th), it should still come apart, and you can knock that end ring off, after you cut thogh both of them.
oh, becarfull how long you use for the 3/8 bolt. Check out mine, it really close to botteming out. The welded step just touches that rubber boot, so keep it that lenght or move it 1/4 more form the ball end if anything. I think I cut it with a cutoff wheel right along the side of the silver part (looks like 2 1/4 in the 1st pic I posted). Maybe cut it between the end and were the 1st crimp is (2 3/8th), it should still come apart, and you can knock that end ring off, after you cut thogh both of them.
Last edited by studderin; 10-11-2009 at 11:29 PM.
10-22-2009, 01:21 PM
#77
TECH Enthusiast
iTrader: (13)

Join Date: Aug 2006
Location: Pensacola, FL
Posts: 591
Likes: 0
Received 0 Likes
on
0 Posts
Using a dremel, cut the rod by the eye that goes on the clutch pedal so there is about .25-.4 inches of ROUND part on the eye side. (sorry, no picture)
Can someone take pics of the above step and post them..
Can someone take pics of the above step and post them..
12-01-2009, 06:16 PM
#78
Teching In

Join Date: Jun 2009
Posts: 2
Likes: 0
Received 0 Likes
on
0 Posts
Adding myself to the list of folks who broke the push rod by threading the rod too far down. Just thread the end of the rod, per above!
A Question: For those that cut the internal stop, did you also cut off a coil of the spring? From my mock-up, it looks like the coil now will bind well before the shortened stop hits, and removing a coil would be needed to obtain the full travel...
A Question: For those that cut the internal stop, did you also cut off a coil of the spring? From my mock-up, it looks like the coil now will bind well before the shortened stop hits, and removing a coil would be needed to obtain the full travel...
12-08-2009, 08:18 PM
#80
TECH Enthusiast
iTrader: (2)
Join Date: Dec 2004
Location: Thibodaux Louisiana
Posts: 630
Likes: 0
Received 0 Likes
on
0 Posts
so other than threading the rod too far has anyone else had any problems with this? I'm about to swap to a ls7 clutch and would like to know if i can do this or just spend the money and get he tick mc?