


header install
On The Tree

Joined: Mar 2010
Posts: 108
Likes: 0
From: Amarillo, Texas

TECH Fanatic
Joined: Aug 2002
Posts: 1,013
Likes: 0
From: Katy, TX
Trending Topics

On The Tree
Joined: Sep 2009
Posts: 197
Likes: 0
From: Huntsville, AL
If you're going to do headers, consider doing motor mounts as well. You'll be happy you considered it even if you don't do them.
Try out Kroil in the aerosol can. I tried to buy a can off of their website and they sent me two big cans for free. This stuff is ridiculously good. You might have to order it via Amazon, as the site said they only sell it to companies as of this posting.
Seriously. Especially with our pig-iron bolts I want as much help as I can get.
Seriously. Especially with our pig-iron bolts I want as much help as I can get.
LS1 Tech Stories
The Best V8 Stories One Small Block at Time

Top 10 Greatest Cadillac V Series Performance Models Ever, Ranked
Pouria Savadkouei
Top 10 Most Powerful Chevy Trucks Ever Made!

Hennessey's New Supercharged Silverado ZR2 Has 700 HP
Verdad Gallardo
Coachbuilt N2A Anteros Is an LS2-Powered C6 Corvette In Italian Clothes
Verdad Gallardo
Awesome K5 Blazer Restomod Comes With C7 Corvette Power
Verdad Gallardo
10 Camaros You Should Never Buy

10 LS Engine Myths That Refuse to Die
Verdad Gallardo
Five Reasons the Camaro Was the Most Pivotal Player in the Pony Car Wars 2.0
Brett Foote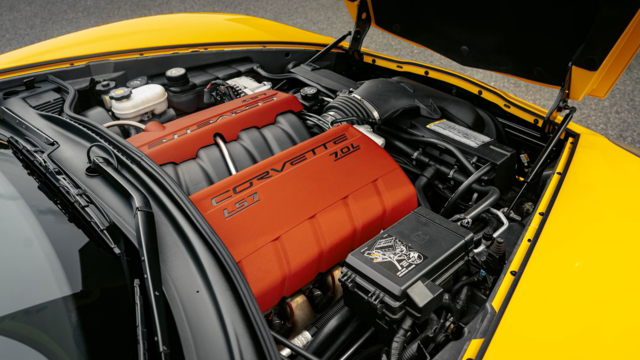
10 Reasons the LS7 Is GM's Most Extreme Naturally Aspirated V8 Engine Ever
Verdad Gallardo

In a nutshell, here is the order and steps I took for my LT/Catted Y/Poly MM Install...
1) Jack the car way up in the air. I had my car in the air for a couple days before I started disassembly so I could spray every single nut and bolt (including the O2 Sensors and Motor Mount bolts) I could get to with some Panther ****. PB Blaster, WD-40, BD-777, whatever you wanna call it, you'll definitely want a couple cans handy.
2) Disconnect the Battery. I removed the battery entirely from the engine bay. I'm 6' tall, but I'm skinny so I would use the battery tray as a place to crouch, while working on the engine bay disassembly.
3) Remove the Plug Wires, Disconnect the Electrical Connection to the Coil Packs and Unbolt the bracket holding the Coils to the Valve Covers. Then remove the Spark Plugs. The furthest back on the passenger side is more easily accessable from below the car.
4) Disconnect the A.I.R. System tubing from each manifold. If you have a 98-00 F-body you need to disconnect the EGR from the Passenger Manifold and where it connects at the top of the Intake Manifold. Remove from the EGR from engine bay and set aside. If you're going with a "Race Style" LT, you can remove these systems from the car entirely. (I retained the A.I.R. on my car, so I'm not familiar with it's removal procedure.)
5) On the passenger side remove the 15mm(?) Bolt holding the dipstick tube to the Head. Then pull the tube out of the Oil Pan. This may take a little effort and some twisting, but it will come out.
Now we move to below the car. This is where having sprayed the bolts/nuts ahead of time will come in handy...
6) Disconnect the 4 O2 Sensors from their electrical connectors. Its not necessary to remove the Rear O2s from the Y-pipe unless you plan to save them or tranfer them to your new Y. If you do, remove them now. You may need to wait until the Y-pipe is off the car to remove the front sensors. I labelled mine to know which was driver's and passenger and installed them in the headers accordingly.
7) Loosen the clamp holding the Y-pipe to the catback (I reused mine, but if you break it, you'll want a 2 3/4" Clamp) and remove every nut and bolt having to do with the exhaust between there and the flanges on the manifolds, including the ones connecting the manifolds to the Y-pipe. Disassemble the Y-pipe. You may have to twist the Y-pipe up and down to get it removed from the catback.
All you should have left now are the two manifolds to be removed. So back up top we go...
8) Each manifold is attached to the head with six 10mm bolts, loosen them first, then remove all but one of the center bolts on each. This is where you'll probably need a helper either under the car to lower the manifold out or to remove the last bolt on each. I had my fiance' underneath hold the manifold while I removed the bolts.
Bingo, man! You now have the exhaust off the car and outta the way.
9) Now you can either start to install the headers or you can do the right thing and upgrade your Motor Mounts while the exhaust is out of the way and the mounts are accessible.
If you choose to latter, use this writeup...
https://ls1tech.com/forums/generatio...r-written.html
10) Once you've completed installing the new Motor Mounts, then you can slide the new Headers into engine bay from under the car. You'll probably need a friend to hold the header in place while you get a couple bolts and the Header Gaskets in place.
11) Install the remaining Exhaust Manifold Bolts to the head. Alot of guys like to use Anti-seize on the threads to be sure the bolts will come out without trouble in the future. I used medium strength Loctite instead to prevent them from backing out over time. Pick your poison and then torque the bolts to ~20 ft/lbs.
Bam! Headers installed!
The next step depends on what type of exhaust you're planning to install on the car.
I went with a Y-pipe/Catback Setup, so my next move was to assemble the Y-pipe from the collector to the I-pipe of the catback.
If you're doing True Duals, you're looking at a very custom setup. The next step will be deciding where to route the pipes.
That's it, man.
Good luck.
the way you put it maakes it seem so easy lol,dont i need to disconnect the steering linkage?
I have heard of guys who installed Pacesetter LTs who had to remove the Steering Knuckle in order to get the drivers header in place.
I can't tell you if the brand of header made the difference, but fitment can be an issue with budget headers.
Even if the Steering should need to be removed, it can't be that difficult of a task to accomplish. Just one more step in the process.
This is just my experience with LT's on LSx cars. Take it for what it is.

P.S. If you're considering adding a set of LTs you should look into upgrading your Motor Mounts at the same time.
yea i have pacesetter race style long tubes so like yu and others said im prolly going to take it off no biggie tho i still havent had any free time to put them on but sum time this week when i buy some new jack stands,tools,motor mounts,gasket etc im going to try to do my first header install.....

I know I've tried all kinds of gaskets on old small blocks, big blocks, etc. The pacesetters come with the old style paper/asbestos material.
I've re-used the stock MLS gaskets on both of my cars, they still seal good, never loosened up. None of the problems of the old type materials.
You must have your originals still right? Clean them up and re-use them.

TECH Enthusiast
Joined: Aug 2006
Posts: 734
Likes: 2
From: Hamlin ny
yea i have pacesetter race style long tubes so like yu and others said im prolly going to take it off no biggie tho i still havent had any free time to put them on but sum time this week when i buy some new jack stands,tools,motor mounts,gasket etc im going to try to do my first header install.....