

HSW dry plate kit.. anyone got pics???

 01-22-2009, 08:05 AM
#22
 01-22-2009, 09:29 AM
#23
FormerVendor
iTrader: (4)
Join Date: Jul 2005
Location: Glenolden, PA
Posts: 1,954
Likes: 0
Received 0 Likes
on
0 Posts
Nick
Last edited by Nick@HSW; 01-23-2009 at 08:16 AM.
01-23-2009, 06:56 AM
#27
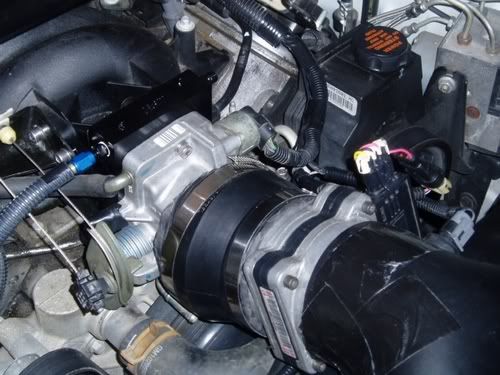
Not real pretty yet, but it will get new lines and what not as the $$ come around, you guys know how that is, lol. this is my 2nd and 3rd stages off the Dry plate. also still need to tidy up all of the wiring looms and little stuff like that. The lines will be SS braided, the smoke colored and the fittings will be black and silver, real nice look, imo. i have some trick spacers for getting the lines nice so they don't flap all over, but all in all it's coming along, lol.


The microedge can ride on the LM1 window mount, or go in the glove box, along with being hand holdable.

The Interfaces and a nice mounting spot that is easy to get to.

I have many, many more pictures and did a step by step on the wiring so anyone can follow along. Results and logs and dyno print outs and the similar are coming.
Robert
The microedge can ride on the LM1 window mount, or go in the glove box, along with being hand holdable.
The Interfaces and a nice mounting spot that is easy to get to.
I have many, many more pictures and did a step by step on the wiring so anyone can follow along. Results and logs and dyno print outs and the similar are coming.
Robert
01-23-2009, 07:10 AM
#28
Not real pretty yet, but it will get new lines and what not as the $$ come around, you guys know how that is, lol. this is my 2nd and 3rd stages off the Dry plate. also still need to tidy up all of the wiring looms and little stuff like that. The lines will be SS braided, the smoke colored and the fittings will be black and silver, real nice look, imo. i have some trick spacers for getting the lines nice so they don't flap all over, but all in all it's coming along, lol.
The microedge can ride on the LM1 window mount, or go in the glove box, along with being hand holdable.
The Interfaces and a nice mounting spot that is easy to get to.
I have many, many more pictures and did a step by step on the wiring so anyone can follow along. Results and logs and dyno print outs and the similar are coming.
Robert
 01-23-2009, 08:42 AM
#29
FormerVendor
iTrader: (6)

Join Date: Nov 2007
Location: Glenolden, PA
Posts: 1,593
Likes: 0
Received 0 Likes
on
0 Posts
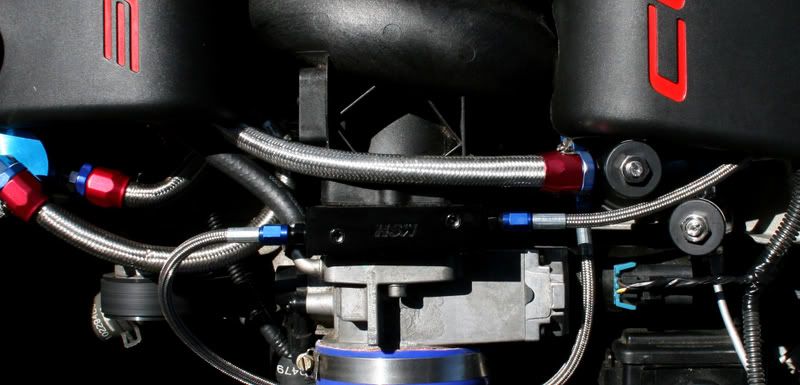
Here was my two stage dry plate we tested. Right now I am running a different setup
 , but this one tested really well. Technically speaking, the dual stage dry brute force plate can flow in excess of 1000hp
  (not that i would EVER recommend that!)...When it comes down to it, I would say that makes it the highest flowing plate on the market.
 01-23-2009, 08:55 AM
#30
10 Second Club
iTrader: (38)

Join Date: Oct 2006
Location: Phoenix, Az
Posts: 1,259
Likes: 0
Received 0 Likes
on
0 Posts

Robert, very sweet install! Where did you get your solenoid mount from? Was that a custom piece?
Mike, if I ever decide to do an LSx swap on my '70 I will definitely be hitting you up for one of these setups!!
Mike, if I ever decide to do an LSx swap on my '70 I will definitely be hitting you up for one of these setups!!
01-23-2009, 05:36 PM
#31
What I did was cut down the top portion and re-drill for the NX solenoids. No mods required for any standard style solenoids. the reason this was needed is the fact that the stage 6 solenoids have their bottom screw holes 90� off compared to reg noids. Also, they don't have a round flat bottom and thus trimming of the brackets top portion. Also, for better looks and fit, I re-drilled the TB mount holes by relocating them higher. What this did was to lower the mount and noids closer to the CAI plumbing for cleaner tighter look.
I was thinking about going hard line, but my personal choice in looks is I like the braided better. however, Mike's install and hard-lines do look killer. We still have lots of ideas and work to do before I would say it's done. But for now it's the beta version, lol, and ready for racing.
Robert
01-25-2009, 11:43 AM
#32
12 Second Club
Thread Starter
Join Date: Aug 2007
Location: Rowlett
Posts: 508
Likes: 0
Received 0 Likes
on
0 Posts
nice.. thanks for all the pics and information....
I am just waiting on mr. IRS to fill my account up.. LOL
Then its n2o, DR's, and exhaust time.. LOL
I am just waiting on mr. IRS to fill my account up.. LOL
Then its n2o, DR's, and exhaust time.. LOL

 01-27-2009, 03:39 PM
#34

Homie, you need to do the wire mod.
I think that�s the coolest part of the dry plate and interface combination. If you just use one side you�re getting 10 distribution points, really good atomization. Split it into two lines you�re doubling your discharge points. Like nick said, pretty much overkill for small shots, but an improvement regardless. Now the part i really like, just like Robert did, you can run this as a two stage setup. In terms of flow potential, let�s just say it�s more then you would ever need.
Here was my two stage dry plate we tested. Right now I am running a different setup, but this one tested really well. Technically speaking, the dual stage dry brute force plate can flow in excess of 1000hp (not that i would EVER recommend that!)...When it comes down to it, I would say that makes it the highest flowing plate on the market.
Here was my two stage dry plate we tested. Right now I am running a different setup
, but this one tested really well. Technically speaking, the dual stage dry brute force plate can flow in excess of 1000hp (not that i would EVER recommend that!)...When it comes down to it, I would say that makes it the highest flowing plate on the market. 

