


CETA Mod

Thread Starter
Teching In
Joined: Sep 2010
Posts: 9
Likes: 0
Posted this on another forum a while back, but never got around to posting it here.
Decided to finally do the CETA mod to the 96 WS6.
Materials (All from Wal-Mart)
--------------
100 grit sandpaper - $5
Sanding block (Not required) - $5
Blue 1" Painters Tape - $5
Clear plastic tarp - $2
2 cans Krylon Fusion Satin Black - $10
Note: All prices are random estimates... don't have the receipt on me.
TOTAL COST - $25-$30
There are very detailed guides on the internet explaining how to do this with many steps. I skipped most of them.
1. I backed my TA up on some cheap ramps to make it easier on my back while working
2. Remove the license plate (4 screws)
3. I used 100 grit sand paper to get rid of the clear coat in the area I was painting.
4. I washed the area with simple water and a rag.
5. Let it dry completely (Takes only a minute or two if you are just wiping with wet rag)
6. Begin taping the line around where you will be painting. Make sure you take a bit of time with this... you don't want your lines looking sloppy.
Picture of bumper sanded, washed, and taped.

7. I draped the tarp over the rear of my TA and taped it down. It was a slightly windy day and I didn't want overspray reaching my car anywhere. I also cut a bit of this to wrap around my tailpipes (even though they're black already...)

8. Time for the fun part. Spray the entire bumper in a light coat, in full sweeping motions. Never stop your spray on the bumper if possible.
9. Let the coat sit for 15 minutes, then repeat. Make sure you do light coats, so the paint doesn't run. I ended up doing 5 light coats.
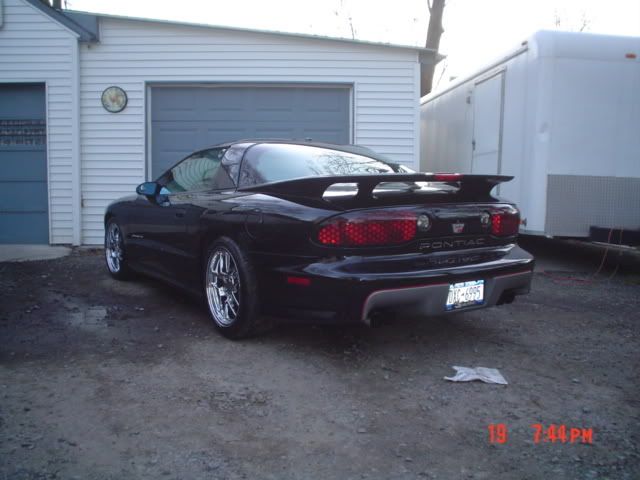
This pic is after a few coats.

10. Let sit for a few hours (I let it sit for 3-4 hours), and remove tape/tarp. Krylon Fusion dries very quickly, so 3-4 hours is all it really needs to harden. It wasn't even sticky 20 minutes after my last coat, but I didn't want to push my luck.
11. ENJOY your nice new rear bumper.


Decided to finally do the CETA mod to the 96 WS6.
Materials (All from Wal-Mart)
--------------
100 grit sandpaper - $5
Sanding block (Not required) - $5
Blue 1" Painters Tape - $5
Clear plastic tarp - $2
2 cans Krylon Fusion Satin Black - $10
Note: All prices are random estimates... don't have the receipt on me.
TOTAL COST - $25-$30
There are very detailed guides on the internet explaining how to do this with many steps. I skipped most of them.
1. I backed my TA up on some cheap ramps to make it easier on my back while working
2. Remove the license plate (4 screws)
3. I used 100 grit sand paper to get rid of the clear coat in the area I was painting.
4. I washed the area with simple water and a rag.
5. Let it dry completely (Takes only a minute or two if you are just wiping with wet rag)
6. Begin taping the line around where you will be painting. Make sure you take a bit of time with this... you don't want your lines looking sloppy.
Picture of bumper sanded, washed, and taped.
7. I draped the tarp over the rear of my TA and taped it down. It was a slightly windy day and I didn't want overspray reaching my car anywhere. I also cut a bit of this to wrap around my tailpipes (even though they're black already...)
8. Time for the fun part. Spray the entire bumper in a light coat, in full sweeping motions. Never stop your spray on the bumper if possible.
9. Let the coat sit for 15 minutes, then repeat. Make sure you do light coats, so the paint doesn't run. I ended up doing 5 light coats.
This pic is after a few coats.
10. Let sit for a few hours (I let it sit for 3-4 hours), and remove tape/tarp. Krylon Fusion dries very quickly, so 3-4 hours is all it really needs to harden. It wasn't even sticky 20 minutes after my last coat, but I didn't want to push my luck.
11. ENJOY your nice new rear bumper.
Last edited by Disarmer; May 17, 2011 at 12:32 PM.

Staging Lane
Joined: Apr 2011
Posts: 91
Likes: 1
From: maryland
i was just thinking yesturday, painting the center section black is a "mod" but now-a-days if it comes from the factory like that, then the mod it to paint it to match the color of the car, how funny is that...like on the GTOs the bumper center section, its grey from the factory and people like to paint to match the car, lol
Thread Starter
Teching In
Joined: Sep 2010
Posts: 9
Likes: 0
I used 100 grit, not 1000. 5 light coats of Krylon Fusion Satin Black covered all sanding marks just fine. Since it is a Satin finish, it does not matter very much. If you were going for a perfect glossy look, you would want a much finer grit sandpaper. Satin is forgiving.
I'll try and get some good pictures in good light next time I give it a wash, just so show how the paint finish turned out. Looks great in person. Also gonna buy some VHT nightshade and try to hide the lamination issues with my tails. Hopefully it works.
I'll try and get some good pictures in good light next time I give it a wash, just so show how the paint finish turned out. Looks great in person. Also gonna buy some VHT nightshade and try to hide the lamination issues with my tails. Hopefully it works.
Trending Topics
LS1 Tech Stories
The Best V8 Stories One Small Block at Time

Topdon ONE vs. Artidiag 800 BT2: Which is the Diagnostic Tablet For You?
Pouria Savadkouei
Gas Monkey Built a 6-Wheel Ferrari Testarossa With a Corvette LT4 Engine
Verdad Gallardo
7 Most Reliable High-Performance Engines GM Has Ever Built
Verdad Gallardo
Amazing '71 Camaro Restomod Is Modern Muscle Car Under the Skin
Verdad Gallardo
6 Common C5 Corvette Failures and What's Involved In Repairing Them
Pouria Savadkouei
Retro Modern Bandit Pontiac Trans AM Comes With Burt Reynolds' Autograph
Verdad Gallardo
Top 10 Greatest Cadillac V Series Performance Models Ever, Ranked
Pouria Savadkouei
Top 10 Most Powerful Chevy Trucks Ever Made!

Hennessey's New Supercharged Silverado ZR2 Has 700 HP
Verdad Gallardo Looks good but I would definitely recommend 320-400 grit sandpaper for sanding down the bumper. 100 is just way too aggressive in my opinion.
Also I would recommend tinting your tail lights with a true clear coat/black base coat mix and not that niteshade crap. May cost you a little more if you have to pay someone to do it/do not have a spray gun and materials but the quality difference is astounding.
Also I would recommend tinting your tail lights with a true clear coat/black base coat mix and not that niteshade crap. May cost you a little more if you have to pay someone to do it/do not have a spray gun and materials but the quality difference is astounding.

On The Tree
Joined: Jul 2004
Posts: 144
Likes: 0
Dude has 2 posts and used 100 grit. No one take coating or painting or any kind of finishes advice from this guy. 800 would have done just fine, and turned out better.
Oh well, I guess these cars are too old to be taken care of properly, until they're ready to be restored.
Oh well, I guess these cars are too old to be taken care of properly, until they're ready to be restored.


Thread Starter
Teching In
Joined: Sep 2010
Posts: 9
Likes: 0
Dude has 2 posts and used 100 grit. No one take coating or painting or any kind of finishes advice from this guy. 800 would have done just fine, and turned out better.
Oh well, I guess these cars are too old to be taken care of properly, until they're ready to be restored.
Oh well, I guess these cars are too old to be taken care of properly, until they're ready to be restored.

800 will work, as will 100. If you can tell no difference, what does it matter?
Nope. If you are going for a gloss finish I would definitely recommend wet sanding in between every other coat as well as applying a nice clear (Also, using a much higher grit sandpaper originally... 100 grit is NOT for gloss). With the satin finish, it's not really necessary. (Clear is optional for durability)
Last edited by Disarmer; May 22, 2011 at 06:12 AM.


Dude has 2 posts and used 100 grit. No one take coating or painting or any kind of finishes advice from this guy. 800 would have done just fine, and turned out better.
Oh well, I guess these cars are too old to be taken care of properly, until they're ready to be restored.
Oh well, I guess these cars are too old to be taken care of properly, until they're ready to be restored.

 that cracked me up, Chaman your car is sick man, Best looking bird on tech,
