
 05-10-2016, 02:55 PM
Last edit by: IB Advertising
See related guides and technical advice from our community experts:
- Camaro and Firebird How to Paint Rims Using Plasti Dip<br>Step by step instructions for do-it-yourself repairs.

Plasti-Dipped Camaro
01-05-2014, 08:18 PM
#21
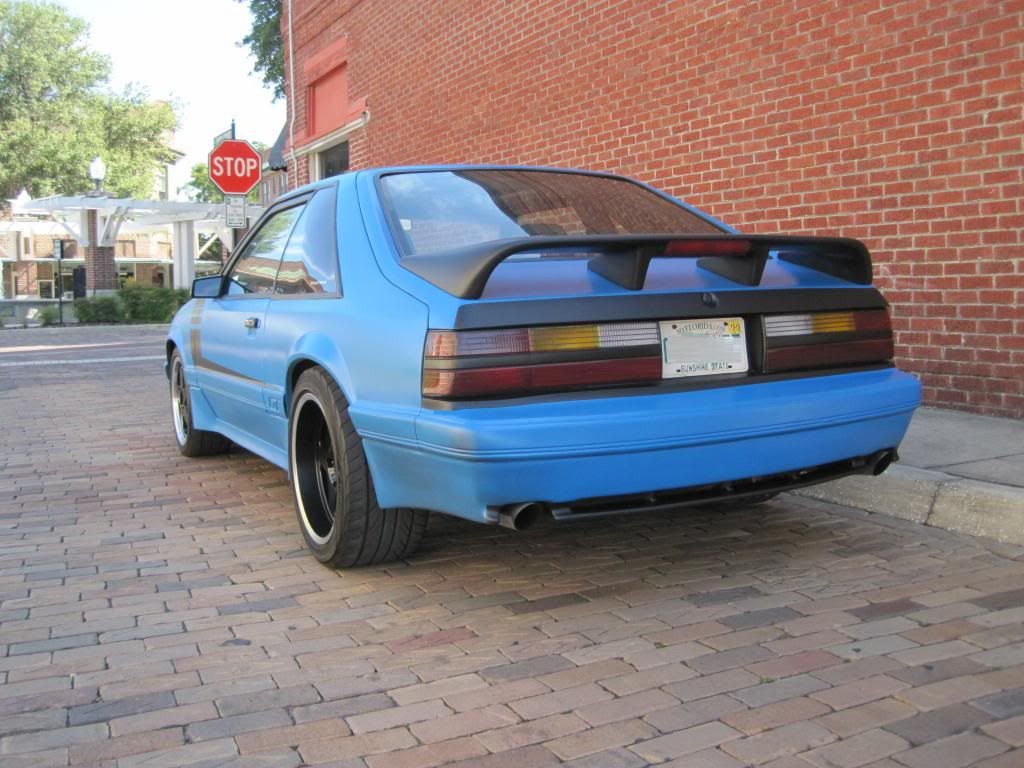
I as well dumped too much into my drivetrain and found myself not wanting to dump more into the car so I too plasti-dip my car. I did it myself in my garage. So many thumbs up. My goal was a grabber blue with boss like stripes. I sold it in Oct.


 01-06-2014, 10:00 AM
#24
No thread highjack but for me it took about 6hrs. I took time to prep almost like paint. I thought the material was thicker but lays down similar to paint so it will run. Its easy to tiger stripe depending on color under. You also want to laydown as many coats as you can as this makes it easy to take off later. I did tape up my windows and seals. I wanted to save the material for the body. You can spray everything then peal it off but you have to spray those areas heavy to so it come off easy. I also did the black in plasti. Now that was a challenge. You have to tape off and spray heavy and quick as you have to pull the tape off BEFORE it is dry. So planning ahead of how and where you peal is key. Note I did use the glosifier in my blue, I mixed it in so that would have a semigloss look to it. The new owner wants to keep the look, I painted it this summer and still looks like pic today. When I saw it leaving, I said that was a damn good looking car.
Color choice is key to look good. I saw a blue TA on here that looks plasti, its a qtr mile car that looked super sick.
OP rims would need a change or color change. Other than that, pics look good.
Color choice is key to look good. I saw a blue TA on here that looks plasti, its a qtr mile car that looked super sick.
OP rims would need a change or color change. Other than that, pics look good.
01-06-2014, 10:32 AM
#25
Tools I used:
Whole car kit from dipyourcar.com (includes spray gun and 3 gallons of dip)
Painters tape
newspapers/blankets/plastic
rubbing alcohol
paint thinner
extension cord for spray gun
Here is a list of how I prepped the car and the process of spraying.
I watched the dipyourcar.com youtube video and pretty much did everything they say to do. It's about 30 minutes long but was very helpful to me since I've never done anything like this before.
1) I removed the headlights, radio antenna, and spoiler. You probably don't need to remove the headlights but it only takes 10 minutes to remove and I wanted to make sure I got full coverage when spraying.
2) I placed cardboard in front of the radiator to prevent that from getting sprayed.
3) I left the hood popped up about an inch just to make sure I fully sprayed the edges of the hood.
4) One thing I did different was I taped off the roof, windshield, rear window, sail panel, and dr. and pass. windows with a blanket and left about 2" not covered near the bottom. I technically did not need to even tape this off because the dip peels off on areas you don't want covered, but I thought this would save me in the end from peeling a huge section off. Plus I wasn't in a rush to get this done, so I took my time.
5) I then taped off the wheels and tires so I didn't spray them either.
6) I taped off my exhaust tips too which I wished I would have taped off more than that underneath the car. There is still overspray under my car that I find every time I crawl under there. Next time, I am going to tape a huge sheet of painters plastic across the entire underside of the car from front to back.
7) I did not buy the pre dip spray or whatever its called on dipyourcars site. I just wiped the car down with a mix of water and rubbing alcohol to get and dirt and grease off of it
8) I started my first coat which is supposed to be a really light coat. Make sure you have your extension cord laid out just right so that it does not get caught underneath the car or on the tires. Make sure you have enough slack so that it doesn't make contact with anywhere you are spraying on the car. Sounds stupid, but it was a pain in the butt until I figured out a system for the cord layout.
I waited 12 minutes between each coat. I think on the video it said 10-15 so I just split the difference. I actually used the timer on my phone to make sure every coat had the same amount of dry time.
9) I layed my 2nd, 3rd, and 4th coats on thin as well. I should have gone thick with these. This is one thing I will be doing different the next time around.
10) I did 7 coats total, I wish I would have done 1 or 2 more but I ran out of dip. Next time I will buy 4 or 5 gallons. Also in between coats, I would make sure that the tip of the gun wasn't clogged with dip. if it was, I would clean it with thinner.
11) my spray technique was to keep the gun as steady as possible and to get down low with the car while spraying instead of just angling the gun down.
12) Now I removed the excess dip after about 30 minutes of dry time and removed all the taping and newspapers I used to cover items.
13) Here is where some of my imperfections happened. I wish I would have adjusted my body lines prior to spraying the car. I opened my hood all the way and a little rubbing happened in the corner of the hood and fender. It never rubbed prior to dip but I always noticed it was close. So the thickness of the dip on both body parts must have been the difference between rubbing and not rubbing. Same thing happened between my pass side door and fender. It never rubbed before but it did the first time I opened the door. It actually made a popping noise and the dip itself ripped and is noticeable. So moral of the story is CHECK YOUR BODY LINES BEFORE YOU SPRAY!!!
14) Also, when I opened the doors, the dip did not cut itself along the bottom of the door and rocker and actually started to come up off the rocker panel. I noticed this before it was too late and cut it with a razor blade. But it did look bad when the door was open on the rocker so I put a long strip of black electrical tape across the entire thing to prevent it from peeling in the future.
15) Be careful putting the headlights back in. Do not force anything as you will rip the plasti-dip.
16) This is annoying and hard to remember to do all the time. Every time I get in my car now, I have to remember not to drag my leg across the rocker at all. Especially if you are wearing jeans, it will wear down the dip and actually start to peel on you. You also have to tell all your passengers this. I forgot to once and now my passengers side rocker is all chewed up. I'm not sure if spraying it thicker there would have helped or if this happens to everyone that dips their car, but it sure is annoying for me.
01-06-2014, 10:48 AM
#28
That is the most common thing I hear about the car. I am actually a huge fan of the gunmetal rims. I think they set the car off. Everyone does black, I even had black ZR1 wheels at one time on the car. I was thinking of painting the manta a gunmetal color to match the wheels. I just painted the new s60 rearend in gunmetal to give it a subtle attribute. Who knows, maybe I'm the only one that likes it, but I didn't build the car to please anyone but myself.
01-06-2014, 07:53 PM
#30
Rare99, that was a great write up! I did most of what you did. I used the dipyourcar kit too. I'll tell you painted it twice. I used some tint since I thought the light blue was a bit too cotton candy for me. Though it turned out nice, the color just wasn't for me. So I dipped it again. It was a bit of work.
Bottom line tip, to do it right think like it was going to a paint booth.
I'm not a fan of complete black rims, looks like a big black hole. I would say at min gun metal or silver with stock rims. Check the dipyourcar web forum and they do some nice work. Not much American muscle but some nice corvettes. If you go aftermarket rims a gloss black would be nice offset.
I built this 347 all my garage. I love this part the most. Sorry for the non LS but it was nice to look at. Its a very healthy 347 with EVERY goodie.

My try with that tint I didn't like.
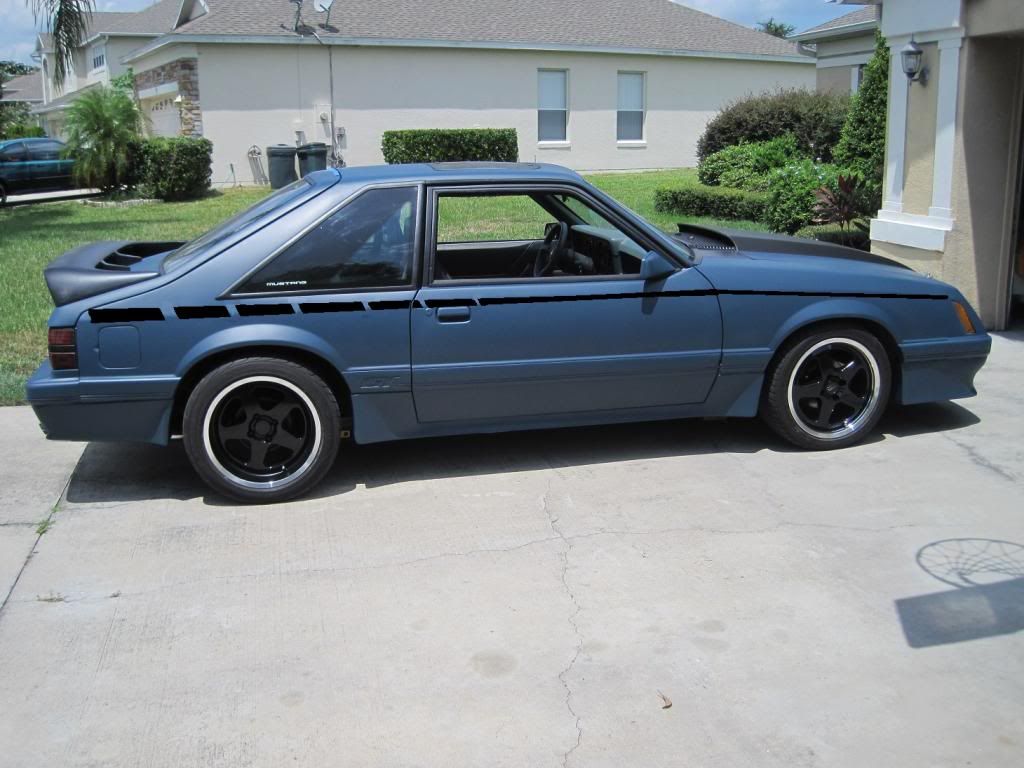
What it looked like before my first dip. I fixed any body work on it, far from a pro but turned out nice.

Bottom line tip, to do it right think like it was going to a paint booth.
I'm not a fan of complete black rims, looks like a big black hole. I would say at min gun metal or silver with stock rims. Check the dipyourcar web forum and they do some nice work. Not much American muscle but some nice corvettes. If you go aftermarket rims a gloss black would be nice offset.

I built this 347 all my garage. I love this part the most. Sorry for the non LS but it was nice to look at. Its a very healthy 347 with EVERY goodie.

My try with that tint I didn't like.

What it looked like before my first dip. I fixed any body work on it, far from a pro but turned out nice.

Last edited by RyanSws6; 01-06-2014 at 08:00 PM.
02-27-2014, 03:45 PM
#31
On The Tree
Join Date: Feb 2014
Location: sacramento, ca
Posts: 162
Likes: 0
Received 0 Likes
on
0 Posts
Rare99, that was a great write up! I did most of what you did. I used the dipyourcar kit too. I'll tell you painted it twice. I used some tint since I thought the light blue was a bit too cotton candy for me. Though it turned out nice, the color just wasn't for me. So I dipped it again. It was a bit of work.
Bottom line tip, to do it right think like it was going to a paint booth.
I'm not a fan of complete black rims, looks like a big black hole. I would say at min gun metal or silver with stock rims. Check the dipyourcar web forum and they do some nice work. Not much American muscle but some nice corvettes. If you go aftermarket rims a gloss black would be nice offset.
I built this 347 all my garage. I love this part the most. Sorry for the non LS but it was nice to look at. Its a very healthy 347 with EVERY goodie.
My try with that tint I didn't like.
What it looked like before my first dip. I fixed any body work on it, far from a pro but turned out nice.
 02-27-2014, 07:31 PM
#33
On The Tree
Join Date: Feb 2014
Location: sacramento, ca
Posts: 162
Likes: 0
Received 0 Likes
on
0 Posts
Nice so no compressor needed. 3 gallons was enough for the fbody? I just looked it up and of course its not for sale in ca probably for some Bs reason
 02-27-2014, 08:40 PM
#35
TECH Regular
iTrader: (2)
Join Date: Dec 2009
Location: Austin Texas
Posts: 414
Likes: 0
Received 0 Likes
on
0 Posts
Just dipped my whole car today using Dip your Car's paint gun station came out really nice. I have painted (clear coat/base coat) about 10 cars in the past 10 years and the plasti dip is super easy compaired to regular car painting.
I sprayed mine in a spray booth and removed alot of stuff so it took me a little longer to do the job but still was done in 6 1/2 hours. Im doing a 2 tone so Im not done yet gotta let the dip cure to I can tape over it.
I used 2 gallons of black as base, 2 gallons of aluminum mixed with 1 gallon of pearlizer and 50 grams of ballon white candy pearl. I was expecting it to come out lighter but it still looks good.
I will post some pics soon....

