
Do it your self paint job on Intake?
 06-22-2006, 06:51 AM
#21
TECH Enthusiast
Join Date: Jul 2005
Location: New Jersey
Posts: 600
Likes: 0
Received 0 Likes
on
0 Posts
SS LS1, do you ever drive your car lol, that is possibly the cleanest, nicest engine bay I think I have ever seen. My is a daily driver so I have to clean it all the time, but mine looks like someone took a dump under the hood compared to yours....
 06-22-2006, 07:12 AM
#22
TECH Enthusiast
iTrader: (4)

Join Date: Feb 2004
Location: Charlotte NC...but a Jersey boy till death
Posts: 574
Likes: 0
Received 0 Likes
on
0 Posts
Ok here's a ? for you guys, well two. I didn't use an adhesive promotor on my FRC, just sanded it down like a bitch and hit it up with some light coats of primer then the base... Will I be screwed. Second I used the wrong paint on one of them...I need to sand it off...should I just sand them both down and start from the begining?
06-22-2006, 09:11 AM
#23
TECH Addict
iTrader: (17)

Join Date: Dec 2002
Location: Hanover, MD
Posts: 2,190
Likes: 0
Received 0 Likes
on
0 Posts

Originally Posted by PopaPork
Ok here's a ? for you guys, well two. I didn't use an adhesive promotor on my FRC, just sanded it down like a bitch and hit it up with some light coats of primer then the base... Will I be screwed. Second I used the wrong paint on one of them...I need to sand it off...should I just sand them both down and start from the begining?
I would.
06-22-2006, 10:36 AM
#25
11 Second Club
iTrader: (7)
Join Date: Sep 2005
Location: Eagle Pass, TX
Posts: 1,930
Likes: 0
Received 0 Likes
on
0 Posts
Originally Posted by PopaPork
Damnit to hell not the answer I wanted .....****
Ha ha ha...that is funny
Not laughing at you bro, just the situation.
Hey it happens to everyone.
06-22-2006, 05:08 PM
#27
TECH Addict
iTrader: (17)
Join Date: Dec 2002
Location: Hanover, MD
Posts: 2,190
Likes: 0
Received 0 Likes
on
0 Posts
Originally Posted by PopaPork
Should I just take like an 80 Grit to go at it to get the paint off or what?
Use some aircraft stripper. Leave it on for 2-3 minutes at a time then wash off. Will take 2-3 applications. Don't waste time trying to sand paint off.
06-22-2006, 07:39 PM
#28
On The Tree

Join Date: Mar 2006
Posts: 107
Likes: 0
Received 0 Likes
on
0 Posts
Originally Posted by stryker14
popped open a rattle can and wa laaa 
but yeah just take parbreaks advice with his how to and you cant really go wrong
but yeah just take parbreaks advice with his how to and you cant really go wrong
06-22-2006, 10:39 PM
#29
12 Second Club
iTrader: (8)
Join Date: Jul 2004
Location: Vancouver, BC
Posts: 708
Likes: 0
Received 0 Likes
on
0 Posts
Originally Posted by parbreak
Here's a little write up I did a while ago....
Bryan
parbreak
Bryan
parbreak
I'm now moving onto 400 grit on my LSX and this fills in all the things I was gonna search for once I got that done.
Thread Tools | Subscribe !!
excellent writeup.
DJ
06-22-2006, 11:10 PM
#30

Originally Posted by SS LS1
I just Dupli-Color rattle canned mine after sanding smooth and topped with a little 600 deg F clear coat. Been on the car for 3 years and there are no signs of it commig off from the engine heat. So I say take your time and go for it! 


06-23-2006, 02:12 AM
#31
On The Tree
iTrader: (12)

Join Date: Aug 2004
Location: Newnan GA
Posts: 123
Likes: 0
Received 0 Likes
on
0 Posts
^^^ How did you get the top of the fender wells that shiny? Was it done while the engine was out, or just a very meticulous tape job to cover everything, then paint, or am I completly wrong and there is another way to go about it?
06-23-2006, 04:26 PM
#33
TECH Enthusiast
Join Date: Feb 2003
Location: Michigan (Holland/Grand Rapids)
Posts: 614
Likes: 0
Received 0 Likes
on
0 Posts
Originally Posted by RpSS4844
^^^ How did you get the top of the fender wells that shiny? Was it done while the engine was out, or just a very meticulous tape job to cover everything, then paint, or am I completly wrong and there is another way to go about it?
The engine was still in the car, I just removed the TCS, battery, PCM, fuse boxes, master cylinder, abs module, STB, A/C Canister, radiator heat shield, wiring harness, ground wires,................then a very meticulous tape job............ whew! Yep it's a lot of stuff to remove but the results are worth the effort IMO. The whole project was completed in one afternoon, well actually I reinstalled the parts the next day after the paint dried but you get the idea. This is a very doable project at home.
blown 346...........
The large blue annodized washers or "cones" were purchased from MBA (Mallory Billet) but they have gone out of business.


Greg
 06-23-2006, 04:31 PM
#34

Originally Posted by SS LS1
The engine was still in the car, I just removed the TCS, battery, PCM, fuse boxes, master cylinder, abs module, STB, A/C Canister, radiator heat shield, wiring harness, ground wires,................then a very meticulous tape job............ whew! Yep it's a lot of stuff to remove but the results are worth the effort IMO. The whole project was completed in one afternoon, well actually I reinstalled the parts the next day after the paint dried but you get the idea. This is a very doable project at home.
blown 346...........
The large blue annodized washers or "cones" were purchased from MBA (Mallory Billet) but they have gone out of business.
Greg
blown 346...........
The large blue annodized washers or "cones" were purchased from MBA (Mallory Billet) but they have gone out of business.
Greg
 06-23-2006, 11:27 PM
#37
TECH Enthusiast
Join Date: Feb 2003
Location: Michigan (Holland/Grand Rapids)
Posts: 614
Likes: 0
Received 0 Likes
on
0 Posts
Originally Posted by DEMONBIRD
Also, was that clear coat rattle can or gun?
Originally Posted by FireSilverLullaby
Hey greg also what did you used to make the fenderwalls shiny just clearcoat or sand and clearcoat? thanks
You are making me give up all of my secrets! 
Since I was leaving on the HotRod Power Tour in just 3 weeks I had to hussle to do all the interior and under hood modifications (paint work too) you see in the pictures before I left. I did not have time to wait on a body shop to spray the inner fenders so I did them myself (with believe it or not) a rattle can.
 I'm almost embarrased to say that but they turned out so nice and have stayed that way for the last 3 years that I can't see spending big body shop dollars to get the same results. The inner fenders are not clear coated just painted with a high gloss Duplicolor spray paint. No sanding was required, just apply a coat of wax after the paint has cured for a week or so and walla! shinny inner fenders.
 Of course if you tell anyone about this then you will have to be hunted down and taken care of if you know what I mean!


Greg
06-24-2006, 02:58 AM
#38
Originally Posted by SS LS1
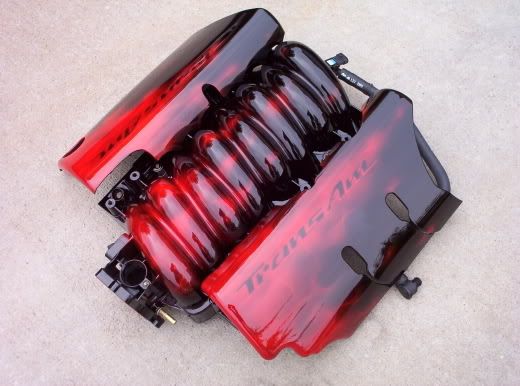
The clear was Duplicolor 600 deg F clear coat right from a rattle can. The intake and FRC'c were painted Duplicolor Antique Sage Pearl from Autozone if I remember correctly. Silver sometimes looks like that cheap chrome in a can so I wanted a color with a little more richness or warmth to it to contrast the polished aluminum and stainless steel parts under the hood. The true color is a little less gold looking in person than it appears in pictures for some reason.
Damn you guys! You are making me give up all of my secrets!
Since I was leaving on the HotRod Power Tour in just 3 weeks I had to hussle to do all the interior and under hood modifications (paint work too) you see in the pictures before I left. I did not have time to wait on a body shop to spray the inner fenders so I did them myself (with believe it or not) a rattle can. I'm almost embarrased to say that but they turned out so nice and have stayed that way for the last 3 years that I can't see spending big body shop dollars to get the same results. The inner fenders are not clear coated just painted with a high gloss Duplicolor spray paint. No sanding was required, just apply a coat of wax after the paint has cured for a week or so and walla! shinny inner fenders.
Of course if you tell anyone about this then you will have to be hunted down and taken care of if you know what I mean!
Greg
Damn you guys!
You are making me give up all of my secrets! Since I was leaving on the HotRod Power Tour in just 3 weeks I had to hussle to do all the interior and under hood modifications (paint work too) you see in the pictures before I left. I did not have time to wait on a body shop to spray the inner fenders so I did them myself (with believe it or not) a rattle can.
I'm almost embarrased to say that but they turned out so nice and have stayed that way for the last 3 years that I can't see spending big body shop dollars to get the same results. The inner fenders are not clear coated just painted with a high gloss Duplicolor spray paint. No sanding was required, just apply a coat of wax after the paint has cured for a week or so and walla! shinny inner fenders. Of course if you tell anyone about this then you will have to be hunted down and taken care of if you know what I mean!
Greg
 !!!
!!!Now I have a few projects in line....

Since you're in the giving mood...
...did you make the tweeter mounts or buy them???
06-24-2006, 09:08 AM
#39
TECH Enthusiast
Join Date: Feb 2003
Location: Michigan (Holland/Grand Rapids)
Posts: 614
Likes: 0
Received 0 Likes
on
0 Posts
Originally Posted by DEMONBIRD
Since you're in the giving mood... ...did you make the tweeter mounts or buy them???
...did you make the tweeter mounts or buy them???I did not make them as I found them for sale from another board member. Ther were new unused when I got them. However I do know who made them. (Now this one is going to cost you)

 ...........
 The only person making (or that did make them) was a moderator over at fbodyaudio.com His name is Kevin McDearis and his e-mail last year was sshevy@bellsouth.net He made a few of them every couple of months by hand so they can be hard to find but maybe he is making more of them now

TTL, Greg