Documentary, build thread... eh. 2000 Pewter WS6

 06-08-2012, 09:21 PM
#22
Staging Lane
Join Date: Mar 2012
Location: Pensacola, Florida
Posts: 98
Likes: 0
Received 0 Likes
on
0 Posts
Sounds like a plan chris, I'm looking into getting an exhaust here in a week or two along with some sort of Ram Air Mod for cool air into the Lid, So after I play with all of that we should meet up and ride one day!
06-09-2012, 12:07 AM
#23
On The Tree
Thread Starter
iTrader: (1)

Join Date: May 2012
Location: Mobile, AL
Posts: 140
Likes: 0
Received 0 Likes
on
0 Posts
Yeah if my bike sells tomorrow I'm ordering TSP headers and then it'll probably go to the shop for a true dual exhaust next weekend if I get the headers and motor/trans mounts installed. What are your plans for exhaust? You could use the same guy I'm using if you're interested. Right around $350 for an entire true dual system. Better sound, more power, more awesome-factor.
As far as ram-air, just debaffle your hood and add a lid or something. I'll eventually look at getting a Volant system, but that'll be after I do my headers and exhaust.
As far as ram-air, just debaffle your hood and add a lid or something. I'll eventually look at getting a Volant system, but that'll be after I do my headers and exhaust.
06-09-2012, 01:12 PM
#25
On The Tree
Thread Starter
iTrader: (1)
Join Date: May 2012
Location: Mobile, AL
Posts: 140
Likes: 0
Received 0 Likes
on
0 Posts
My car's PO felt like it was a good idea to just cut or smash out the baffles. It looks awful. I'm gonna take a dremel and square out the cut so it doesn't look so awful.
Drills aren't too expensive. I have one if you're ever around this way.
In other news, I'll have a pretty decent update here in a few.
Drills aren't too expensive. I have one if you're ever around this way.
In other news, I'll have a pretty decent update here in a few.
06-09-2012, 01:45 PM
#26
On The Tree
Thread Starter
iTrader: (1)
Join Date: May 2012
Location: Mobile, AL
Posts: 140
Likes: 0
Received 0 Likes
on
0 Posts
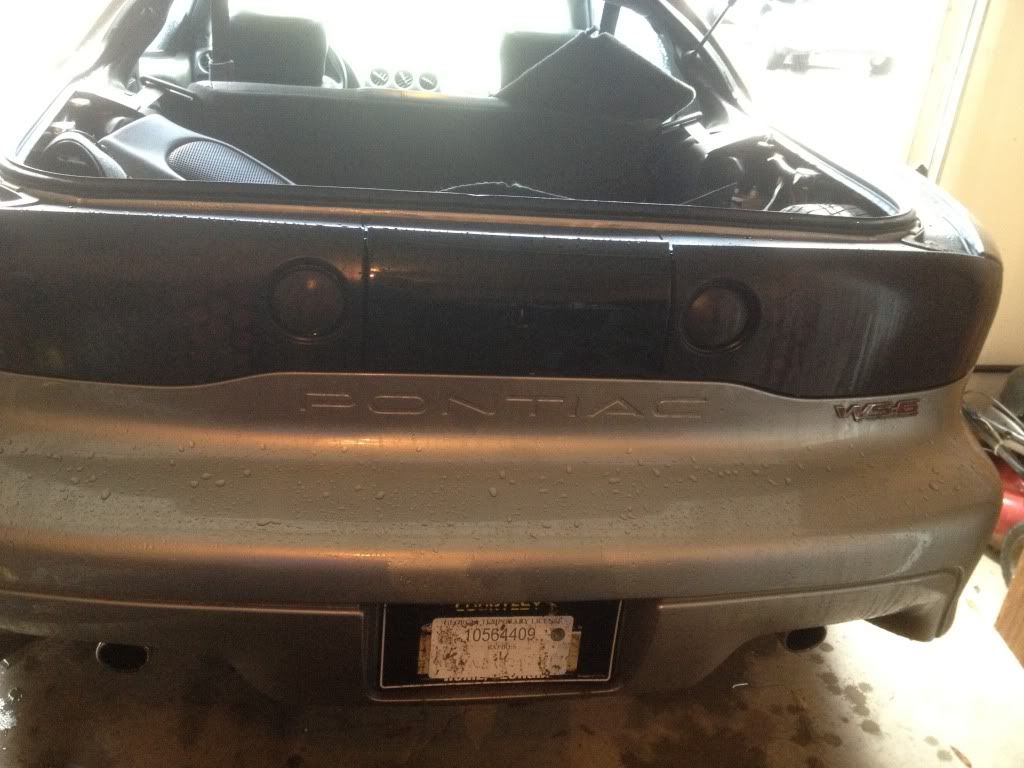
First off I decided to go ahead and tint my taillights last night.
REMOVAL
Started off by removing the two panels in the trunk on each side that house the speakers and cover the back side of the taillights. Then peel back the carpet that covers the trunk latch.
Next, loosen the spare tire and begin removing the wing nuts that hold the tail lights to the body of the car (5 for each side).
Once you have those wing nuts off, twist off the light bulbs from the housing and remove the housing from the car (It's a good idea to go ahead and replace the lights, since they're known the blow pretty often).
One the housings are removed, the middle panel can then be removed. Mine was simply "stuck" on, as the same wing nuts that hold the tail light housings on also hold down the middle panel.
PREP and PAINT
I hit the housings with 2000 grit wet sanding to scuff up the glossy surface
Next I added 3 coats of the tint (10-15 minutes between) and 3 coats of clear (10-15 minutes again)
FINISHING
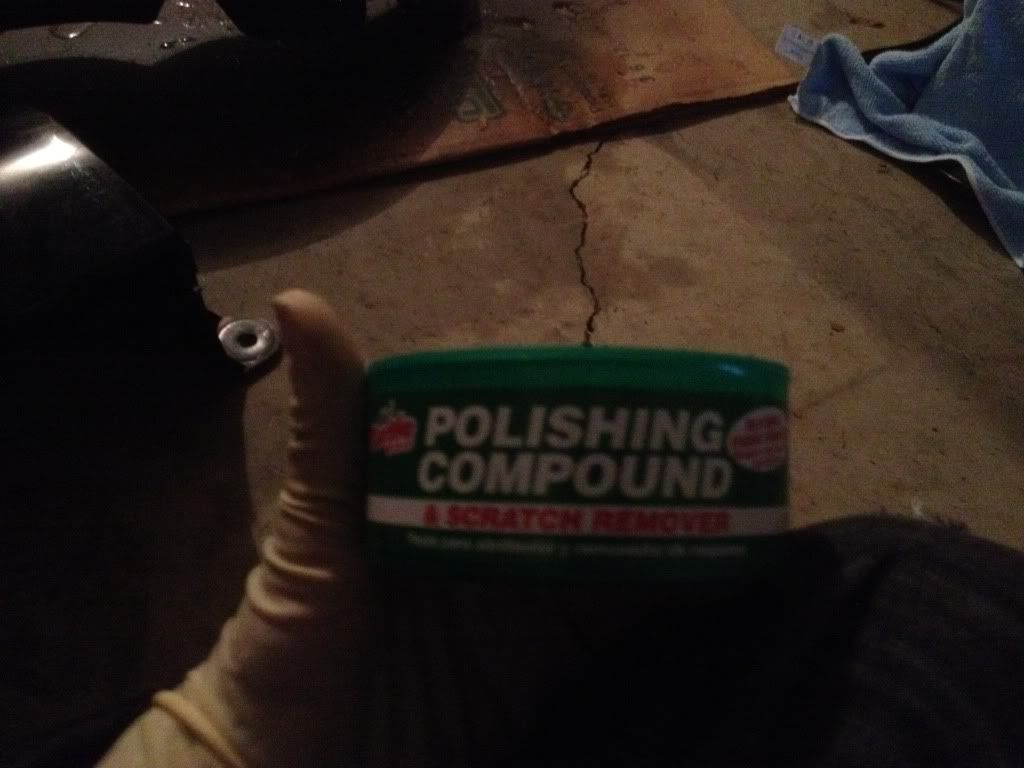
I let the housings dry overnight and came back this morning and polished each one with Turtle Wax Polishing Compound and Scratch Remover. I applied two thorough coats with a microfiber cloth and dried with another (CLEAN) microfiber cloth
Lastly I took some wax (I think it's called ICE or something) and applied two coats of that.
The taillights shine like new!
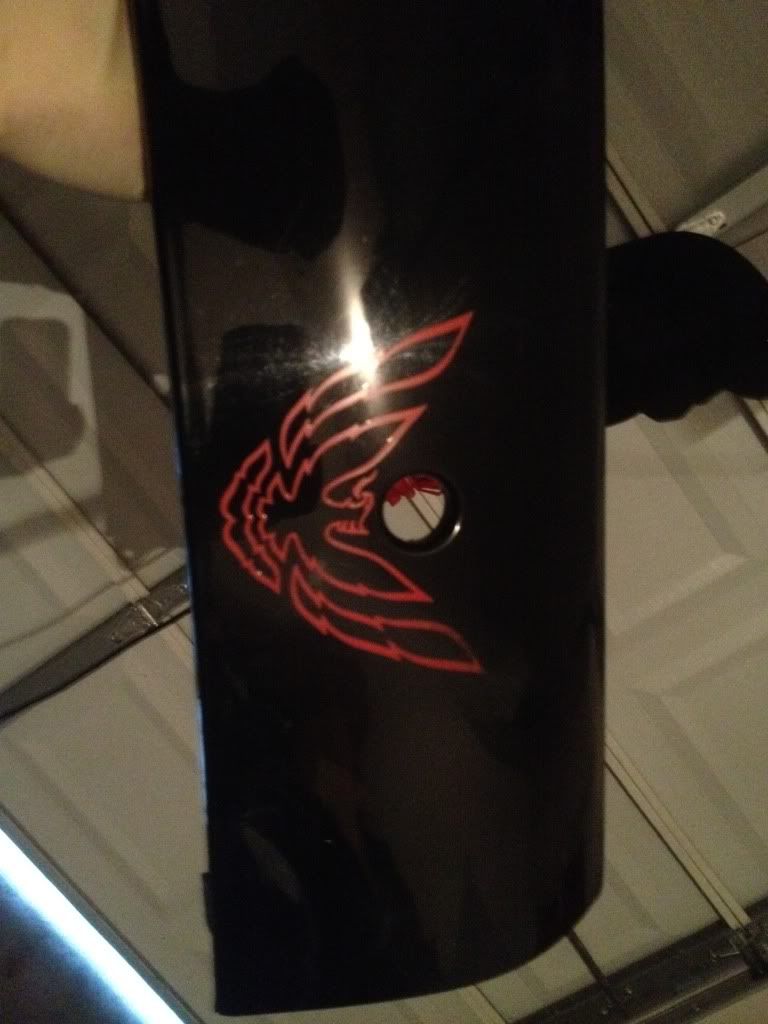
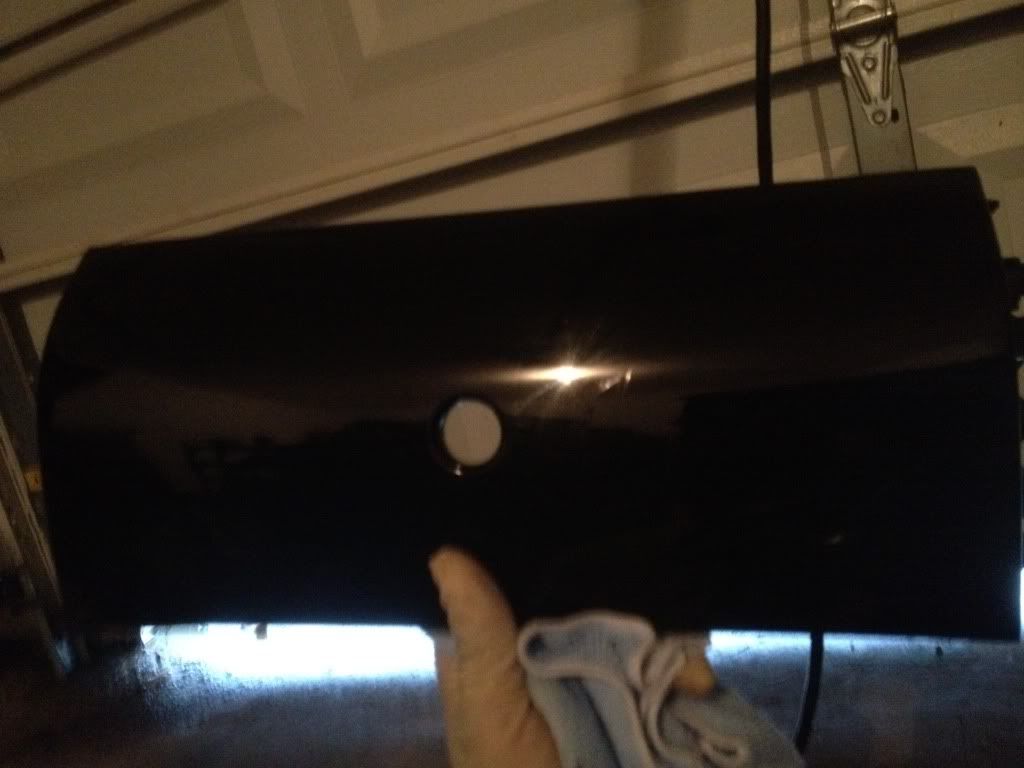
For the middle panel, I decided I wanted it to be completely black. I had enough sanding for the day, so I figured I'd just polish it and see what happens.
Lucky for me, the same polish that I used for the light housings earlier, also removed all the color from the middle panel! So in all of 10 minutes, with no sanding or anything, I have a completely black, glossy, new-looking middle panel!
REMOVAL
Started off by removing the two panels in the trunk on each side that house the speakers and cover the back side of the taillights. Then peel back the carpet that covers the trunk latch.
Next, loosen the spare tire and begin removing the wing nuts that hold the tail lights to the body of the car (5 for each side).
Once you have those wing nuts off, twist off the light bulbs from the housing and remove the housing from the car (It's a good idea to go ahead and replace the lights, since they're known the blow pretty often).
One the housings are removed, the middle panel can then be removed. Mine was simply "stuck" on, as the same wing nuts that hold the tail light housings on also hold down the middle panel.
PREP and PAINT
I hit the housings with 2000 grit wet sanding to scuff up the glossy surface
Next I added 3 coats of the tint (10-15 minutes between) and 3 coats of clear (10-15 minutes again)
FINISHING
I let the housings dry overnight and came back this morning and polished each one with Turtle Wax Polishing Compound and Scratch Remover. I applied two thorough coats with a microfiber cloth and dried with another (CLEAN) microfiber cloth
Lastly I took some wax (I think it's called ICE or something) and applied two coats of that.
The taillights shine like new!
For the middle panel, I decided I wanted it to be completely black. I had enough sanding for the day, so I figured I'd just polish it and see what happens.
Lucky for me, the same polish that I used for the light housings earlier, also removed all the color from the middle panel! So in all of 10 minutes, with no sanding or anything, I have a completely black, glossy, new-looking middle panel!
06-09-2012, 02:02 PM
#27
On The Tree
Thread Starter
iTrader: (1)
Join Date: May 2012
Location: Mobile, AL
Posts: 140
Likes: 0
Received 0 Likes
on
0 Posts
The other thing I did today was install my WS6 store short stick and white shift ****. It's easy enough, but I figure I'll go ahead and explain everything since I took some pictures.
Tools needed
Two Ratchets (or a 13mm wrench)
13mm socket
Size 6 hex key or attachment (really don't know what it's called)
7mm socket with a decently log extension (or a screwdriver with a coupler attachment)
Panel Removal
Begin by opening the middle glove compartment
Pull up the coin holder and move it aside
Remove the two 7mm screws holding the console panel down
(optional) remove the ash tray by simply lifting it out of the console
Poke the bottom part of the traction control button (if you have one) and push it through the panel.
Remove the small trim panel around the traction control button
Unhook the electrical connections from the ash tray light and outlet
Now lift up the console panel and move it to the side
(I chose to remove the stick before removing the shift ****. I didn't want to cause any unnecessary pressure anywhere. If you've already removed the ****, remove the console completely at this time.)
Remove the two bolts on the passenger side from the stick, then remove the console, stick, and **** assembly from the car.
At this time (if you haven't already) remove the **** by twisting it (lefty loosey) from the stick.
Now thread the new bolts through the base where you removed the old bolts (Make sure you thread them completely or the washers will rattle)
Slide the new short stick on the two bolts
Use the lock washer and nut to fasten the stick to the base
(At this time, thread the new **** on to ensure your shift pattern or design will be facing the correct way once tight, then take it back off)
Now bring the console back over, and place the electrical connections back in their seats
Snap the console back in place and install the two screws in the glove box.
Place the traction control button trim back onto the console
Pull the traction control button back through the trim and snap it into place
Reinstall the ash tray if you removed it
Thread on your new shift **** and enjoy! (I didn't use thread lock. It seems pretty stable as-is)
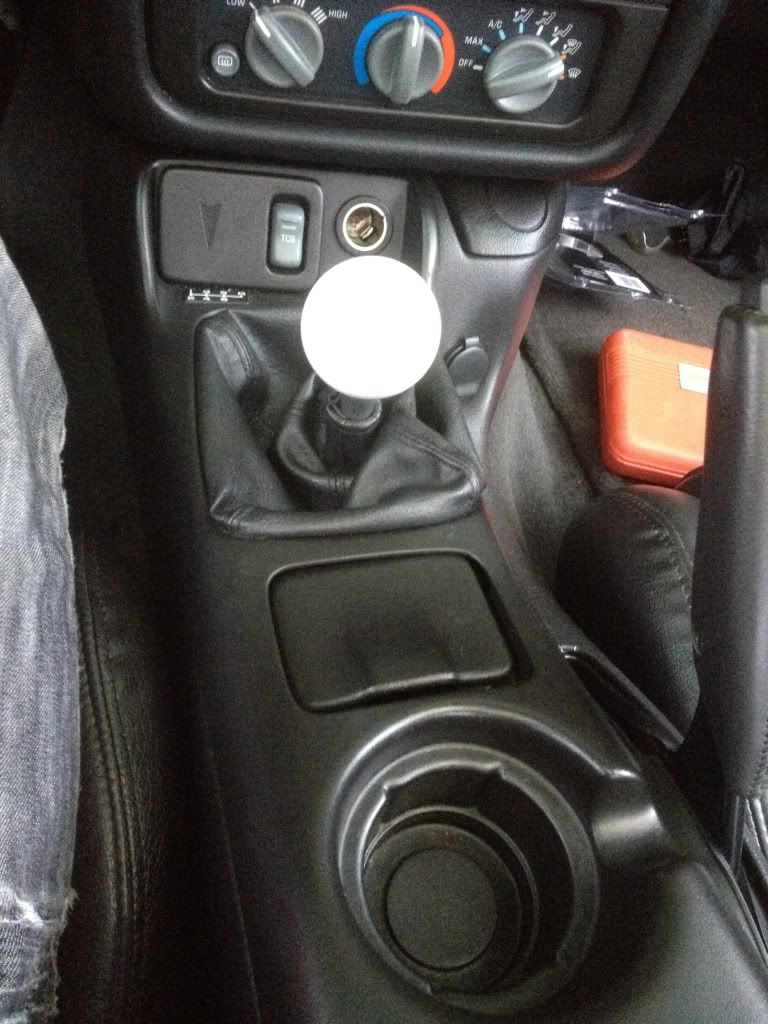
More pictures available upon request
Tools needed
Two Ratchets (or a 13mm wrench)
13mm socket
Size 6 hex key or attachment (really don't know what it's called)
7mm socket with a decently log extension (or a screwdriver with a coupler attachment)
Panel Removal
Begin by opening the middle glove compartment
Pull up the coin holder and move it aside
Remove the two 7mm screws holding the console panel down
(optional) remove the ash tray by simply lifting it out of the console
Poke the bottom part of the traction control button (if you have one) and push it through the panel.
Remove the small trim panel around the traction control button
Unhook the electrical connections from the ash tray light and outlet
Now lift up the console panel and move it to the side
(I chose to remove the stick before removing the shift ****. I didn't want to cause any unnecessary pressure anywhere. If you've already removed the ****, remove the console completely at this time.)
Remove the two bolts on the passenger side from the stick, then remove the console, stick, and **** assembly from the car.
At this time (if you haven't already) remove the **** by twisting it (lefty loosey) from the stick.
Now thread the new bolts through the base where you removed the old bolts (Make sure you thread them completely or the washers will rattle)
Slide the new short stick on the two bolts
Use the lock washer and nut to fasten the stick to the base
(At this time, thread the new **** on to ensure your shift pattern or design will be facing the correct way once tight, then take it back off)
Now bring the console back over, and place the electrical connections back in their seats
Snap the console back in place and install the two screws in the glove box.
Place the traction control button trim back onto the console
Pull the traction control button back through the trim and snap it into place
Reinstall the ash tray if you removed it
Thread on your new shift **** and enjoy! (I didn't use thread lock. It seems pretty stable as-is)
More pictures available upon request
06-09-2012, 03:33 PM
#28
On The Tree
Thread Starter
iTrader: (1)
Join Date: May 2012
Location: Mobile, AL
Posts: 140
Likes: 0
Received 0 Likes
on
0 Posts
Just did my poly trans mount.
Using this: https://ls1tech.com/forums/manual-tr...-swap-how.html
Then I got back and read this: https://ls1tech.com/forums/automatic...l-problem.html
Smh. I don't think I'll have any issues, but just in case I'll probably not drive too much until I can do my header and poly motor mount install.
Just from moving my car back to its spot, it feels a lot more.... "intuitive?" and for some reason even sounds a little louder. That's probably just me though.
Side note... I need a new jack. Mine's a POS.
06-09-2012, 06:22 PM
#30
On The Tree
Thread Starter
iTrader: (1)
Join Date: May 2012
Location: Mobile, AL
Posts: 140
Likes: 0
Received 0 Likes
on
0 Posts
Yeah it looks pretty slick. I might do it later on down the road. I haven't had very good success painting bumpers in the past... Lol
Plus I'm trying to get my go-fast parts first.
Plus I'm trying to get my go-fast parts first.
06-09-2012, 09:40 PM
#31
On The Tree
Thread Starter
iTrader: (1)
Join Date: May 2012
Location: Mobile, AL
Posts: 140
Likes: 0
Received 0 Likes
on
0 Posts
Found the mufflers I'm going with.
Kooks 2.5 in/out 14" long race-style mufflers
http://www.kookscustomheaders.com/sh...=&make=&model=
http://www.summitracing.com/parts/KOK-R250-14/
Great price, great name, great sound. Coupled with TSP LTs, I should have me an amazing setup once it's finished, and with an amazing price.
Kooks 2.5 in/out 14" long race-style mufflers
http://www.kookscustomheaders.com/sh...=&make=&model=
http://www.summitracing.com/parts/KOK-R250-14/
Great price, great name, great sound. Coupled with TSP LTs, I should have me an amazing setup once it's finished, and with an amazing price.
06-09-2012, 10:32 PM
#32
Staging Lane
Join Date: Mar 2012
Location: Pensacola, Florida
Posts: 98
Likes: 0
Received 0 Likes
on
0 Posts
Sweet, I think im going with the SLP loudmouthII Catback system. I'm not looking to change my headers anytime soon so I'm running with SLP for now. =D It will be ordered this thursday.
Yeah I am doing a lot of research before I try to paint my bumper. lol
Yeah I am doing a lot of research before I try to paint my bumper. lol
 06-10-2012, 12:04 AM
#34
On The Tree
Thread Starter
iTrader: (1)
Join Date: May 2012
Location: Mobile, AL
Posts: 140
Likes: 0
Received 0 Likes
on
0 Posts
I did just fine with the stock shifter too, then I realized how much better the short stick is. It just feels so much more precise and quick.
You know how there are sometimes two "clicks" getting into a gear? Almost like a neutral-almost in gear-in gear kind of deal? Well the short stick seemed to fix that for me.
Plus, at around $27, it's pretty hard to beat.
You know how there are sometimes two "clicks" getting into a gear? Almost like a neutral-almost in gear-in gear kind of deal? Well the short stick seemed to fix that for me.
Plus, at around $27, it's pretty hard to beat.
06-10-2012, 12:52 PM
#35
I did just fine with the stock shifter too, then I realized how much better the short stick is. It just feels so much more precise and quick.
You know how there are sometimes two "clicks" getting into a gear? Almost like a neutral-almost in gear-in gear kind of deal? Well the short stick seemed to fix that for me.
Plus, at around $27, it's pretty hard to beat.
You know how there are sometimes two "clicks" getting into a gear? Almost like a neutral-almost in gear-in gear kind of deal? Well the short stick seemed to fix that for me.
Plus, at around $27, it's pretty hard to beat.
06-10-2012, 03:50 PM
#37
TECH Regular
Join Date: Mar 2010
Location: Piqua,OH
Posts: 430
Likes: 0
Received 0 Likes
on
0 Posts

