
My custom amp rack & amp installation (lots of pics)
 12-08-2013 | 05:43 PM
#1
I thought I'd write up a thread on the amp rack & amp installation I did in my 1994 Camaro. The results aren't too bad, but I made plenty of mistakes & learned a lot along the way, so maybe others can learn a little from what I did. I have recently installed a Pioneer DEH-X8500BH head unit, Rockford Fosgate P1675 speakers in the sail panels, and Rockford Fosgate P165 speakers in the doors. If I could do it over, I'd use P1675's all around, they sound much better. Anyway, after installing those, I made my own amp rack from the directions in this thread:
https://ls1tech.com/forums/stereo-el...lkthrough.html
Everything sounds pretty good after getting it all hooked up. I do have an RPM-related whine that I need to figure out. The power wires & RCA cables travel near each other behind the amp, not sure if that's the interference or if it's something else. I couldn't turn the amp around (which also would have made it easier to hook up the power cable), but then the lettering would have been upside down. And don't play music without the car running while you put everything back together, you'll kill the battery like I did. I did this in weather that was in the teens - even though I was in my (unheated) garage, it was cold!
I used the DB Link PK4Z 4 Gauge amp install kit from eBay. The RCA cables & power lead wire were both a little short, this kit has 17' of wiring for both. I'd recommend getting at least 20' for each for this type of install. Also, the 4 gauge power wire was barely long enough at 17', even just another foot would be great.
See more pics on my Flickr page:
/
First I made a cardboard cutout, so I could trace it out on the board I used. On the flat section, I cut out a section to be able to access the turn signal bolts. However, without slits in the carpet, you can't access them without removing the spare tire cover & the cover on the other side, so I'd recommend sticking with a regular rectangular shape. As you can see, my measurements turned out to be 36" x 13."
http://www.flickr.com/photos/dsbransom/11134148396/
Traced out on the board. I used 1/2" MDF, but I'd probably recommend something a little more solid because mine broke in the narrow area near the hatch latch cutout.
http://www.flickr.com/photos/dsbransom/11134184214/
The back of the rack, showing the brackets. I carpeted the 2 sections separately. It was a little easier, but carpeting as one piece would probably look a little cleaner.
http://www.flickr.com/photos/dsbransom/11134119695/
Front side of the rack. Be careful which side you carpet - I carpeted the wrong side of the top section so I had to do it all over. I didn't think it was really necessary to use adhesive, so my carpet is just stapled to the back side.
http://www.flickr.com/photos/dsbransom/11134301253/
Amp rack installed:
http://www.flickr.com/photos/dsbransom/11134124835/
Amp mounted to rack:
http://www.flickr.com/photos/dsbransom/11263311783/
Wiring through the carpet:
http://www.flickr.com/photos/dsbransom/11263278346/
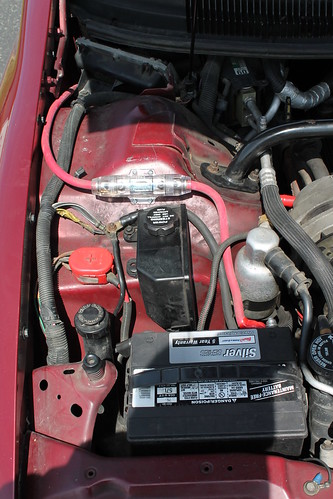
Power cable hooked up to the battery:
http://www.flickr.com/photos/dsbransom/11263246945/
After hooking everything up, I wasn't getting any sound from the right front speaker. Finally found the culprit in here. I wired those speakers through the dash & down the left side, along with all the speaker wiring. I had a connector in here that had come apart, so I hooked it all up and everything was in working order.
http://www.flickr.com/photos/dsbransom/11263284386/
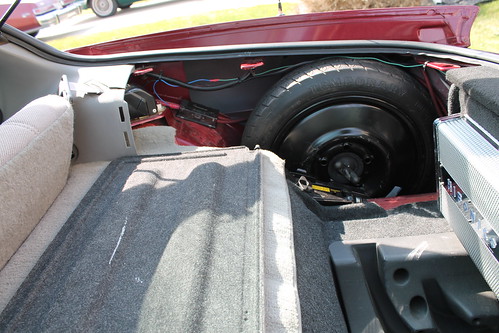
Amp & rack installed:
http://www.flickr.com/photos/dsbransom/11263345133/
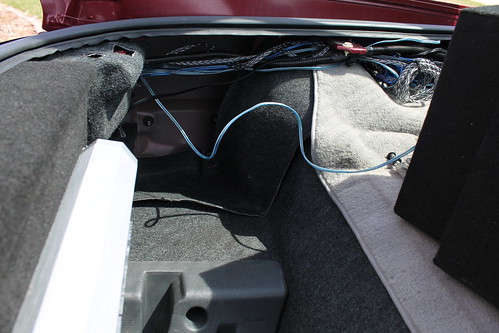
Wiring - the power cable is barely long enough.
http://www.flickr.com/photos/dsbransom/11263349593/
http://www.flickr.com/photos/dsbransom/11263274255/
Lighted up
http://www.flickr.com/photos/dsbransom/11263299836/
https://ls1tech.com/forums/stereo-el...lkthrough.html
Everything sounds pretty good after getting it all hooked up. I do have an RPM-related whine that I need to figure out. The power wires & RCA cables travel near each other behind the amp, not sure if that's the interference or if it's something else. I couldn't turn the amp around (which also would have made it easier to hook up the power cable), but then the lettering would have been upside down. And don't play music without the car running while you put everything back together, you'll kill the battery like I did.
I did this in weather that was in the teens - even though I was in my (unheated) garage, it was cold!I used the DB Link PK4Z 4 Gauge amp install kit from eBay. The RCA cables & power lead wire were both a little short, this kit has 17' of wiring for both. I'd recommend getting at least 20' for each for this type of install. Also, the 4 gauge power wire was barely long enough at 17', even just another foot would be great.
See more pics on my Flickr page:
First I made a cardboard cutout, so I could trace it out on the board I used. On the flat section, I cut out a section to be able to access the turn signal bolts. However, without slits in the carpet, you can't access them without removing the spare tire cover & the cover on the other side, so I'd recommend sticking with a regular rectangular shape. As you can see, my measurements turned out to be 36" x 13."
http://www.flickr.com/photos/dsbransom/11134148396/
Traced out on the board. I used 1/2" MDF, but I'd probably recommend something a little more solid because mine broke in the narrow area near the hatch latch cutout.
http://www.flickr.com/photos/dsbransom/11134184214/
The back of the rack, showing the brackets. I carpeted the 2 sections separately. It was a little easier, but carpeting as one piece would probably look a little cleaner.
http://www.flickr.com/photos/dsbransom/11134119695/
Front side of the rack. Be careful which side you carpet - I carpeted the wrong side of the top section so I had to do it all over. I didn't think it was really necessary to use adhesive, so my carpet is just stapled to the back side.
http://www.flickr.com/photos/dsbransom/11134301253/
Amp rack installed:
http://www.flickr.com/photos/dsbransom/11134124835/
Amp mounted to rack:
http://www.flickr.com/photos/dsbransom/11263311783/
Wiring through the carpet:
http://www.flickr.com/photos/dsbransom/11263278346/
Power cable hooked up to the battery:
http://www.flickr.com/photos/dsbransom/11263246945/
After hooking everything up, I wasn't getting any sound from the right front speaker. Finally found the culprit in here. I wired those speakers through the dash & down the left side, along with all the speaker wiring. I had a connector in here that had come apart, so I hooked it all up and everything was in working order.
http://www.flickr.com/photos/dsbransom/11263284386/
Amp & rack installed:
http://www.flickr.com/photos/dsbransom/11263345133/
Wiring - the power cable is barely long enough.
http://www.flickr.com/photos/dsbransom/11263349593/
http://www.flickr.com/photos/dsbransom/11263274255/
Lighted up
http://www.flickr.com/photos/dsbransom/11263299836/
Last edited by DamonZ28; 12-09-2013 at 10:38 AM.
 12-28-2013 | 02:52 PM
#3
With the weather in the 40's today, I pulled the car out of the garage to see if I could find the source of the RPM whine. I cleaned up the ground area a little bit, and separated the power & speaker wires a little further, where they pass behind the amp. I started the car back up, and the RPM whine seems to be gone! Very happy about that.
12-28-2013 | 05:06 PM
#4

With the weather in the 40's today, I pulled the car out of the garage to see if I could find the source of the RPM whine. I cleaned up the ground area a little bit, and separated the power & speaker wires a little further, where they pass behind the amp. I started the car back up, and the RPM whine seems to be gone! Very happy about that.
04-20-2014 | 12:23 PM
#5
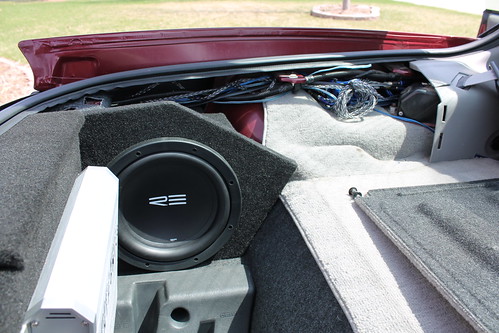
Finally finished up the install this weekend. I added an RE Audio RFX10D4 10" subwoofer, powered by a Hifonics ZRX1200.1D 1200W Zeus Series Amplifier. I've had it installed for several weeks, but finally cleaned everything up yesterday. Here are some more pics of the install.
Upgraded the power wire to 1/0 guage.
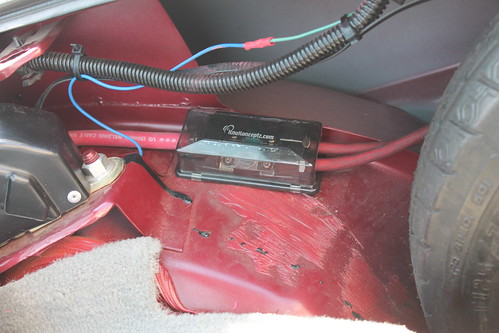
Distribution block.
Closeup of the distribution block.
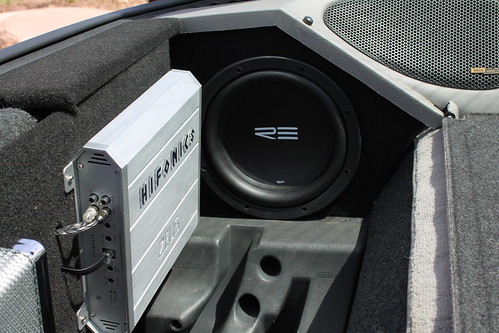
Subwoofer area.
What a mess of speaker wiring.
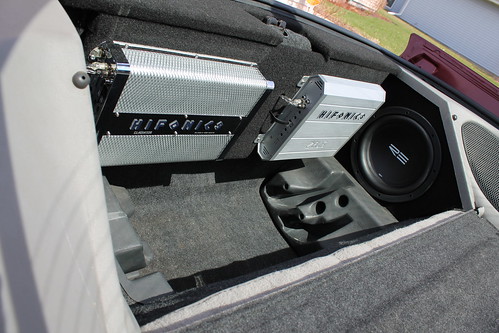
Completed installation!

Upgraded the power wire to 1/0 guage.
Distribution block.
Closeup of the distribution block.
Subwoofer area.
What a mess of speaker wiring.
Completed installation!
 04-20-2014 | 09:37 PM
#7

Nice write up. I did the exact same thing a few years ago and then sold it. I missed it, so I made another because I kept the template I used the first time. I even had the same sub.
Trending Topics
 04-26-2014 | 08:45 AM
#10
The sound quality is very good. I actually moved the 3-way speakers to the doors, and left the sail panels empty. The sound stage is much better. The Rockford Fosgate speakers have a great range of sound, and the sub really pounds. I'm very happy with it.
05-12-2014 | 03:38 AM
#11
hey man, how many feet of speaker wire did it take you to rewire the sails and doors with the amp all the way back there, I'm fixing to order the parts I need to wire up my 4-channel (I got for Christmas) and since i'm doing Knukonceptz wire I can order by the foot instead of having to buy a big roll it's just been a long time since I did a whole car and kinda at a loss for what it will take.
05-12-2014 | 05:34 AM
#12
To be honest, I didn't measure it. I used one roll (don't even remember how much), then some wire that came with my DB Link kit, then a bit off another roll. Just use a tape measure to get a somewhat accurate guess, then add a little extra to be on the safe side. As for RCA's, 20 feet would probably be enough - I used 25 and it was more than enough.
05-14-2014 | 06:57 PM
#13
To be honest, I didn't measure it. I used one roll (don't even remember how much), then some wire that came with my DB Link kit, then a bit off another roll. Just use a tape measure to get a somewhat accurate guess, then add a little extra to be on the safe side. As for RCA's, 20 feet would probably be enough - I used 25 and it was more than enough.
06-03-2014 | 05:28 AM
#14
how much of the 1/0 did you end up ordering, I'm about to do my ordering for the power wire upgrades to support 2 amps, also how was the shopping experience (I assume you went with the site I sent you the PM about), I've yet to buy from them and wondering the turn around time?
06-03-2014 | 09:46 AM
#15
I'll check tonight to see how much I ordered. I did order from that site - it was very easy to order, & I had it within 2 or 3 days. I ordered extra for the Big 3 upgrade, but I split it up when I was measuring & making notes so I can let you know.
06-04-2014 | 11:18 PM
#17
06-05-2014 | 07:50 AM
#18
That was just for the stereo - I ordered another 4-5 feet for the Big 3). I assume your battery is the same place mine is - on the passenger side? (pretty much the same as the Birds I think?)
 06-10-2014 | 08:17 PM
#20
To be perfectly honest - it's not mounted to anything. It fits so snugly over the hatch latch, sides, & bottom, that it's not going anywhere. It can always be secured to the rear wall if necessary.