


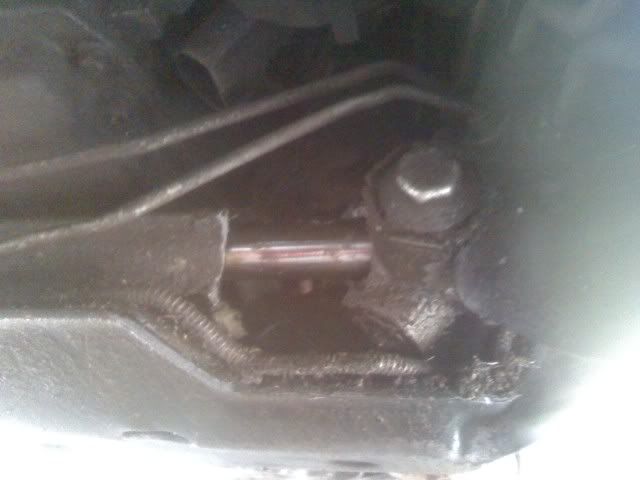
PLEASE HELP! What is busted in this pic??
I hit a big brick in the road (long story) and this happened. I have NO steering, obviously, and need help! How do I fix this? Expensive?
Joined: Jul 2007
Posts: 2,861
Likes: 4
From: Ringoes/Flemington, New Jersey
holy **** ***** thats your steering rack dude. hahaha. will need an alignment when you do one. make sure your power steering lines are good too. never did one on our cars but I have swapped them on others.
Hey:
Here is the best deal I could find on ebay for you.
http://cgi.ebay.com/ebaymotors/2000-...Q5fAccessories
Just verify your option codes from your glovebox to what they have listed.
Dub
When In Doubt Do Without
Here is the best deal I could find on ebay for you.
http://cgi.ebay.com/ebaymotors/2000-...Q5fAccessories
Just verify your option codes from your glovebox to what they have listed.
Dub
When In Doubt Do Without

TECH Addict
Joined: Dec 2001
Posts: 2,907
Likes: 1
From: Bergen County, NJ
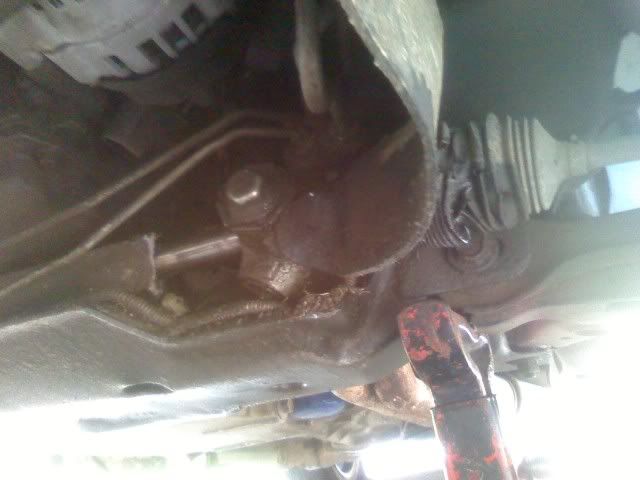
Just take your time, mark where everything is aligned, count the turns on the tie rod ends etc.
This not a simple job:
I have heard of people getting to the bolts without aising the engine but it must be a bear!
1.Remove the air intake resonator.
2.Remove the serpentine belt.
3.Support the engine with a hydraulic jack.
4.Raise and support the vehicle. Refer to Vehicle Lifting.
5.Remove the tires and wheels. Refer to Tire and Wheel Removal and Installation.
6.Place a drain pan under the steering gear (5).
7.Disconnect the steering gear outer tie rods.
8.Remove the generator.
9.Remove the left-side engine mount through bolt.
10.Lower the vehicle.
11.Raise the engine with the hydraulic jack.
12.Disconnect the following hoses from the steering gear (5):
•The power steering gear inlet hose
•The power steering gear outlet hose
13.Remove the steering gear flexible coupling from the steering gear (5). Refer to Intermediate Steering Shaft Replacement in Steering Wheel and Column.
14.Remove the nuts (4) and bolts/screws (1).
15.Remove the steering gear (5).
Installation Procedure
1.Position the steering gear (5) to the crossmember (2).
2.Adjust the steering gear (5). Ensure that the steering aligns as straight as possible with the steering gear coupling shaft.
3.Hand start the bolts (1) and nut (4). Notice: Refer to Fastener Notice in Service Precautions.
4.Position the back-up wrench to the nuts (4).
•Tighten the bolts to 85 Nm (63 ft. lbs.) .
5.Install the steering gear flexible coupling to the steering gear. Refer to Intermediate Steering Shaft Replacement in Steering Wheel and Column.
•Tighten the bolts to 47 Nm (35 ft. lbs.) .
6.Connect the following hoses to the steering gear (5).
6.1. Tighten the inlet hose to 28 Nm (21 ft. lbs.) .
6.2. Tighten the outlet hose to 28 Nm (21 ft. lbs.) .
7.Lower the vehicle. Allow the vehicle to stay slightly above the ground while the tires and wheels are not installed.
8.Lower the engine with the hydraulic jack.
9.Raise and suitably support the vehicle. Refer to Lifting and Jacking the Vehicle.
10.Install the left side engine mount through-bolt.
11.Install the generator.
12.Connect the steering gear outer tie rods to the steering knuckles.
13.Install the tire and wheels. Refer to Tire and Wheel Removal and Installation.
14.Lower the vehicle.
15.Remove the hydraulic jack supporting the engine.
16.Install the serpentine belt.
17.Install the air intake resonator.
18.Refill and bleed the power steering system. Refer to Bleeding Power Steering System
Last edited by DaddySS; Aug 15, 2009 at 08:39 PM.
Trending Topics
LS1 Tech Stories
The Best V8 Stories One Small Block at Time

Gas Monkey Built a 6-Wheel Ferrari Testarossa With a Corvette LT4 Engine
Verdad Gallardo
7 Most Reliable High-Performance Engines GM Has Ever Built
Verdad Gallardo
Amazing '71 Camaro Restomod Is Modern Muscle Car Under the Skin
Verdad Gallardo
6 Common C5 Corvette Failures and What's Involved In Repairing Them
Pouria Savadkouei
Retro Modern Bandit Pontiac Trans AM Comes With Burt Reynolds' Autograph
Verdad Gallardo
Top 10 Greatest Cadillac V Series Performance Models Ever, Ranked
Pouria Savadkouei
Top 10 Most Powerful Chevy Trucks Ever Made!

Hennessey's New Supercharged Silverado ZR2 Has 700 HP
Verdad Gallardo
Coachbuilt N2A Anteros Is an LS2-Powered C6 Corvette In Italian Clothes
Verdad Gallardo


Joined: Jul 2006
Posts: 381
Likes: 15
From: Oshawa (Home of the 5th-gen)
I broke the one in my car too, a couple years ago ... it looked EXACTLY the same as the one in the pictures above  . However, mine broke because of an off-track "excursion" at the race track!!
  (I dropped two wheels off the track, and bottomed out on the cement curbing).
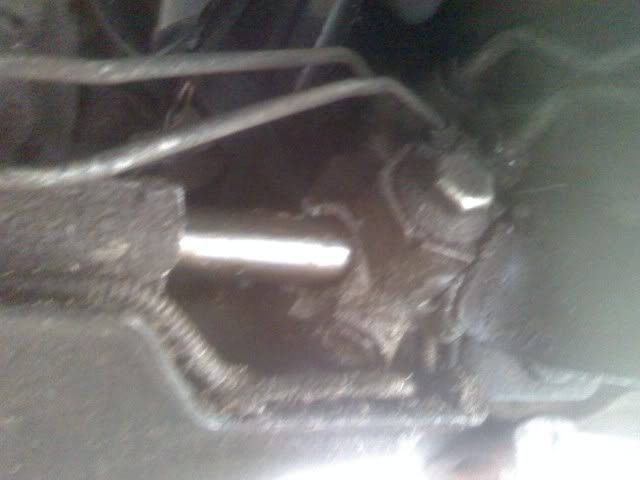
Anyway, as far as getting the rack out and back in? I can't remember now (it's been awhile) but I don't think jacking the motor was necessary. Basically, there are two main bolts that actually hold the rack in ... one on the passenger's side, and one on the driver's side. The one on the passenger's side will come out on its own. BUT, the one on the driver's side wouldn't come out even after I TRIED to jack the motor up ... there still wasn't enough clearance. SO? I cut the head of the bolt off (sawzall I think) and let it drop out the bottom. Then when I installed the new rack, I put that bolt in from the bottom, with the nut on top. Works like a charm that way .
.
It's a finicky job, but can be done at home. I set the toe by myself in the garage, then took it in right away for a proper alignment. Surprisingly, I had it very close .
.
Sorry about your luck though .
.
The thing is about these steering racks, the actual rack inside is steel, but I think the housing is only made of aluminum, so it's really not that strong. Also, breaking where yours did is in the same place as mine went. The bitch about that is, the housing is still bolted in solid, but where the steering input is, is now on a "free floating" part of the rack!! So when you try to steer, the rack has to "catch up" to itself before it has any effect on the direction of the wheel(s). It took steering full lock to full lock just to keep the car going in a straight line!?!?!?!
. However, mine broke because of an off-track "excursion" at the race track!! (I dropped two wheels off the track, and bottomed out on the cement curbing).Anyway, as far as getting the rack out and back in? I can't remember now (it's been awhile) but I don't think jacking the motor was necessary. Basically, there are two main bolts that actually hold the rack in ... one on the passenger's side, and one on the driver's side. The one on the passenger's side will come out on its own. BUT, the one on the driver's side wouldn't come out even after I TRIED to jack the motor up ... there still wasn't enough clearance. SO? I cut the head of the bolt off (sawzall I think) and let it drop out the bottom. Then when I installed the new rack, I put that bolt in from the bottom, with the nut on top. Works like a charm that way
.It's a finicky job, but can be done at home. I set the toe by myself in the garage, then took it in right away for a proper alignment. Surprisingly, I had it very close
.Sorry about your luck though
The thing is about these steering racks, the actual rack inside is steel, but I think the housing is only made of aluminum, so it's really not that strong. Also, breaking where yours did is in the same place as mine went. The bitch about that is, the housing is still bolted in solid, but where the steering input is, is now on a "free floating" part of the rack!! So when you try to steer, the rack has to "catch up" to itself before it has any effect on the direction of the wheel(s). It took steering full lock to full lock just to keep the car going in a straight line!?!?!?!
Well it took about a total of about 2 hours to complete. Had to cut off the driver side bolt and replace it, but other than that, the job was VERY simple. Thanks for the help guys!!
ive ben there before when i hit a curb, my rack broke in the exact same place, weired,
https://ls1tech.com/forums/wheels-ti...ed-advice.html
https://ls1tech.com/forums/suspensio...ain-today.html
https://ls1tech.com/forums/wheels-ti...ed-advice.html
https://ls1tech.com/forums/suspensio...ain-today.html