Caster/Camber Bushing Depths
 03-24-2013, 09:38 AM
#1
Launching!
Thread Starter
iTrader: (1)
Join Date: Apr 2007
Location: Portland, OR
Posts: 262
Likes: 0
Received 0 Likes
on
0 Posts
I've searched everywhere and can't seem to find any information on how far in to press the bushings on the front lower arms (stock). It seems like If I were to bottom out the caster bushing, it would likely cause a bind.
Does anyone have a decent picture that shows far the bushing should go (both caster and camber)?
Thanx.
Does anyone have a decent picture that shows far the bushing should go (both caster and camber)?
Thanx.

 03-24-2013, 04:02 PM
#3
Launching!
Thread Starter
iTrader: (1)
Join Date: Apr 2007
Location: Portland, OR
Posts: 262
Likes: 0
Received 0 Likes
on
0 Posts
Thanx for the reply. Leadfoot. Note the remaining gap on the left and the position of the bushing on the right. Per this pic, if I push it all the way in, the bottom mounting surface will basically be flush with the bottom of the arm, which should cause it to bind in the mount whenever the body lifts or the wheel drops.

03-24-2013, 05:31 PM
#5
Launching!
Thread Starter
iTrader: (1)
Join Date: Apr 2007
Location: Portland, OR
Posts: 262
Likes: 0
Received 0 Likes
on
0 Posts
That's always a good rule, but these have been changed a few times and I know that I didn't pay attention to that the first time because "I have the maintenance manual to tell me the right answer" I've since learned GM has an odd interpretation of what parts are serviceable and what parts aren't 
03-24-2013, 05:43 PM
#7
Thanx for the reply. Leadfoot. Note the remaining gap on the left and the position of the bushing on the right. Per this pic, if I push it all the way in, the bottom mounting surface will basically be flush with the bottom of the arm, which should cause it to bind in the mount whenever the body lifts or the wheel drops.
Trending Topics
03-30-2013, 02:28 PM
#9
TECH Junkie
iTrader: (17)
Join Date: Aug 2006
Location: Rapid City, SD
Posts: 3,161
Likes: 0
Received 0 Likes
on
0 Posts

I'm about to replace all my front end stuff: upper and lower control arm bushings, sway bar end links, tie rod ends, and balljoints. All Moog.. How did everything end up coming out for your WhiteStallion?
03-30-2013, 03:32 PM
#10
Launching!
Thread Starter
iTrader: (1)
Join Date: Apr 2007
Location: Portland, OR
Posts: 262
Likes: 0
Received 0 Likes
on
0 Posts
Everything came out fine, but It's definitely time to start thinking about replacing the upper and lower arms. I replaced all you mentioned several years ago (also with Moog), but this time around noticed that the bushings and balljoints don't fit as tightly as they did before. My upper arm bushings (which I replaced a couple months ago) no longer rotate with the arm, the arm rotates around them on one side. For one of the lower balljoints, I actually cut a piece of diamond plate (that's all I had except aluminum and I didn't trust that) and pounded it into a strip about 1/4"wide and 2" long to use as an insert around the balljoint because it wasn't tight enough in the hole for my liking.
Mark your caster/camber adjustments by spraypainting all around the heads (I did both the front and back on the camber bolt).
You want to tighten the caster/camber nuts down at ride height, which can be a real pain in the ***. I left the coilover out, used a jack to hold the lower arms parallel to the deck and tightened things down that way.
It's up to you, but I swapped the torx bolts on the shock towers around so they are both on the passenger side. You'll have to loosen the master cylinder reservoir to get to the driver side ones; so having a hex bolt and ratcheting wrench will make things easier in the future.
Other than that, you can fab a press to get bushings and balljoints out, but much easier to borrow one from your favorite parts store. Good Luck
04-01-2013, 09:46 PM
#14
Teching In

Join Date: Jan 2012
Posts: 34
Likes: 0
Received 0 Likes
on
0 Posts
Yes, I pushed mine all the way in, and it no longer lines up and looks very wrong, did some research and they all show them backed out a little, I just don't know how much. I put a poly bushing in last year and then realized it wasn't a go idea and decided to switch back to rubber on the caster bushing (although I have an over steer problem, not an under steer), but I lost my reference height in my horsing around. I was hoping someone like Sam Strano would reply, he probably does these in his sleep...and knows exactly what it should be.
04-02-2013, 10:46 PM
#15
Launching!
Thread Starter
iTrader: (1)
Join Date: Apr 2007
Location: Portland, OR
Posts: 262
Likes: 0
Received 0 Likes
on
0 Posts
I didn't have much of a problem, but I just went out and looked and even though I thought I had pushed them all the way in, there is a bit of a gap there (again, though, my holes are a little stretched and none of the bushings are as tight as they were when it rolled out of the factory). I do put both sides into the slots before putting the bolts through, then I do the camber and finally I use a power ratchet or cordless drill to screw the caster bolt in, so it's possible that threading the caster bolt through actually pulled the camber bushing to where it belonged.
Here are closeups of a couple different images of stock arms that I took off ebay:


Here are closeups of a couple different images of stock arms that I took off ebay:
04-02-2013, 10:51 PM
#16
Launching!
Thread Starter
iTrader: (1)
Join Date: Apr 2007
Location: Portland, OR
Posts: 262
Likes: 0
Received 0 Likes
on
0 Posts
Not sure why that's not working, so here are the links:
http://www.facebook.com/photo.php?fb...70283826_n.jpg
http://www.facebook.com/photo.php?fb...31040022_n.jpg
http://www.facebook.com/photo.php?fb...70283826_n.jpg
http://www.facebook.com/photo.php?fb...31040022_n.jpg
11-02-2013, 01:41 AM
#17
Hey guys so i am about to press my new Moog bushings and when measureing the old bushings, i noticed the lip is actually higher (more toward the outside most mounting point) on the stock bushing then the Moog ones. I will take pictures tomorrow to give a better example but could Moog have revised their bushings so you have to mount them flush instead of just winging it?
11-02-2013, 03:40 AM
#18
Ok so i took some pictures and here is what i mean:
Here is the new Moog bushing with the old one (still installed) and as you can see if i line up the bushing lip, then the Moog one appears to be off center
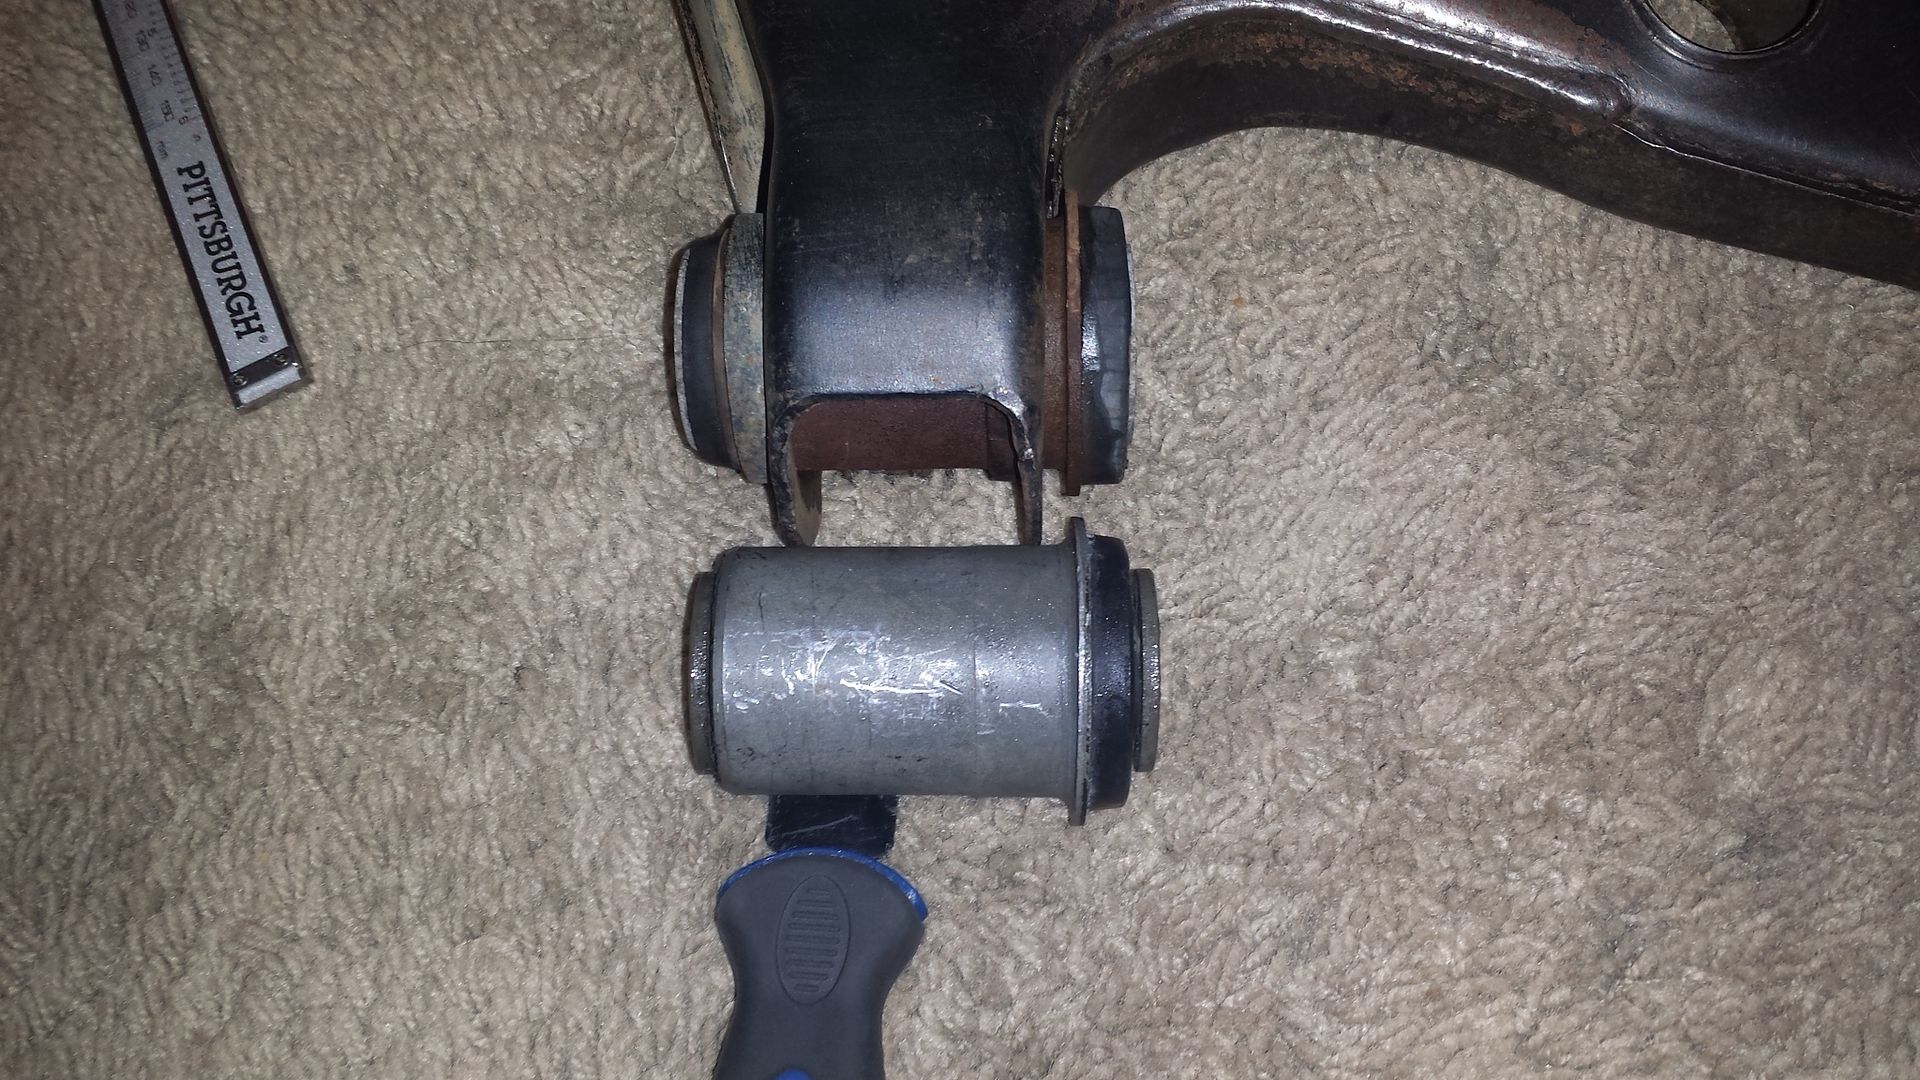
now if i align the bushing ends, then the lip on the Moog bushings lines up flush with the control arm.

This is how far the end of the bushing is from the control arm, about .625", and as you can see in the next picture, the moog bushing from the lip to the end of the bushing is the exact same measurment. I measured the other side and the gap is the same, indicating the bushing is center on the control arm. This also tells me that if i install the Moog bushing flush then it will retain the same gap as the original.
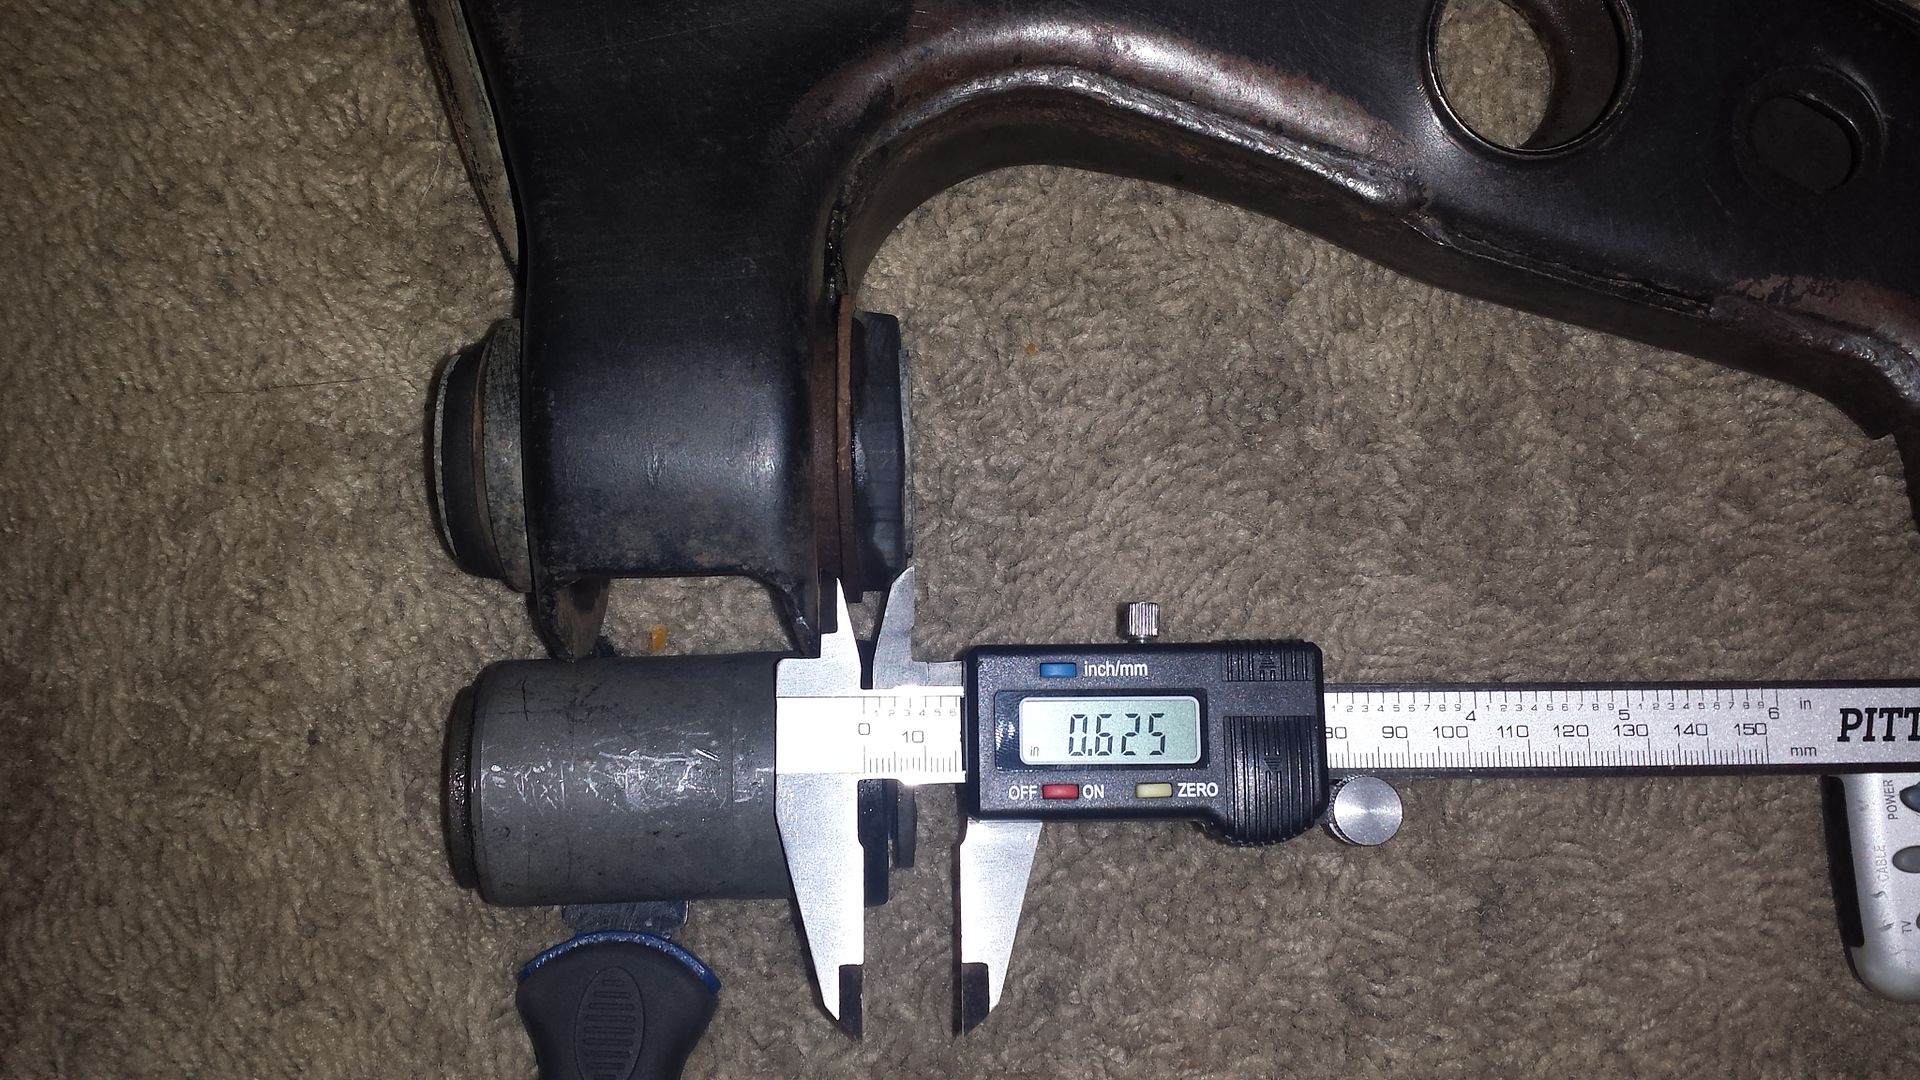
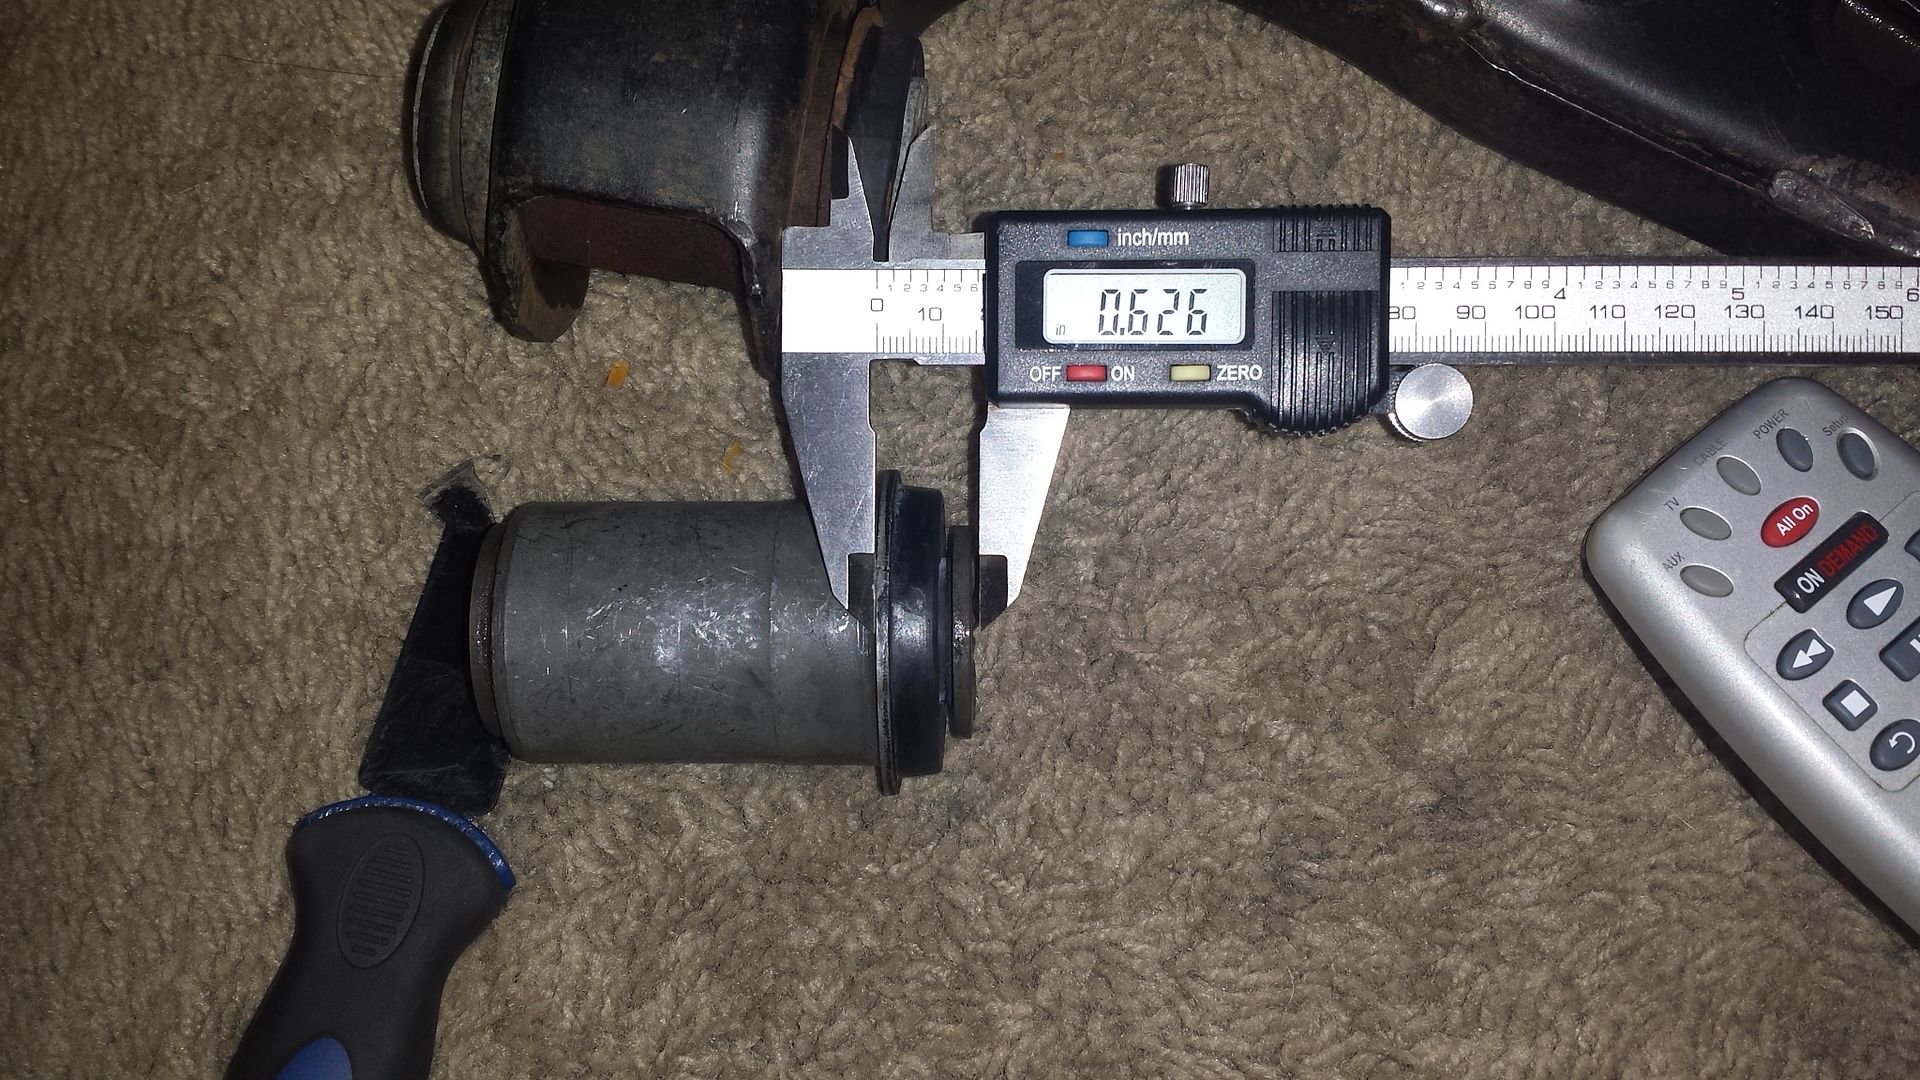
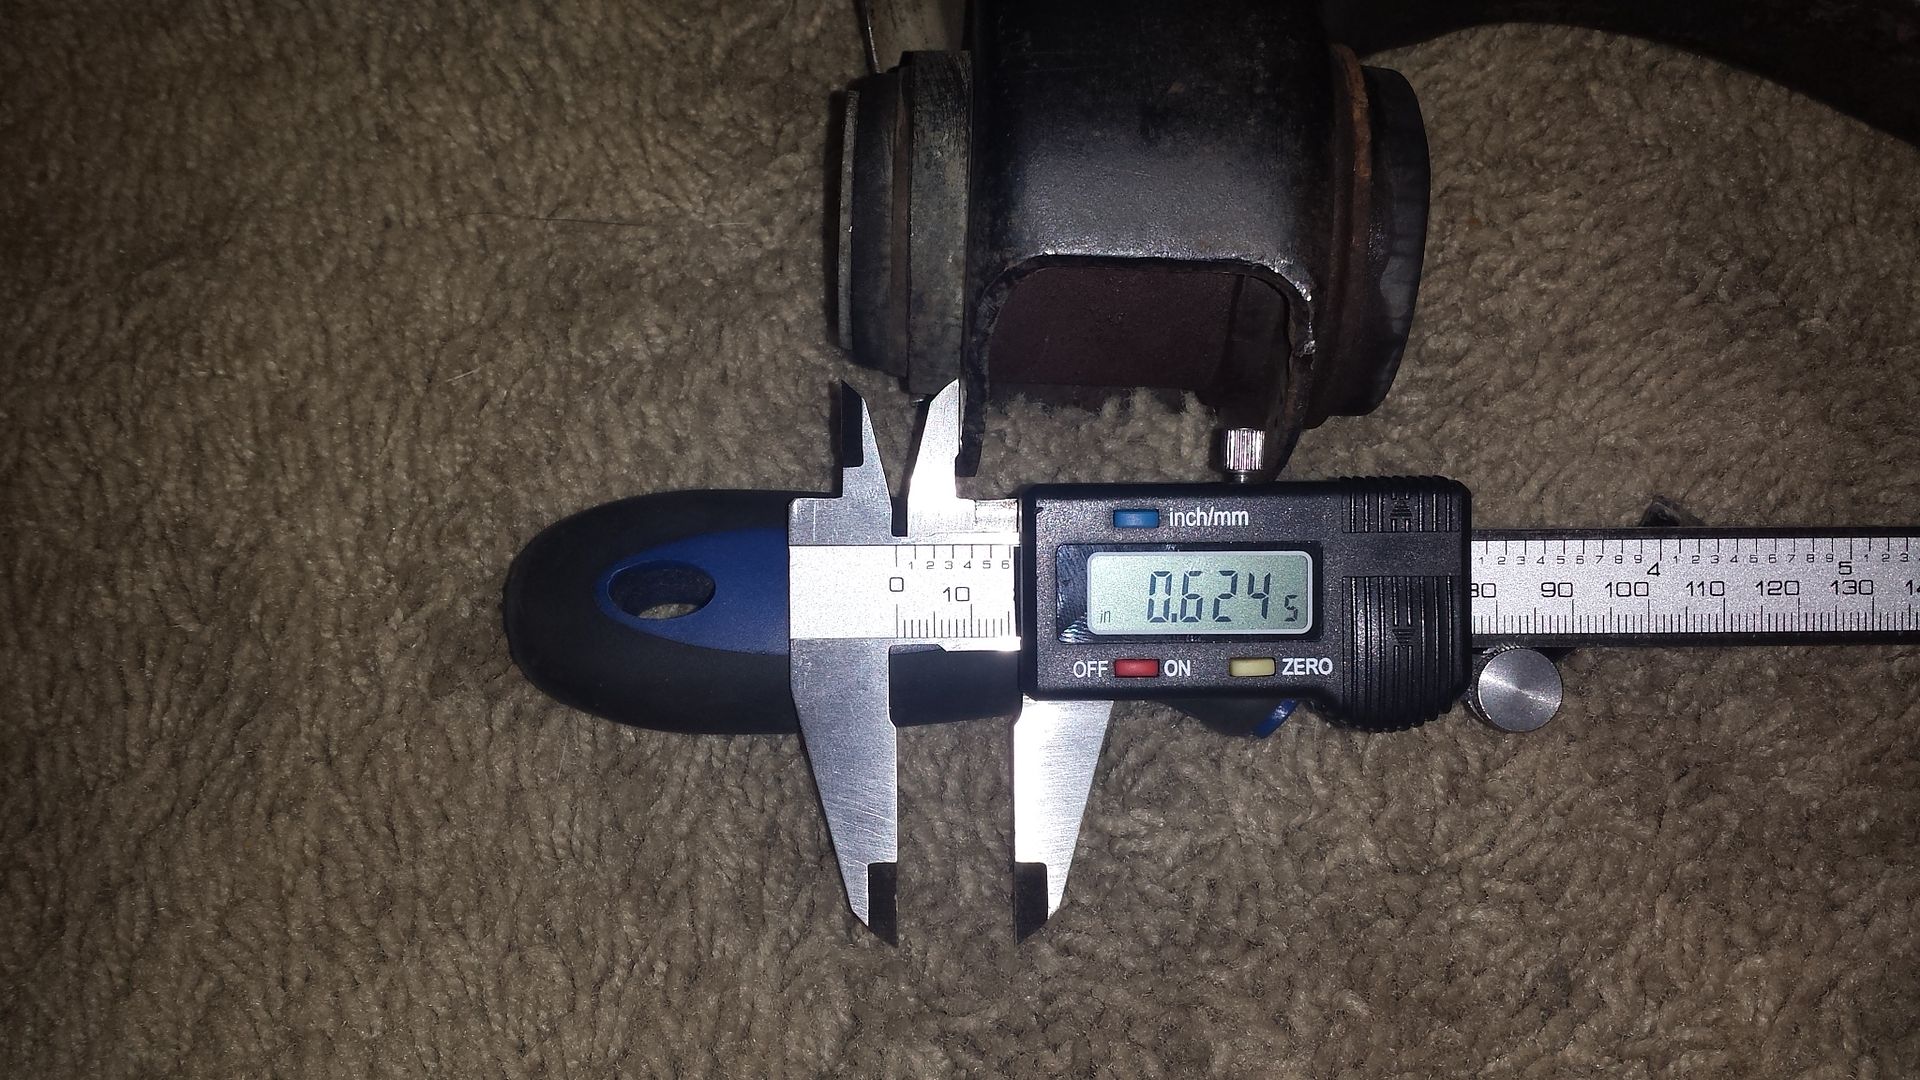
Now this only goes for this bushing as the "swivel" bushing on the rear most part of the front lower control arm seams to be the same size and design (with a little bit more rubber on the mounting ends) so i will just match it up with the old one. Is this a new design from Moog to make install alot easier on finding instant center?
Also when it comes to re-installing the front lower control arms, do i need to slot my camber/castor holes so i can run more castor with camber? Right now my alignment specs are
Toe: 0 / 0
Camber: -.5 / -.5
Castor: 5.0* / 5.3*
My castor is maxed out on the drivers side, and i was hoping to get closer to 6* on drivers side and 6.5* on passenger side. If i can get more camber/castor out of my alignment with slotting, which side do i slot, how much, and is there any ill effects by slotting the K member for a street / road coarse car?
Here is the new Moog bushing with the old one (still installed) and as you can see if i line up the bushing lip, then the Moog one appears to be off center

now if i align the bushing ends, then the lip on the Moog bushings lines up flush with the control arm.

This is how far the end of the bushing is from the control arm, about .625", and as you can see in the next picture, the moog bushing from the lip to the end of the bushing is the exact same measurment. I measured the other side and the gap is the same, indicating the bushing is center on the control arm. This also tells me that if i install the Moog bushing flush then it will retain the same gap as the original.


Now this only goes for this bushing as the "swivel" bushing on the rear most part of the front lower control arm seams to be the same size and design (with a little bit more rubber on the mounting ends) so i will just match it up with the old one. Is this a new design from Moog to make install alot easier on finding instant center?
Also when it comes to re-installing the front lower control arms, do i need to slot my camber/castor holes so i can run more castor with camber? Right now my alignment specs are
Toe: 0 / 0
Camber: -.5 / -.5
Castor: 5.0* / 5.3*
My castor is maxed out on the drivers side, and i was hoping to get closer to 6* on drivers side and 6.5* on passenger side. If i can get more camber/castor out of my alignment with slotting, which side do i slot, how much, and is there any ill effects by slotting the K member for a street / road coarse car?
Last edited by trans_am7935; 11-02-2013 at 04:01 AM.
04-02-2016, 04:29 PM
#19
TECH Apprentice
Join Date: Jan 2004
Posts: 392
Likes: 0
Received 0 Likes
on
0 Posts
Found this old thread. I did measure the gap on my bushings before I had them removed from the lower control arm. Well, I measured them on one side anyhow. I have the Moog bushings so do I press them in until the lip touches the arm? Or should I still leave the gap? I don't have the old bushings (shop threw them away when I had them press them out).
Also, what is this caster/camber slot holes mentioned when installing the lower control arms? When I broke torque there was some pretty good movements of the bolt as I was removing the nut. Is there something I need to be aware of when reinstalling the lower control arms?
Also, what is this caster/camber slot holes mentioned when installing the lower control arms? When I broke torque there was some pretty good movements of the bolt as I was removing the nut. Is there something I need to be aware of when reinstalling the lower control arms?
04-04-2016, 06:18 PM
#20
TECH Apprentice
Join Date: Jan 2004
Posts: 392
Likes: 0
Received 0 Likes
on
0 Posts
Well I do see that the Moog bushing in this thread should be pressed all the way until the flange contacts the arm. However, I have not found anything for the vertical bushing in the rear. I do not have my old bushings to compare either. Does anybody know how far the rear vertical bushing gets pressed in?