HELP: Watts link & Having to adjust rear-end geometry....
 06-23-2014, 07:05 PM
#41

Your non-adjustable rear bar came with some bushing that eliminate the need to use the Fays2 Watts Link mount spacers? Either I am misunderstanding, did not receive these or do not recall any longer.
Also, it sounds like all the replacement longer u-bolts do not have the flat part on the "U" like the factory ones do, or have some been identified by anyone?
Also, it sounds like all the replacement longer u-bolts do not have the flat part on the "U" like the factory ones do, or have some been identified by anyone?
 06-24-2014, 06:07 PM
#42
On The Tree
Thread Starter
iTrader: (1)

Join Date: Jun 2011
Location: Amherst, NH
Posts: 191
Likes: 0
Received 0 Likes
on
0 Posts
Do you supply these parts separately still? I don't think my adjustable swaybar came with them, I ordered it quite a while ago. I'd have to dig through my records but it's been a few years. I know I ordered the FAYS2 and rear bar from you at the same time, and you made sure they were compatible with each other... but the parts I have definitely don't work on my stock rear.
Since like I said, I had to try and fab up my own parts and ended up destroying the u-bolts I was attempting to use, perhaps I should just order the parts you currently recommend instead.
I also need to get one of the UMI torque arm relocation bars to get that damn thing off the tailshaft of my transmission (I already have ruined the tail seal because of it!), so maybe I'll just order them all at once.
06-24-2014, 07:19 PM
#43

No, I don't typically do the part separately. I changed the bushings in the bar after we build the earliest ones to get rid of the need for the spacer. If you want some, I can probably get you some, but they are special run for my bars so it might take a little time and they will cost more than "standard" bushings.
__________________
www.stranoparts.com --814-849-3450
Results matter. Talk is cheap. We are miles beyond the success anyone else has had with the 4th gens, and C5, C6, C7 Corvettes,
10 SCCA Solo National Championships, 2008 Driver of they Year, 2012 Driver of Eminence
13 SCCA Pro Solo Nationals Championships
2023 UMI King of the Mountain Champion
06-24-2014, 09:20 PM
#44
Sam, we are not receiving clear information here. JD_AMG also confirmed he needed to use the spacers and longer u-bolts for the Watts Link to fit with your rear sway package. This bit about the bushings negating the need for the watts link spacers doesn't seem to fly.
Are there some pictures showing what you're talking about as well as photos showing the Watts fits w/out spacers on the original GM 10-bolt?
I am in the midst of the Watts install, and would rather not use spacers, if there is a way not to...
TIA
Are there some pictures showing what you're talking about as well as photos showing the Watts fits w/out spacers on the original GM 10-bolt?
I am in the midst of the Watts install, and would rather not use spacers, if there is a way not to...
TIA
06-29-2014, 11:43 AM
#46
The Watts Link is very clapptrappy, but I do think it is worthwhile, it just takes a long time to get everything aligned and set.
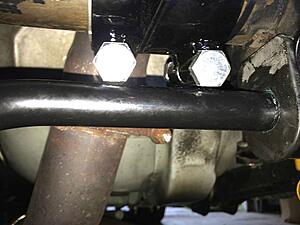
Here's mine after adjusting on the passenger side, which is supposed to be about 4 O'Clock, but I had to lower a little, and raise the driver side slightly above 9 O'Clock to maintain proper geometry and keep arms equal length.
These ARE the bushings Sam is talking about, but they need to be a few mm taller STILL for adequate clearance. Driver side is fine, but passenger side is so close it will be hitting.
What I wish is Sam would provide photos of equal length, proper geometry and show the clearance he is saying should be there.

Last edited by libertyforall1776; 06-29-2014 at 12:11 PM.
06-29-2014, 01:46 PM
#47
TECH Senior Member
Sam, we are not receiving clear information here. JD_AMG also confirmed he needed to use the spacers and longer u-bolts for the Watts Link to fit with your rear sway package. This bit about the bushings negating the need for the watts link spacers doesn't seem to fly.
Are there some pictures showing what you're talking about as well as photos showing the Watts fits w/out spacers on the original GM 10-bolt?
I am in the midst of the Watts install, and would rather not use spacers, if there is a way not to...
TIA
Are there some pictures showing what you're talking about as well as photos showing the Watts fits w/out spacers on the original GM 10-bolt?
I am in the midst of the Watts install, and would rather not use spacers, if there is a way not to...
TIA
The Watts Link is very clapptrappy, but I do think it is worthwhile, it just takes a long time to get everything aligned and set.
Here's mine after adjusting on the passenger side, which is supposed to be about 4 O'Clock, but I had to lower a little, and raise the driver side slightly above 9 O'Clock to maintain proper geometry and keep arms equal length.
These ARE the bushings Sam is talking about, but they need to be a few mm taller STILL for adequate clearance. Driver side is fine, but passenger side is so close it will be hitting.
What I wish is Sam would provide photos of equal length, proper geometry and show the clearance he is saying should be there.

 06-29-2014, 02:50 PM
#48
^ Thanks but none of those photos show the factory axle with the current bushings and *no spacer*, which was my point. I could try more angle experiments, but I think I had enough Watts fun for one weekend. The install documentation certainly leaves much to be desired as well, I passed some of the suggestions over to Jim.
If anyone has their factory rear-end, current longer Strano sway bushings w/out spacers and still correct geometry and arm lengths, please post your photos, it's that passenger side that is the PITA. TIA!
If anyone has their factory rear-end, current longer Strano sway bushings w/out spacers and still correct geometry and arm lengths, please post your photos, it's that passenger side that is the PITA. TIA!
Last edited by libertyforall1776; 06-29-2014 at 02:59 PM.
06-29-2014, 04:18 PM
#49
On The Tree
Thread Starter
iTrader: (1)
Join Date: Jun 2011
Location: Amherst, NH
Posts: 191
Likes: 0
Received 0 Likes
on
0 Posts
^ Thanks but none of those photos show the factory axle with the current bushings and *no spacer*, which was my point. I could try more angle experiments, but I think I had enough Watts fun for one weekend. The install documentation certainly leaves much to be desired as well, I passed some of the suggestions over to Jim.
If anyone has their factory rear-end, current longer Strano sway bushings w/out spacers and still correct geometry and arm lengths, please post your photos, it's that passenger side that is the PITA. TIA!
If anyone has their factory rear-end, current longer Strano sway bushings w/out spacers and still correct geometry and arm lengths, please post your photos, it's that passenger side that is the PITA. TIA!
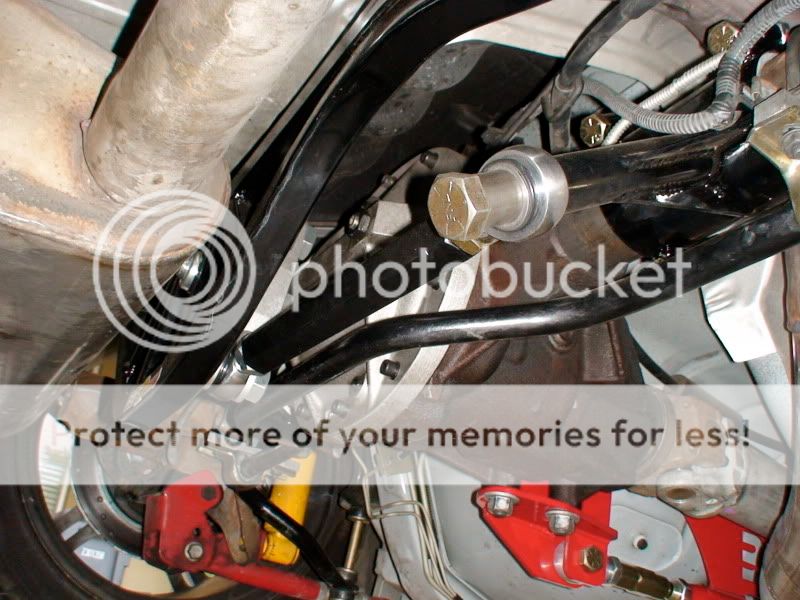
I see those extended bushings. Definitely not what I got. That would have made my life a lot easier than drilling and sawing through bar stock to fab up the spacers myself, etc. etc.
06-29-2014, 04:31 PM
#50
TECH Senior Member
^ Thanks but none of those photos show the factory axle with the current bushings and *no spacer*, which was my point. I could try more angle experiments, but I think I had enough Watts fun for one weekend. The install documentation certainly leaves much to be desired as well, I passed some of the suggestions over to Jim.
If anyone has their factory rear-end, current longer Strano sway bushings w/out spacers and still correct geometry and arm lengths, please post your photos, it's that passenger side that is the PITA. TIA!
If anyone has their factory rear-end, current longer Strano sway bushings w/out spacers and still correct geometry and arm lengths, please post your photos, it's that passenger side that is the PITA. TIA!
06-29-2014, 06:47 PM
#52
http://www.pdf-archive.com/2014/06/3...ns-low-res.pdf
Last edited by libertyforall1776; 06-29-2014 at 07:10 PM.
06-29-2014, 06:58 PM
#53
On The Tree
Thread Starter
iTrader: (1)
Join Date: Jun 2011
Location: Amherst, NH
Posts: 191
Likes: 0
Received 0 Likes
on
0 Posts
I will have to experiment while using my level, however, look at page 14 of the PDF manual (11 marked on the page), you have two other valid options as opposed to parallel...
http://www.pdf-archive.com/2014/06/3...ns-low-res.pdf
http://www.pdf-archive.com/2014/06/3...ns-low-res.pdf

