Control Arm Bushings and Ball Joints are IN!!

 04-25-2013, 05:46 AM
#23
When I bought my car it had 100k and was 12 years old, first thing I did was a complete overhaul of all of everything rubber except tires. Moog upper and lower ball joints, outer tie rods, control arm bushings, motor and trans mount, and bilstein HD shocks. Changed how the car felt completely. After I was done it handled better and rode nicer than my friends 4 year old 22k mile (at the time) ls1. Definitely worth the $1000.
04-25-2013, 10:15 AM
#24
TECH Apprentice
When I bought my car it had 100k and was 12 years old, first thing I did was a complete overhaul of all of everything rubber except tires. Moog upper and lower ball joints, outer tie rods, control arm bushings, motor and trans mount, and bilstein HD shocks. Changed how the car felt completely. After I was done it handled better and rode nicer than my friends 4 year old 22k mile (at the time) ls1. Definitely worth the $1000.
I'm thinking of add 17 inch wheels and lowering springs to my car to help in the handling department, but if I can get a night and day difference out of replacing old parts, I might do that first.
04-25-2013, 11:05 AM
#25
TECH Junkie
iTrader: (17)
Join Date: Aug 2006
Location: Rapid City, SD
Posts: 3,161
Likes: 0
Received 0 Likes
on
0 Posts


Here are the parts. All MOOG:
(2) K6940 - FRONT LOWER CONTROL ARM BUSHING, includes front and rear bushings
(2) K6689 - FRONT UPPER CONTROL ARM BUSHING, includes front and rear bushings
(2) K6178 - REAR LOWER CONTROL ARM BUSHINGS, includes front and rear bushings
(2) K6573 - SPRING MOUNT INSULATOR
(2) K6462 - FRONT UPPER BALL JOINT
(2) K6145T - FRONT LOWER BALL JOINT
(4) K6630 - SWAY BAR END LINK, (same part number for all 4 end links, front and rear)
(2) ES3238RL - OUTER TIE ROD END
(2) EV260 - INNER TIE ROD END (I suggest buying a rebuilt steering rack for $120 from RackDoctor that includes the inner tie rod ends already installed)
I can't find MOOG sway bar bushings on RockAuto, but I don't plan to replace those right now anyway. They are such an easy thing to replace, it can be done anytime.
Hope that helps
Last edited by HoLLo; 04-25-2013 at 11:10 AM.
04-25-2013, 09:24 PM
#26
The spring mount insulators I doubt are necessary to replace. Last time I installed my springs, one side didn't have an insulator on it, so we took the other one out to make it even. We were in a hurry to get it back installed, so I've been rolling around for a few years with no spring mount insulators. Time to install some
 04-25-2013, 11:12 PM
#28
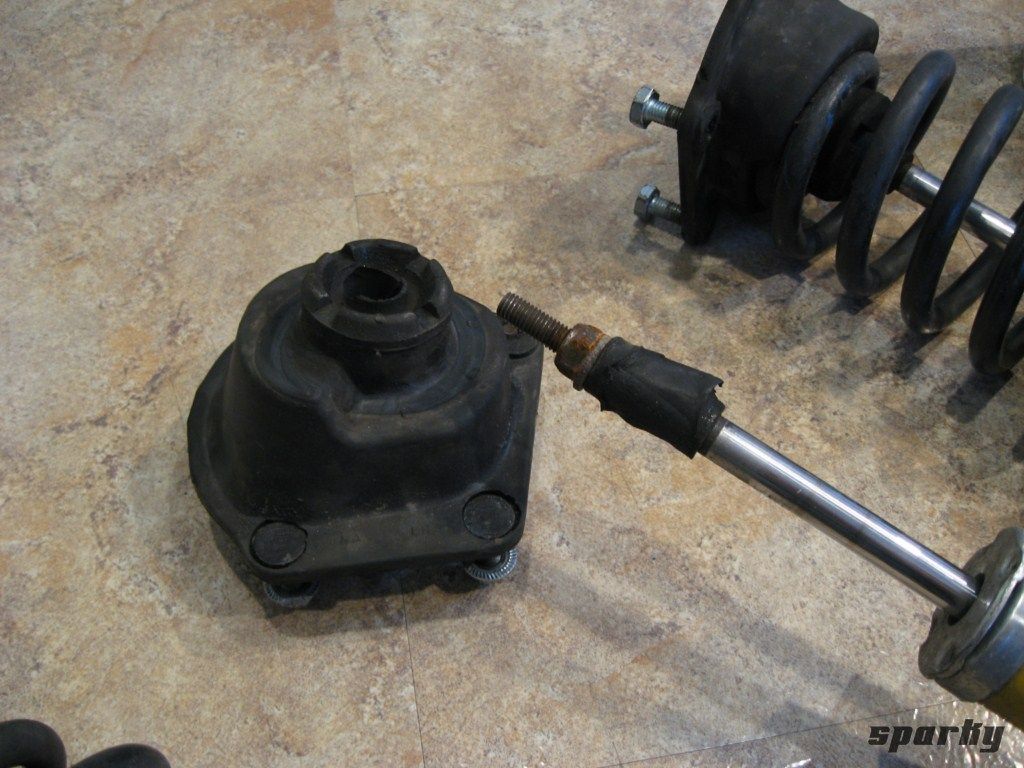
Yeah, that one popped when it was off the car sitting in my living room. Thankfully it didn't blow apart and send the mount through the wall. That would have been an interesting conversation with the landlord 
If that's not bad enough, it's no fun when it yanks out while IN the car (Not my pic). Anyone want to guess would could have happened if that spring had come off the mount?
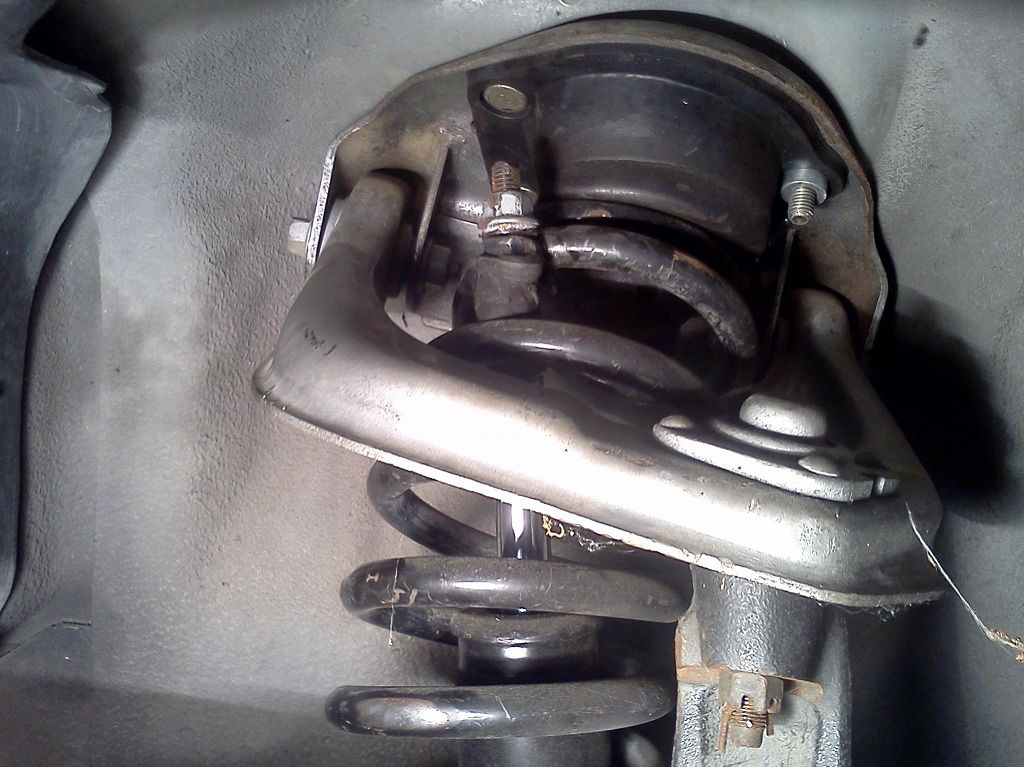
If that's not bad enough, it's no fun when it yanks out while IN the car (Not my pic). Anyone want to guess would could have happened if that spring had come off the mount?
04-26-2013, 06:00 PM
#30
Your mounts must be pretty darn well built if they've lasted this long. That's rather amazing, really.
04-26-2013, 06:30 PM
#31
TECH Junkie
iTrader: (17)
Join Date: Aug 2006
Location: Rapid City, SD
Posts: 3,161
Likes: 0
Received 0 Likes
on
0 Posts
When you drive over bumps and the suspension is compressing and extending, all that pressure is getting exerted on the shock's shaft and that top nut. The insulator spreads out that load across a metal plate against the rubber, so it reduces the force in one spot. Without it the entire stress is on the metal sleeve in the mount and can easily rip out after getting worked.
Your mounts must be pretty darn well built if they've lasted this long. That's rather amazing, really.
Your mounts must be pretty darn well built if they've lasted this long. That's rather amazing, really.
04-26-2013, 06:37 PM
#32
I'd plan on it. Those things don't like coming apart in one piece if they've been together for a while. Although I did successfully separate the other bilstein and the mount in my first pic I just didn't trust it as I wasn't sure how stressed it had gotten, so I got two new mounts and insulators. Can't wait to get all the stuff installed next weekend! Then waiting on OEwheels to get stock back in again.
04-26-2013, 08:09 PM
#33
The spring mount insulators I doubt are necessary to replace. Last time I installed my springs, one side didn't have an insulator on it, so we took the other one out to make it even. We were in a hurry to get it back installed, so I've been rolling around for a few years with no spring mount insulators. Time to install some
Here are the parts. All MOOG:
(2) K6940 - FRONT LOWER CONTROL ARM BUSHING, includes front and rear bushings
(2) K6689 - FRONT UPPER CONTROL ARM BUSHING, includes front and rear bushings
(2) K6178 - REAR LOWER CONTROL ARM BUSHINGS, includes front and rear bushings
(2) K6573 - SPRING MOUNT INSULATOR
(2) K6462 - FRONT UPPER BALL JOINT
(2) K6145T - FRONT LOWER BALL JOINT
(4) K6630 - SWAY BAR END LINK, (same part number for all 4 end links, front and rear)
(2) ES3238RL - OUTER TIE ROD END
(2) EV260 - INNER TIE ROD END (I suggest buying a rebuilt steering rack for $120 from RackDoctor that includes the inner tie rod ends already installed)
I can't find MOOG sway bar bushings on RockAuto, but I don't plan to replace those right now anyway. They are such an easy thing to replace, it can be done anytime.
Hope that helps
Thank you so much! Now when you say you can't find the Moog sway bar bushing, are you referring to the endlinks? Before I put in my Strano sway bar set, I had just replaced the sway bar end link bushings. Had them on for a few months and they are Moog heavy duty ones so I could send them your way for free - jus' pay the shipping. Should be like a 3 or 4 bucks to ship out I imagine and would save you $28 + shipping.
04-26-2013, 08:21 PM
#34
TECH Junkie
iTrader: (17)
Join Date: Aug 2006
Location: Rapid City, SD
Posts: 3,161
Likes: 0
Received 0 Likes
on
0 Posts
Thank you so much! Now when you say you can't find the Moog sway bar bushing, are you referring to the endlinks? Before I put in my Strano sway bar set, I had just replaced the sway bar end link bushings. Had them on for a few months and they are Moog heavy duty ones so I could send them your way for free - jus' pay the shipping. Should be like a 3 or 4 bucks to ship out I imagine and would save you $28 + shipping.
05-04-2013, 02:30 PM
#35
TECH Junkie
iTrader: (17)
Join Date: Aug 2006
Location: Rapid City, SD
Posts: 3,161
Likes: 0
Received 0 Likes
on
0 Posts
When you drive over bumps and the suspension is compressing and extending, all that pressure is getting exerted on the shock's shaft and that top nut. The insulator spreads out that load across a metal plate against the rubber, so it reduces the force in one spot. Without it the entire stress is on the metal sleeve in the mount and can easily rip out after getting worked.
Your mounts must be pretty darn well built if they've lasted this long. That's rather amazing, really.
Your mounts must be pretty darn well built if they've lasted this long. That's rather amazing, really.
Well, I got around to installing everything yesterday. The car rides amazingly now. But you were right, the passenger side strut mount basically came right off, and I was able to separate the spring from the shock by hand. Could have had potential to be a sticky situation. My driver's side mount was near perfect though, which I don't understand. I've been having a lot of extra wear on my passenger side tire, and the tie rod end and ball joints were far more worn out on the passenger side, so all in all, I think everything together just made it worse. I went to Oreillys and bought a MasterPro mount and installed everything with new insulators on the mount, including brand new KONIs, should be good for awhile! Thanks for the heads up and information!!
05-05-2013, 11:52 AM
#37
On The Tree
iTrader: (1)

Join Date: Jun 2011
Location: Amherst, NH
Posts: 191
Likes: 0
Received 0 Likes
on
0 Posts
I've been sawing at them for a couple days now. Gonna swap off for some Lenox Gold Lazer blades and see if I get better performance.
Has anyone else loaded these things with antiseize when assembling?
05-05-2013, 07:09 PM
#38
I'd do a hundred lower ball joints before I deal with another set of seized lower arm rear bushings!
I've been sawing at them for a couple days now. Gonna swap off for some Lenox Gold Lazer blades and see if I get better performance.
Has anyone else loaded these things with antiseize when assembling?
I've been sawing at them for a couple days now. Gonna swap off for some Lenox Gold Lazer blades and see if I get better performance.
Has anyone else loaded these things with antiseize when assembling?
05-05-2013, 08:33 PM
#39
TECH Fanatic
Thread Starter
I'm actually hating the ride now. It's been a few weeks since I did all the bushings and ball joints, and alignment .... I'm thinking it's got to be the alignment.
The steering is tight (actually too tight for my liking).... very "twitchy". When I swapped the rack, I noticed that the pre-load is tighter than what was stock. Tomorrow I'm going to back the pre-load adjuster on the rack 1/8 turn.
Besides that .... it's difficult to make turns and on the highway ... it feels a bit erratic when changing lanes.
Could this be the alignment? Do I have everything torqued too tight? The lower ball joints are right at 80 ft/lbs and the upper ball joints and tie rod ends 35 ft/lbs.
I can provide the alighnment specs if that would be helpful.
05-05-2013, 10:51 PM
#40
Adjust that preload first. If the caster is real high it'll bite turns a bit better and be more stable at speed but stiffer to turn.
Ball joint and tie rod end torque won't affect that really as long as they are tight enough.
Post up the specs perhaps, that may help.
BTW, even with my alignment eyeballed into place mine drives 100x better than it did. Stranos + Bilsteins, amazing. I can't imagine what properly adjusted Konis would be like. The ride is controlled and firm, but certainly not harsh anymore. The old KYB GR2 shocks were quite harsh, almost jarring at times.