


.jpg)


Modifying Your Front Upper Shock Mount
FYI, unless water never touches your car your still going to get rust in up in the upper mount, regardless if you drill a hole in that location or not.
You can always squirt some water proof grease in the hole , then put a piece of tape over it.
Regardless, I would still recommend coating the inside of the upper mount, the isolator, and the shock shaft from where it goes into the upper mount on up with something like the clear waterproof grease you put on poly bushings.
Last edited by 99Bluz28; Jul 4, 2009 at 12:43 AM.
FYI, unless water never touches your car your still going to get rust in up in the upper mount, regardless if you drill a hole in that location or not.
You can always squirt some water proof grease in the hole , then put a piece of tape over it.
Regardless, I would still recommend coating the inside of the upper mount, the isolator, and the shock shaft from where it goes into the upper mount on up with something like the clear waterproof grease you put on poly bushings.
You can always squirt some water proof grease in the hole , then put a piece of tape over it.
Regardless, I would still recommend coating the inside of the upper mount, the isolator, and the shock shaft from where it goes into the upper mount on up with something like the clear waterproof grease you put on poly bushings.

 I feel like stupid LOL.
 I like the idea of putting bushing grease. I'll make a note of it.
Thread Starter
Joined: Sep 2004
Posts: 6,814
Likes: 3
From: Hou. TX.
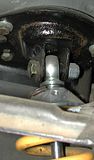
I always pack a bunch of bearing grease around that shock nut to prevent rust. It works.
I'm considering doing away with the factory mount and replacing it with a rod end.
I'm considering doing away with the factory mount and replacing it with a rod end.
Hmm amazing right up and idea. WIll this work on a 96? Im not sure the differences on the front control arms. But my front is lowered 1.25", with blisten shocks, just wondering if this can apply to me
Nice write-up Jason!
I just read the first and last pages... Looks like a great walkthrough of the process.
I did have to clearance the shock tower on mine, on account of the shock rod sticking higher up into it.
I just read the first and last pages... Looks like a great walkthrough of the process.
I did have to clearance the shock tower on mine, on account of the shock rod sticking higher up into it.
LS1 Tech Stories
The Best V8 Stories One Small Block at Time

Gas Monkey Built a 6-Wheel Ferrari Testarossa With a Corvette LT4 Engine
Verdad Gallardo
7 Most Reliable High-Performance Engines GM Has Ever Built
Verdad Gallardo
Amazing '71 Camaro Restomod Is Modern Muscle Car Under the Skin
Verdad Gallardo
6 Common C5 Corvette Failures and What's Involved In Repairing Them
Pouria Savadkouei
Retro Modern Bandit Pontiac Trans AM Comes With Burt Reynolds' Autograph
Verdad Gallardo
Top 10 Greatest Cadillac V Series Performance Models Ever, Ranked
Pouria Savadkouei
Top 10 Most Powerful Chevy Trucks Ever Made!

Hennessey's New Supercharged Silverado ZR2 Has 700 HP
Verdad Gallardo
Coachbuilt N2A Anteros Is an LS2-Powered C6 Corvette In Italian Clothes
Verdad Gallardo Thread Starter
Joined: Sep 2004
Posts: 6,814
Likes: 3
From: Hou. TX.
Thread Starter
Joined: Sep 2004
Posts: 6,814
Likes: 3
From: Hou. TX.
Switching over to a rod end requires having the spring fully supported by the shock. Once that is done, then you can weld a rod end to the top of the shock. The upper shock mount is tossed aside and you use 4 nuts and bolts to attach the upper control arm mount to the shock tower. At this point you only need to weld 2 metal tabs to the UCA mount to bolt the rod end to.
If your using a Koni shock, you can unscrew the tophat and screw on a rod end style tophat which Koni sells. It even has the adjustment window in it, so it is very easy to do and won't void the shocks warranty.

Click on the thumbnails


If your using a Koni shock, you can unscrew the tophat and screw on a rod end style tophat which Koni sells. It even has the adjustment window in it, so it is very easy to do and won't void the shocks warranty.
Click on the thumbnails


Last edited by JasonWW; Jul 5, 2009 at 11:34 AM.
Thread Starter
Joined: Sep 2004
Posts: 6,814
Likes: 3
From: Hou. TX.
Here is how you change the Koni shock. Unscrew the old, screw on the new. Simple.


Here is how you can modify ANY shock to a sperical bearing.You buy a kit and then weld the main cylinder to the top of the shock rod. Then the bearing slides in and is held in place by snap rings.

I'm also working on an aluminum drop spindle conversion which reduces the ride height 1.25", reduces unsprung weight, maintains the ABS and will do away with the shocktowers. It's pretty complicated and unfinished so I won't go into details here.

Here is how you can modify ANY shock to a sperical bearing.You buy a kit and then weld the main cylinder to the top of the shock rod. Then the bearing slides in and is held in place by snap rings.
I'm also working on an aluminum drop spindle conversion which reduces the ride height 1.25", reduces unsprung weight, maintains the ABS and will do away with the shocktowers. It's pretty complicated and unfinished so I won't go into details here.
Last edited by JasonWW; Jul 5, 2009 at 12:57 PM.
Thread Starter
Joined: Sep 2004
Posts: 6,814
Likes: 3
From: Hou. TX.
A started a thread already on the spindle swap.
https://ls1tech.com/forums/suspensio...t-spindle.html
I mean about switching over to rod end top mount. I read about the short spindle conversion. That's something too complicate for me to deal with.
I wanna know what exactly need to be done to the top mount. Also, according to your pics, did the shock travel being reduced?
I wanna know what exactly need to be done to the top mount. Also, according to your pics, did the shock travel being reduced?
Thread Starter
Joined: Sep 2004
Posts: 6,814
Likes: 3
From: Hou. TX.
You can then put the bearing higher or lower than the stock location. You can mount it as high as the hood if you want. You would just cut a big hole in that upper control arm piece so you can mount the rod end higher.
This is a picture of a sperical bearing mounting kit welded to the top of a coilover shock and then gold anodized to prevent corrosion. See how the bearing is held in place with snap rings?
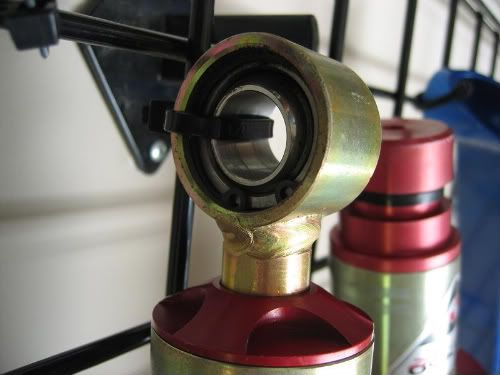
You can also take the bearing and turn it sideways. This is often refered to as a "pillow ball mount".

I'm trying to decide whether a metal bearing or a polyurethane bushing would be best for me. The big advantage for me is the ease of removing the shocks. Right now you have to undo the 8 shock tower bolts, 2 master cylinder bolts, 2 ABS bolts, 4 lower shock bolts and finally the 2 stud bolts. I want to change this to only 4 lower shock bolts and 2 upper shock bolts. So from 18 bolts down to 6.
Last edited by JasonWW; Jul 7, 2009 at 03:23 AM.

For the spacer, did you essentially use the 3/4" part that you cut off the bottom of the mount and placed it on top of the mount under the nut? Can you just use a 3/4" hollow steel tube?
Are there any modifications available for the rear? I like the idea of doing this mod and cutting the springs for a nice 1" drop that won't cost a fortune and should drive very smooth. Would the rear just bottom out if the rear springs were cut to lower the car 1"?
I wonder what it would take to get my bilstein hd's to work. I'll try to take a look and post results.
Thread Starter
Joined: Sep 2004
Posts: 6,814
Likes: 3
From: Hou. TX.
Are there any modifications available for the rear? I like the idea of doing this mod and cutting the springs for a nice 1" drop that won't cost a fortune and should drive very smooth. Would the rear just bottom out if the rear springs were cut to lower the car 1"?
I wonder what it would take to get my bilstein hd's to work. I'll try to take a look and post results.
I wonder what it would take to get my bilstein hd's to work. I'll try to take a look and post results.
Did anyone else use a hacksaw to do this? I don't have access to a bandsaw (I don't think) and I don't trust just anyone performing this. If I can mark it and hacksaw it then I know it'll be right. What blade should be used with a hacksaw?