My wooden ramps....work great!!!
 03-31-2007, 08:28 AM
#21

navymitch12: Those look good! I would probably be ok backing up a set of smaller ramps...like the rhino ramps. But pulling foward onto them is a different story. if I manage to get my tires to hit the ramp before my front end, my tires usually push the ramps out of the way....or atleast out of alignment so that one is further ahead than the other. It doesnt help that im still a newbie at driving stick, and my cars set up is kinda against smooth driving. haha. Looks good though!
thanks for the compliments on what i did. Im going to try to use the jack and jack stands on the front now thats its on the ramp. I dont really need to for what Im doing...its more just to test the ramps out. Ill let you all know how that goes.
Justin
thanks for the compliments on what i did. Im going to try to use the jack and jack stands on the front now thats its on the ramp. I dont really need to for what Im doing...its more just to test the ramps out. Ill let you all know how that goes.
Justin
 03-31-2007, 11:39 AM
#22
12 Second Club
iTrader: (1)
Join Date: Nov 2005
Location: Texas
Posts: 1,017
Likes: 0
Received 0 Likes
on
0 Posts

yea, yours look a little easier to drive on cause its more of a gradual incline.
the wood ones dont slide like the plastic ones do which is another thing i like about them
the wood ones dont slide like the plastic ones do which is another thing i like about them
04-18-2007, 07:24 AM
#23
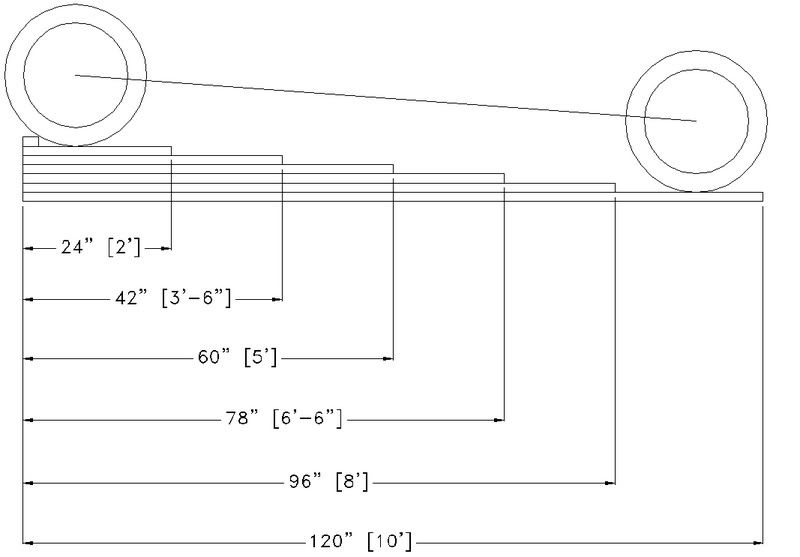
I had a couple requests for dimensions...so instead of just replying to each one I figured Ide just post the info up to make it easy.
Keep in mind you dont have to build them to the exact specs. But the way I have outlined makes no scrap wood and works out perfectly at 7 pcs of lumber. You could leave the last level off and you would only need 5 pcs then.
Here is a profile view of the ramps showing the boards, as well as the wheels relative to the boards. Only thing not shown is the taller wheel stop. Im leaving the wheel stop you to you, but two 2x3's nailed down work good for me.
Here is a plan view of them, just to show basically how I screwed them together. I knew I didnt have to go overboard with screws, but I did the ones in the middle to help flatten the slightly curved pieces out. I used 2.5" screws for treated lumber. They have the green coating. Pleny of screw to hold them together.

Finally, here is a basic materials list. If you have any trouble understanding it, let me know. But its pretty self explanitory. It shows the size of lumber I used, how many pieces, and where to cut each piece to make it come out even.

If you have any questions feel free to ask, as well as if you have any suggestions for better ramps, or different ramps, feel free to upgrade the design.
Justin
Keep in mind you dont have to build them to the exact specs. But the way I have outlined makes no scrap wood and works out perfectly at 7 pcs of lumber. You could leave the last level off and you would only need 5 pcs then.
Here is a profile view of the ramps showing the boards, as well as the wheels relative to the boards. Only thing not shown is the taller wheel stop. Im leaving the wheel stop you to you, but two 2x3's nailed down work good for me.
Here is a plan view of them, just to show basically how I screwed them together. I knew I didnt have to go overboard with screws, but I did the ones in the middle to help flatten the slightly curved pieces out. I used 2.5" screws for treated lumber. They have the green coating. Pleny of screw to hold them together.
Finally, here is a basic materials list. If you have any trouble understanding it, let me know. But its pretty self explanitory. It shows the size of lumber I used, how many pieces, and where to cut each piece to make it come out even.
If you have any questions feel free to ask, as well as if you have any suggestions for better ramps, or different ramps, feel free to upgrade the design.
Justin
04-19-2007, 04:26 PM
#24
I didn't see anyone make this suggestion so I thought I would give my 2cents.
If you want to make sure that you always line up the ramps right the first time, just measure the distance between the fronts and the backs when you have it up on the ramp. You can write that number on the ramp for the next time and just use a tape measure to get the fronts and backs lined up. Takes a minute to measure, but can save you from an unpleasant surprise when your eyes decieve you.
If you want to make sure that you always line up the ramps right the first time, just measure the distance between the fronts and the backs when you have it up on the ramp. You can write that number on the ramp for the next time and just use a tape measure to get the fronts and backs lined up. Takes a minute to measure, but can save you from an unpleasant surprise when your eyes decieve you.
04-19-2007, 05:27 PM
#25
Thats pretty much how Im doing it. I line it up with the tires, then measure, then match the fronts. The problem isnt the spacing as much as being lined up with the car. Since my design has the rear wheels come up on the ramps, and since they are so long, if the ramps arent parallel to the cars track, it will get out of wack on the way up. You can correct alittle bit on the way up by steering.
Its not really a huge deal. Its a small inconvience when you consider that the ramps make other parts of the job easier.
Good call on the measuring tho. Thats probably how Ill keep doing it. I dont know how often Ill be using them, so I might not be able to justify putting more time into them.
Justin
 04-20-2007, 12:03 PM
#28
Originally Posted by 2002ssls1
I like this idea a lot, just wondering on the cost to build them?
99blancoSS: does (jester smiley) = sarcastic smiley??? Just checking to make sure you dont actually think they are scary...
I put the car on all jack stands yesterday. I wanted side access. It was really easy to do because the ramps are under the tires. So they dont ubstruct the jack from getting under. I jacked it up alittle, slid in the jack stand, let it down, and it was about an inch off the ramp. PERFECT! Room to slide the ramp out, and slide it back in when Im done.
Justin
04-20-2007, 04:46 PM
#29
To me they're scary as in frightening. Driving up on them and then being trapped underneath the car with no side exit is what scares me about them.
Love the ingenuity and you did a great job on construction, but no way in hell you'll get me to do that. I use the factory jack to get it up enough to use my floor jack and then I place the car on 3 ton ramps and jack stands. I've stacked 2x4's on the ramps for extra height, but I'm paranoid laying on the ground under the car.
Dont like being trapped, would never have made it as a submariner... lol
Good work though, no disrespect intended!
04-20-2007, 07:05 PM
#30
Gottcha. No offense taken. I understand how you could be nervous. Im the same way with rhino ramps. Plenty of people use them, but Ive had one fail before.
It is alittle closed in feeling. But I know the ramps cant crush. I know the car cant roll. And there isnt much chance of it falling to the sides.
Im not trying to say that I have your concerns about them covered and that you should feel safe under them...thats up to you. However, your concern is a concern of mine, which is why I think Im going to try to make 2/3 of the ramp removable. Allowing you to get in/out from the side. Its also kind of a pain to slide in and out from the front or back if you are gonna be up and down a lot. Not too bad if you are gonna be under there, do a job, then get out. Like an oil change...
Thanks for the feedback 99blancoSS!
J.
 04-22-2007, 08:29 PM
#33
TECH Enthusiast
iTrader: (1)

Join Date: Nov 2004
Location: Ontario, Canada
Posts: 698
Likes: 0
Received 0 Likes
on
0 Posts
Just for fun, here is how I change oil on my van. Because both sets of tires are on level platforms, the van doesn't roll at all. There is a wheel chock behind the far wheel. Your ramps are safe because the wheels are also on level pieces of the ramp.


 04-30-2007, 10:26 PM
#37
I used a 2x8x8' for lighter weight for moving it around. A 2x10x8' can be used for wide tires.
Top 15"
2nd 19"
3rd 24"
bottom 38"
The reason why the bottom piece is longer is that when you roll up on it, the cars weight holds it in place while you make it to the top. It also raises the car about 2" to clear the low front spoilers on these cars, without hitting the steps of the ramp first.
Ron
05-08-2007, 07:49 AM
#39
How do you get 4 separate ramps under the car???? More specifically, how do you get a ramps in front of the rear tires? They arent very high I assume?
I thought about making front ramps shorter and using smaller rear ramps to get a few inches of lift. But then I thought about having to line up 4 ramps instead of just two. So I just built them big heavy and stable.
Post some pics if you got em tho...
J.
I thought about making front ramps shorter and using smaller rear ramps to get a few inches of lift. But then I thought about having to line up 4 ramps instead of just two. So I just built them big heavy and stable.
Post some pics if you got em tho...
J.