Mocked up the CCW's...


 09-06-2008, 01:26 PM
#23
TECH Addict
Thread Starter
iTrader: (24)
Join Date: Oct 2006
Location: Webb City, MO...out in the garage
Posts: 2,610
Likes: 0
Received 0 Likes
on
0 Posts

wat the... that is awesome. i remember you stressin about what kind of wheel you wanted for a while.. i was excited you went with the z06 but DAYAM that blows everything outta the water.. sucks they polished tho.. Just make sure you keep those clean so they always look fab!
on a diff note.. why is your car taken apart???? maybe i missed something
on a diff note.. why is your car taken apart???? maybe i missed something

to the rest of ya'll:
20x11's and 19x9.5's
yes, the 454 will dominate
the rims ARE killer, and i think they're too big too, but only time will tell their fate.
 thanks for the kind words guys/gals. i started an overall progress thread on a local board, but will get one up on here once i get the car back from paint. it will go together quite fast. i missed my deadline i had set previously, so i've been taking a little more time and focusing on some details i otherwise would have neglected. keep your eyes peeled for a new thread with words like "ccw/sunoco/454/som/6xxrwhp NA" in the title
 09-06-2008, 03:08 PM
#25
TECH Addict
Thread Starter
iTrader: (24)
Join Date: Oct 2006
Location: Webb City, MO...out in the garage
Posts: 2,610
Likes: 0
Received 0 Likes
on
0 Posts
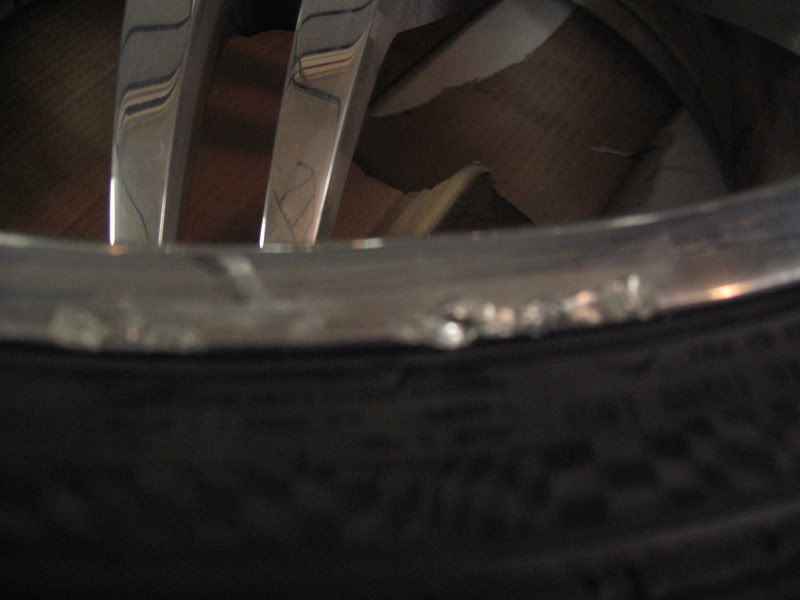
-**** a little, when i looked at my CCW's next to the pile of sandpaper, soaking in water.
-start with 800 grit, wet and see how long it takes to rub the damage down/out. go WITH the rim/grain. don't sand in circles or erratic-all-over motions. keep a spray bottle handy to keep the wheel lubed up. you can add a little dish soap to help lubricate if you feel it is necessary.
-if 800 isn't coarse enough, go to 600. i went as low as 320 on a couple spots. i wetsanded with every grit except the 320.
-work your way up through the grits, 320-400-600-800-1000-1200-1500-2000. make sure you do NOT move on to a higher grit until all the scratches are uniform in direction and especially in depth. the purpose of sanding is to replace one grit's scratches with smaller ones from the next grit. be sure to keep the paper and wheel wet.
-get an electric drill and chuck up a buffing wheel. ad a little tripoli polish to the wheel and slowly start buffing up the repaired area. the key to the buffing process is heat. getting the part hot enough to let the polish do what it does is equally as important as getting the surface smooth enough to buff up. tripoli will usually remove 1000-grit scratches, but the finer you sand, the better the finish will be and the faster it will shine up.
-after the tripoli, change to a new buffing wheel and hit it with the white buffing compound. the should totally/almost totally remove any sign of repair work. the white compound is typically the last one used on aluminum. there are finer, and coarser, compounds. just use what you see fit, being sure to work coarse to fine, just like with sandpaper.
-once this is all done, get some white vinegar diluted with mineral-free water and wash the wheel(s). use 0000 steel wool to remove any brake dust (carefully) or stubborn stains. dry the wheel off with a clean microfiber towel.
-bust out the powerball or other preferred polishing tool and Mother's Billet polish, or powermetal polish......or whatever you prefer. thoroughly go over the inner and outter wheel surfaces. use a powerball-mini where necessary.
-wipe down with CLEAN microfiber towl.
-get latex gloves, like the doctor uses...
-apply another coat of Mother's (or your polish) in small areas at a time by hand. when it turns to a black liquid, wipe off with ANOTHER CLEAN microfiber towel.
-stand back
-fap 'til it hurts
BEFORE
.
.
.
.
.
.
.
.
AFTER

it takes a LOT of patience and a LOT of time. i try to dedicate one day per wheel (after i work 8 hours, eat, shower, etc...) or a whole weekend to all 4. that way i take my time and don't get pissed as fast. the difference from start to finish can be staggering. it is worth every bit of effort, BUT the sad thing is, there are shops that charge $30-$50 or so per wheel to do what took you all day in 30 minutes....
EDIT: one thing you'll have to realise BEFORE you start working on the wheels, is there may be areas you CAN'T repair, like when the edge of the rim gets dented inward, or material is removed completely. you CAN sand/buff these areas to the point where they aren't noticeable, but with adding material (welding), you can't completely restore the wheel.
i have ONE more spot to repair on one of the rear wheels. i'll make sure to document the process and include pictures of materials used and such. it'll be a couple weeks, but i'll do it.
Last edited by 2000_SS; 09-06-2008 at 03:15 PM.
09-06-2008, 05:05 PM
#26

I think they look like crap, you can just send them this way and I suppose I could take them off your hands and spare you the embarrassment of running them on your car.

I think it looks real good actually, the 20s on the back look pretty sick. Will be interesting to see what it looks like when its back on the ground all back together.
I think it looks real good actually, the 20s on the back look pretty sick. Will be interesting to see what it looks like when its back on the ground all back together.
09-06-2008, 05:06 PM
#27
TECH Addict
Thread Starter
iTrader: (24)
Join Date: Oct 2006
Location: Webb City, MO...out in the garage
Posts: 2,610
Likes: 0
Received 0 Likes
on
0 Posts
I think they look like crap, you can just send them this way and I suppose I could take them off your hands and spare you the embarrassment of running them on your car.
I think it looks real good actually, the 20s on the back look pretty sick. Will be interesting to see what it looks like when its back on the ground all back together.
I think it looks real good actually, the 20s on the back look pretty sick. Will be interesting to see what it looks like when its back on the ground all back together.
 ...right....
i think i'll be sporting some lowering springs in the rear, i can tell already....


 09-06-2008, 08:44 PM
#34
TECH Addict
Thread Starter
iTrader: (24)
Join Date: Oct 2006
Location: Webb City, MO...out in the garage
Posts: 2,610
Likes: 0
Received 0 Likes
on
0 Posts
 09-06-2008, 11:36 PM
#36
TECH Addict
Thread Starter
iTrader: (24)
Join Date: Oct 2006
Location: Webb City, MO...out in the garage
Posts: 2,610
Likes: 0
Received 0 Likes
on
0 Posts
thanks man. IIRC they're 275/30's up front and 295/25's out back, that might not be right though...the rears are going to be replaced with a 305 or 315 though.
i MAY sell them, but it won't be until after the car is completely done. i'd prefer to trade though, but we'll see what happens.
09-07-2008, 11:19 AM
#38
TECH Addict
Thread Starter
iTrader: (24)
Join Date: Oct 2006
Location: Webb City, MO...out in the garage
Posts: 2,610
Likes: 0
Received 0 Likes
on
0 Posts
 we may not....i was 100% satisfied with his work, but i think i might have somebody else do it...like somebody that has tuned a couple motors like mine before. you know, make a road trip/vacation out of it....but we'll see.