


 . haha and i love the shift ****!
How To: Cigarette Lighter to Button Mod
Thread Starter
TECH Fanatic
Joined: Oct 2008
Posts: 1,183
Likes: 0
From: VA
Another guy posted a how to on this but I couldnt find it today and it looks like he might have been banned (again) and all his threads deleted... but this is a MUCH easier way. You dont have to take off your panels. I'm not familiar with fbodys with traction control so it may not work for those. Post or PM me if anyone knows.
Uses: Push Button Start
Materials:
Needle Nose Pliers
Wire Stripper
Electrical Tape
Flashlight
Butt Connectors
Pliers (Or Crimping Tool)
Anything that uses the cigarette lighter, preferably with LED indicator
1. Go to the fuse box to the left of the steering wheel. Pull out the "CIG/ACCY" fuse with your pliers.
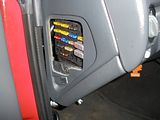
2. I had other fuses pulled already before doing this, so as a safe measure take your cigarette powered device and plug it in to see if it works or the LED indicator comes on. If it does, pull more fuses.
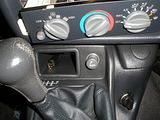
3. Put your hand palm up in the tray as far as you can go. Grip it by putting pressure on the top and try to pull out. You should hear a snap, and it'll come out about half an inch but still be held in. It now is held in by 2 clips on the top of it. It takes a lot of pressure to pull it out now, but dont yank. Try to tilt it up so the back of it is lower and pull it out (this may take some time and many curses).
4. With that out, you can easily look in there (with your flashlight) and see the red/black wires and see where they connect to the cigarette lighter. You can pull them closer and even out of the hole a bit so they are easy to work with.
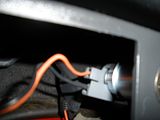
5. Cut the wires with your needle nose pliers. I tried to leave as much wire as I could on the lighter side since I was only working with that.
6. Use the electrical tape to tape over the wires battery side. DO NOT wrap them together. Wrap the positive and negative wires separately.
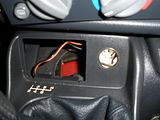
7. Take the wires from whatever you are connecting this too out and crimp them to the cigarette wires. Shouldnt matter which one you connect it to. Wrap this with electrical tape for safe measure.
8. You are done! Test it out. The lighter will work as a regular button. On my carpc, it can be quickly pressed for power or held to shut down if it ever freezes. If it does work just push the wires back in and push the tray back in.
Uses: Push Button Start
Wire to Garage Opener
Power Button for Carputer (the few of us that have one)
Missile Launcher
Whatever You Dream Up in Your Head
Materials:
Needle Nose Pliers
Wire Stripper
Electrical Tape
Flashlight
Butt Connectors
Pliers (Or Crimping Tool)
Anything that uses the cigarette lighter, preferably with LED indicator
1. Go to the fuse box to the left of the steering wheel. Pull out the "CIG/ACCY" fuse with your pliers.

2. I had other fuses pulled already before doing this, so as a safe measure take your cigarette powered device and plug it in to see if it works or the LED indicator comes on. If it does, pull more fuses.
3. Put your hand palm up in the tray as far as you can go. Grip it by putting pressure on the top and try to pull out. You should hear a snap, and it'll come out about half an inch but still be held in. It now is held in by 2 clips on the top of it. It takes a lot of pressure to pull it out now, but dont yank. Try to tilt it up so the back of it is lower and pull it out (this may take some time and many curses).

4. With that out, you can easily look in there (with your flashlight) and see the red/black wires and see where they connect to the cigarette lighter. You can pull them closer and even out of the hole a bit so they are easy to work with.


5. Cut the wires with your needle nose pliers. I tried to leave as much wire as I could on the lighter side since I was only working with that.
6. Use the electrical tape to tape over the wires battery side. DO NOT wrap them together. Wrap the positive and negative wires separately.
7. Take the wires from whatever you are connecting this too out and crimp them to the cigarette wires. Shouldnt matter which one you connect it to. Wrap this with electrical tape for safe measure.
8. You are done! Test it out. The lighter will work as a regular button. On my carpc, it can be quickly pressed for power or held to shut down if it ever freezes. If it does work just push the wires back in and push the tray back in.
What do you do about the extra resistance left in the lighter element?
Also, if you want to have the switch supply accessory power to something, you only need to cut the ground wire and then attach your load to that end.
Also, if you want to have the switch supply accessory power to something, you only need to cut the ground wire and then attach your load to that end.
Thread Starter
TECH Fanatic
Joined: Oct 2008
Posts: 1,183
Likes: 0
From: VA
Trending Topics
Joined: Jul 2007
Posts: 2,861
Likes: 4
From: Ringoes/Flemington, New Jersey
LS1 Tech Stories
The Best V8 Stories One Small Block at Time

Topdon ONE vs. Artidiag 800 BT2: Which is the Diagnostic Tablet For You?
Pouria Savadkouei
Gas Monkey Built a 6-Wheel Ferrari Testarossa With a Corvette LT4 Engine
Verdad Gallardo
7 Most Reliable High-Performance Engines GM Has Ever Built
Verdad Gallardo
Amazing '71 Camaro Restomod Is Modern Muscle Car Under the Skin
Verdad Gallardo
6 Common C5 Corvette Failures and What's Involved In Repairing Them
Pouria Savadkouei
Retro Modern Bandit Pontiac Trans AM Comes With Burt Reynolds' Autograph
Verdad Gallardo
Top 10 Greatest Cadillac V Series Performance Models Ever, Ranked
Pouria Savadkouei
Top 10 Most Powerful Chevy Trucks Ever Made!

Hennessey's New Supercharged Silverado ZR2 Has 700 HP
Verdad GallardoDepending on what's behind the circuit, this may not be a big problem, but unless you are operating a digital circuit, it will impact whatever you have hooked up to it because you'll get a voltage drop across this resistor/element. (You should be able to measure this, also.) This voltage drop could then put additional stress on whatever you have hooked up to it or cause performance problems with the equipment.
If your element is still in, it is getting "hot" when you use it. Depending on your circuit and the power that the "switch" sees, it may not get hot enough to glow red.
I hooked up a similar switch for my old radar detector, but removed the element inside the lighter to avoid the resistance problem. I've attached a picture. The process for removing the element was:
- Carefully pull out the spiral heating element with needle nose pliers, being careful not to tear up the center post or outer attachment. Also watch out for the mica disk (its pearlescent in appearance) at the base of the element. Its fragile.
- Get a very small drill bit and drill 1 hole through the shell 180 degrees opposite from the outer attachment post.
- Going through the same hole just drilled, drill another hole through the thick base of the brass center post.
- Thread a small braided copper wire from the outer attachment post, through the center post hole, and out to the first hole in the shell.
- Solder the entire wire to the inner post hole and two outer attachment points.

Joined: Nov 2003
Posts: 11,334
Likes: 347
From: Jacksonville, FL (originally from Toronto Canada)
The swirls inside the lighter carry the current from the outside shell of the lighter body to the center post. This element creates a lot of resistance, which makes the element hot. So, when you make a switch out of the ligher, its really a switch + a resistor.
Depending on what's behind the circuit, this may not be a big problem, but unless you are operating a digital circuit, it will impact whatever you have hooked up to it because you'll get a voltage drop across this resistor/element. (You should be able to measure this, also.) This voltage drop could then put additional stress on whatever you have hooked up to it or cause performance problems with the equipment.
If your element is still in, it is getting "hot" when you use it. Depending on your circuit and the power that the "switch" sees, it may not get hot enough to glow red.
I hooked up a similar switch for my old radar detector, but removed the element inside the lighter to avoid the resistance problem. I've attached a picture. The process for removing the element was:
- Carefully pull out the spiral heating element with needle nose pliers, being careful not to tear up the center post or outer attachment. Also watch out for the mica disk (its pearlescent in appearance) at the base of the element. Its fragile.
- Get a very small drill bit and drill 1 hole through the shell 180 degrees opposite from the outer attachment post.
- Going through the same hole just drilled, drill another hole through the thick base of the brass center post.
- Thread a small braided copper wire from the outer attachment post, through the center post hole, and out to the first hole in the shell.
- Solder the entire wire to the inner post hole and two outer attachment points.
One small point... although technically electricity flows from negative to positive, we commonly refer to it flowing to ground, so it goes from the center post to the outer shell. IOW, the red wire is connected to the center post and the black wire to a terminal on the edge of the shell.
