Bazooka 6 1/4" 4 Ohm DVC Sail Panel Install w/ pics
 12-01-2010, 07:43 PM
#21
Teching In
Join Date: Oct 2010
Posts: 11
Likes: 0
Received 0 Likes
on
0 Posts

I just got mine and they look very nice. Can't wait to put them in but it will be awhile. The car is putaway for the season and it's 21° in an unheated garage. I have time to prepare. Any other hot tips come to mind
 12-01-2010, 10:20 PM
#22
Yes, I have a question. I see your harness uses the lugs on both sides of the speakers. Necessary?
I just got mine and they look very nice. Can't wait to put them in but it will be awhile. The car is putaway for the season and it's 21° in an unheated garage. I have time to prepare. Any other hot tips come to mind
I just got mine and they look very nice. Can't wait to put them in but it will be awhile. The car is putaway for the season and it's 21° in an unheated garage. I have time to prepare. Any other hot tips come to mind
No tips other than what's in the post.
Fear not cold weather. Rear wheel drive is a ton of fun in the snow/ice - if you can handle it and don't put the car in to a tree.
12-02-2010, 11:03 AM
#23
Teching In
Join Date: Oct 2010
Posts: 11
Likes: 0
Received 0 Likes
on
0 Posts
 It's not the cold or the snow/ice I fear. It's the damage from the salt trucks.
12-31-2010, 12:06 PM
It's not the cold or the snow/ice I fear. It's the damage from the salt trucks.
12-31-2010, 12:06 PM
#24
I've gotten a few questions about building new wiring harnesses for the speakers, so here's the detail:
When working with the car terminals, you'll find a couple of resources handy:
- This is a terminal catalog, which lists many of the connector and terminal part numbers on these cars: http://www.powerandsignal.com/docs/D...%20Catalog.pdf
- The Delphi Connector resource will give you detailed specs and drawings of all these parts for further identification: http://connectors2.delphi.com/dcsgdmcs/homepage.aspx
- This is a copy of a GM terminal repair booklet, which details all of the tools, crimps, and methods, required to install these parts: ftp://164.106.79.2/Instructors/CPeac...38125-620G.pdf
Purchasing parts can be a bit challenging. For most of the basic parts, I like to use Mouser Electronics. For other hard-to-find pieces, I've used Eastern Shore Enterprises, and Terminal Supply Company.
Another thing to note is that automotive wiring requires special insulation. So, if you are replacing wires and prefer your car to be in a state where it's not on fire, you'll want to make sure the wire you are using is correct for the application. Here's a resource that explains the differences: http://www.awcwire.com/FAQ-Automotive-Wire.aspx
From time to time, you'll also need to convert wire AWG sizes to metric (square millimeters): http://www.engineeringtoolbox.com/aw...uge-d_731.html
For the monsoon sail panel speaker harnesses, you'll need 6 pieces in addition to the wires: (All of this is on page 2.3 of the first catalog above.)
1 X Metri-Pack 150 Connector Housing #12064761
1 X Metri-Pack 150 TPA Terminal Lock #12047787
4 X Metri-Pack 150 Male Terminals #12047581 (Even though the catalog lists #12059894 for 20-22 ga wire, it has been replaced with 12047581.)
The crimps required for the terminals are on page 107 of the repair booklet and the install instructions are in the front of the same booklet.
08-12-2011, 08:04 AM
#26
TECH Apprentice
iTrader: (5)
Join Date: Jul 2011
Location: Indianapolis, IN
Posts: 390
Likes: 0
Received 0 Likes
on
0 Posts
I'm reviving this thread just to say I'm doing the same thing now. I put them in last night with the holes not lining up exactly. Tonight I'll make new holes so they'll fit.
Where'd you get that little nibbler tool to bite off some of the sail panel?
And also I'll be chiseling down the washers so they don't rub the foam suspension.
Where'd you get that little nibbler tool to bite off some of the sail panel?
And also I'll be chiseling down the washers so they don't rub the foam suspension.
08-12-2011, 10:02 AM
#27
Just take two vice grip pliers, grab either side of the washer and bend it back and forth. The stress will cause it to break off after 5-8 bends, leaving the bolt pristine.
08-12-2011, 10:04 AM
#28
It is easier to just use the different speed nut. Redoing the hole is not really necessary as the holes are not that far off. I have even used the stock speed nut if you spread it open a little and bring it in some. This requires holding them in place with a little tape as you install the speaker. If you notice the stock speed nuts that are spread out some from the factory move around in the hole for them. There is alot of play there. So much in fact that I usually end up having to squeeze them together on some installs I have done just to keep them in place. Otherwise I use the tape method to hold them there.
The new CDT DVC sub that will be coming out matches up perfectly. It also can use the stock screws as the surround does not interfere with it.
The new CDT DVC sub that will be coming out matches up perfectly. It also can use the stock screws as the surround does not interfere with it.
08-13-2011, 04:11 PM
#31
Teching In
Join Date: Aug 2011
Location: Columbus OH
Posts: 13
Likes: 0
Received 0 Likes
on
0 Posts
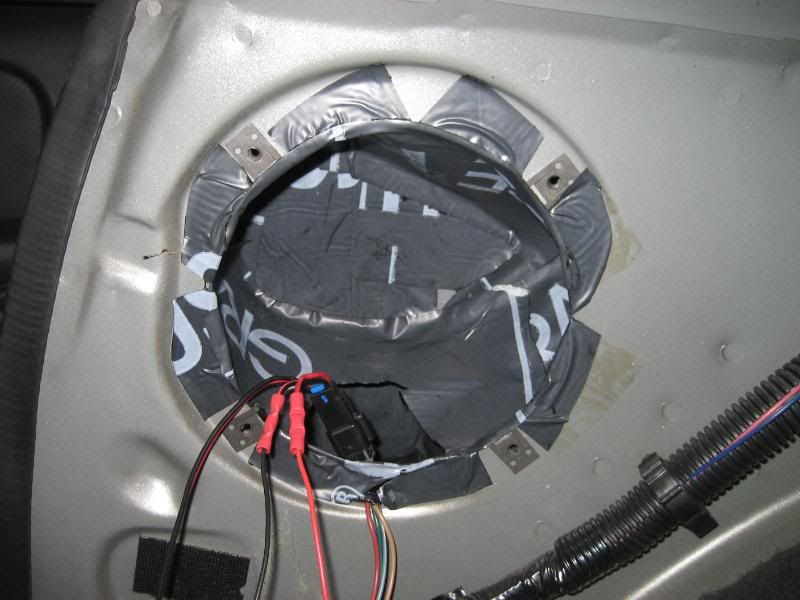
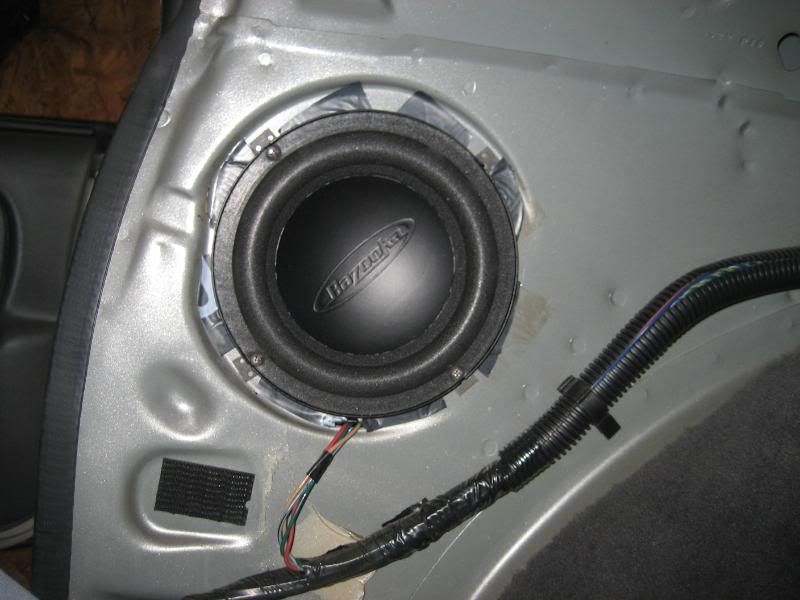
Hey guys. I bought some of these woofers from kee audio and I am very pleased. I honestly did not expect them to sound this good but I never had speakers in the sail panels since I bought the car (2 weeks ago!  ) But they sound great and are very easy to install. I had my phone with me while I installed them this afternoon so I took a few shots in case it would help anyone out.
I just bought some speed nuts from the local hardware store and they clipped right on tight. No tape needed. I had to extend my wires as you can see because whoever snipped them before made them too short. I actually ended up extending all 4 wires to give me more wiggle room. I think I only spent like $5 on the speed nuts plus the connectors that slip onto the woofer. Then just used some screws that my dad had.
The screw holes on the woofers are just a tad closer to the center than the holes in the frame. I put the bottom 2 screws in flush and the top 2 screws had a slight angle to them.
) But they sound great and are very easy to install. I had my phone with me while I installed them this afternoon so I took a few shots in case it would help anyone out. I just bought some speed nuts from the local hardware store and they clipped right on tight. No tape needed. I had to extend my wires as you can see because whoever snipped them before made them too short. I actually ended up extending all 4 wires to give me more wiggle room. I think I only spent like $5 on the speed nuts plus the connectors that slip onto the woofer. Then just used some screws that my dad had.
The screw holes on the woofers are just a tad closer to the center than the holes in the frame. I put the bottom 2 screws in flush and the top 2 screws had a slight angle to them.
08-14-2011, 03:09 PM
#33
It can but there are better speakers for that application that would work better.
The reason for these and the Firebird application is that they are DVC like the stock ones so they work very well. There are only a handful of cars out there that require a DVC 6.5" sub. CDT has some VERY nice 6.5" subs that are single voice coil. Much nicer then the Bazookas.
For a C5 application I would use something like that in parallel with a 3-way system. I have the adapter for the doors that you would need to mount them up and replace the stock stuff in the doors. You would have some very cool options for a nice 3-way setup using the adapter in the doors that would have a 6.5", a 3" midrange and a quality tweeter mounted up top. You could also use a 2-way setup as right now CDT is substituting the ES-10 tweeters for the standard tweeter if you want them. So you could get a nice driver and the ES-10 extended range tweeter to mount in there which would be close to having a 3-way system out of a 2-way set.
 04-22-2012, 12:32 PM
#37
I used some window flashing with the roofing tar crap on it..
**** it sticky are hell and will stick to anything...
did i go to far with it? should i take some of it out?
if you can see in the picture....I covered the back panel and made a little enclosure for the speaker with a hole in the bottom for the bass to escape.
to much?

somebody let me know before i put my panel back on......gonna do the other side.
**** it sticky are hell and will stick to anything...
did i go to far with it? should i take some of it out?
if you can see in the picture....I covered the back panel and made a little enclosure for the speaker with a hole in the bottom for the bass to escape.
to much?
somebody let me know before i put my panel back on......gonna do the other side.
04-22-2012, 12:38 PM
#38
Teching In
Join Date: Oct 2010
Posts: 11
Likes: 0
Received 0 Likes
on
0 Posts
Well, I'm by far no expert but...
The port is cool, unfortunately, I don't think you want that much back pressure on the speaker or it can't move the full length in and out. I'm sure someone else will confirm or deny that.
The port is cool, unfortunately, I don't think you want that much back pressure on the speaker or it can't move the full length in and out. I'm sure someone else will confirm or deny that.
04-22-2012, 01:23 PM
#40
Teching In
Join Date: Oct 2010
Posts: 11
Likes: 0
Received 0 Likes
on
0 Posts
Not to mention if there is tar on the paper will it run off during the high heat of the summer? The dyna mat everyone uses is really there as a dampner and to kind of add rigidity, stiffener or sound deflection to the area. Using that stuff on the back wall might be ok but I'd still be a little concerned. I didn't use any of that stuff on mine at all and am quite pleased with the performance of the Bazooka's.