








optima yellow top and alternator

Thread Starter
Staging Lane
Joined: Jul 2005
Posts: 85
Likes: 0
 optima yellow top and alternator
 I'm looking for the exact size of a opptima yellow top battery for my car. Also, I am looking for information on high output alternators. i.e. brand, amp size, price anything like that.
Joined: Nov 2003
Posts: 11,330
Likes: 346
From: Jacksonville, FL (originally from Toronto Canada)
Car batteries don't come in exact sizes - they come in group sizes. The group size codes incorporate such things as maximum physical size, voltage, terminal type, and terminal placement. Our cars take the 75 group which is a side-terminal battery no more than about 9" x 7" with positive on the right. The 25 group is the same physical size but with top terminals. Optima batteries have both side and top terminals so they classify them as 75/25.

TECH Enthusiast
Joined: Jan 2005
Posts: 697
Likes: 0
From: On a car lot, shopping...
I use a yellow top (fried one due to lack of decent alternator after 4 years of abuse). Second yellow top and a 235 amp alternator installed (Alterstart Load Boss). My electrical system is so good now I have almost no lights dimming when the bass hits.
Thread Starter
Staging Lane
Joined: Jul 2005
Posts: 85
Likes: 0
so the word is use a alterstart load boss 235 amp and 75/25 yellow top optima. When I searched this topic before posting this, many people talked about a bigger battery size something like an 84/ 34...any more on this??? The Optima wesite quotes a 75/ 25 as the correct size but I want first had knowledge.
i have had the yellow top for 3 or 4 years now (the 75/25) and have never had a problem with it, with the older batteries, they kept having trouble holding a charge after winter (the car sat in the garage with the battery disconnected). Do the same thing with the yellow top and works perfect. I have a red top in a yukon and we had to have that one replaced once within a year, but since then its been ok
Trending Topics
Thread Starter
Staging Lane
Joined: Jul 2005
Posts: 85
Likes: 0
I understoand all about the pros and cons of the Optima battery...What I need is input on the BATTRY SIZE for the car and why I haven seen other posts about an Optima battery in stalled at a different size than the Optima website shows...website shows 75/25 others in the posts have used something like a 78/34. I would also appreciate info on a good price for it and where to get it. The other question is on a alternator- I am looking for brand, part number, price, where to buy etc. I am set on the fact that I need a yellow top Optima and a HO alternator. I just need to know battery size and alternator size (amps) price, etc. Thanks
LS1 Tech Stories
The Best V8 Stories One Small Block at Time

Gas Monkey Built a 6-Wheel Ferrari Testarossa With a Corvette LT4 Engine
Verdad Gallardo
7 Most Reliable High-Performance Engines GM Has Ever Built
Verdad Gallardo
Amazing '71 Camaro Restomod Is Modern Muscle Car Under the Skin
Verdad Gallardo
6 Common C5 Corvette Failures and What's Involved In Repairing Them
Pouria Savadkouei
Retro Modern Bandit Pontiac Trans AM Comes With Burt Reynolds' Autograph
Verdad Gallardo
Top 10 Greatest Cadillac V Series Performance Models Ever, Ranked
Pouria Savadkouei
Top 10 Most Powerful Chevy Trucks Ever Made!

Hennessey's New Supercharged Silverado ZR2 Has 700 HP
Verdad Gallardo
Coachbuilt N2A Anteros Is an LS2-Powered C6 Corvette In Italian Clothes
Verdad Gallardo

Yeah, the 75/25 yellow top is correct that's what I have in my car.
For alts. I got mine at jegs, I 'm really happy with it . It was a real pain-in-the-a$$ to install, until I dropped the swaybar down and before I finally realized I had to clock the the back of the alternator ,after that It was easy!
Make sure you do the "Big 3" when you up-grade your alternator.
Otherwise that new high-output will not be very effective!
Also check out excessiveamperage.com and Iraggi-Alternator on ebay .
For alts. I got mine at jegs, I 'm really happy with it . It was a real pain-in-the-a$$ to install, until I dropped the swaybar down and before I finally realized I had to clock the the back of the alternator ,after that It was easy!
Make sure you do the "Big 3" when you up-grade your alternator.
Otherwise that new high-output will not be very effective!
Also check out excessiveamperage.com and Iraggi-Alternator on ebay .

Here are the complete stats for both D34/78 and the D75/25 YellowTop Optima batteries. As Whitebird already mentioned the correct battery is the D75/25 although. Autozone does list the D35 and D51 for the F-body as well I assume because they are almost the exact same size but neither of those battery's have side post terminals.
Here's the chart direct from Optima:
http://www.optimabatteries.com/optim...ical_specs.php
Here's the chart direct from Optima:
http://www.optimabatteries.com/optim...ical_specs.php
Thread Starter
Staging Lane
Joined: Jul 2005
Posts: 85
Likes: 0
does anyone have the "big 3" cable pre-made or does everyone do it themselves? If so where would I find them? does anyone else use a alternator larger than 235 amps? would larger every be too much or is like builder a strong rear end where too much never hurts?

There's no need to go bigger than a 235 amp alt. I'm using a 200 amp alt. with the "Big 3" using 1/0 guage wire, plus 1 run of 4 guage and 1 run of 1/0guage power wire to my amps and I'm running 3800 watts rms of amp power
with no problem! and on top of that a slp underdrive crank pulley. I did bump up my idle to 850rpm though.
IMO run the 1/0 guage wire for the "Big 3."
You'll need about 5-6 ' from alt to batt.+ , around 1.5' from eng./alt.body to chassis ground on drivers side, and 1" from - batt to chassis ground on passenger side.
For the "Big 3" I did it all myself.
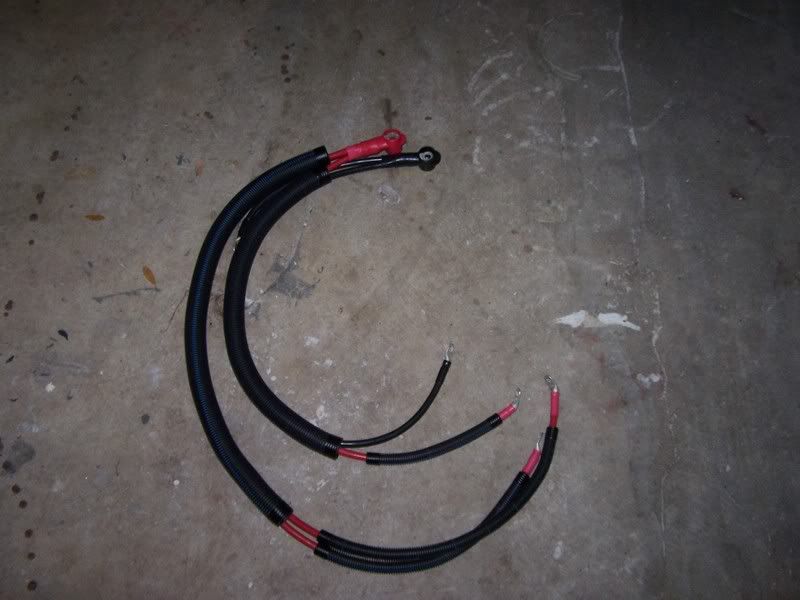
But,You can always buy the cable and 6 crimp on terminals cheaper online ,then take them to a audio shop and for a small fee have them cut to length and the terminals crimped on. And for added cable protection 3/4" flex loom to put over the 1/0 cable.
with no problem! and on top of that a slp underdrive crank pulley. I did bump up my idle to 850rpm though.
IMO run the 1/0 guage wire for the "Big 3."
You'll need about 5-6 ' from alt to batt.+ , around 1.5' from eng./alt.body to chassis ground on drivers side, and 1" from - batt to chassis ground on passenger side.
For the "Big 3" I did it all myself.
But,You can always buy the cable and 6 crimp on terminals cheaper online ,then take them to a audio shop and for a small fee have them cut to length and the terminals crimped on. And for added cable protection 3/4" flex loom to put over the 1/0 cable.
Last edited by 99Bluz28; Jun 28, 2008 at 12:37 AM.
I got the 200a load boss, a big 3 upgrade and have no problems, its plenty of power to run anything, I got ewp, and a 1600 watt rockford amp. PM me for info on the big 3 kit, its a none sponser and I dont want to get into trouble for posting it.
Last edited by ls1mongrel; Jun 28, 2008 at 07:46 AM.

The best home made trick for crimping large terminals was to take a large slot blade screw drive, a hammer and a vice or something like bolt cutters or other large clamping/crimping style tool.
I would install the wire into the terminal, Divit the middle of the crimp area, and then basically fold the terminal in on it'self by means of using a bolt cutter. A vice works damn nice. Crimpers for large sized terminals basically do the same thing in 1 action verses 2-3 or so.
I would install the wire into the terminal, Divit the middle of the crimp area, and then basically fold the terminal in on it'self by means of using a bolt cutter. A vice works damn nice. Crimpers for large sized terminals basically do the same thing in 1 action verses 2-3 or so.
This is what I use , since I don't have a vise. I've also used it to crimp 1/0 guage terminals, with equally good results IMO, use a BFH for best results!
http://www.delcity.net/delcity/servl...d=10383&page=1
http://www.delcity.net/delcity/servl...d=10383&page=1
Last edited by 99Bluz28; Jun 30, 2008 at 12:23 AM.

I'm not aware of any sponsors that carry H.O. alternators, it would be nice if there was. But You can't go wrong with any of the choices listed below.
IMO, The best choice is going to be "Your Choice" by taking the next step yourself and doing some of the leg-work so you can make a informed decision that best Suits YOUR needs.
Alterstart
Excessiveamperage.com
Iraggi-Alternator on ebay
Powermaster
pt # 58203, You will have to clock the case per powermaster directions, and youll probably have to slightly bend / move some of the hard lines coming off the steering rack for clearance, and drop the swaybar which will make the removal / install a lot easier!
IMO, The best choice is going to be "Your Choice" by taking the next step yourself and doing some of the leg-work so you can make a informed decision that best Suits YOUR needs.
Alterstart
Excessiveamperage.com
Iraggi-Alternator on ebay
Powermaster
pt # 58203, You will have to clock the case per powermaster directions, and youll probably have to slightly bend / move some of the hard lines coming off the steering rack for clearance, and drop the swaybar which will make the removal / install a lot easier!
Last edited by 99Bluz28; Jun 30, 2008 at 05:09 PM.