LS1TECH - Camaro and Firebird Forum Discussion
  • LOG IN
  • REGISTER
  • Forums
    • WELCOME TO LS1TECH
      • Introductions & Greetings
      • General LSX Automobile Discussion
      • New LS1 Owners - Newbie Tech
      • User Support & Resources
    • Featured Vehicles & Products
      • New Products Showcase
      • Sponsor Vehicle Projects & Shop Tours
      • Staff Vehicles Showcase
    • LS1-LS2-LS3-LS6-LS7 PERFORMANCE
      • Generation III Internal Engine
      • Generation IV Internal Engine
      • Generation V Internal Engine
      • Generation III External Engine
      • Generation IV External Engine
      • Generation V External Engine
      • Conversions & Swaps
      • PCM Diagnostics & Tuning
      • Fueling & Injection
      • Carbureted LSX Forum
      • Forced Induction
      • Nitrous Oxide
      • Dynamometer Results & Comparisons
      • Tools & Fabrication
      • Advanced Engineering Tech
    • SBC-BBC-LT1-LT4 PERFORMANCE
      • LT1-LT4 Modifications
      • Small Block & Big Block Chevy Specific
    • CHASSIS, SUSPENSION, APPEARANCE
      • General Maintenance & Repairs
      • Automatic Transmission
      • Manual Transmission
      • Gears & Axles
      • Suspension & Brakes
      • Wheels & Tires
      • Appearance & Detailing
      • Paint & Body Work
      • Wiring, Stereo & Electronics
    • Gen 5 Camaro 2010-2015 Forum
      • Gen 5 Camaro External Bolt-On Tech
      • Gen 5 Racing Tech
      • Gen 5 Camaro Power-Adder Tech
      • Gen 5 Camaro Drivetrain Tech
      • Gen 5 Camaro Suspension Tech
      • Gen 5 Camaro Tuning, Diagnostics, Dyno results
      • Gen 5 Camaro Racing Tech, Results
      • Gen 5 Camaro Special Edition Vehicles
    • VEHICLE SPECIFIC FORUMS
      • Gen 6 Camaro 2016+ Forum
      • Pontiac G8 2008-09 & Chevrolet SS 2014+
      • Chevrolet Camaro 1967-2002
      • Pontiac Firebird 1967-2002
      • Corvette Performance
      • Pontiac GTO 2004-2006
      • Cadillac CTS-V 2004-2007 (Gen I)
      • Cadillac CTS-V 2009-2015 (Gen 2)
      • Cadillac CTS-V 2016 - (Gen 3)
      • LS4 Performance
      • Holden Performance
      • Special Edition Vehicles
      • Convertible Vehicles
    • RACING DEPARTMENT
      • Drag Racing Tech
      • Drag Racing Results
      • 12 Second Club
      • 11 Second Club
      • 10 Second Club
      • Single Digit Club
      • Road Racing
      • Street Racing & Kill Stories
    • NATIONAL EVENTS
      • Hot Rod Power Tour/ Pump Gas Drags/ Drag Week
      • LTX Shootout
      • Holley LS Fest
      • Other Special Events
    • SALES DEPARTMENT
      • Marketplace
      • Sponsor Sales & Specials
      • Sponsor Group Purchases
      • Parts Classifieds
      • Parts Wanted
      • Vehicle Classifieds
      • Vehicles Wanted
      • Negative Trader Feedback
      • What is it Worth?
      • Non-Automotive Classifieds
      • Automotive Careers
      • LS1TECH Sponsor Feedback
    • WEBSITE ACTIVITY FORUMS
      • Automotive News, Media & Press
      • Newsletter Archive
      • Multimedia Exchange
    • REGIONAL FORUMS
      • Military Hotrod Club
      • Texas Members
      • Midwestern Members
      • Eastern Members
      • Northwest Members
      • Western Members
      • Southern Members
      • Florida Members
      • Canadian Members
      • International Members
  • News
  • Marketplace
    • Vendor Directory
    • Become a Vendor
    • Vendor Marketplace
    • Marketplace
  • New Posts
  • Tools
    • Car Payment Calculator
    • Tire Rim Calculator
    • Vin Decoder
    • Recalls
    • Technical Service Bulletins (TSBs)
    • Members List
    • Live Feed
  • How-Tos
  • Gallery
  • View Dark Mode
    • Please register or login to enable Dark Mode.
  • Log In
  • Register
LS1TECH - Camaro and Firebird Forum Discussion
    • Threads
      • Advanced
Dark Mode

Please register or login to enable Dark Mode.

Log In

Forgot your Password?

By logging into your account, you agree to our Terms of Use and Privacy Policy, and to the use of cookies as described therein.
or
 
  • Recent
  • Commented
  • Albums
  • My Pictures

My Post Pictures

FranksCustomTrans
April 19, 2023
 118
 0
Sort:
Default
  • Default
  • Most Recent
0 2024/08/11 17:30:23 FranksCust
0 2024/08/11 17:32:42 FranksCust
This is a blunted screwdriver I made , It is bent at the end to remove the bushng, It grabs it but does not damage bushing bore
0 2024/08/11 17:32:46 FranksCust
Number 34 works to perfectly install bushing with the press (I use press for all bushings  except case.)
Number 34 works to perfectly install bushing with the press (I use press for all bushings except case.)
0 2024/08/11 17:32:51 FranksCust
0 2024/08/11 17:32:55 FranksCust
I actually use the planet itself to install this one I like it to ride high in bore new surface area on planet and placing it on the planet then pressing planet into the ringgear worke prefect every time
0 2024/08/11 17:32:59 FranksCust
0 2024/08/11 17:33:04 FranksCust
Shows late model bearing
0 2024/08/11 17:33:08 FranksCust
0 2024/08/11 17:33:12 FranksCust
0 2024/08/11 17:40:16 FranksCust
I always use NEW STEELS . I am not overly particular about the brand same with the fwd clutch frictions (I do prefer the carbon style OVERRUN because of my overun mod and the cycling of the overun clutch resulting)
0 2024/08/12 08:22:50 FranksCust
27mm is perfect for removing these bushings in front sun gear.
0 2024/08/12 08:22:21 FranksCust
Air checking drum before disassembly for leaks . this should be done before dissembly and after reassembly.
0 2024/08/12 08:21:56 FranksCust
These plated along with apply are always warped in the  friction area even NEW ONES I have found are not generally straight.
These plated along with apply are always warped in the friction area even NEW ONES I have found are not generally straight.
0 2024/08/12 08:23:04 FranksCust
0 2024/08/12 08:23:08 FranksCust
Shows apply plate after maching flat and the discoloration is a primitive but functional heat treating I do when donw cutting, This is done by heating  plate red hot then a fast splash through cool water (real fast) this hardens the outter layer of the surface to help with rigidity but leave the flexability inside. I know the process works because i have played with recuting on the lathe and after this process is done the outter .005 or so cuts hard while the inner remain soft to cut.
Shows apply plate after maching flat and the discoloration is a primitive but functional heat treating I do when donw cutting, This is done by heating plate red hot then a fast splash through cool water (real fast) this hardens the outter layer of the surface to help with rigidity but leave the flexability inside. I know the process works because i have played with recuting on the lathe and after this process is done the outter .005 or so cuts hard while the inner remain soft to cut.
0 2024/08/12 08:23:13 FranksCust
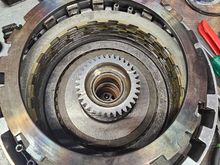
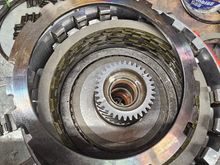
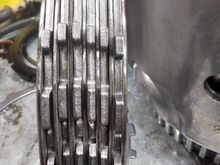
29 ELEMENT sprag, i use the borg dual cage but others will be suitable too, Now if the unit came with the later GM sprag with the 15 percent wider roller pieces I will try to replace with one of those if available, Bear in mind while you can put the borg sprag in place of one of those and be fine , You should not, cannot put one of the late wider Gm sprag in place of the older unless new ring gear and center used.
0 2024/08/12 08:22:25 FranksCust
BURNED 3-4 set This along with burned 2-4 band tells me we probably have a presure rise issue.
0 2024/08/12 08:22:02 FranksCust
Cool universal tool for removing and instaling , If you are an individual building your own this is really the only tool you need to do the job on the 60e
0 2024/08/12 08:22:09 FranksCust
Reassembled drum after cleaning with new pistons, REMEMBER to replace the oring in the drum now.(The reason I say not to replace till after clean ? Well truth if most of the time the oring is fine and lets sayyou do forget ? Unless you see it on bench disaster once in car, But this way 99 percent chance no big deal or issue at all)
0 2024/08/12 08:22:13 FranksCust
I also notch here supposedly helps with planet lube but certainly does not hurt.
0 2024/08/12 08:22:42 FranksCust
Overun cluth set. Note i DO coat frictions. IMO if you are building one to go into a car right away or on a dyno not nessesary, But in my case generally it is neither, Frictions should however not be soaked or coated till after setting your desired gaps as the oil would become part of your setting and you do not want that as oil or air its a gap.
0 2024/08/12 08:22:18 FranksCust
FWD clutch clearance is also not critical , But no more that the thickess of a steel and not so little that if you turn drum horizontal you cannot easily turn sun gear by hand both ways .
0 2024/08/12 08:22:59 FranksCust
0 2024/08/12 08:22:29 FranksCust
4 small hole drilled to vent oil from sprag to Overun hub surface (Honestly GM should have put a thrust washer here)
0 2024/08/12 08:22:34 FranksCust
0 2024/08/12 08:22:38 FranksCust
Never leave wave out of forward , If you do you are asking for a very agressive D APPLY  and to break lugs in drum at forward
Never leave wave out of forward , If you do you are asking for a very agressive D APPLY and to break lugs in drum at forward
0 2024/08/12 08:22:47 FranksCust
0 2024/08/12 08:22:55 FranksCust
I always install tthe load release spings.In this case a stock type set  but I use a hillman set when cluch set position changed dramaically like in the stage 2 and 3  performance units.
I always install tthe load release spings.In this case a stock type set but I use a hillman set when cluch set position changed dramaically like in the stage 2 and 3 performance units.
0 2024/08/12 08:23:26 FranksCust
Machined backing top plate also heat treated
0 2024/08/12 08:23:22 FranksCust
7 friction set up here with .090 steels. This is my towing HD SET UP where cooling is of greater need than massive HP hold . My Performance build get 8 in the stage 2 and 9 in the stage 3 shift time apropriate to setup.THINNER  steels require and much quicker apply to avoid heat warpage. Everything is a trade off to purpose.
7 friction set up here with .090 steels. This is my towing HD SET UP where cooling is of greater need than massive HP hold . My Performance build get 8 in the stage 2 and 9 in the stage 3 shift time apropriate to setup.THINNER steels require and much quicker apply to avoid heat warpage. Everything is a trade off to purpose.
0 2024/08/12 08:23:18 FranksCust
0 2024/08/12 08:59:53 FranksCust
0 2024/08/24 19:35:52 FranksCust
0 2024/09/05 12:32:53 FranksCust
note the bathtube ball area . block both of those holes. then see where overun ball goes, Connest that to the fwd by cutting gasket as shown. omitt bathtub balls , You can omit the overun ball too makes no difference
0 2025/06/10 15:14:16 FranksCust
0 2025/06/10 15:17:26 FranksCust
With stock or the sonnax or any 4th servo when stacked you should have  between none and about 1/16th inch of gap between the cover and center peice  but the actual servo being in contact or within 1/16th of the pin .
With stock or the sonnax or any 4th servo when stacked you should have between none and about 1/16th inch of gap between the cover and center peice but the actual servo being in contact or within 1/16th of the pin .
0 2025/10/16 19:21:29 FranksCust
With stock or the sonnax or any 4th servo when stacked you should have between none and about 1/16th inch of gap between the cover and center peice but the actual servo being in contact or within 1/16th of the pin .
With the stck stock 4th servo ussually just flipping the servo will do this, However if needed you can add a washer of whatever thickness needed to get this and type will do they are 3/8 in size and various thickness can be had at the hardware store. Same is true of all other servos
With stock or the sonnax or any 4th servo when stacked you should have between none and about 1/16th inch of gap between the cover and center peice but the actual servo being in contact or within 1/16th of the pin . With the stck stock 4th servo ussually just flipping the servo will do this, However if needed you can add a washer of whatever thickness needed to get this and type will do they are 3/8 in size and various thickness can be had at the hardware store. Same is true of all other servos
0 2025/10/16 19:44:31 FranksCust
 
First
Page
3 of 3
Last
Go To
Page
  • 1
  • 2
  • 3
3 of 3
Go To GO
Go to page of 3 pages
  • 1
  • 2
  • 3

Top
LS1TECH - Camaro and Firebird Forum Discussion
  • FAQ
  • Archive
  • Advertising
  • Cookie Policy
  • Privacy Statement
  • Terms of Service
  • About Us
  • Your Privacy Choices
  • Manage Preferences

© 2026 MH Sub I, LLC dba Internet Brands

Follow Us        


When you click on links to various merchants on this site and make a purchase, this can result in this site earning a commission. Affiliate programs and affiliations include, but are not limited to, the eBay Partner Network.