
How to: The camaro light panel
 11-26-2008, 09:49 AM
#1
11 Second Club
Thread Starter
iTrader: (1)

Join Date: Nov 2005
Location: south carolina
Posts: 224
Likes: 0
Received 0 Likes
on
0 Posts
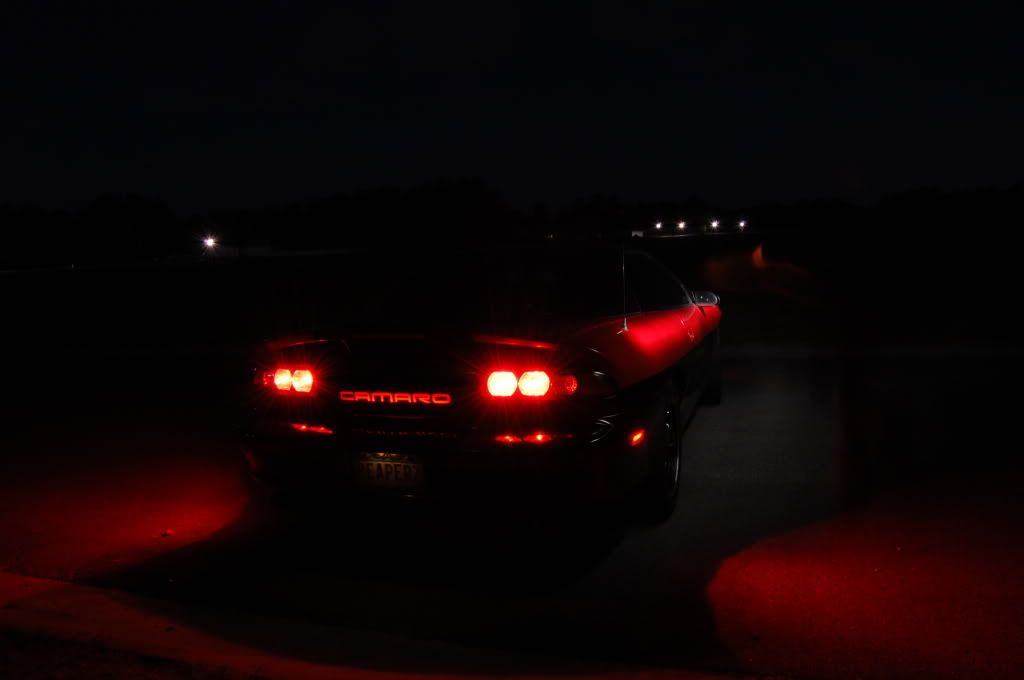
please do not comment on the tail lights


project takes all of about 3hours being patient and generous
i used
a rotozip - optional very high powered dremel
multipurpose rotary cutting bit x2
the clear plastic from a poster frame at walmart
privacy window tint from lowes - frosted glass
grey double sided molding tape - advance auto parts
led bar of your choice - mine 20 in multidance pattern
800 - 1000 grit sand paper
optional but a good idea to have it repanted afterwards
i got a completely seprate panel picked it up from a junk yard for $50
laid it down and strateled it to keep it in place
dug the rotozip in and slowly started cutting the C
once done with that i moved on
i found when cutting the A and O it is best to cut out the middle first
once youve cut it out sand all edges smoothe and you will end up with a tip on the inner parts of the A and O that will need to be sanded off
cut out a piece of clear plastic the size and of the word camaro leaving room to put tape
i used the poster plastic because its thin and very flexible
cover both sides with the privacy tint - it gives it a frosted glass look and will disperce the light better
tape the plastic to the back side of the panel be generous and tape everywhere for firm fitment
now for the inners of the O and A. place a piece of double sided tape on back and position carefully press from front and back to give a firm placement but without pusshing the plastic off the panel
for the light. depending on what you use it may require some fabrication
i was able to fit mine in but its very snug. i pointed the lights directly toward the CAMARO and used double sided tape to help it stay in place
friend of mine beat the back of the car flat till he had a good place to mount
mount the light and make sure it works before installing the panel
leave the light on while installing the panel in case it cuts off for some reason
then install the panel
ta da
i might have left something out or not been clear on something but feel free to ask anything you need to


Trending Topics
11-26-2008, 03:20 PM
#8
TECH Apprentice

Join Date: Jun 2008
Location: Mesa, AZ
Posts: 391
Likes: 0
Received 0 Likes
on
0 Posts
So... you asked us not to comment on the actual tail lights...
If I were to comment on them... and maybe ask what kind they were & where I could get a set... what would you tell me?
If I were to comment on them... and maybe ask what kind they were & where I could get a set... what would you tell me?
11-26-2008, 06:14 PM
#11
11 Second Club
Thread Starter
iTrader: (1)
Join Date: Nov 2005
Location: south carolina
Posts: 224
Likes: 0
Received 0 Likes
on
0 Posts
it has
1 steady on
2 pulse to music or in my case pulse to the chop of cam
3 multifunction of all available dance patterns
4-10 is separate dance funtion
last is off
i believe slickcar.com is where i found these, but i think they are on ebay now
i had never seen a pair like them when i bought them and i thought they went with the car well
you wouldnt believe the crap i catch for them on here
11-26-2008, 06:17 PM
#12
11 Second Club
Thread Starter
iTrader: (1)
Join Date: Nov 2005
Location: south carolina
Posts: 224
Likes: 0
Received 0 Likes
on
0 Posts
thanks to all for the nice compliments
i keep doing little things like this and doing write ups
i did one write on changing the colors of the halos and im in progress of doing one for the camaro on the front bumper just gotta get some money up so i can start that one
i keep doing little things like this and doing write ups
i did one write on changing the colors of the halos and im in progress of doing one for the camaro on the front bumper just gotta get some money up so i can start that one
11-26-2008, 06:24 PM
#14
11 Second Club
Thread Starter
iTrader: (1)
Join Date: Nov 2005
Location: south carolina
Posts: 224
Likes: 0
Received 0 Likes
on
0 Posts
Non-sponsor link removed.
taillights.
and thanks
to me one compliment out ways the many critizims
taillights.
and thanks
to me one compliment out ways the many critizims
Last edited by LawmanSS; 11-28-2008 at 08:39 AM.
 11-26-2008, 06:53 PM
#17
11 Second Club
Thread Starter
iTrader: (1)
Join Date: Nov 2005
Location: south carolina
Posts: 224
Likes: 0
Received 0 Likes
on
0 Posts
i usually show it it off dancing to cam but yeah i get my rear seat delete in and it will be kinda cool. ill post my rear seat delete another day. havent seen one like this before

