
6le cf targa install
 02-25-2012, 11:00 PM
#1

so making this thread more of a install then a how to because as more of these get installed people might find easyer or better ways of doing it
parts you will need
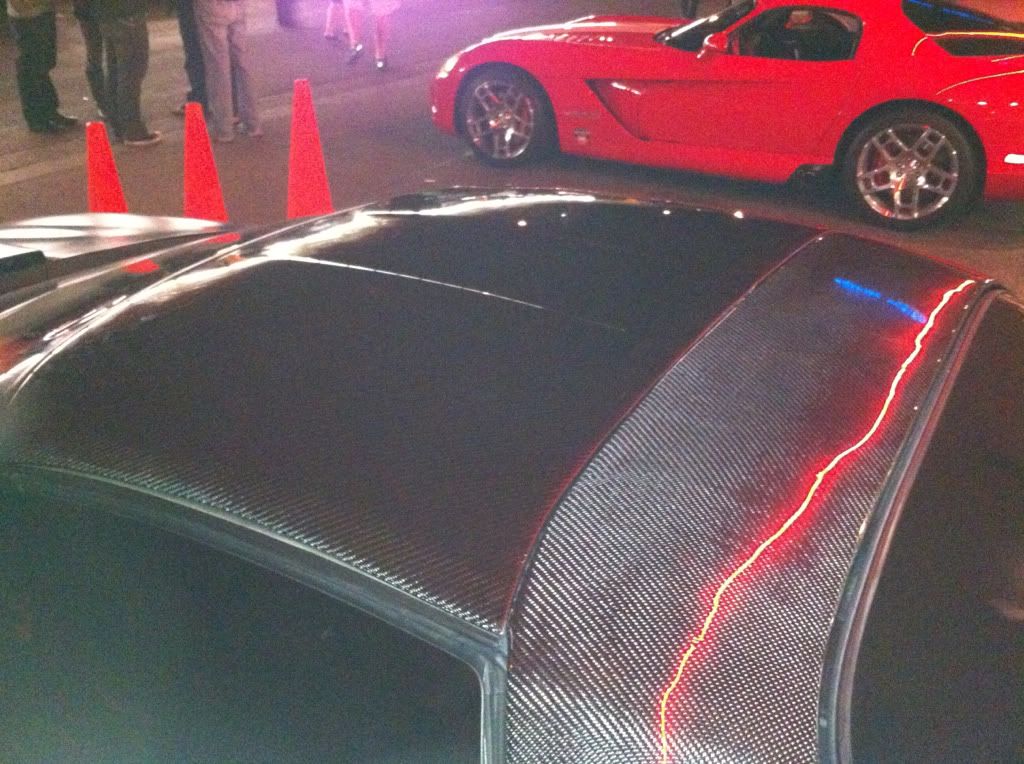
- carbon fiber targa from 6le designs
-ttop brackets
-pro grip adhesive
-fender washers
-6le center bar or tripblack custom brackets (will discuss this later)
- two pizzas and a 12pack lol
tools you will need
-10mm wrench and socket setup
- preferably a good cordless drill and a few different size drill bits
- some painters tape, marker , and a tape measure, chisel
Well lets jump into it, as we all know your going to need a set of ttop brackets to install this piece and if the glass is still intact you will need to brake it lol .
From that point , we used a sharp chiesl and removed all the excess glass and glue left of the bracket

Once you have both brackets cleaned install one side and lay the targa on top, have a second person on the side without a bracket and have them line there side up as perfectly as possible. you then will adjust your side and mark where the studs will need to sit in the bracket (we used small pieces of tape)

Repeat the same process to the other side

From here you will lay the brackets next to the targa and measure the distance form the edge of the targa to the studs and then mark your brackets at that measurement

Now you have your tape marks and the crossmarks for where the studs should go through the brackets , time to drill, use a drill bit slightly larger then the stud
!note use cation if your hole need to be drilled near the edge of the bracket as its possible to break the edge ( i did doh!)

Now you will find that most likley all your holes in your brackets dont line up with the studs the first time you drill and you will have to oblong the holes for it to go in place, just make sure you aline the bracket to the targa as you mark for your oblonging

Once you have both sides done and your brackets on the targa, use a couple of the provided hardware (like two or three bolts) and lightly bolt them down and i mean do not tighten just put the bolts on, it they need play for the trial fit

Now put the targa on for a trial fit and attempted to latch only one side (DO NOT FORCE IT). from here you will start to see where the targa needs to be adjusted to and if it is relatively close try to latch the other side

We had to slot the holes 1/4 inch on both sides, opposite directions on both sides , i drill my holes wrong the first time and went the wrong direction with them lol
At this point it should be fitting pretty good but most likely sits a lil high and you will need to adjust the ttop shims
stock -


remove the rear bolt completely and loosen the front one but do not take completely out or you might loose your backing plate.
we removed all the shims and moved the attachment point under the the the a pillar metal

Lightly bolt down the attachments and reinstall the targa , if you need to do readjustment. otherwise time to tighten everything down and i recommend adding quarter size fender washers for a better grip on the brackets
you will find once you tighten down your brackets they dont sit all the way down, this is fine and normal just the way it was designed


now it should be on and great looking, if its lifting in any spots then your bracket holes are not drilled properly and will need more adjusting, if not you should be ready for the next step
Reinstall the top and loosen your bracket bolt on one side and lift the targa away from the brackets without removing it, take your progrip adhesive and applie a bead along the bracket. lay the targa back down and retighten your bolts, repeat on the other side
from here your targa is 90% installed and should look like something like this
now you are left with a few different choices
(continued in the next post)
i will be updating this with more pics and info
parts you will need
- carbon fiber targa from 6le designs
-ttop brackets
-pro grip adhesive
-fender washers
-6le center bar or tripblack custom brackets (will discuss this later)
- two pizzas and a 12pack lol
tools you will need
-10mm wrench and socket setup
- preferably a good cordless drill and a few different size drill bits
- some painters tape, marker , and a tape measure, chisel
Well lets jump into it, as we all know your going to need a set of ttop brackets to install this piece and if the glass is still intact you will need to brake it lol .
From that point , we used a sharp chiesl and removed all the excess glass and glue left of the bracket
Once you have both brackets cleaned install one side and lay the targa on top, have a second person on the side without a bracket and have them line there side up as perfectly as possible. you then will adjust your side and mark where the studs will need to sit in the bracket (we used small pieces of tape)
Repeat the same process to the other side
From here you will lay the brackets next to the targa and measure the distance form the edge of the targa to the studs and then mark your brackets at that measurement
Now you have your tape marks and the crossmarks for where the studs should go through the brackets , time to drill, use a drill bit slightly larger then the stud
!note use cation if your hole need to be drilled near the edge of the bracket as its possible to break the edge ( i did doh!)
Now you will find that most likley all your holes in your brackets dont line up with the studs the first time you drill and you will have to oblong the holes for it to go in place, just make sure you aline the bracket to the targa as you mark for your oblonging
Once you have both sides done and your brackets on the targa, use a couple of the provided hardware (like two or three bolts) and lightly bolt them down and i mean do not tighten just put the bolts on, it they need play for the trial fit
Now put the targa on for a trial fit and attempted to latch only one side (DO NOT FORCE IT). from here you will start to see where the targa needs to be adjusted to and if it is relatively close try to latch the other side
We had to slot the holes 1/4 inch on both sides, opposite directions on both sides , i drill my holes wrong the first time and went the wrong direction with them lol
At this point it should be fitting pretty good but most likely sits a lil high and you will need to adjust the ttop shims
stock -
remove the rear bolt completely and loosen the front one but do not take completely out or you might loose your backing plate.
we removed all the shims and moved the attachment point under the the the a pillar metal
Lightly bolt down the attachments and reinstall the targa , if you need to do readjustment. otherwise time to tighten everything down and i recommend adding quarter size fender washers for a better grip on the brackets
you will find once you tighten down your brackets they dont sit all the way down, this is fine and normal just the way it was designed
now it should be on and great looking, if its lifting in any spots then your bracket holes are not drilled properly and will need more adjusting, if not you should be ready for the next step
Reinstall the top and loosen your bracket bolt on one side and lift the targa away from the brackets without removing it, take your progrip adhesive and applie a bead along the bracket. lay the targa back down and retighten your bolts, repeat on the other side
from here your targa is 90% installed and should look like something like this
now you are left with a few different choices
(continued in the next post)
i will be updating this with more pics and info
 02-25-2012, 11:00 PM
#2
so now here is the options
the targa needs a extra brace for speeds above 80mph so
1 the easy method, order a center bracket from 6le which has a small lip in the front for the targa to slip into
2 the harder tripblack method which we will discuss now, if you choose the 6le center bracket, skip this and start your headliner
so i did not really like the look of the 6le center bracket and felt much more secure with mulitpul brackets vs one , since my car sees speeds of 150+ almost every time its driven
so i went to home depot and bought the supplies for the tripblack brackets
- 1 stick of 1/8th inch x 2 inch wide aluminum flat stock
- 6 sliding glass door locks
- fiberglass repair kit
-1.5 long countersink bolts and nuts and washers
so i cut the aluminum in to strips of about 3in and drilled and countersink the holes and assembled the part, looks like this

i did four brackets for the front and two for the rear (pics of placement later)
remove the weather striping and drill a 1/4 hole in the lip

now a test fit of the bracket

Trim the weather stripping around the bolt and reinstall the weather stripping


once you have all your brackets in place, put the targa back on and use the bolts and nuts to adjust the aluminum piece to sit flush on the underside of the targa, once you have them all done, use progrip adhesive remove the bracket and put a light layer of progrip on it. put the bracket back on making sure it has good contact with the targa and is in the hole straight, do this to all of them and let the progrip dry for at least a hour or two

these locks simply pull the bolt back to release them, make sure to hold the brackets so you dont move or pull them off
carefully remove the targa and lay it upside down on a soft work area (i use my spare bedroom carpet floor lol) , carefully remove the brackets from the aluminum strips that are now glued to the targa.

using a simple fiberglass repair kit , now put a few layers of fiberglass over the aluminum brackets

i did two small strips vertical and then two more horizontal

 (make sure to remove the bracket before fiberglassing , i just place it on there for the pic)
after this dried i did one whole large piece over each brackets, probably (guessing ) 8" x 8", once this drys you can move on to headliner
i bought a roll of replacement carpet from walmart

using spray adhesive its fairly easy to put on, work in small sections and work from the middle out

then all that is left is to paint the brackets and reassemble NOTE! i had to disassemble the bracket (pull the bolts out) and flip them over and around as you will see in the next few pics


as you can see i need to still put my ttop bracket covers back on and do some touch up paint on the tripblack brackets (got scratched up from wrenches)
all done
the targa needs a extra brace for speeds above 80mph so
1 the easy method, order a center bracket from 6le which has a small lip in the front for the targa to slip into
2 the harder tripblack method which we will discuss now, if you choose the 6le center bracket, skip this and start your headliner
so i did not really like the look of the 6le center bracket and felt much more secure with mulitpul brackets vs one , since my car sees speeds of 150+ almost every time its driven
so i went to home depot and bought the supplies for the tripblack brackets
- 1 stick of 1/8th inch x 2 inch wide aluminum flat stock
- 6 sliding glass door locks
- fiberglass repair kit
-1.5 long countersink bolts and nuts and washers
so i cut the aluminum in to strips of about 3in and drilled and countersink the holes and assembled the part, looks like this
i did four brackets for the front and two for the rear (pics of placement later)
remove the weather striping and drill a 1/4 hole in the lip
now a test fit of the bracket
Trim the weather stripping around the bolt and reinstall the weather stripping
once you have all your brackets in place, put the targa back on and use the bolts and nuts to adjust the aluminum piece to sit flush on the underside of the targa, once you have them all done, use progrip adhesive remove the bracket and put a light layer of progrip on it. put the bracket back on making sure it has good contact with the targa and is in the hole straight, do this to all of them and let the progrip dry for at least a hour or two
these locks simply pull the bolt back to release them, make sure to hold the brackets so you dont move or pull them off
carefully remove the targa and lay it upside down on a soft work area (i use my spare bedroom carpet floor lol) , carefully remove the brackets from the aluminum strips that are now glued to the targa.
using a simple fiberglass repair kit , now put a few layers of fiberglass over the aluminum brackets
i did two small strips vertical and then two more horizontal
(make sure to remove the bracket before fiberglassing , i just place it on there for the pic)after this dried i did one whole large piece over each brackets, probably (guessing ) 8" x 8", once this drys you can move on to headliner
i bought a roll of replacement carpet from walmart
using spray adhesive its fairly easy to put on, work in small sections and work from the middle out
then all that is left is to paint the brackets and reassemble NOTE! i had to disassemble the bracket (pull the bolts out) and flip them over and around as you will see in the next few pics
as you can see i need to still put my ttop bracket covers back on and do some touch up paint on the tripblack brackets (got scratched up from wrenches)
all done
Last edited by tripblackls1; 02-28-2012 at 07:42 PM.
02-26-2012, 10:19 AM
#4
10 Second Club
Join Date: Mar 2008
Location: Cape Girardeau, Missouri
Posts: 1,034
Likes: 0
Received 1 Like
on
1 Post
Awesome write up! I cant wait to keep seeing more pics of these tops as more and more people get them. They look like a real nice piece and a great addition to the F-Body!
Trending Topics
02-26-2012, 05:21 PM
#8

Even without that though there is a reason:
1) Looks 100xs more modern IMHO
3) Save weight
3) If you're in an accident you don't have glass raining down on you. I never thought much about that until it happened to a friend's girlfriend in her LT1 and now she's paranoid about riding in t-top cars.
02-26-2012, 05:24 PM
#9
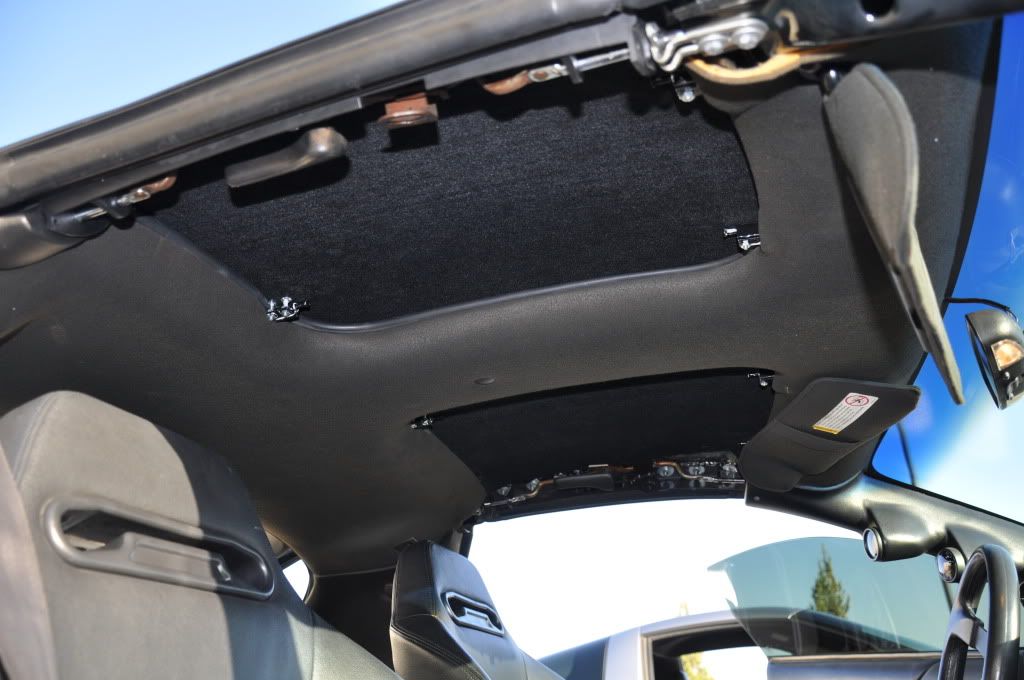
This is an important picture I had them take on purpose...
THIS IS HOW IT IS SUPPOSED TO LOOK, WE DESIGNED IT THIS WAY. My friend Neil (DRIVING) is the one who came up with this idea (C6 style targa on our cars) because he wanted more headroom (he's like 6'2" and his head almost hit the t-tops, let alone with a helmet).
SO, using the C6 style (the bubble up) we were able to get more room. That is why there is a gap between the bracket and the roof there, our roof INTENTIONALLY bubbles away from that factory line to make more head room and then comes back down to the factory line in the center.
There is still plenty of surface that the t-top bracket adheres to AND you get more head room...
02-26-2012, 07:44 PM
#11
10 Second Club
Join Date: Mar 2008
Location: Cape Girardeau, Missouri
Posts: 1,034
Likes: 0
Received 1 Like
on
1 Post
I cant wait to see HD pics! If you cut the center bar out of the car wont this cause a lot of flex and twisting in our cars, since they dont have all the bracing that convertable cars do? I guess cutting the bar out isnt advisable for a race oriented car, but would look amazing for a cruiser/show car.
02-26-2012, 08:25 PM
#14
I cant wait to see HD pics! If you cut the center bar out of the car wont this cause a lot of flex and twisting in our cars, since they dont have all the bracing that convertable cars do? I guess cutting the bar out isnt advisable for a race oriented car, but would look amazing for a cruiser/show car.
02-28-2012, 09:13 PM
#16
This is an important picture I had them take on purpose...
THIS IS HOW IT IS SUPPOSED TO LOOK, WE DESIGNED IT THIS WAY. My friend Neil (DRIVING) is the one who came up with this idea (C6 style targa on our cars) because he wanted more headroom (he's like 6'2" and his head almost hit the t-tops, let alone with a helmet).
SO, using the C6 style (the bubble up) we were able to get more room. That is why there is a gap between the bracket and the roof there, our roof INTENTIONALLY bubbles away from that factory line to make more head room and then comes back down to the factory line in the center.
There is still plenty of surface that the t-top bracket adheres to AND you get more head room...
THIS IS HOW IT IS SUPPOSED TO LOOK, WE DESIGNED IT THIS WAY. My friend Neil (DRIVING) is the one who came up with this idea (C6 style targa on our cars) because he wanted more headroom (he's like 6'2" and his head almost hit the t-tops, let alone with a helmet).
SO, using the C6 style (the bubble up) we were able to get more room. That is why there is a gap between the bracket and the roof there, our roof INTENTIONALLY bubbles away from that factory line to make more head room and then comes back down to the factory line in the center.
There is still plenty of surface that the t-top bracket adheres to AND you get more head room...
