
technical shift kit install questions
 03-11-2012, 10:36 PM
#1

I'd like to get my transgo HD-2 kit installed this week on my 4l60e, so as of right now I have the tranny in the garage and flipped upside down.
couple of questions for those experienced with this, so I'm going to post the entire manual here so you know what I am talking about.

couple of questions for those experienced with this, so I'm going to post the entire manual here so you know what I am talking about.
 03-11-2012, 10:36 PM
#2
ok, lets get down to buisness:
Page 1:
step 1...is this my servo? Or would otherwise be the corvette servo that I have coming?
it says install everything without blue o-ring...(no idea why it says see page 5??) so only if it is too tight am I removing the one shim and than installing WITH the blue o-ring?? or Am I checking it, if it is ok and not too tight, remove and reinstall with the blue o-ring?...im confused.
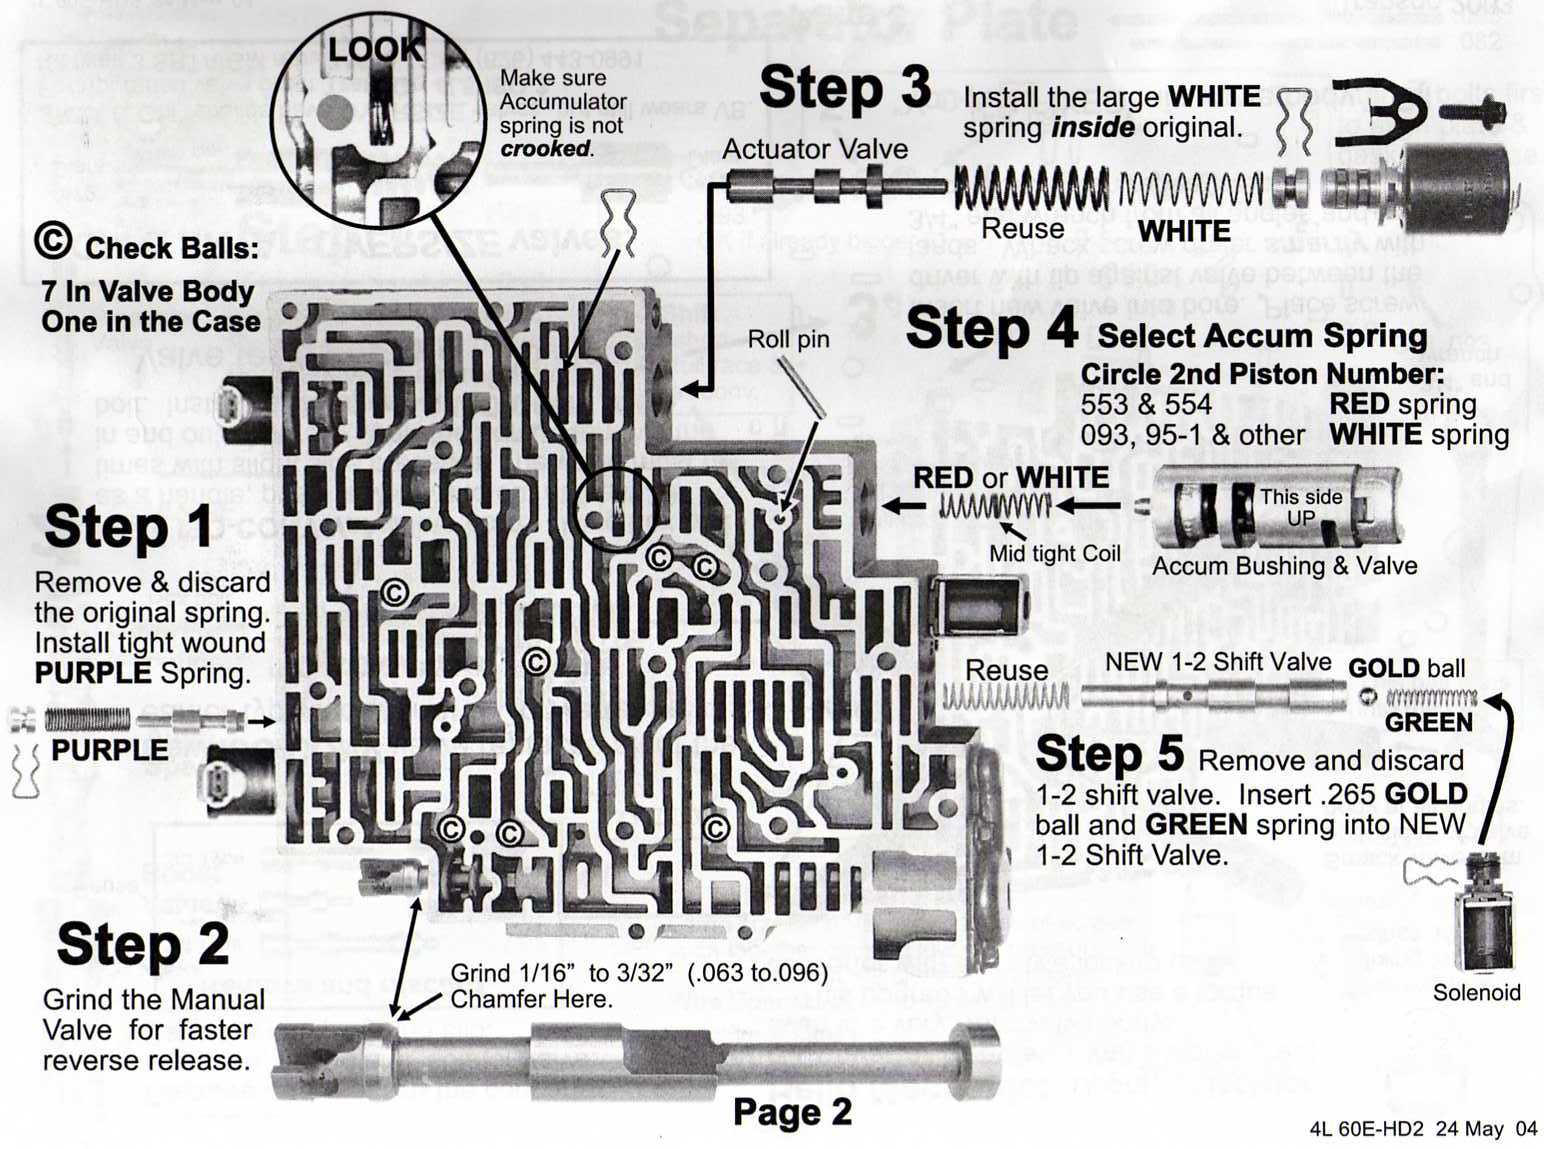
Step 2...am I going to see both sets of those numbers on there? which ones should I go by? and what happens if I have piston 554? because on page 2 it says if I have piston 553 or 554 use the red spring? I thought I shouldnt have 554?
Page 2:
Do I really need to grind the manual valve? How can I accurately grind 1/16 to 3/32 chamfer in there accurately without having access to a machine shop at this exact time?
Page 3:
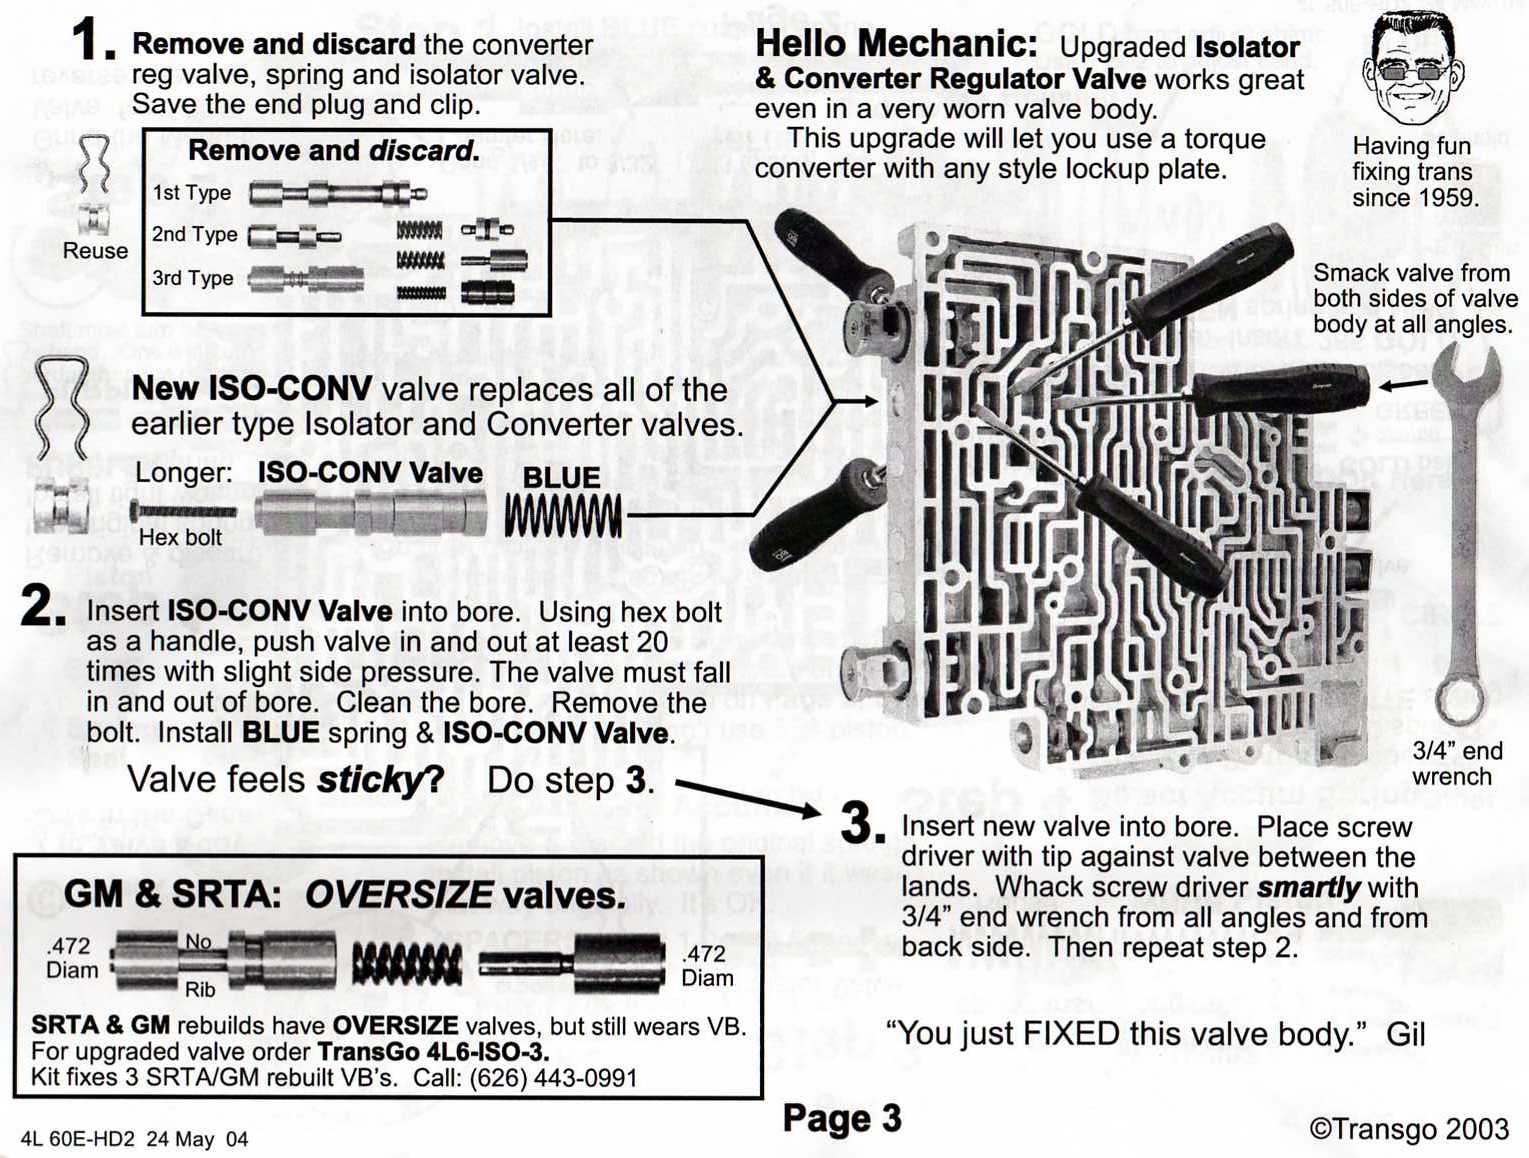
Does that maze like thing seperate from the transmission?
In step 2, what is the best thing to use to clean the bore with?
When would you need the oversize valve?
Page 4:
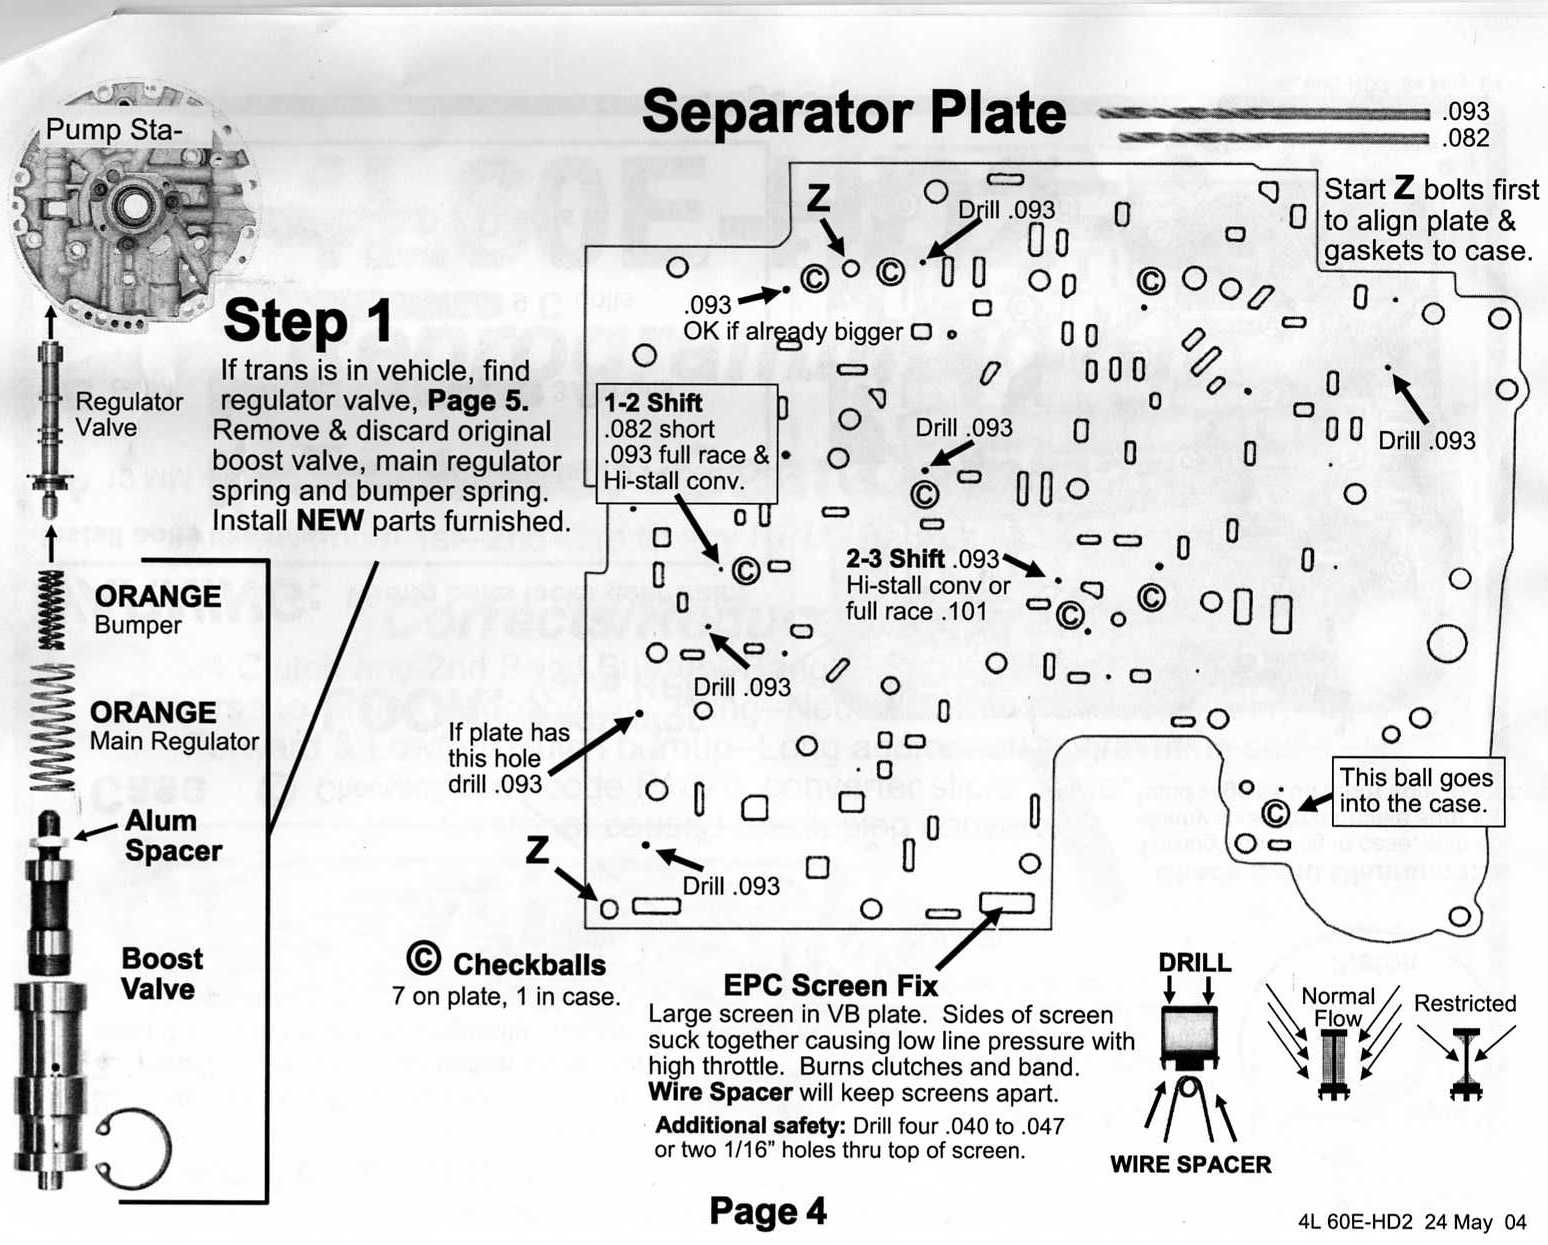
Is step one the area that the conver bolts to at the front of the tranny? Im having a hard time pictureing this?
onto the separator plate:
the 1-2 shift part says .082 short, .093 full race and Hi stall converter....What does that mean? what is short? ...and if you go .082 there, should you be going .082 rather than .093 everywhere else?
next: the spot where it says "if plate has this hole drill .093...so if the plate doesn't have this hole am I still drilling it?
does anyone have a picture of this mentioned EPC screen?
Page 5:
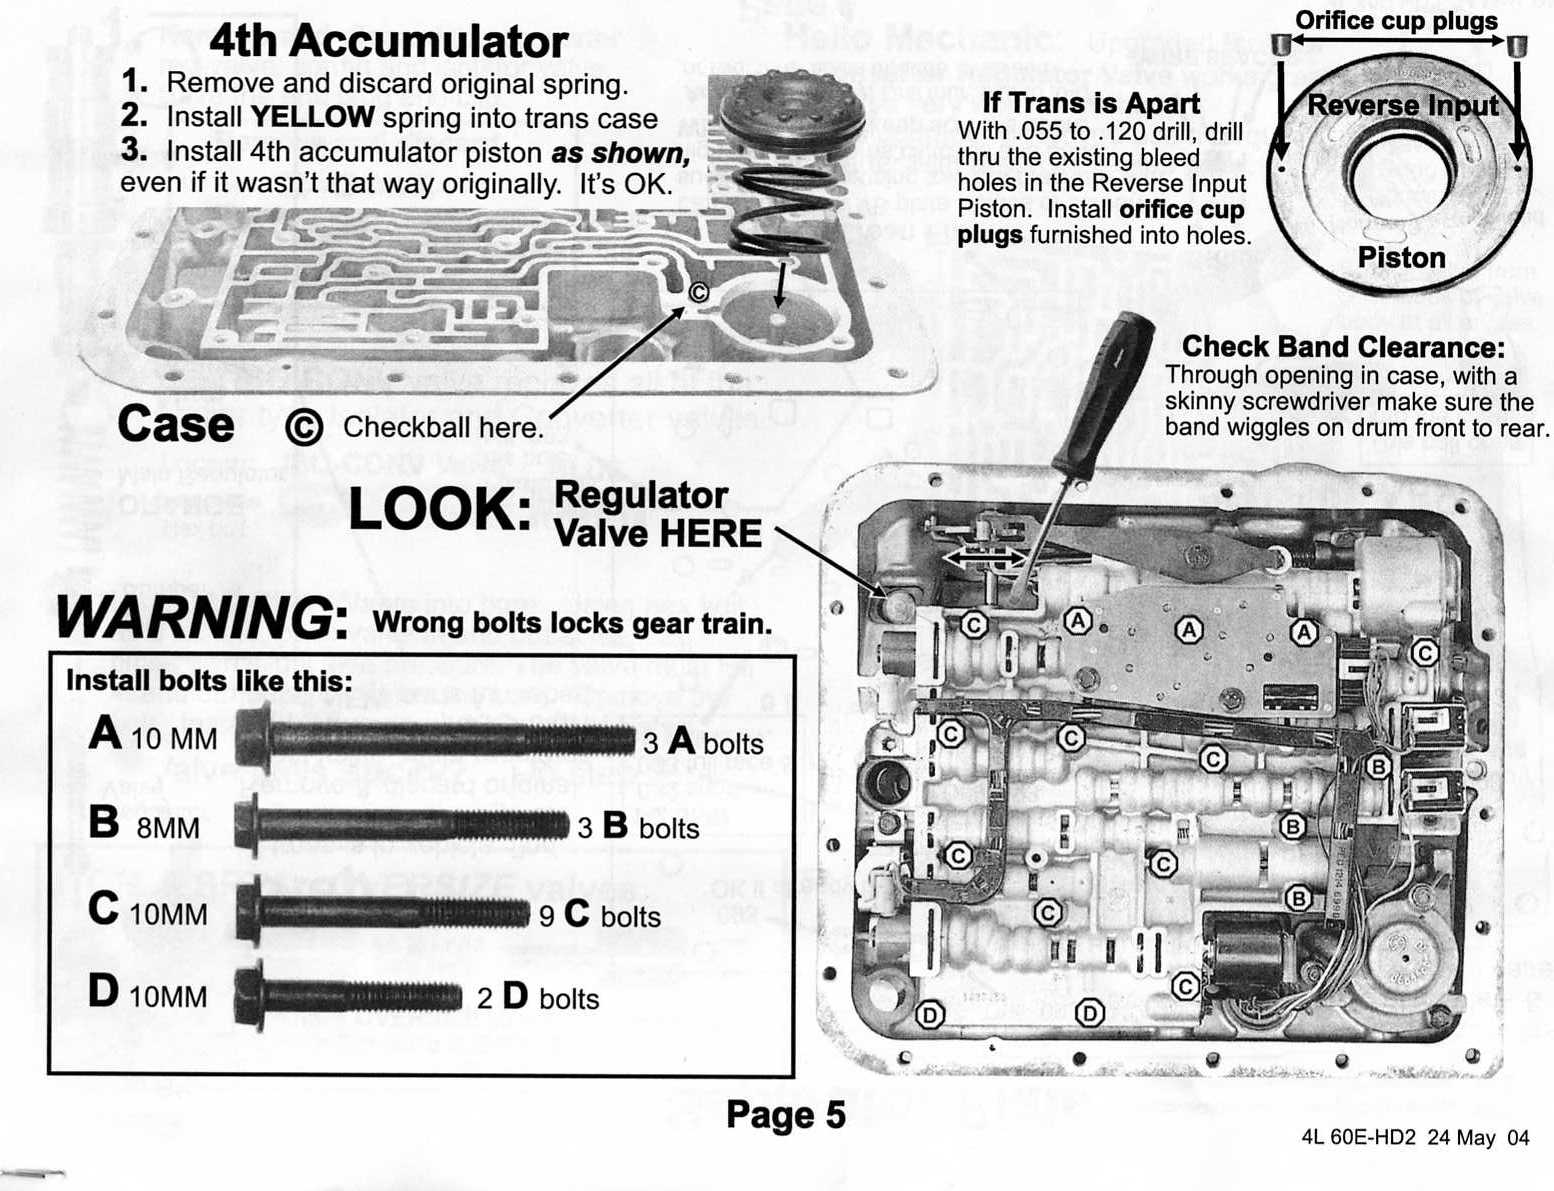
If trans is apart...how far apart? it's on my floor...can I get to whatever this reverse input piston is? Where is it?
I think that sums up my questions at this point.
Thanks in advance guys.
Page 1:
step 1...is this my servo? Or would otherwise be the corvette servo that I have coming?
it says install everything without blue o-ring...(no idea why it says see page 5??) so only if it is too tight am I removing the one shim and than installing WITH the blue o-ring?? or Am I checking it, if it is ok and not too tight, remove and reinstall with the blue o-ring?...im confused.
Step 2...am I going to see both sets of those numbers on there? which ones should I go by? and what happens if I have piston 554? because on page 2 it says if I have piston 553 or 554 use the red spring? I thought I shouldnt have 554?
Page 2:
Do I really need to grind the manual valve? How can I accurately grind 1/16 to 3/32 chamfer in there accurately without having access to a machine shop at this exact time?
Page 3:
Does that maze like thing seperate from the transmission?
In step 2, what is the best thing to use to clean the bore with?
When would you need the oversize valve?
Page 4:
Is step one the area that the conver bolts to at the front of the tranny? Im having a hard time pictureing this?
onto the separator plate:
the 1-2 shift part says .082 short, .093 full race and Hi stall converter....What does that mean? what is short? ...and if you go .082 there, should you be going .082 rather than .093 everywhere else?
next: the spot where it says "if plate has this hole drill .093...so if the plate doesn't have this hole am I still drilling it?
does anyone have a picture of this mentioned EPC screen?
Page 5:
If trans is apart...how far apart? it's on my floor...can I get to whatever this reverse input piston is? Where is it?
I think that sums up my questions at this point.
Thanks in advance guys.
03-11-2012, 11:26 PM
#3
Well, I'm definitely MUCH more 4L80E oriented, but the fundamentals of transmissions are generally the same, so I'll see what I can do here. I'll be honest I have no read your post yet as I am typing this so I'll go at it step by step and see what's going on.
Hope I was some help.
ok, lets get down to buisness:
Page 1:
step 1...is this my servo? Or would otherwise be the corvette servo that I have coming?
Yes. That's your servo. The Corvette servo replaces that one.
it says install everything without blue o-ring...(no idea why it says see page 5??) so only if it is too tight am I removing the one shim and than installing WITH the blue o-ring?? or Am I checking it, if it is ok and not too tight, remove and reinstall with the blue o-ring?...im confused.
Ok, so do as it says and do not put the blue O-ring on the cover after you put on the two gold shims. The reason is because it's a bitch to get that off when the blue ring is on there and it's much easier to test what you're doing that way. Kind of like how we builders test clutch pack clearances by dropping a piston into a drum without putting the seals on so it's much easier to take everything out if needed.
It's telling you to see page 5 so you know how to check the band. Follow the instructions with the picture on page 5 to know how to properly check the band. You can also check, and I recommend doing this as well to be sure, that you can turn the output shaft by hand, both ways. If you can do that, then take the cover off, put the o-ring back on, use some ATF to lube it up and put it back in. If the band and shaft test failed, remove one of the shims, start over and do the band/shaft tests again. Simple.
Step 2...am I going to see both sets of those numbers on there? which ones should I go by? and what happens if I have piston 554? because on page 2 it says if I have piston 553 or 554 use the red spring? I thought I shouldnt have 554?
To me it looks like you're going to see one of those sets of numbers in one of those places on the piston, perhaps it varies from transmission to transmission, year to year etc. Choose the numbers from the set that you see.
I don't know what the deal is with the 554 piston. Call TransGo and ask, or maybe someone on here will know. Best hope you don't get it I guess?
Page 2:
Do I really need to grind the manual valve? How can I accurately grind 1/16 to 3/32 chamfer in there accurately without having access to a machine shop at this exact time?
It seems you don't NEED to grind the manual valve, but doing so will give you a faster reverse release.
Page 3:
Does that maze like thing separate from the transmission?
That maze like thing is the valve body. To be honest man, and I don't mean to sound like a dick, but if you don't know what a valve body is you might want to consider having someone else do this install for you. To answer your question though, yes it does, it's just held on by bolts. It's not something you should probably be taking apart and cleaning and modifying if you don't know what it is.
In step 2, what is the best thing to use to clean the bore with?
Brake cleaner from any autoparts store will clean it nicely.
When would you need the oversize valve?
Without me looking at the directions at the moment, it sounds like an oversize valve would be needed for a very worn valve bore? I don't really know to be honest.
Page 4:
Is step one the area that the conver bolts to at the front of the tranny? Im having a hard time pictureing this?
You're honestly confusing me a little. Step one is a picture of the pump. The pump is the part that your converter slides onto. Look on the side of the pump. There should be a snap ring that almost looks like a "bull ring" snap ring. You need special snap ring pliers to remove it without damaging it. Then you need to use a screw driver and possible a hammer or other device to tap the end of the screw driver with to get the old valve and spring junk out.
onto the separator plate:
the 1-2 shift part says .082 short, .093 full race and Hi stall converter....What does that mean? what is short? ...and if you go .082 there, should you be going .082 rather than .093 everywhere else?
The .082 and .093 are the size of your drill bits you would need. What is your converter? If this is going to be a full on race car or has a high stall converter, then do as it says. Otherwise, go with the lesser option. .082 for the 1-2 shift, and .093 for the 2-3 shift.
next: the spot where it says "if plate has this hole drill .093...so if the plate doesn't have this hole am I still drilling it?
It doesn't say to so I would assume no.
does anyone have a picture of this mentioned EPC screen?

Page 5:
If trans is apart...how far apart? it's on my floor...can I get to whatever this reverse input piston is? Where is it?
The majority of the work done it seems is to your valve body and pump. You don't really need to get into the transmission internals. The reverse input piston is part of the trans internals and you will honestly **** yourself if you try to mess with that, and I say that with no hate. You will need to disassemble the trans to get to it, though you won't have to take it apart all the way. It's still enough that I highly don't recommend you mess with it.
I think that sums up my questions at this point.
Thanks in advance guys.
Page 1:
step 1...is this my servo? Or would otherwise be the corvette servo that I have coming?
Yes. That's your servo. The Corvette servo replaces that one.
it says install everything without blue o-ring...(no idea why it says see page 5??) so only if it is too tight am I removing the one shim and than installing WITH the blue o-ring?? or Am I checking it, if it is ok and not too tight, remove and reinstall with the blue o-ring?...im confused.
Ok, so do as it says and do not put the blue O-ring on the cover after you put on the two gold shims. The reason is because it's a bitch to get that off when the blue ring is on there and it's much easier to test what you're doing that way. Kind of like how we builders test clutch pack clearances by dropping a piston into a drum without putting the seals on so it's much easier to take everything out if needed.
It's telling you to see page 5 so you know how to check the band. Follow the instructions with the picture on page 5 to know how to properly check the band. You can also check, and I recommend doing this as well to be sure, that you can turn the output shaft by hand, both ways. If you can do that, then take the cover off, put the o-ring back on, use some ATF to lube it up and put it back in. If the band and shaft test failed, remove one of the shims, start over and do the band/shaft tests again. Simple.
Step 2...am I going to see both sets of those numbers on there? which ones should I go by? and what happens if I have piston 554? because on page 2 it says if I have piston 553 or 554 use the red spring? I thought I shouldnt have 554?
To me it looks like you're going to see one of those sets of numbers in one of those places on the piston, perhaps it varies from transmission to transmission, year to year etc. Choose the numbers from the set that you see.
I don't know what the deal is with the 554 piston. Call TransGo and ask, or maybe someone on here will know. Best hope you don't get it I guess?
Page 2:
Do I really need to grind the manual valve? How can I accurately grind 1/16 to 3/32 chamfer in there accurately without having access to a machine shop at this exact time?
It seems you don't NEED to grind the manual valve, but doing so will give you a faster reverse release.
Page 3:
Does that maze like thing separate from the transmission?
That maze like thing is the valve body. To be honest man, and I don't mean to sound like a dick, but if you don't know what a valve body is you might want to consider having someone else do this install for you. To answer your question though, yes it does, it's just held on by bolts. It's not something you should probably be taking apart and cleaning and modifying if you don't know what it is.
In step 2, what is the best thing to use to clean the bore with?
Brake cleaner from any autoparts store will clean it nicely.
When would you need the oversize valve?
Without me looking at the directions at the moment, it sounds like an oversize valve would be needed for a very worn valve bore? I don't really know to be honest.
Page 4:
Is step one the area that the conver bolts to at the front of the tranny? Im having a hard time pictureing this?
You're honestly confusing me a little. Step one is a picture of the pump. The pump is the part that your converter slides onto. Look on the side of the pump. There should be a snap ring that almost looks like a "bull ring" snap ring. You need special snap ring pliers to remove it without damaging it. Then you need to use a screw driver and possible a hammer or other device to tap the end of the screw driver with to get the old valve and spring junk out.
onto the separator plate:
the 1-2 shift part says .082 short, .093 full race and Hi stall converter....What does that mean? what is short? ...and if you go .082 there, should you be going .082 rather than .093 everywhere else?
The .082 and .093 are the size of your drill bits you would need. What is your converter? If this is going to be a full on race car or has a high stall converter, then do as it says. Otherwise, go with the lesser option. .082 for the 1-2 shift, and .093 for the 2-3 shift.
next: the spot where it says "if plate has this hole drill .093...so if the plate doesn't have this hole am I still drilling it?
It doesn't say to so I would assume no.
does anyone have a picture of this mentioned EPC screen?
Page 5:
If trans is apart...how far apart? it's on my floor...can I get to whatever this reverse input piston is? Where is it?
The majority of the work done it seems is to your valve body and pump. You don't really need to get into the transmission internals. The reverse input piston is part of the trans internals and you will honestly **** yourself if you try to mess with that, and I say that with no hate. You will need to disassemble the trans to get to it, though you won't have to take it apart all the way. It's still enough that I highly don't recommend you mess with it.
I think that sums up my questions at this point.
Thanks in advance guys.
The following users liked this post:
Yasin usta (04-13-2024)
03-11-2012, 11:48 PM
#4
thanks that definetly helped some...I don't exactly know what a valvebody is, this is the first tranny I've ever opened up...Give me a motor and I'll tear it apart in minutes...Ive done all other work on my car (heads/cam) figured it would be easy enough to do this project as well.
Keep in mind when Im asking these questions I only have the tranny upside down with the filter still on it...I havent physically seen any of these pieces yet, so some of these questions Im asking are probably dumb atm, but Im trying to study the step by step so I have a heads up before going into it ***** deep on tuesday/wednesday lol.
My converter is a TCI 3200 stall. The car is daily driven in the summer with 4-6 trips to the strip a year. So I am still stuck? should I be going .082 or .093...I think the consensus is split whether or not a 3200 stall is really a "Hi stall" converter perse (I think alot of people consider something 3800 or higher to be a "Hi" stall...although I consider 3200 a Hi-stall myself?
So as far as page 5 goes with the reverse input piston you are saying I should skip that step as I would have to take the internals of the tranny apart?
And them comes the age old debate...1 or 2 spacers for the 2nd accumulator...what is considered very firm? <<<this question is of least importance to me as it looks like I *think* I can access this when the trans is back in the car, and adjust it if need be pretty easily?...maybe not?...I can debate about this with myself later if need be, its the other questions that are most important lol
Thanks
03-12-2012, 12:20 AM
#5
thanks that definetly helped some...I don't exactly know what a valvebody is, this is the first tranny I've ever opened up...Give me a motor and I'll tear it apart in minutes...Ive done all other work on my car (heads/cam) figured it would be easy enough to do this project as well.
Keep in mind when Im asking these questions I only have the tranny upside down with the filter still on it...I havent physically seen any of these pieces yet, so some of these questions Im asking are probably dumb atm, but Im trying to study the step by step so I have a heads up before going into it ***** deep on tuesday/wednesday lol.
My converter is a TCI 3200 stall. The car is daily driven in the summer with 4-6 trips to the strip a year. So I am still stuck? should I be going .082 or .093...I think the consensus is split whether or not a 3200 stall is really a "Hi stall" converter perse (I think alot of people consider something 3800 or higher to be a "Hi" stall...although I consider 3200 a Hi-stall myself?
I would definitely not consider that "Hi stall". With the amount of racing and what not, I would most definitely choose the .082 option for that 1-2 shift valve and the .093 option for the 2-3, since that was the default IIRC.
So as far as page 5 goes with the reverse input piston you are saying I should skip that step as I would have to take the internals of the tranny apart?
Yes. Not only would you need to take out the internals, but you would need a special spring compressor and snap ring pliers to disassemble the drum to compress and remove the spring to access the piston.
And them comes the age old debate...1 or 2 spacers for the 2nd accumulator...what is considered very firm? <<<this question is of least importance to me as it looks like I *think* I can access this when the trans is back in the car, and adjust it if need be pretty easily?...maybe not?...I can debate about this with myself later if need be, its the other questions that are most important lol
I would just use 2 myself. If you can put the car on a lift or on jackstands you can definitely access it later, but I would do 2 to start off with. I've never installed or felt what the kit looked like myself, like I said, I'm a 4L80E builder for one of the sponsors on here. We touch 4L60E's once in a blue moon.
Thanks
 03-12-2012, 01:10 AM
#7
You know, now that I think about it, you may want to call TransGo for sure tomorrow and ask what they consider "Hi Stall" because my brain wasn't fully clicking when I remembered this guide can also be used for those with stock converters (hurr durr @ me). You may want to end up drilling the larger holes as well, and possibly only putting 1 spacer on the accumulator. 2 would probably be doable but I honestly do not know how firm your shifts would be at that point.
Trending Topics
03-12-2012, 03:56 AM
#8
i stayed on the small side of all drill hole sizes.......left the stock springs in the 1-2 accumulator......no TG springs or spacers in there.......since the servos are already vette servos in f bods......you can almost skip the the entire portion related to the servos......i am thinking those gold washers just tighten up the band......plus it is a MAJOR PITA to do anything to the servos while the tranny is in the car.............save yourself the headache......be very careful when removing the circlip on the boost valve.....hard to remove and easy to get lost......get a new separator plate....those metal check ***** wear holes in it........new plate and PLASTIC check *****.......you will thank me later......its not hard to do.....i have done about 5 installs on various cars i have owned..............there is a generic video on TG website showing a install.......they used to include a video with every kit but not anymore
03-12-2012, 07:04 PM
#9
Moderator
Yup, the Transgo HD2 instructions sure are terse. I'm no expert, but here are my comments:
The "standard" low-performance servo is part # 8642553.
The Corvette servo is part # 8642093.
==> therefore use the white spring on Page 2, Step 4.
I would suggest drilling the 1-2 hole to the smaller size ( 0.082) as I found the 1-2 shift nicely firm but not harsh with that size. Also, there are other posts with that recommendation.
I would suggest drilling the 2-3 hole to the larger size (0.101) as I found the 2-3 shift lame with the smaller hole. Also with the Corvette servo, IMHO, more 2-3 fluid is needed to quickly release the band. (If you study the hydraulics, the 2nd gear servo is pressured in gears 2, 3(!) and 4. It is the 3rd gear fluid on the inner side of the servo, with more surface area, which pushes against the pressure on the 2nd servo side to release the band.)
Assuming you change the Accumulator spring (Page 2 Step 4), I would suggest the kit's 1-2 accumulator springs (one on each side of piston). Again if you study the hydraulics, it is the hydraulic force from the accumulator valve which is primary dampening for the accumulator pistons; the spring(s) only modify it and are not the primary dampening force. (Hence different kits/builders even have the springs on different sides of the pistons.) Unless you really understand the hydraulics, I would suggest following the kit instructions exactly. As suggested, just one spacer in the 1-2 accumulator will probably make you happy.
As suggested, don't take the trans apart to install the optional parts. They are OPTIONAL.
As suggested, you really should consider a new separator plate ($25) and the plastic check ***** which are Sonnax part # 10000-08:
http://www.sonnax.com/system/announcement/10000-08.pdf
Many builders also like the Sonnax "Servo Release Check valve":
http://www.sonnax.com/system/instruc...701-076-IN.pdf
I have not yet tried it in conjunction with the Trango HD2 kit, but will later this month; I don't see any conflicts in the hydraulics.
To adjust the servo/band tightness, I use a spare slip-yoke to feel for any drag. As mentioned, it is nearly impossible to remove the servo with the trans in the car.
---------
BTW - I briefly had the TCI 3200 stall and found it too sloppy in city driving; I next tried the TCI 2400 and found that much tighter, but slower at the track.
I just bought a Yank 3600 and hope it handles both city and track better.
Good luck.
03-12-2012, 07:51 PM
#10
the reason I say not to change out the springs from stock in the 1-2 accum cuz IMO they are plenty stout stock.....mine was a 2 spring system in the accumulator......i have the servo release check valve in mine.....i guess it does what it is supposed to do
03-12-2012, 08:11 PM
#11
Moderator
Since you are happy with the stock springs (and location), this is a good indicator that different spring configurations probably don't make a huge difference.
Good to hear that the Servo release check valve is working for you.
03-12-2012, 11:03 PM
#12
another reason i left the stock setup in the 1-2 accum is in my past installs of the TG kit there was no matching shift quality in each shift......in the past i have used the TG springs and 1 spacer washer......the 1-2 shift was a lot harsher IMO than any other shift point....with my latest TG install and stock springs the shift points are more matching....i think a good shift kit should try to have all the shift points match in firmness
03-13-2012, 03:28 AM
#13

You cannot have the same shift quality for the 1-2 shift and the 2-3 shift. The 1-2 shift is a band coming on, and the 2-3 shift is a band coming off and clutches coming on. The shift feel will be different. With a stock diameter torque converter, drill the 1-2 feed to .082", and do not install any spacers ever. With a 10.5" or 9.5" torque converter, drill the 1-2 feed hole to .093" - .096". Alway use the Corvette servo if you do not already have one. You want to get the band clearance down to a minimum, so that the 3rd apply oil brings on the clutches instead of releasing the band because of too much band clearance. You will almost always need one gold shim on the servo. The 2-3 shift hole should never be less than .093", and I like .110" here. Never do the installation of the restrictors going in the reverse input clutch piston. As for the grinding on the manual valve, that is for the 1993 - 1995 units only. GM fixed the low/reverse clutch release problem in 1996 & later units. The Sonnax servo release valve is not necessary with this Shift kit, as you are addressing the band release another way here. With the 2nd accumulator housing that ends in PN ****428, in stall the accumulator springs as shown. With the PN ****937 housing install the blue spring first, then the spring seat, otherwise you will destroy the spring seat. The separator plate should be in excellent shape or use a new one and use the .250" Torlon checkballs from any Ford AOD or AODE transmission. Always use the white 2nd accumulator spring in the valve body. If you want even a smoother 1-2 part throttle shift, you can leave out the 2nd accumulator spring in the valve body. There is even more, but you would have to call me for that. This should be fine in the vast majority of cases.
The following 2 users liked this post by PBA:
b1qwkbird (12-16-2020), Yasin usta (04-13-2024)
03-13-2012, 08:30 AM
#14
Moderator
I (and surely others) would also appreciate your experience and suggestions with the different 1-2 and 3-4 accumulator spring configurations.
03-13-2012, 10:31 AM
#15
You cannot have the same shift quality for the 1-2 shift and the 2-3 shift. The 1-2 shift is a band coming on, and the 2-3 shift is a band coming off and clutches coming on. The shift feel will be different. With a stock diameter torque converter, drill the 1-2 feed to .082", and do not install any spacers ever. With a 10.5" or 9.5" torque converter, drill the 1-2 feed hole to .093" - .096". Alway use the Corvette servo if you do not already have one. You want to get the band clearance down to a minimum, so that the 3rd apply oil brings on the clutches instead of releasing the band because of too much band clearance. You will almost always need one gold shim on the servo. The 2-3 shift hole should never be less than .093", and I like .110" here. Never do the installation of the restrictors going in the reverse input clutch piston. As for the grinding on the manual valve, that is for the 1993 - 1995 units only. GM fixed the low/reverse clutch release problem in 1996 & later units. The Sonnax servo release valve is not necessary with this Shift kit, as you are addressing the band release another way here. With the 2nd accumulator housing that ends in PN ****428, in stall the accumulator springs as shown. With the PN ****937 housing install the blue spring first, then the spring seat, otherwise you will destroy the spring seat. The separator plate should be in excellent shape or use a new one and use the .250" Torlon checkballs from any Ford AOD or AODE transmission. Always use the white 2nd accumulator spring in the valve body. If you want even a smoother 1-2 part throttle shift, you can leave out the 2nd accumulator spring in the valve body. There is even more, but you would have to call me for that. This should be fine in the vast majority of cases.
can I buy a seperator plate from GM?
Do you have a part number from Ford? Our dealerships around here are retarded, it's absolutly impossible to get anything from those dummies without part numbers or a VIN from a vehicle.
/ what does using the ford torlon check ***** do? and would I be replacing the one gold ball that comes in the HD-2 kit with the ford check ***** as well?
what is the sonnax release valve?
The part number for the housing 937 and 428, where would I be finding these part numbers?
Thanks.
03-13-2012, 12:56 PM
#16
Moderator
The torlon check ***** are available from Sonnax.
http://www.trutechtrans.com/Sonnax-T...-10000-08.html
Google "Sonnax 10000-08" to find other vendors.
You can get a stock or a Transgo separator plate:
http://www.transmissionpartsusa.com/...-00035098b.htm
I'm sure someone carries both, perhaps one of the sponsors.
Your other questions a more experience person will have to answer. However, I suspect these early 4L60E V6 trans are weak and the reason these trans have a poor reputation. Many parts need to be updated to handle any kind of V* power. (Just my opinion.)
03-14-2012, 06:12 PM
#18
Couple more questions here...back to the reverse manual valve thing...is it only going to release reverse quicker? Or is it something more significant? Mine has no chamfer and I cannot get access to a machine shop anytime soon it looks like.
2nd, what is best to use to clean the seperator plate and gasket? My plate is in great shape, but I think there was some contaminated oil in here (makes me second guess the quality of this trans)
3rd, it looks like I have 2 epc screens? What should I clean these with? They're filthy?
2nd, what is best to use to clean the seperator plate and gasket? My plate is in great shape, but I think there was some contaminated oil in here (makes me second guess the quality of this trans)
3rd, it looks like I have 2 epc screens? What should I clean these with? They're filthy?
03-14-2012, 07:33 PM
#19
Moderator
Couple more questions here...back to the reverse manual valve thing...is it only going to release reverse quicker? Or is it something more significant? Mine has no chamfer and I cannot get access to a machine shop anytime soon it looks like.
2nd, what is best to use to clean the seperator plate and gasket? My plate is in great shape, but I think there was some contaminated oil in here (makes me second guess the quality of this trans)
3rd, it looks like I have 2 epc screens? What should I clean these with? They're filthy?
2nd, what is best to use to clean the seperator plate and gasket? My plate is in great shape, but I think there was some contaminated oil in here (makes me second guess the quality of this trans)
3rd, it looks like I have 2 epc screens? What should I clean these with? They're filthy?
Brake cleaner should clean anything off the separator plate. You really should replace the gaskets; you don't want high-pressure hydraulic fluid seeping between passages.
The screens that snap into the separator plate need to be replaced too. If those screens are filthy then replace the solenoids too because they have a tiny internal screen which can get clogged.
All these parts should be readily available from any half-way cooperative trans shop for less than $50. (Some rebuilders just rip the screen out of the solenoids, but I don't have the experience to evaluate that.)
03-14-2012, 11:24 PM
#20
The manual valve modification is for the 1993 - 1995 only as stated earlier. You can use a grinder, but do it carefully. The grinding of the valve is to get the low/reverse clutches off faster when going to any forward shifter position, as they are on when in Park. The best way when you move the lever to Drive, is to count to "one", then go, that way the L/R clutches are off before you move forward. The valve body gasket should come off easily, if not put in very hot soapy water, and in a few minutes it should peel off, then rinse with water. If the filters are in good shape, rinse with solvent or mineral spirits. The bigger filter should not be collasped on itself. I carry & use the TransGo separator plates and modify them accordingly to match the Shift kit or rebuild kit that I am working on. Use high pressure air to clean the solenoids, it works everytime with just band or clutch material in the oil. If there is a lot of metal in the oil, it will be harder to save them, and you might consider new ones unless you can test them. The paper & rubber kits come with new o-rings for the solenoids and the pressure manifold switch. Any transmission shop should have the .250" Torlon checkballs from a Ford AOD or AODE. Most 4L60E applications call for 8 checkballs. Good builders don't rip out or leave out filters. You can modify a filter to flow more, but not leave it out. Always oil the valves before installing the valve body and use a "inch pound" torque wrench to tighten the valve body bolts. 90 - 95 in. lbs.