CTS-V Clutch Install Write Up Monster Twin Disc
 04-15-2014, 09:11 PM
#1

I got my Monster Twin Disc Clutch from SNL performance (Street version , level 1) and man does it kick ***. I want to do a new write up for you guys since my old writeup was quite awhile ago. I'll use some of the old pics since that's when I had my stock turd rear diff before I got smart and went with the 9" Gforce...but I digress. Here's where you can get the twin disc....
http://www.monsterclutches.com/shop/...andtriple.html
Tools You'll Need:
Wrenches/ Sockets:
10mm
13mm
15mm
18mm
T-47 Torx
Misc:
Breaker Bar
Multiple Long (Super Long) Extensions
Torque Wrench
Unless you have two elbows and like being on your back, GET A REMOTE LINE. SNL has them, Tick sells them, whoever you buy one from, makesure you ask them for the small adapter fitting for the slave.
You have to get the jackstands really high so that you can have room to pull the trans out. I had enough room to pull the trans, and barely enough for the trans to clear the frame rails. So, make sure you account for this.
Remove the exhaust. I have B&B, so you need 11/16" and 5/8" wrenches for those bolts.
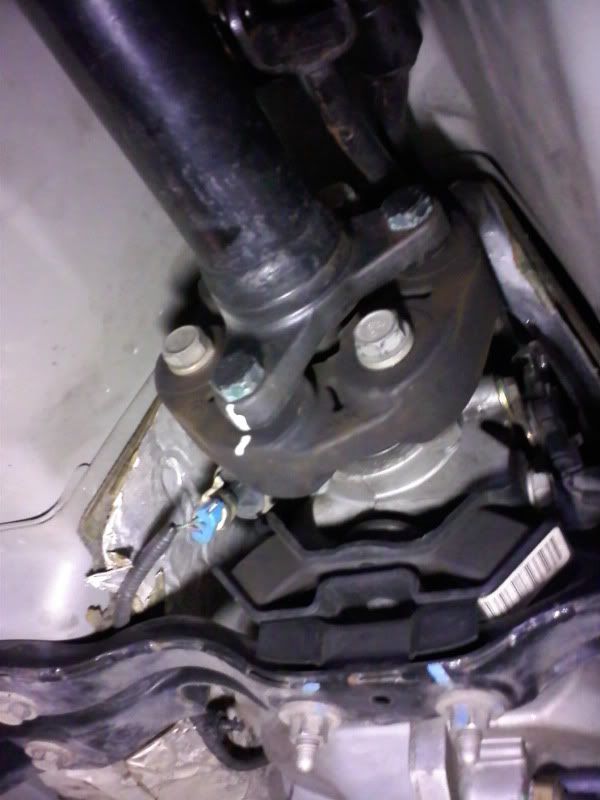
Remove the driveshaft. The bolts holding the driveshaft/carrier bearing are 15mm. The heat shield bolts are 10mm.
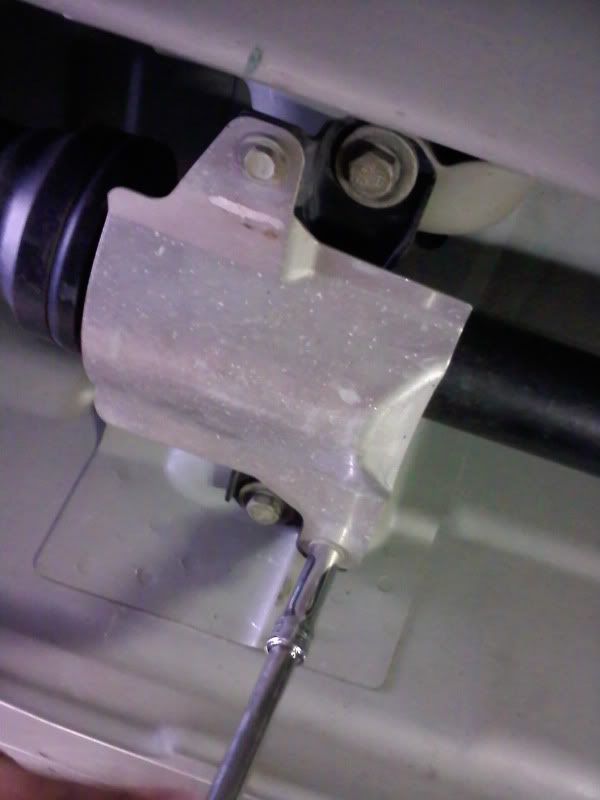
The bolts on the diff side are 8mm allen wrench, and the bolts on the trans side are 18mm. Make sure you mark where your driveshaft is before you remove it! (unless you were getting vibes already and you need to reindex it)
Shifter Removal:
Pull up on the back of the boot plate while pushing up towards the front of the car. Be careful because they are just plastic tabs. Don't snap em.
Once that's unhooked, pull up on the shifter ****. It took quite a yank from mine and I about went through the roof, but it'll come off with enough force. Don't twist it!
Once the **** and boot are removed, take out the big sound insulation piece, and you'll need to remove the (6 total) 10mm bolts holding the big plastic plate on.
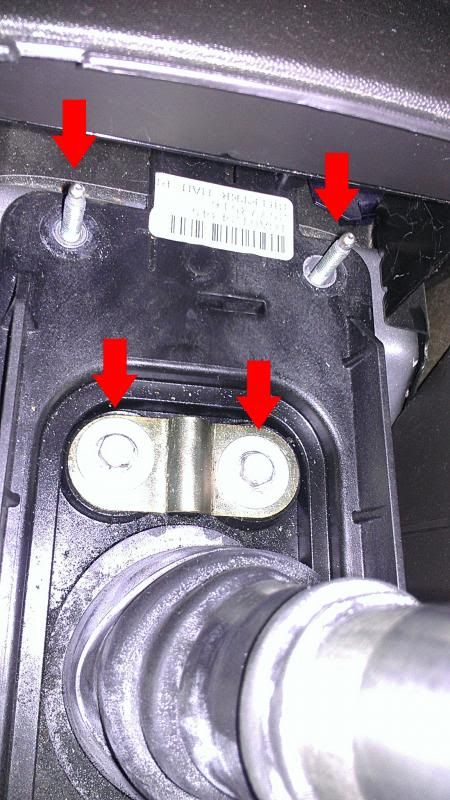
Here's the front 2 bolts, and the middle two bolts that all need removed.
Here's the back two:
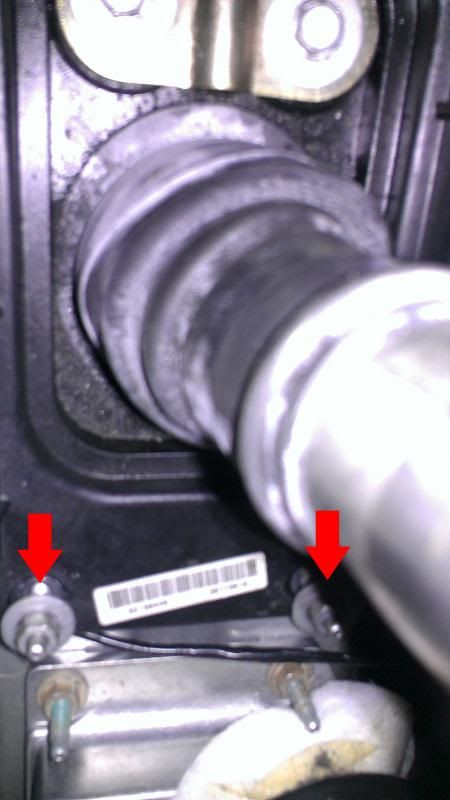
Once you remove that black plate, you'll see the two screws (or rivets that need drilled out if you haven't installed one of Brian's (PISINUOFF) shifters yet.
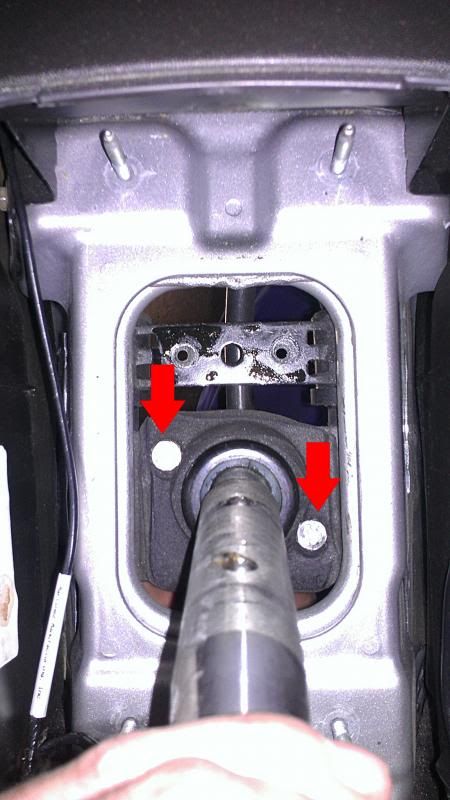
I don't have pics of underneath, but the nuts on the underside of the bolts need removed, and the long horizontal bolt holding the shifter to the linkage needs removed.
Once all that is removed, take out the shifter.
Unplugging Sensors:
Unplug all the sensors (mark em with tape if you don't remember)
Sensors:
Transmission Fluid Sensor
Backup Lamp Switch
Vehicle Speed Sensor
Reverse Lockout Sensor
Gear select/Skip Shift Solenoid (or CAGS)
Oxygen Sensors (all 4)
Removing the transmission:
Put a jack under the transmission so you can support the weight off of the cross member (aka transmission support) This is where you can either leave the fluid in the trans, or drain it (less weight)....I chose to leave the fluid in since I just changed it not too long ago.
Remove all the bolts from the transmission support. (15mm, and T-47 Torx bit) and remove it.
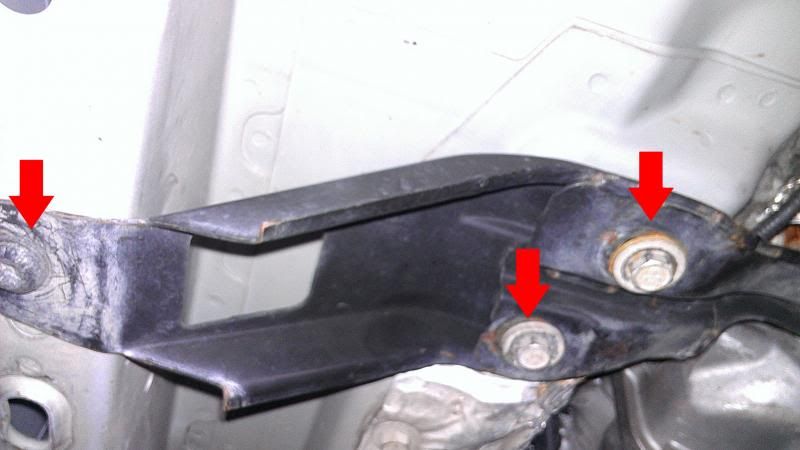
Now the transmission is supported by the jack and is held in by the (8) bolts you need to remove, so you can pull the trans away from the bell housing.
Now it's time for the super long extensions. Lower the jack a little bit so the trans can lower to access the upper bolts. Here's a pic of the bell housing so you can where the bolt holes are:
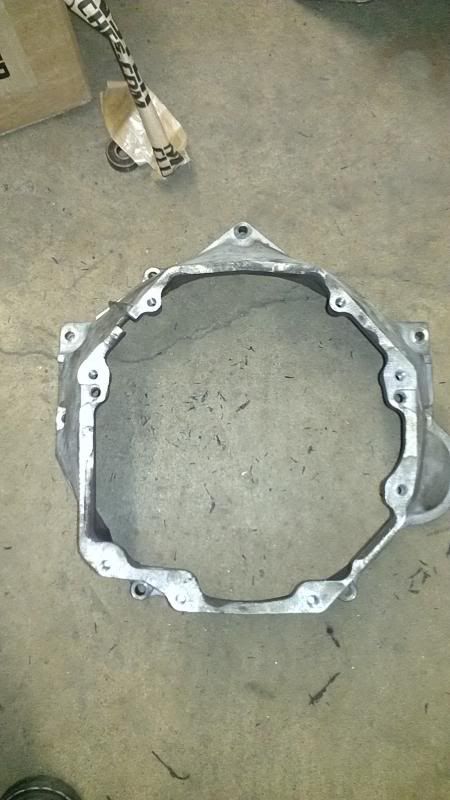
^there a few extra holes for the studs that help hold up the trans^
Removing the slave bolts:
Once you have the bolts removed, you have to manipulate the trans input shaft out of the old clutch disc. This is semi tricky, TAKE YOUR TIME. A pry bar can get you started, but be careful and use common sense.....it's all aluminum down there.
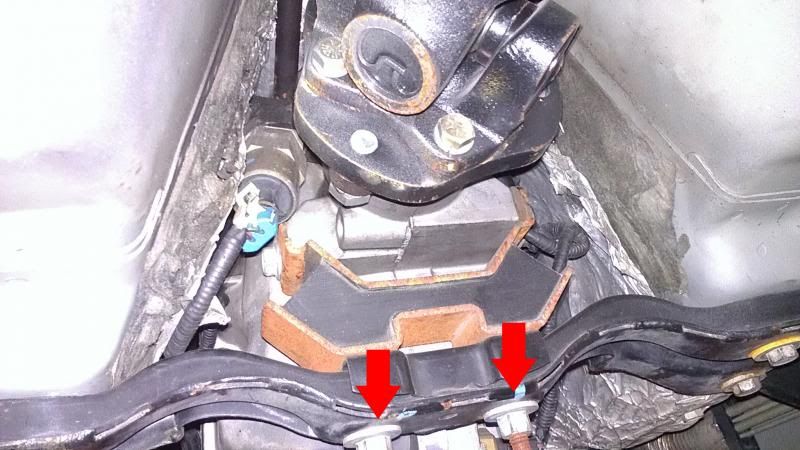
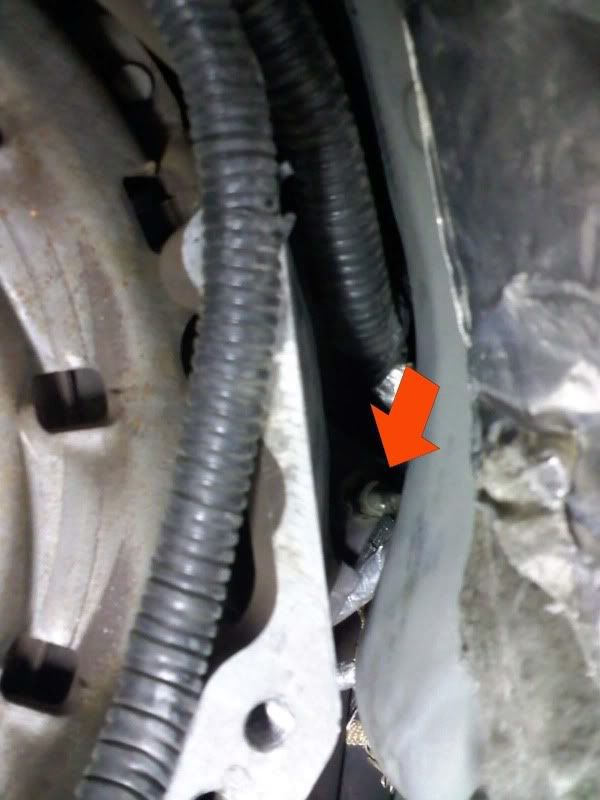
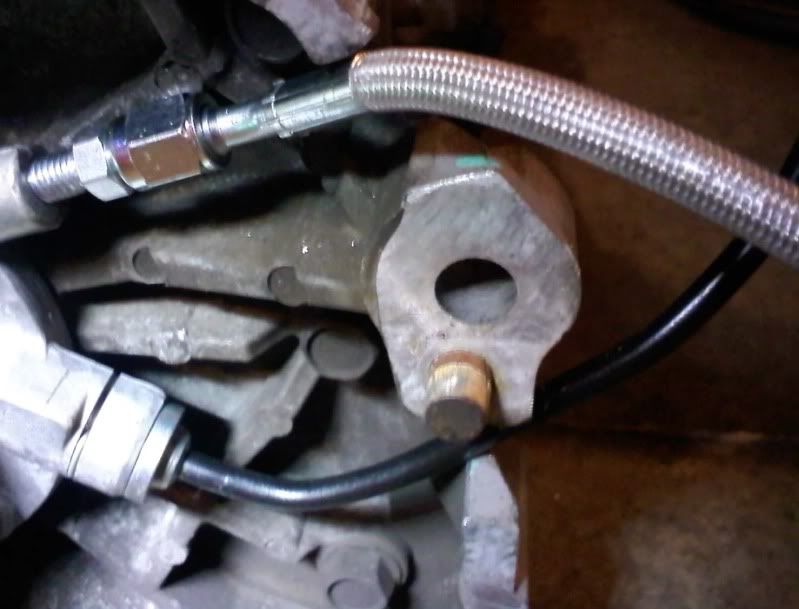
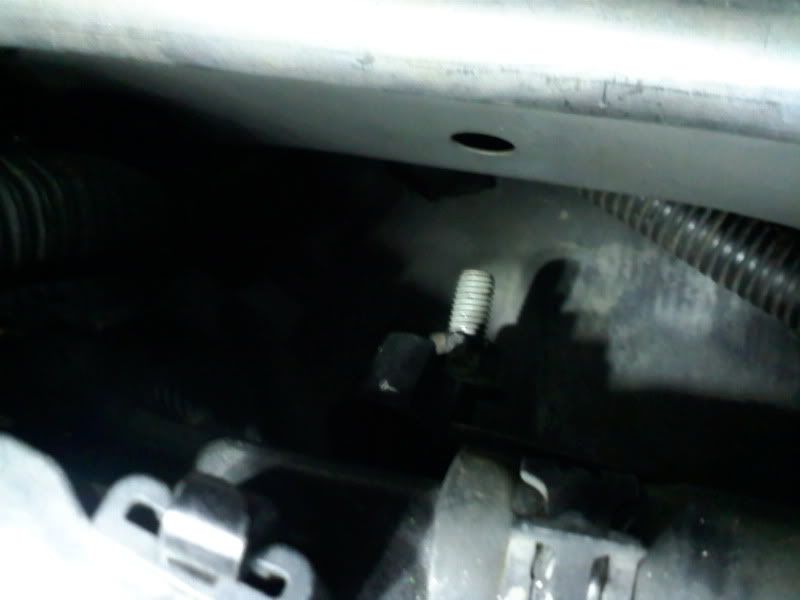
Once you back it off the bell housing a few inches, there are (2) slave bolts that you need to remove before you yank the trans all the way out. Here's a pic of them. IIRC, they are 10mm.
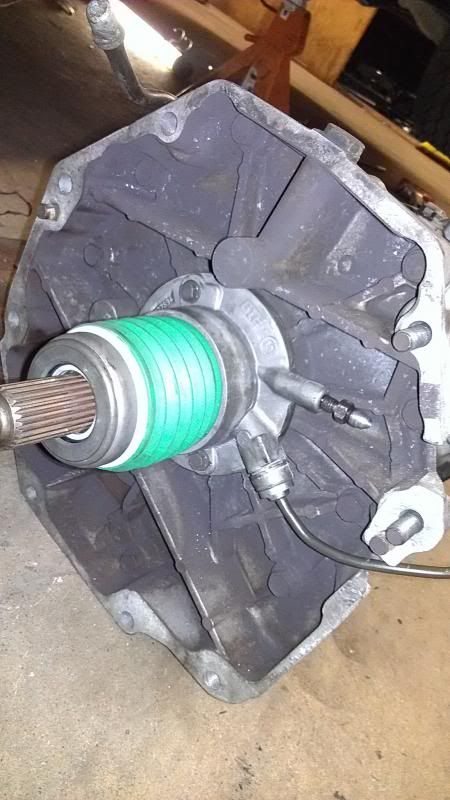
I'll have to look up the TQ spec, but they aren't torqued down very hard at all.
**also in that pic I have already installed the small adapter to the slave in order to attach the remote line**
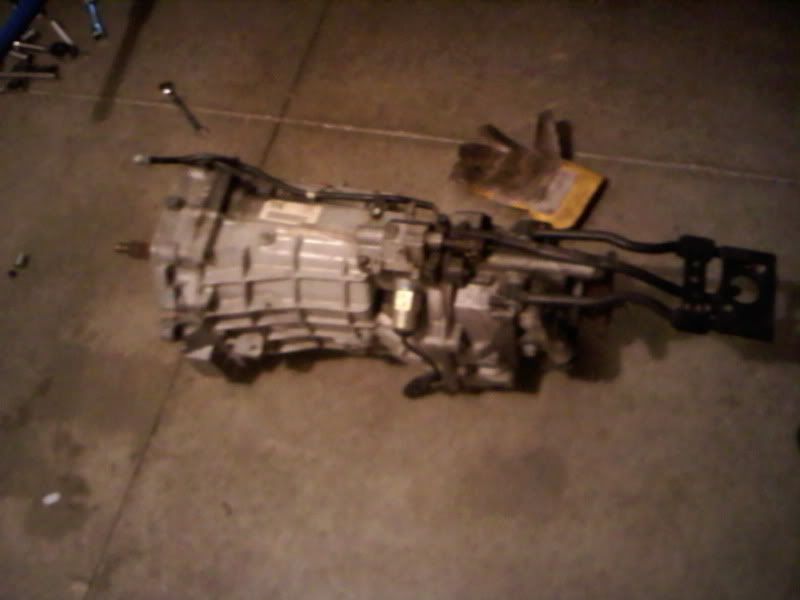
Lifting and lowering the jack and wiggling it back and forth will get Elvis to leave the building. Here she be out of the way:
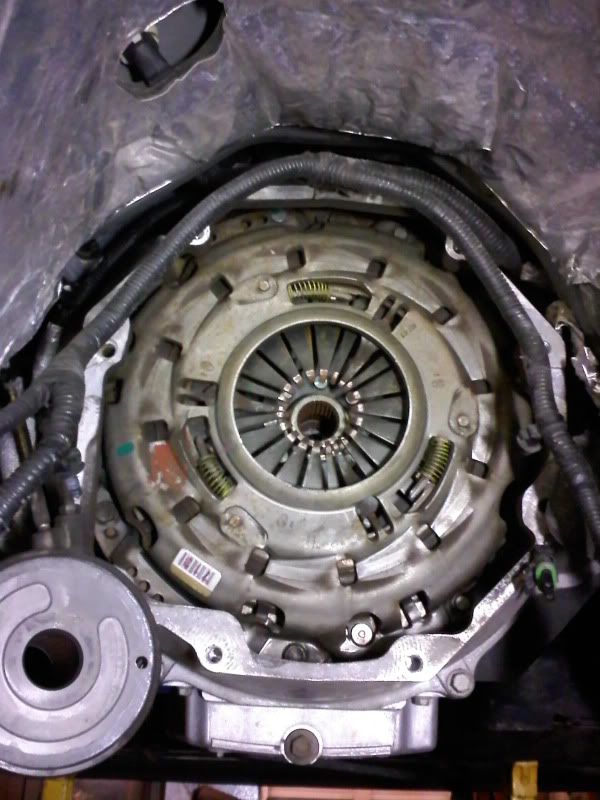
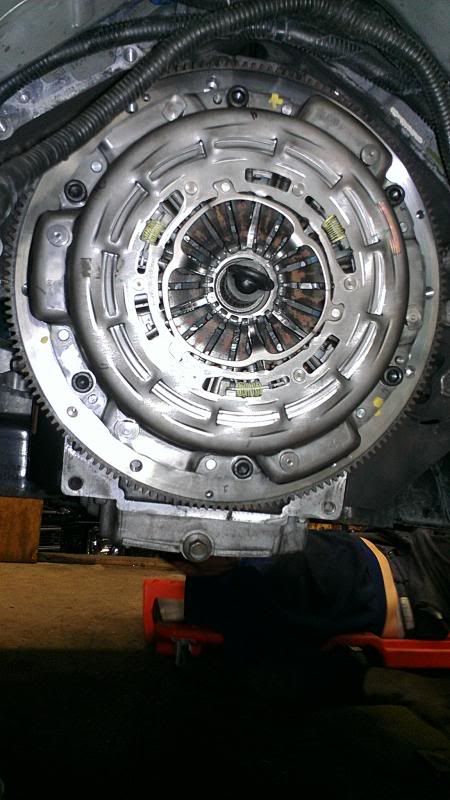
Now you'll be looking at this if you still have the stock clutch:
Removing the slave:
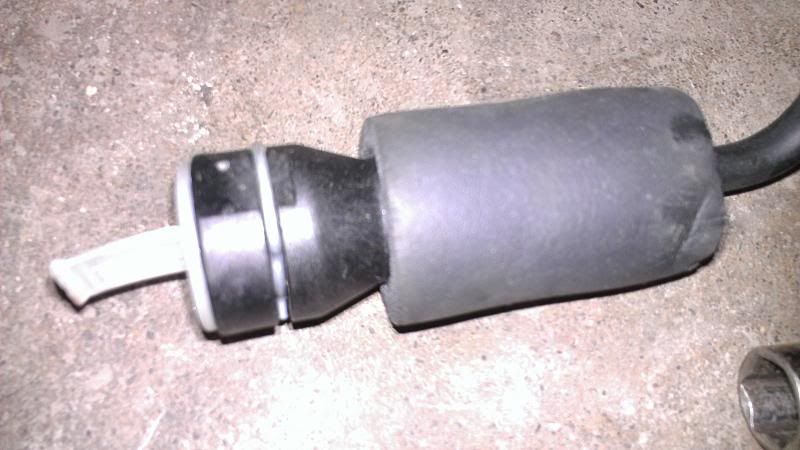
You have to pull the retaining locking pin on the connector to release the connection. Here's a pic of it. A straight edge screwdriver works well here. Get a pan, since the brake fluid will spill out once removed.
Removing the Bell Housing:
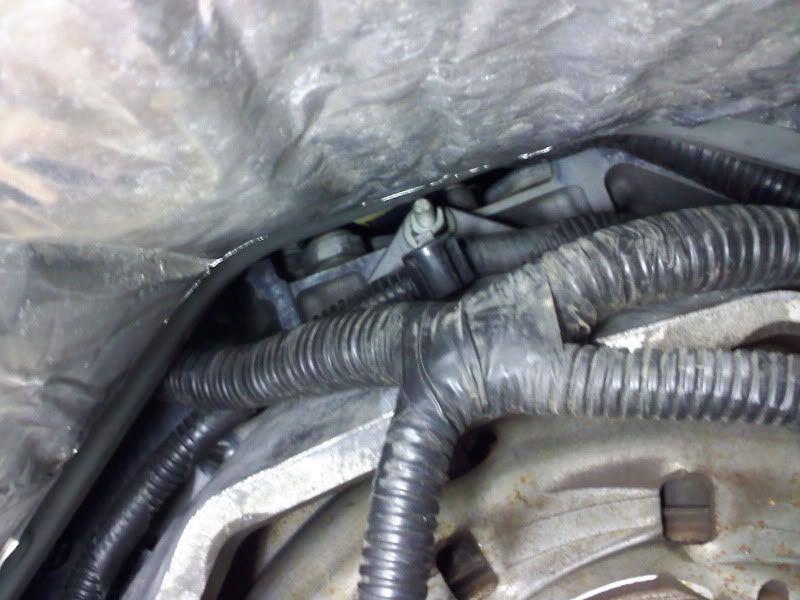
There are (you guessed it, 8 more bolts) holding that on to the block. The lower ones are no prob, but the upper studs bolts are hard to get to. They are hidden by the black plastic connectors that hold the myriad of wire looms, so keep looking.....you'll find em.
Here's one on upper left.....
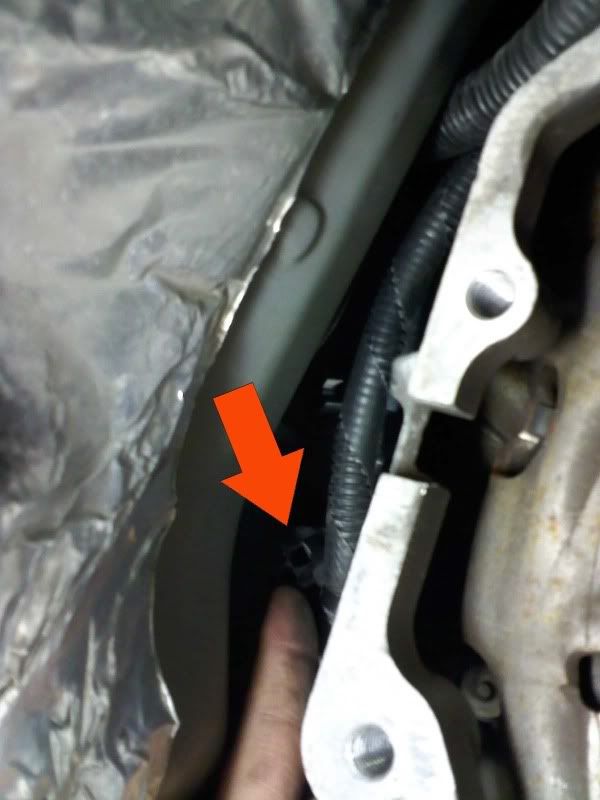
The one on the right:
On top.... (I actually got to this one from the top...through the engine bay. Used a Gear Wrench and it worked out great
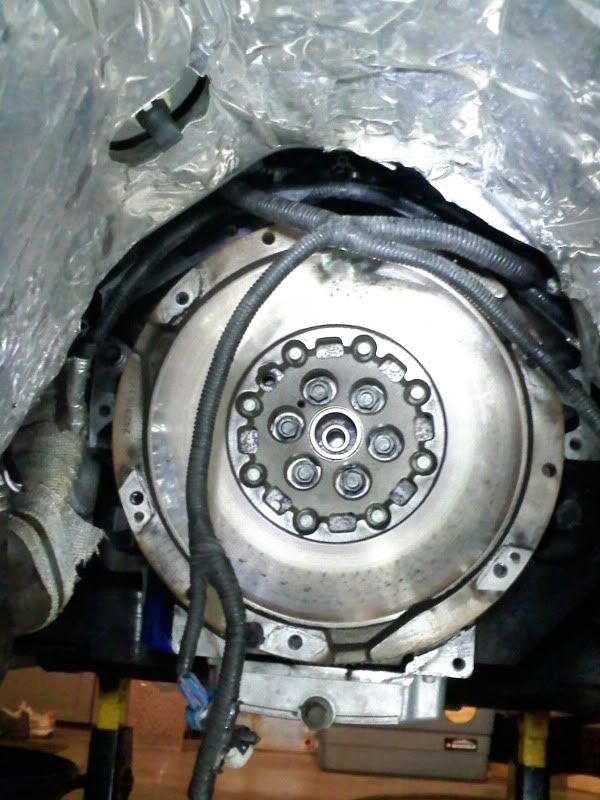
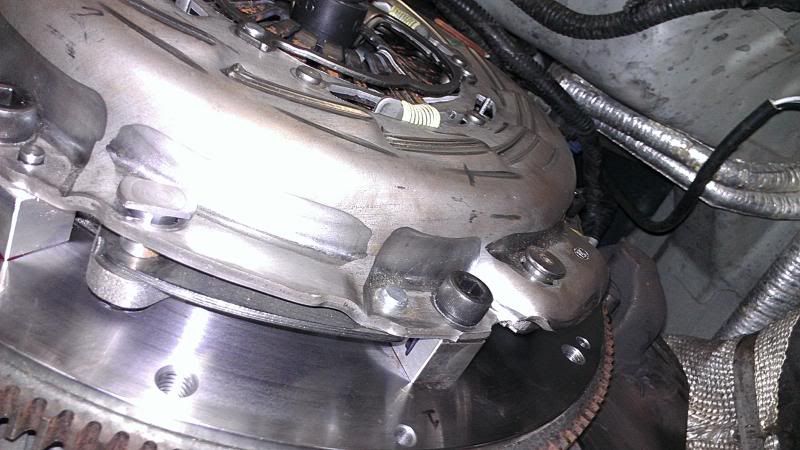
Once all the bolts are out, it's a major pain in the *** to get the bell housing out, because our dual mass flywheels are so thick. Just try to keep the wire looms out of the way and pull and turn it to get it out of there. Once out...here's what you are looking at.
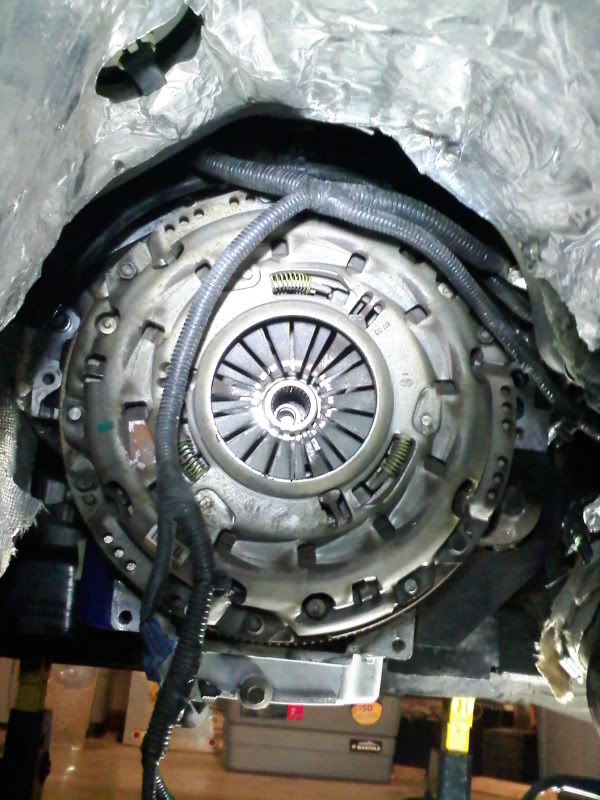
^Remove the six bolts. Be careful.....pressure plate is heavy.^
Once removed, you get the pleasure of seeing the boat anchor dual mass flywheel. Remove the six bolts and be VERY careful. The stock turd weighs 45 lbs!!
http://www.monsterclutches.com/shop/...andtriple.html
Tools You'll Need:
Wrenches/ Sockets:
10mm
13mm
15mm
18mm
T-47 Torx
Misc:
Breaker Bar
Multiple Long (Super Long) Extensions
Torque Wrench
Unless you have two elbows and like being on your back, GET A REMOTE LINE. SNL has them, Tick sells them, whoever you buy one from, makesure you ask them for the small adapter fitting for the slave.
You have to get the jackstands really high so that you can have room to pull the trans out. I had enough room to pull the trans, and barely enough for the trans to clear the frame rails. So, make sure you account for this.
Remove the exhaust. I have B&B, so you need 11/16" and 5/8" wrenches for those bolts.
Remove the driveshaft. The bolts holding the driveshaft/carrier bearing are 15mm. The heat shield bolts are 10mm.

The bolts on the diff side are 8mm allen wrench, and the bolts on the trans side are 18mm. Make sure you mark where your driveshaft is before you remove it! (unless you were getting vibes already and you need to reindex it)

Shifter Removal:
Pull up on the back of the boot plate while pushing up towards the front of the car. Be careful because they are just plastic tabs. Don't snap em.
Once that's unhooked, pull up on the shifter ****. It took quite a yank from mine and I about went through the roof, but it'll come off with enough force. Don't twist it!
Once the **** and boot are removed, take out the big sound insulation piece, and you'll need to remove the (6 total) 10mm bolts holding the big plastic plate on.
Here's the front 2 bolts, and the middle two bolts that all need removed.

Here's the back two:

Once you remove that black plate, you'll see the two screws (or rivets that need drilled out if you haven't installed one of Brian's (PISINUOFF) shifters yet.

I don't have pics of underneath, but the nuts on the underside of the bolts need removed, and the long horizontal bolt holding the shifter to the linkage needs removed.
Once all that is removed, take out the shifter.
Unplugging Sensors:
Unplug all the sensors (mark em with tape if you don't remember)
Sensors:
Transmission Fluid Sensor
Backup Lamp Switch
Vehicle Speed Sensor
Reverse Lockout Sensor
Gear select/Skip Shift Solenoid (or CAGS)
Oxygen Sensors (all 4)
Removing the transmission:
Put a jack under the transmission so you can support the weight off of the cross member (aka transmission support) This is where you can either leave the fluid in the trans, or drain it (less weight)....I chose to leave the fluid in since I just changed it not too long ago.
Remove all the bolts from the transmission support. (15mm, and T-47 Torx bit) and remove it.
Now the transmission is supported by the jack and is held in by the (8) bolts you need to remove, so you can pull the trans away from the bell housing.
Now it's time for the super long extensions. Lower the jack a little bit so the trans can lower to access the upper bolts. Here's a pic of the bell housing so you can where the bolt holes are:

^there a few extra holes for the studs that help hold up the trans^
Removing the slave bolts:
Once you have the bolts removed, you have to manipulate the trans input shaft out of the old clutch disc. This is semi tricky, TAKE YOUR TIME. A pry bar can get you started, but be careful and use common sense.....it's all aluminum down there.
Once you back it off the bell housing a few inches, there are (2) slave bolts that you need to remove before you yank the trans all the way out. Here's a pic of them. IIRC, they are 10mm.

I'll have to look up the TQ spec, but they aren't torqued down very hard at all.
**also in that pic I have already installed the small adapter to the slave in order to attach the remote line**
Lifting and lowering the jack and wiggling it back and forth will get Elvis to leave the building. Here she be out of the way:
Now you'll be looking at this if you still have the stock clutch:

Removing the slave:
You have to pull the retaining locking pin on the connector to release the connection. Here's a pic of it. A straight edge screwdriver works well here. Get a pan, since the brake fluid will spill out once removed.

Removing the Bell Housing:
There are (you guessed it, 8 more bolts) holding that on to the block. The lower ones are no prob, but the upper studs bolts are hard to get to. They are hidden by the black plastic connectors that hold the myriad of wire looms, so keep looking.....you'll find em.
Here's one on upper left.....

The one on the right:

On top.... (I actually got to this one from the top...through the engine bay. Used a Gear Wrench and it worked out great

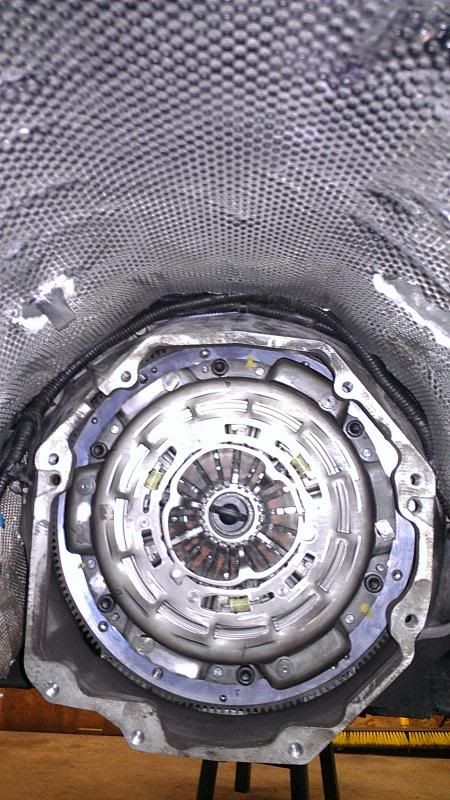
Once all the bolts are out, it's a major pain in the *** to get the bell housing out, because our dual mass flywheels are so thick. Just try to keep the wire looms out of the way and pull and turn it to get it out of there. Once out...here's what you are looking at.

^Remove the six bolts. Be careful.....pressure plate is heavy.^
Once removed, you get the pleasure of seeing the boat anchor dual mass flywheel. Remove the six bolts and be VERY careful. The stock turd weighs 45 lbs!!

 04-15-2014, 09:39 PM
#2
^Remove the six bolts. Be careful.....pressure plate is heavy.^
Once removed, you get the pleasure of seeing the boat anchor dual mass flywheel. Remove the six bolts and be VERY careful. The stock turd weighs 45 lbs!!
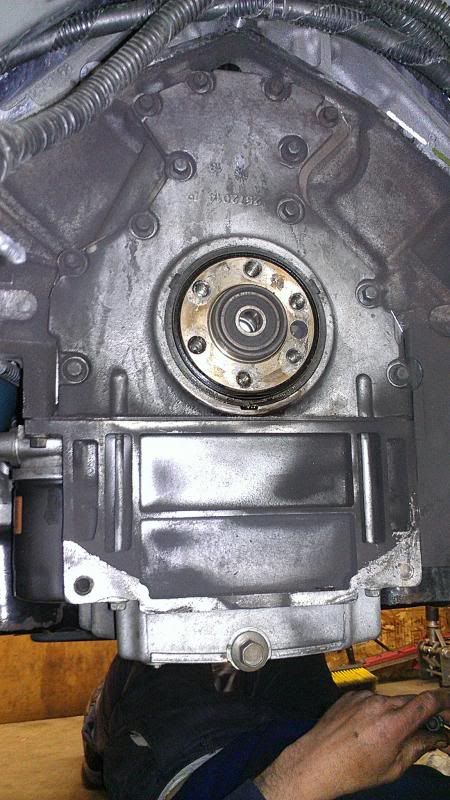
Once your old flywheel has flew the coop, you'll be looking at the back of the block.
**optional**
Rear Main Seal replacement:
I had a special surprise waiting for me, which you should look for once you are at this point. My rear main seal was barely seeping, but I did see a tiny bit of oil....so rather be safe than sorry, I replaced it.
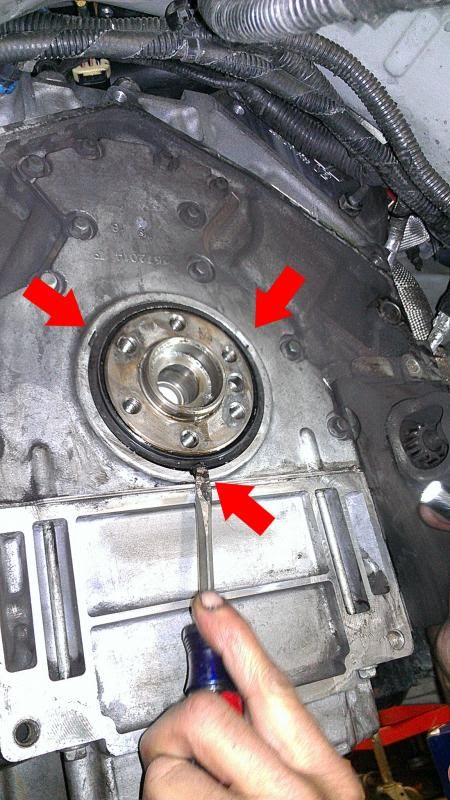
It was actually very easy to do. Pry it out with a small flat head screwdriver on the 3 points that are notched out.
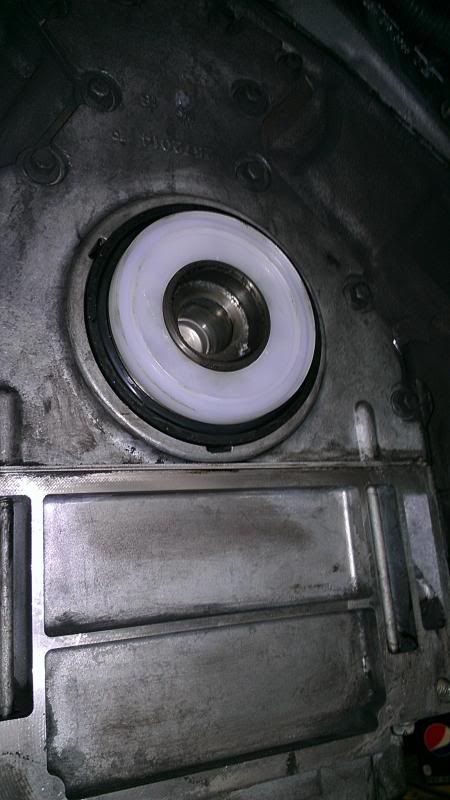
The new comes with a plastic ring inside it, and you set it over the bolts holes and place a block of wood over it to distribute the weight evenly, and just tap it in.
Now that that fun is over, let's move on......
Replacing the Pivot Bearing:
Get or rent a slide hammer....you can probably get a cheap one at Harbor Freight or rent one at Auto Zone.
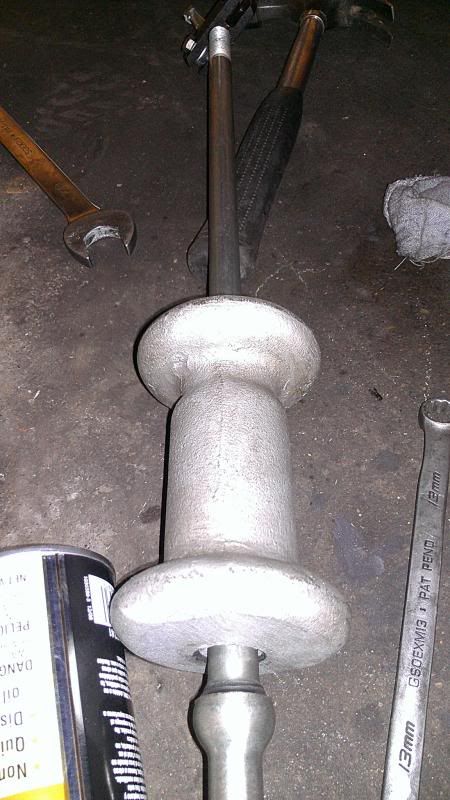
Give a few smacks and it'll come out. The new one goes in with a piec of wood or plastic block in order to distribute the weight evenly.
Install the remote bleeder into the slave.
**You may or may not have to notch your bell housing in order to get the salve connections to fit. If it doesn't sit flush behind the face of the trans, then take a little notch out until it does.**
*****Now this twin disc kit comes assembled and needs to be reassembled exactly like you take it apart. There are 3 aluminum stands that can spin when installing them. The direction of them doesn't matter. There are three pinned aluminum stands that must go on as they come out of the package.
What I did before I removed was make little numbers on the small aluminum blocks and on the pressure plate so I knew where everything went. I even put a number 1 on the FW to ensure everything went back together as it did when I got it.********
Here's a picture of what I mean:
Installing the flywheel:
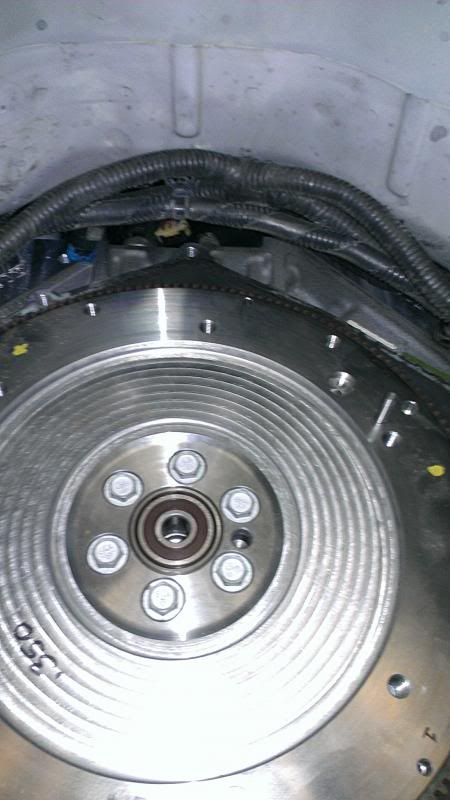
Using the stock GM bolts (DO NOT USE ARP BOLTS WITH THE TWIN DISC as they will cause damage and failure) they will be torqued in 3 different phases of 15-37-74 ft lbs. The torque sequence is 1-4-6-2-5-3. You'll need to use a pry bar in the flywheel teeth to stop the FW from moving on you while torquing. Once all the bolts are torqued, clean everything off really well with brake cleaner!
Installing the pressure plate:
Brake clean off any residue on the p.plate surface, and once you line up all the blocks, slide the pressure plate on and install the allen head pressure plate bolts (USING RED LOCTITE ON THE PRESSURE PLATE BOLTS) and get it up there a little less than hand tight. Install the alignment tool and make sure it comes and goes freely. This will make it easier on you when trying to install the input shaft on the trans into the pivot bearing later. Then torque the bolts in three phases. The torque specs are 20-40-57 ft lbs. The torque sequence is 1-4-6-2-5-3.
All done, you'll be looking at:
Reinstalling the bell housing:
Put all the bolts back in and don't forget the one bolt up top. Gear wrench should be up there waiting on you.
Here's a good reference pic of all the trans bolt holes after the bell housing is installed:
Reinstall the slave onto the transmission:
Slide the slave onto the input shaft and tighten those two bolts in the pic above. I'll try and find the TQ spec, but they aren't very much.
Reinstalling the transmission:
Now here's the hardest part of the whole install.......getting the trans input shaft to line up with the clutch disc, and the pivot bearing. Just have patience. You'll have to work the jack up and down (a little) and back and forth, and wiggle it back forth to get it to go in. If you did a good job keeping the clutch disc aligned while tightening the pressure plate down, it'll be easier on you. Make sure you aren't crushing any connections when reinstalling the trans. Watch the vent, remote line, slave line, and all the wire looms. Use common sense, and take your time.
Once you get it in, put the shifter back in, driveshaft, exhaust back in. Connect all the electrical connections, and O2's. Bleed the clutch.....if you were smart you are doing it with your remote line. It took literally 6 minutes to totally bleed my system after the install.
Driving impressions:
The new FW is a little heavier than the 18 lb one I took out (which I'll admit is too light for a DD....decels too fast) but the overall weight over everything was lighter than the old setup. I LOOOOVVVVEE IT. There's no noises, squeeks, chatter, nothing. Just smooth sailing. I have 150 miles on it so far, and am dying for the 500 miles break in period, but it really feels like a new car. It's hard to imagine a clutch rated at 700HP can feel this good. The pedal is really light pressure, so my left calf appreciates that lol. It does engage higher than before, but I'm getting used to it, and actually prefer it now than having to go all the way to the floor to engage. Call SNL/Monster and order that **** because I'm in love with my car again.
Once removed, you get the pleasure of seeing the boat anchor dual mass flywheel. Remove the six bolts and be VERY careful. The stock turd weighs 45 lbs!!
Once your old flywheel has flew the coop, you'll be looking at the back of the block.

**optional**
Rear Main Seal replacement:
I had a special surprise waiting for me, which you should look for once you are at this point. My rear main seal was barely seeping, but I did see a tiny bit of oil....so rather be safe than sorry, I replaced it.
It was actually very easy to do. Pry it out with a small flat head screwdriver on the 3 points that are notched out.

The new comes with a plastic ring inside it, and you set it over the bolts holes and place a block of wood over it to distribute the weight evenly, and just tap it in.

Now that that fun is over, let's move on......
Replacing the Pivot Bearing:
Get or rent a slide hammer....you can probably get a cheap one at Harbor Freight or rent one at Auto Zone.

Give a few smacks and it'll come out. The new one goes in with a piec of wood or plastic block in order to distribute the weight evenly.
Install the remote bleeder into the slave.

**You may or may not have to notch your bell housing in order to get the salve connections to fit. If it doesn't sit flush behind the face of the trans, then take a little notch out until it does.**
*****Now this twin disc kit comes assembled and needs to be reassembled exactly like you take it apart. There are 3 aluminum stands that can spin when installing them. The direction of them doesn't matter. There are three pinned aluminum stands that must go on as they come out of the package.
What I did before I removed was make little numbers on the small aluminum blocks and on the pressure plate so I knew where everything went. I even put a number 1 on the FW to ensure everything went back together as it did when I got it.********
Here's a picture of what I mean:

Installing the flywheel:

Using the stock GM bolts (DO NOT USE ARP BOLTS WITH THE TWIN DISC as they will cause damage and failure) they will be torqued in 3 different phases of 15-37-74 ft lbs. The torque sequence is 1-4-6-2-5-3. You'll need to use a pry bar in the flywheel teeth to stop the FW from moving on you while torquing. Once all the bolts are torqued, clean everything off really well with brake cleaner!
Installing the pressure plate:
Brake clean off any residue on the p.plate surface, and once you line up all the blocks, slide the pressure plate on and install the allen head pressure plate bolts (USING RED LOCTITE ON THE PRESSURE PLATE BOLTS) and get it up there a little less than hand tight. Install the alignment tool and make sure it comes and goes freely. This will make it easier on you when trying to install the input shaft on the trans into the pivot bearing later. Then torque the bolts in three phases. The torque specs are 20-40-57 ft lbs. The torque sequence is 1-4-6-2-5-3.
All done, you'll be looking at:

Reinstalling the bell housing:
Put all the bolts back in and don't forget the one bolt up top. Gear wrench should be up there waiting on you.

Here's a good reference pic of all the trans bolt holes after the bell housing is installed:

Reinstall the slave onto the transmission:
Slide the slave onto the input shaft and tighten those two bolts in the pic above. I'll try and find the TQ spec, but they aren't very much.
Reinstalling the transmission:
Now here's the hardest part of the whole install.......getting the trans input shaft to line up with the clutch disc, and the pivot bearing. Just have patience. You'll have to work the jack up and down (a little) and back and forth, and wiggle it back forth to get it to go in. If you did a good job keeping the clutch disc aligned while tightening the pressure plate down, it'll be easier on you. Make sure you aren't crushing any connections when reinstalling the trans. Watch the vent, remote line, slave line, and all the wire looms. Use common sense, and take your time.
Once you get it in, put the shifter back in, driveshaft, exhaust back in. Connect all the electrical connections, and O2's. Bleed the clutch.....if you were smart you are doing it with your remote line. It took literally 6 minutes to totally bleed my system after the install.
Driving impressions:
The new FW is a little heavier than the 18 lb one I took out (which I'll admit is too light for a DD....decels too fast) but the overall weight over everything was lighter than the old setup. I LOOOOVVVVEE IT. There's no noises, squeeks, chatter, nothing. Just smooth sailing. I have 150 miles on it so far, and am dying for the 500 miles break in period, but it really feels like a new car. It's hard to imagine a clutch rated at 700HP can feel this good. The pedal is really light pressure, so my left calf appreciates that lol. It does engage higher than before, but I'm getting used to it, and actually prefer it now than having to go all the way to the floor to engage. Call SNL/Monster and order that **** because I'm in love with my car again.
Last edited by lollygagger8; 04-15-2014 at 09:48 PM.


Trending Topics


The following users liked this post:
Satterly2164 (04-01-2022)


 04-16-2014, 01:46 PM
#12

Great write up. Was looking at this a while back in preparation for my clutch swap. After reading this I am going to go ahead and plan on doing the rear main seal while I am there. The only thing with the write up is that it makes it look so dang easy!
04-16-2014, 02:59 PM
#13
TECH Resident
iTrader: (1)

Join Date: Sep 2010
Location: Winnipeg, mb
Posts: 789
Likes: 0
Received 0 Likes
on
0 Posts
just bought a monster twin disc the lt1-sc believe its a level 2 equivalent.
Originally wanted the Katech ls9r but they no longer make it, then went to order the twin disc monster stage 2 from tick, they talked monster and recommended the LT version for the V, said it would be a better clutch for the weight of the car.
Also didn't go with the aluminum flywheel, I had one for my Fidanza and liked it, but monster only recommends it for autocross, not street and dragstrip.
04-17-2014, 07:35 AM
#16
Nothing wrong with GM bolts, I still use them on my headers.
I gotta say props to Monster on this setup. It shifts like gravy, and doesn't make a peep. My only gripe is I still have 300 miles to go on the break in period. lol
04-17-2014, 10:28 AM
#19
just bought a monster twin disc the lt1-sc believe its a level 2 equivalent.
Originally wanted the Katech ls9r but they no longer make it, then went to order the twin disc monster stage 2 from tick, they talked monster and recommended the LT version for the V, said it would be a better clutch for the weight of the car.
Also didn't go with the aluminum flywheel, I had one for my Fidanza and liked it, but monster only recommends it for autocross, not street and dragstrip.
Originally wanted the Katech ls9r but they no longer make it, then went to order the twin disc monster stage 2 from tick, they talked monster and recommended the LT version for the V, said it would be a better clutch for the weight of the car.
Also didn't go with the aluminum flywheel, I had one for my Fidanza and liked it, but monster only recommends it for autocross, not street and dragstrip.
That's a better question for Steve @ SNL, but they might create clearance issues. I had ARP's in on the old setup, and switched out the GM bolts.
Nothing wrong with GM bolts, I still use them on my headers.
I gotta say props to Monster on this setup. It shifts like gravy, and doesn't make a peep. My only gripe is I still have 300 miles to go on the break in period. lol
Nothing wrong with GM bolts, I still use them on my headers.
I gotta say props to Monster on this setup. It shifts like gravy, and doesn't make a peep. My only gripe is I still have 300 miles to go on the break in period. lol