
Sparco seat install (PICS)

 04-12-2012, 09:29 PM
#3
TECH Regular
Thread Starter
iTrader: (4)
Join Date: Jun 2007
Posts: 467
Likes: 0
Received 0 Likes
on
0 Posts
None taken Cole. The Sparcos don't come in any colors that match the tan. The carpet and console are tan. The dash and door panels are black, so the car was really a two color interior to begin with.
04-12-2012, 09:47 PM
#6
TECH Fanatic
iTrader: (8)
Join Date: Jun 2010
Location: Helendale
Posts: 1,921
Likes: 0
Received 0 Likes
on
0 Posts
Quoted from CadillacForum...hope you dont mine Mike.
Here are a few hi lights of the Sparco Chronos seat mod for the V1. DISCLAIMER. Let me start off by saying that this mod will disable or remove some of the car's airbags. Some of the original safety features of the car will be changed. This modification is not recommended by me for operating a vehicle on the street. Do so at your own risk. This project is about 80% finished. I have yet to install the 4 point roll bar which will be the anchor point for the harness tail straps. More on that later. The fasten seat belt indicator will not message the DIC with the connectors unplugged. The air bag light is still on until I figure a way to by pass. I started with the following:
2 Sparco Chronos Road seatd (medium)
2 Sparco universal mount kits
2 Sparco universal slider kits
2 Schroth Profi II ASM FE 4 point harnesses.

The seat cushion and the seat back removed made it easier to get the seats in and out. Once it's out I located the fuse panel in front of the rear seat on the passenger side. I looked under the lid at the diagram and removed the air bag fuse. I relocated to a spare position. There is a plastic tool in the box you can use.
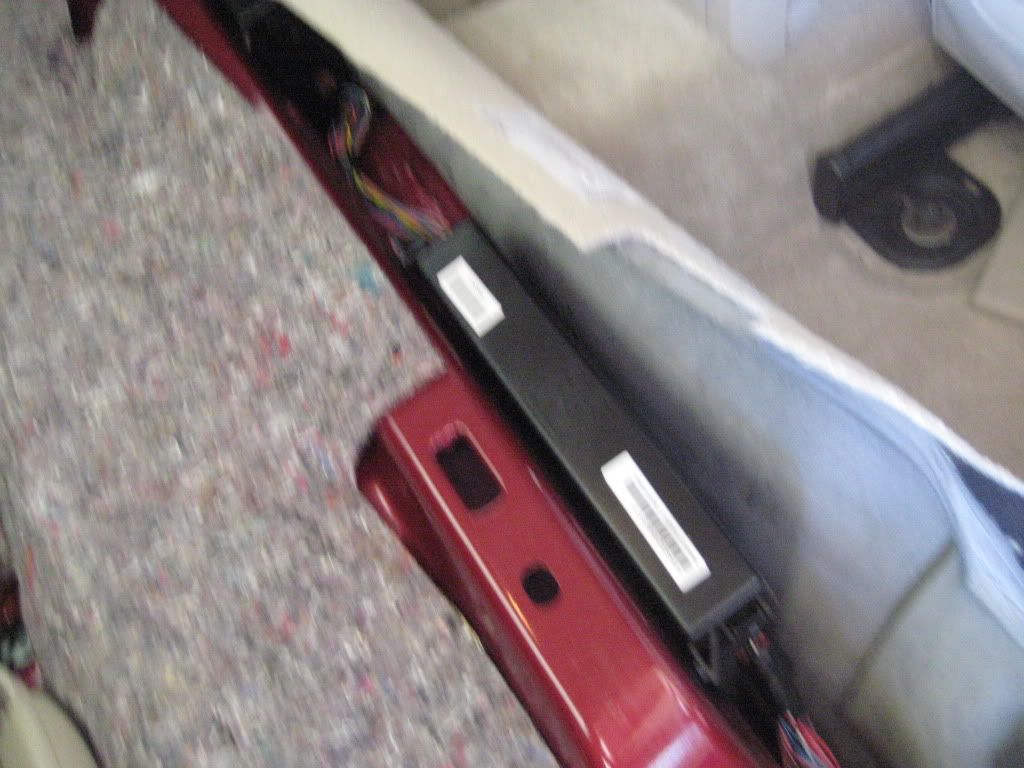

I then removed the torx bolts from the two locations in the rear of the seat. This will become my lap belt anchor points so I saved the bolts.
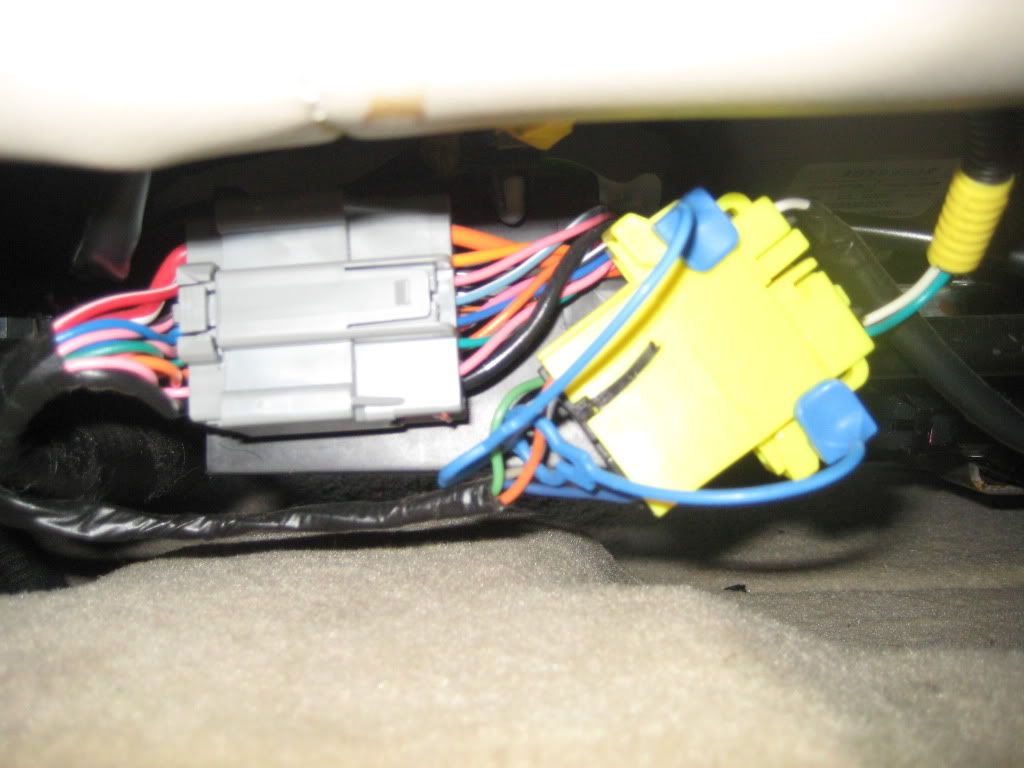
I then unplugged the grey and yellow connector under the front of the seat.
Removing the seat was easy. I tilted the seat forward by pushing the top of the seat back up and forward. I then pulled the seat backwards out of the two hooked slots in the front of the seat. The seat is heavy about 83 lbs.
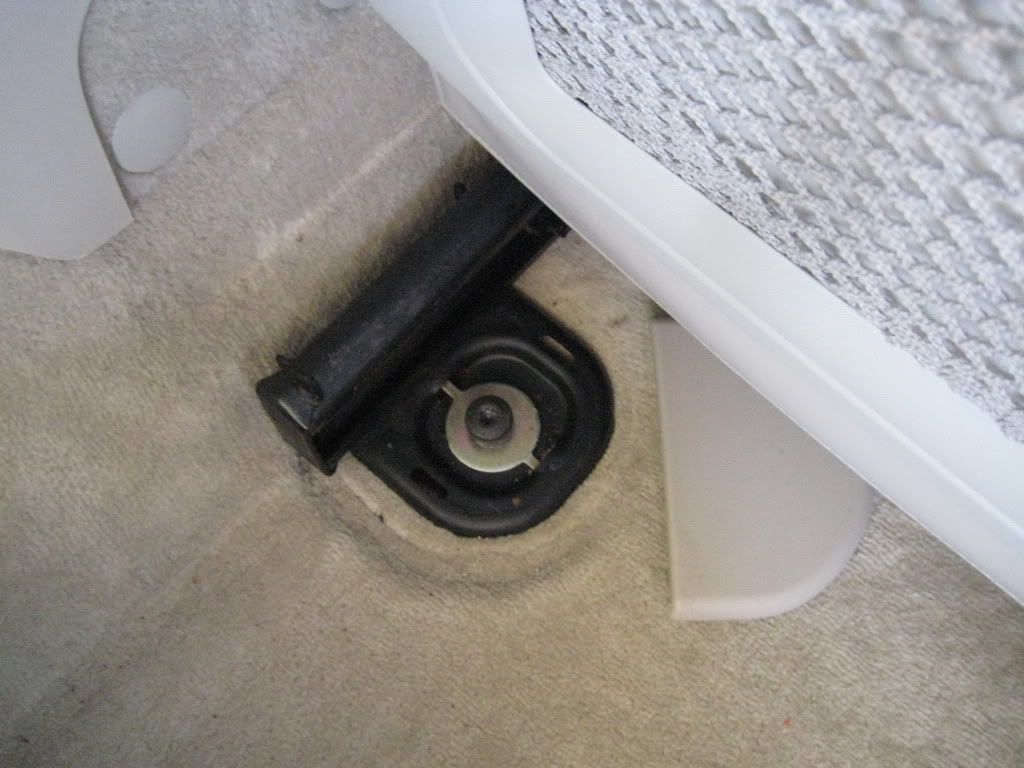
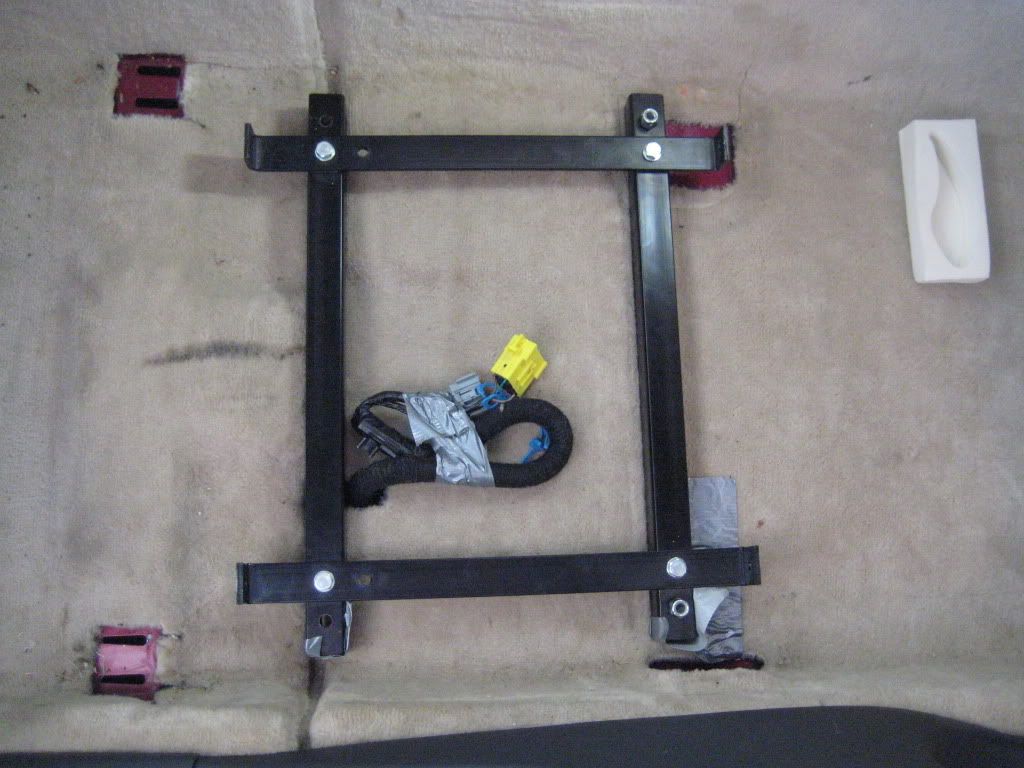
The rest of the install was a bit of trial and error. Pictured below is the way the frame sits on the floor. The left side of the pic is the front of the seat frame. Notice the hooked slots I was speaking about. Notice the black plastic heat vent for the rear heat in the following pic. In my install the front rail sat exactly at the seam where the carpet is sectioned. I'm 5'10" and that gives me plenty of fore and aft adjust. If you try to move the frame any closer to the firewall, you may have to trim the heat vent. Also you have to open the slit in the carpet to move the cable harness back a bit.
See next post.
----------
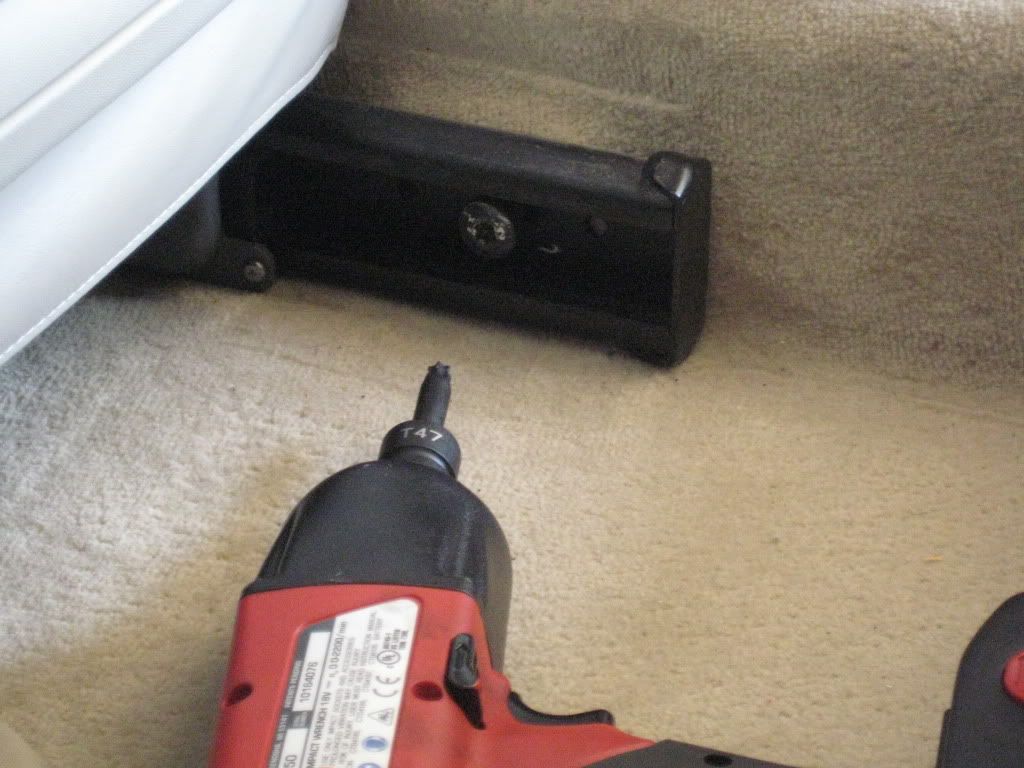
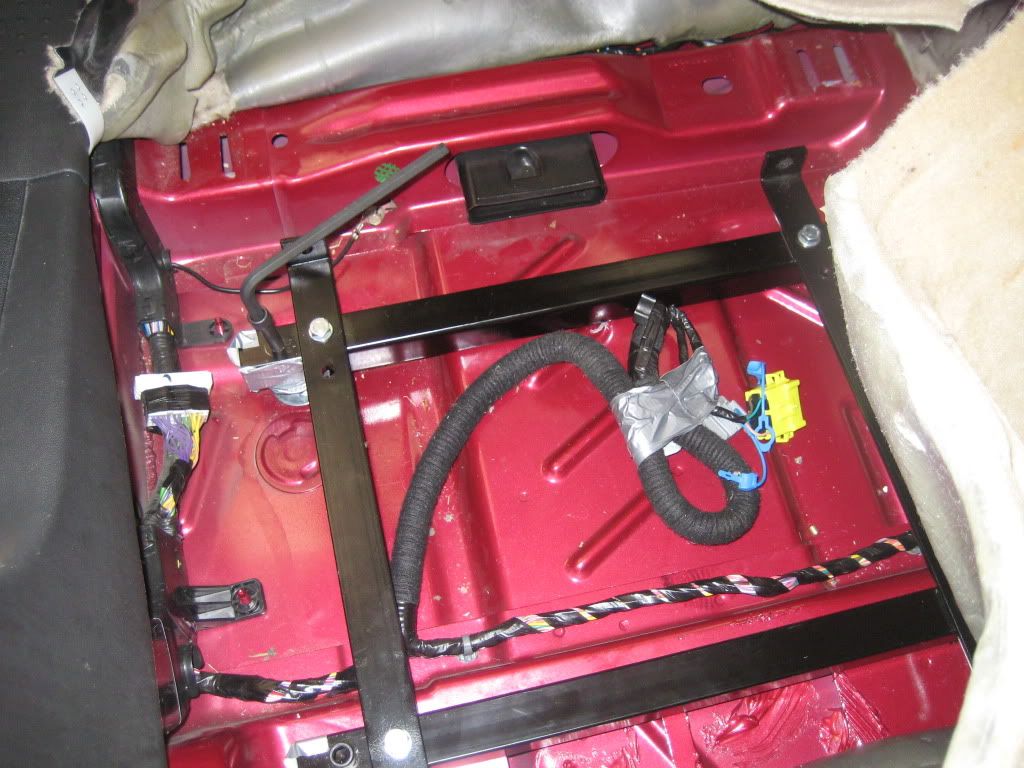
With the Sparco seat assembled to the frame I marked the position I liked then removed the seat from the frame, I pulled up the carpet to begin putting in 4 holes. This is where it gets a bit tricky. The floor is not flat. The front bolts needed to be blocked up with a machined spacer or washers. I used washers. Also I had to flatten a small spot or 2 in the floor with a hammer so the spacers sit flat. The rear holes drilled through 2 layers of sheet metal. I used the frame for a drill template as pictured below.
I should have anchored the lap belts next, but I figured that out later and had to pull the frames back out. Below is the shot of how the Schroth lap belt anchors. Using the original Torx seat mounting locations, I bent the inboard lap belt bracket to 90 degrees (it's OK they are made for that). I bent the outboard lap belt to about 15%. These brackets should always be metal to metal anchored. They hold you in the car not the seat. The old seat mounting locations are perfect.


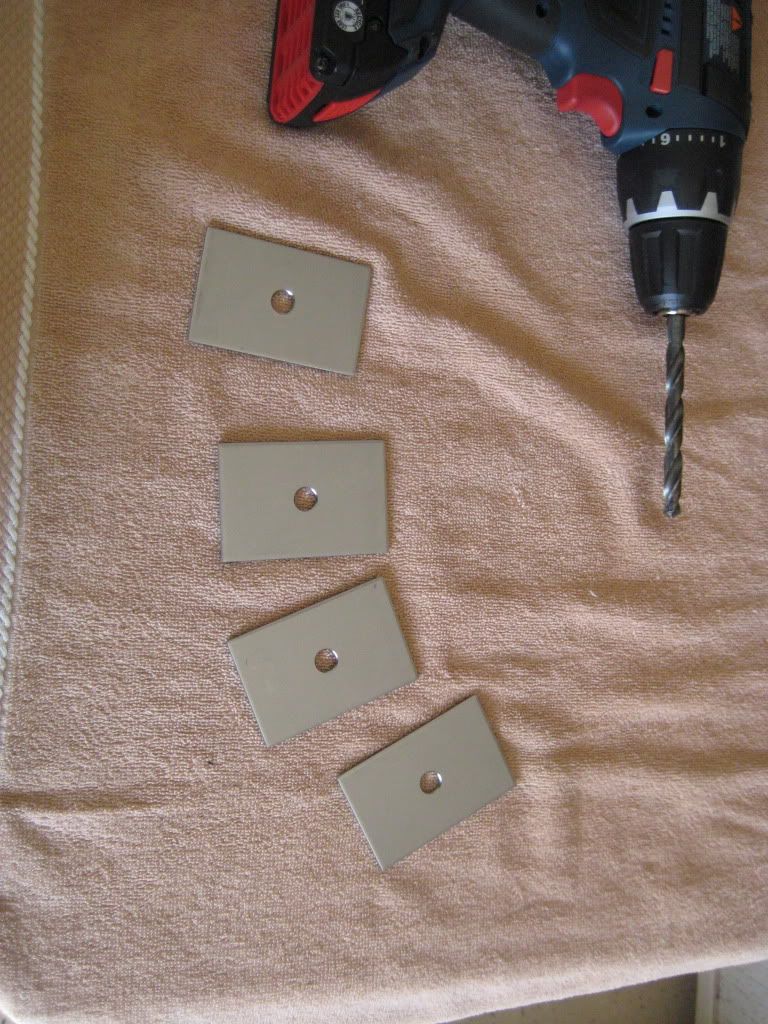
I made sure when I bolted the frames to the floor I used reinforcement plates under the car. i made these from 3 X 2 stainless steel.
I have TEMPORARILY mounted the tail straps to the rear seat belt anchor mounts. I don't like the angle of the shoulder harness so I'm getting a roll bar.

I'll keep you updated when I get it all wrapped up
Mike
2 Sparco Chronos Road seatd (medium)
2 Sparco universal mount kits
2 Sparco universal slider kits
2 Schroth Profi II ASM FE 4 point harnesses.
The seat cushion and the seat back removed made it easier to get the seats in and out. Once it's out I located the fuse panel in front of the rear seat on the passenger side. I looked under the lid at the diagram and removed the air bag fuse. I relocated to a spare position. There is a plastic tool in the box you can use.
I then removed the torx bolts from the two locations in the rear of the seat. This will become my lap belt anchor points so I saved the bolts.
I then unplugged the grey and yellow connector under the front of the seat.
Removing the seat was easy. I tilted the seat forward by pushing the top of the seat back up and forward. I then pulled the seat backwards out of the two hooked slots in the front of the seat. The seat is heavy about 83 lbs.
The rest of the install was a bit of trial and error. Pictured below is the way the frame sits on the floor. The left side of the pic is the front of the seat frame. Notice the hooked slots I was speaking about. Notice the black plastic heat vent for the rear heat in the following pic. In my install the front rail sat exactly at the seam where the carpet is sectioned. I'm 5'10" and that gives me plenty of fore and aft adjust. If you try to move the frame any closer to the firewall, you may have to trim the heat vent. Also you have to open the slit in the carpet to move the cable harness back a bit.
See next post.
----------
With the Sparco seat assembled to the frame I marked the position I liked then removed the seat from the frame, I pulled up the carpet to begin putting in 4 holes. This is where it gets a bit tricky. The floor is not flat. The front bolts needed to be blocked up with a machined spacer or washers. I used washers. Also I had to flatten a small spot or 2 in the floor with a hammer so the spacers sit flat. The rear holes drilled through 2 layers of sheet metal. I used the frame for a drill template as pictured below.
I should have anchored the lap belts next, but I figured that out later and had to pull the frames back out. Below is the shot of how the Schroth lap belt anchors. Using the original Torx seat mounting locations, I bent the inboard lap belt bracket to 90 degrees (it's OK they are made for that). I bent the outboard lap belt to about 15%. These brackets should always be metal to metal anchored. They hold you in the car not the seat. The old seat mounting locations are perfect.
I made sure when I bolted the frames to the floor I used reinforcement plates under the car. i made these from 3 X 2 stainless steel.
I have TEMPORARILY mounted the tail straps to the rear seat belt anchor mounts. I don't like the angle of the shoulder harness so I'm getting a roll bar.
I'll keep you updated when I get it all wrapped up
Mike
Trending Topics
04-12-2012, 11:24 PM
#8

Why does the angle matter? It would seem that since the belt contacts the edge of seat where hole is, the pressure on the person in the seat would be the same.
Is there concern the seat would break under extreme pressure?
Is there concern the seat would break under extreme pressure?
04-13-2012, 07:27 AM
#10
04-13-2012, 09:21 AM
#11
TECH Regular
Thread Starter
iTrader: (4)
Join Date: Jun 2007
Posts: 467
Likes: 0
Received 0 Likes
on
0 Posts
I asked myself that as well. Conventional wisdom says that in a roll -over the shoulder harness would compress your spine if they are mounted at to steep an angle. That being said I have seen dozens of setups like this on HPDE track days. I'm not suggesting that is safe. I'm just saying I've seen it in many cars without rollbars. If you could mount the tail straps higher ( like where the seat back mounting studs are...you can see them in one of the pics) you might be able to get an angle that is 25 degrees or less.
 04-14-2013, 01:21 PM
#13
TECH Enthusiast

Join Date: Aug 2007
Location: Wash., DC / Kabul, Afghanistan
Posts: 716
Likes: 0
Received 0 Likes
on
0 Posts

There's a plastic cover over the bolt heads in the rear of the seat. One on the inside is into the floor while the outside is horizontal if I recall correctly.
04-14-2013, 01:30 PM
#15
Once all of my major performance mods are done (read: engine and supercharger), I've got my eye on a set of Recaro Pole positions. The trick is going to be finding a great upholsterer--it has to be leather and Alcantara. D3 has a set that they sell, but they're charging $1600 a seat:


You guys might like this thread as a side study in installing seats.
http://www.m3post.com/forums/showthread.php?t=314742
You guys might like this thread as a side study in installing seats.
http://www.m3post.com/forums/showthread.php?t=314742
04-14-2013, 02:15 PM
#16
TECH Regular
Thread Starter
iTrader: (4)
Join Date: Jun 2007
Posts: 467
Likes: 0
Received 0 Likes
on
0 Posts

 04-14-2013, 06:36 PM
#19
TECH Enthusiast

Had his belts mounted in a similar manner.
Looking good so far, can't wait to see a shot from the front to see how it all looks.
-meaty
