Conversions & Swaps LSX Engines in Non-LSX Vehicles
Sponsored by:
Sponsored by:

BMW e34 Touring LS1 swap (BMW 5 series wagon)

Thread Tools
 
Search this Thread
 
Old 03-05-2013, 01:13 PM
  #21  
Teching In
 
Sparkydog's Avatar
 
Join Date: Dec 2012
Posts: 42
Likes: 0
Received 0 Likes on 0 Posts

Default

vazfx16 - coach me on how you did those photos ^. I am an old dog and I want to learn new tricks!

Thanks!
Old 03-05-2013, 01:15 PM
  #22  
Launching!
 
SWAGON's Avatar
 
Join Date: Dec 2012
Location: Richmond, VA
Posts: 287
Likes: 0
Received 4 Likes on 3 Posts
Default

Yeah, those design illustrations are the bees knees!
Old 03-05-2013, 02:11 PM
  #23  
Teching In
 
mckchr67's Avatar
 
Join Date: Dec 2011
Location: Liverpool, PA
Posts: 4
Likes: 0
Received 0 Likes on 0 Posts
Default

Looking good. Subscribed!
Old 03-05-2013, 02:21 PM
  #24  
TECH Regular
Thread Starter
 
vazfx16's Avatar
 
Join Date: Jan 2007
Posts: 411
Likes: 0
Received 8 Likes on 7 Posts

Default

Originally Posted by 1970 ls_c10
interesting car for this swap! want to see it finished!
This will be my Daily Driver, so it must be finished
Old 03-05-2013, 02:26 PM
  #25  
TECH Regular
Thread Starter
 
vazfx16's Avatar
 
Join Date: Jan 2007
Posts: 411
Likes: 0
Received 8 Likes on 7 Posts

Default

Originally Posted by Sparkydog
vazfx16 - coach me on how you did those photos ^. I am an old dog and I want to learn new tricks!

Thanks!
It is easy if you have photoshop:
1. Use tripod (to keep this in alignment)
2. Photograph the object (in this case a crossmember)
3. Change wait you want in with the subject (I added the oilpane)
4. Photograph
5. Bring into Photoshop and add both images to the same document
6. Have a layer of each image
7. Reduce opacity on the image that you want to ghosted out
8. save as the format you want
9. I then drew the red bracing in with Illustrator, but it can be done in Photoshop to, just a bit more work to draw in and stroke
Old 03-07-2013, 08:20 AM
  #26  
TECH Fanatic
iTrader: (7)
 
LQ4-E39's Avatar
 
Join Date: Aug 2012
Posts: 1,321
Received 121 Likes on 85 Posts

Default

See, and you were saying how tough it is to document a build as it goes…

It comes naturally once brain gets sucked into the “tornado” of the project (always seems to be in the back of your mind).
Old 03-07-2013, 05:57 PM
  #27  
TECH Regular
Thread Starter
 
vazfx16's Avatar
 
Join Date: Jan 2007
Posts: 411
Likes: 0
Received 8 Likes on 7 Posts

Default

Originally Posted by LQ4-E39
See, and you were saying how tough it is to document a build as it goes…

It comes naturally once brain gets sucked into the “tornado” of the project (always seems to be in the back of your mind).
Your right. The big thing is to take the camera out to the garage with you. I am finding that taking lots of shots will help my memory also.

Thanks for the encouragement.
Old 03-07-2013, 05:59 PM
  #28  
TECH Regular
Thread Starter
 
vazfx16's Avatar
 
Join Date: Jan 2007
Posts: 411
Likes: 0
Received 8 Likes on 7 Posts

Default

The next thing I think I realize I may be able to do is to use the BMW ac compressor. I have not tried to fit the LS1 pulley yet, but that is next. If I can do that it will save some time on dough on getting ac lines made. I can then make my own PS lines.
Old 03-10-2013, 12:32 PM
  #29  
TECH Regular
Thread Starter
 
vazfx16's Avatar
 
Join Date: Jan 2007
Posts: 411
Likes: 0
Received 8 Likes on 7 Posts

Default

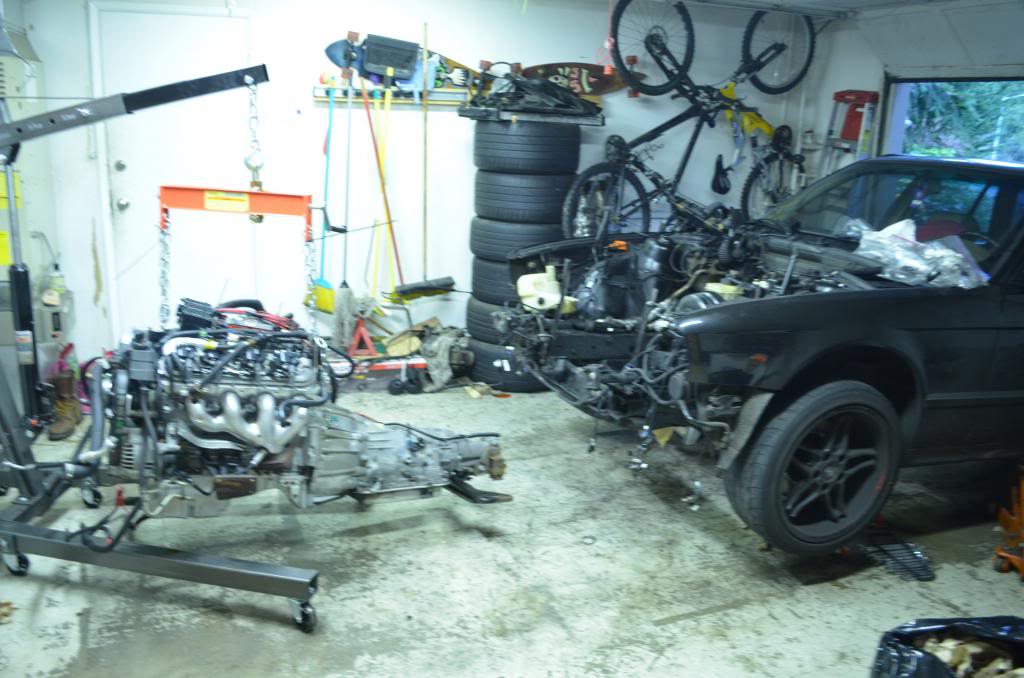
I made a metal yard run yesterday, so I am ready to start making hard parts.

I maybe be able to do the first test fit today. Yesterday was spent on GTO oilpan swap. Sounds easier that it was. Photos to come.
Old 03-10-2013, 04:03 PM
  #30  
TECH Regular
iTrader: (1)
 
brewster240's Avatar
 
Join Date: May 2006
Location: clearwater fl
Posts: 405
Likes: 0
Received 0 Likes on 0 Posts

Default

come on over to silviav8.com, there are a few front sump pans we have figured out cause the 240sx uses them too.

somewhere there is a thread with comparisons.
Old 03-10-2013, 10:28 PM
  #31  
TECH Regular
Thread Starter
 
vazfx16's Avatar
 
Join Date: Jan 2007
Posts: 411
Likes: 0
Received 8 Likes on 7 Posts

Default

Originally Posted by brewster240
come on over to silviav8.com, there are a few front sump pans we have figured out cause the 240sx uses them too.

somewhere there is a thread with comparisons.
Will do
Old 03-10-2013, 10:38 PM
  #32  
TECH Regular
Thread Starter
 
vazfx16's Avatar
 
Join Date: Jan 2007
Posts: 411
Likes: 0
Received 8 Likes on 7 Posts

Default

Name:  CleanInternals_zps10b9f4c9.jpg
Views: 14180
Size:  78.8 KB
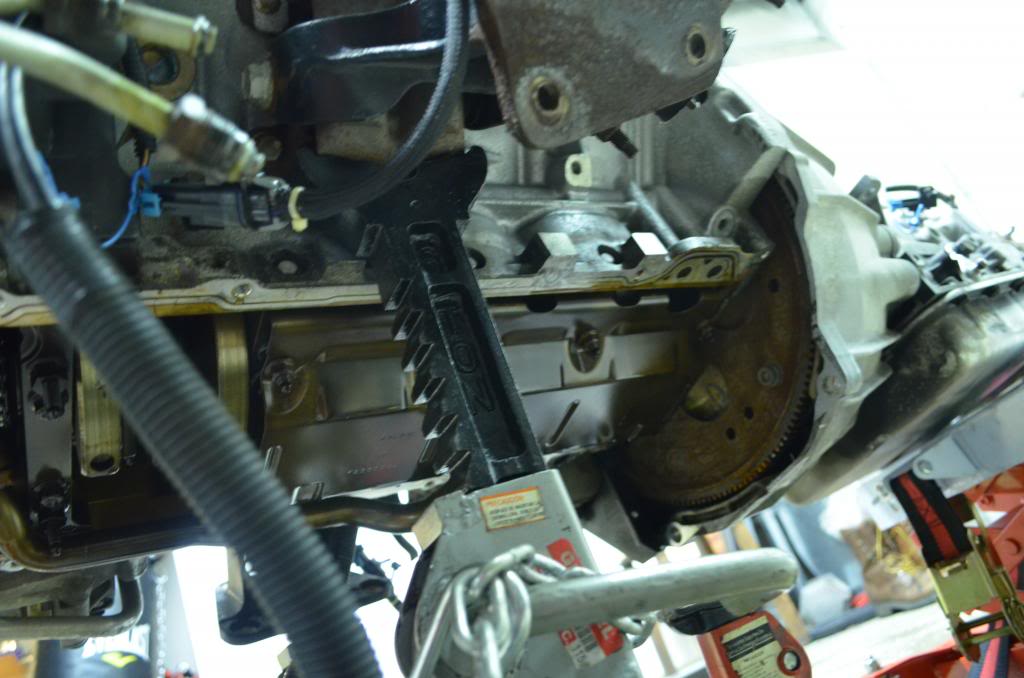
I am surprised how clean and fresh the inside of the pan was. Lots of clean oil too.


Name:  GoingIn_zpsf03a08f1.jpg
Views: 14058
Size:  95.9 KB
About to do the first test fit. LS1, meet BMW E34 5 series Touring.


Name:  firstTestFit_zps93eeda36.jpg
Views: 14301
Size:  135.7 KB
Consummation of a long relationship to come.

Name:  SteeringBoxInWay_zpsd76aafc7.jpg
Views: 14262
Size:  68.3 KB
Wait! The stock mounts and manifold wants to occupy the same location as that giant steering box. Next, I need to remove the motor mounts and driver's side manifold then see how much space I have, then I will start making things.
Old 03-10-2013, 10:51 PM
  #33  
TECH Regular
Thread Starter
 
vazfx16's Avatar
 
Join Date: Jan 2007
Posts: 411
Likes: 0
Received 8 Likes on 7 Posts

Default

Name:  m60ls1Compared_zpsb28de4bf.jpg
Views: 15997
Size:  120.3 KB
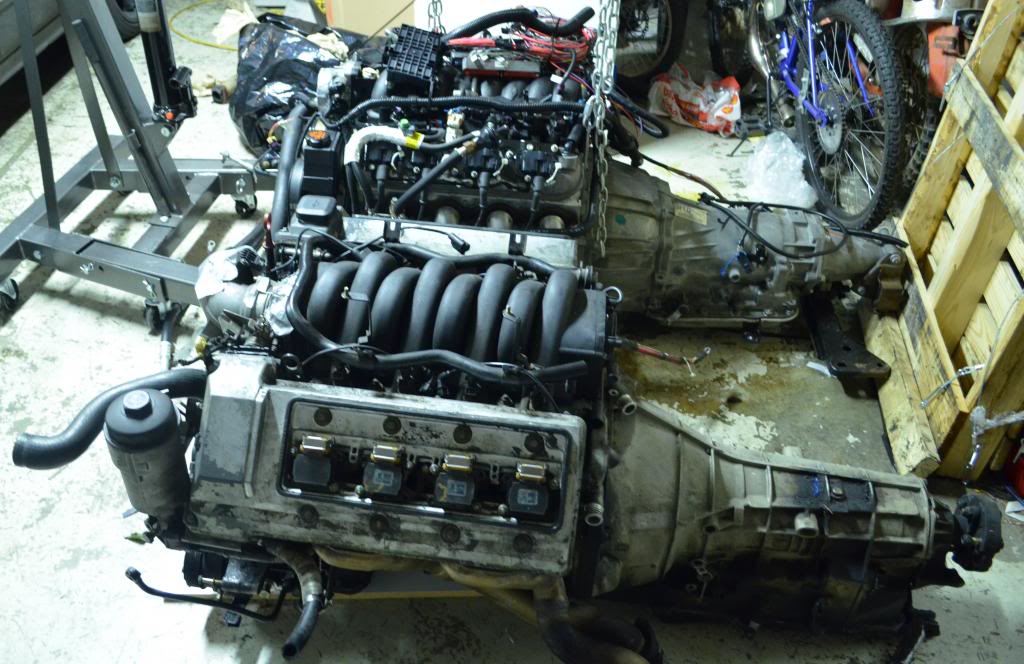
BMW m60 compared to GM LS1. I am surprised that they are so close in size. I was under the impression the the LS1 would be quite a bit smaller. Based on research, the LS1 is 40lbs lighter than the BMW M60. A rough measurement says that the M60 might be about 2 inches longer and about 2 inches wider.
Old 03-11-2013, 12:00 AM
  #34  
Teching In
 
rathersmart's Avatar
 
Join Date: Mar 2013
Posts: 31
Likes: 0
Received 0 Likes on 0 Posts

Default

can't wait till it's done!!
Old 03-11-2013, 07:30 AM
  #35  
TECH Fanatic
iTrader: (7)
 
LQ4-E39's Avatar
 
Join Date: Aug 2012
Posts: 1,321
Received 121 Likes on 85 Posts

Default

Great comparison picture.
Old 03-16-2013, 11:21 PM
  #36  
TECH Regular
Thread Starter
 
vazfx16's Avatar
 
Join Date: Jan 2007
Posts: 411
Likes: 0
Received 8 Likes on 7 Posts

Default

Name:  HungUpTrans_zpse4da2ae8.jpg
Views: 14162
Size:  62.5 KB
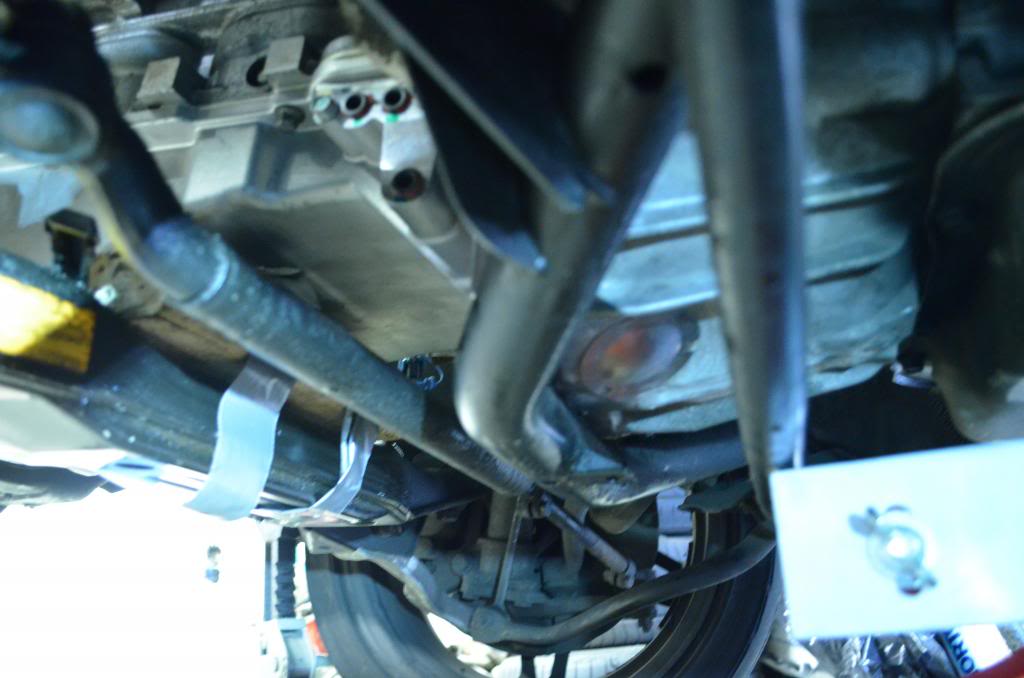
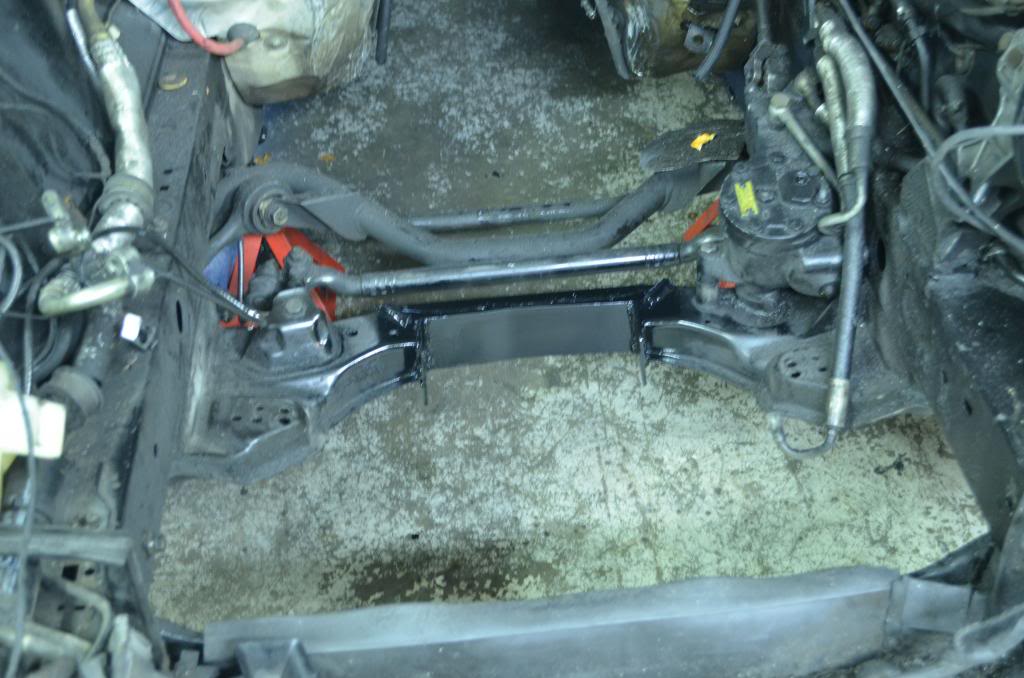
Tight fit, but I was able to get the bellhousing to clear the rear crossmember.

Name:  HowHigh1Inch_zps286ae010.jpg
Views: 14205
Size:  70.3 KB
Using my hightech organic measuring device to determine how low the engine must go to fit under the hood.

Name:  IdeaWall_zps3df2b427.jpg
Views: 14251
Size:  38.9 KB
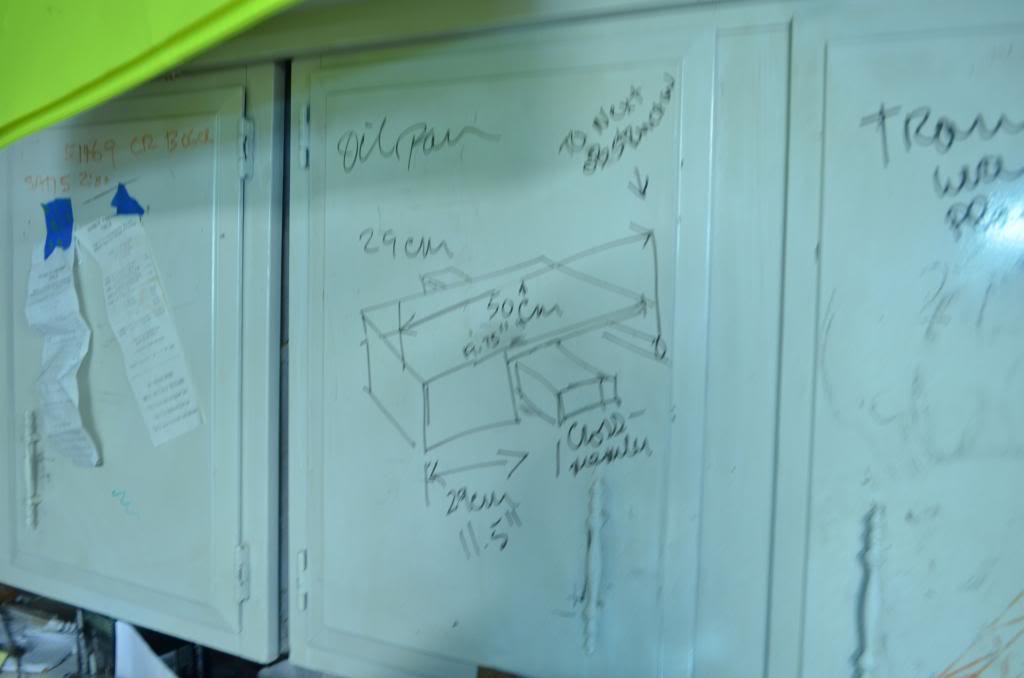
Using all surface to solve problems. I used some dry erase book paint on the cabinets so that I can use them a writing surface. Works well...

Name:  HowMuchNotch_zpsc04b06b8.jpg
Views: 14083
Size:  61.7 KB
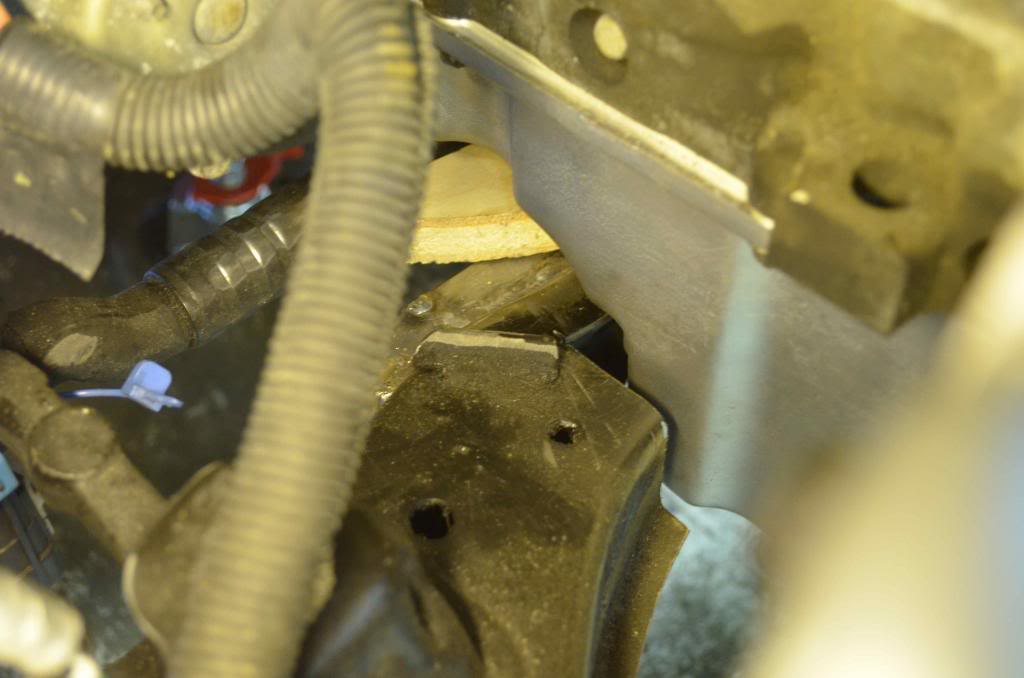
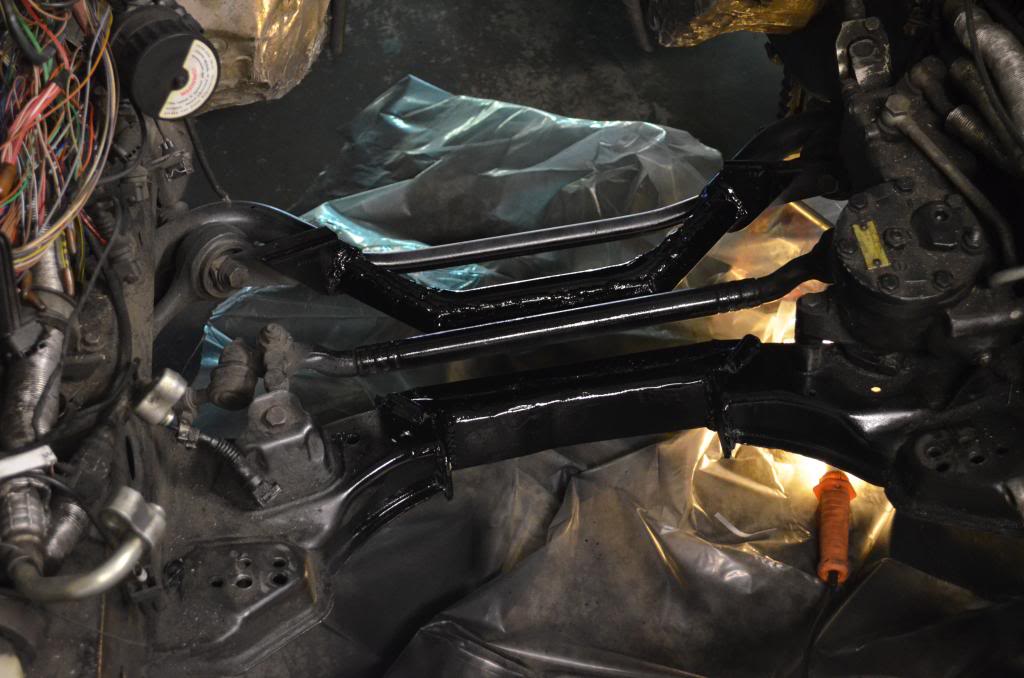
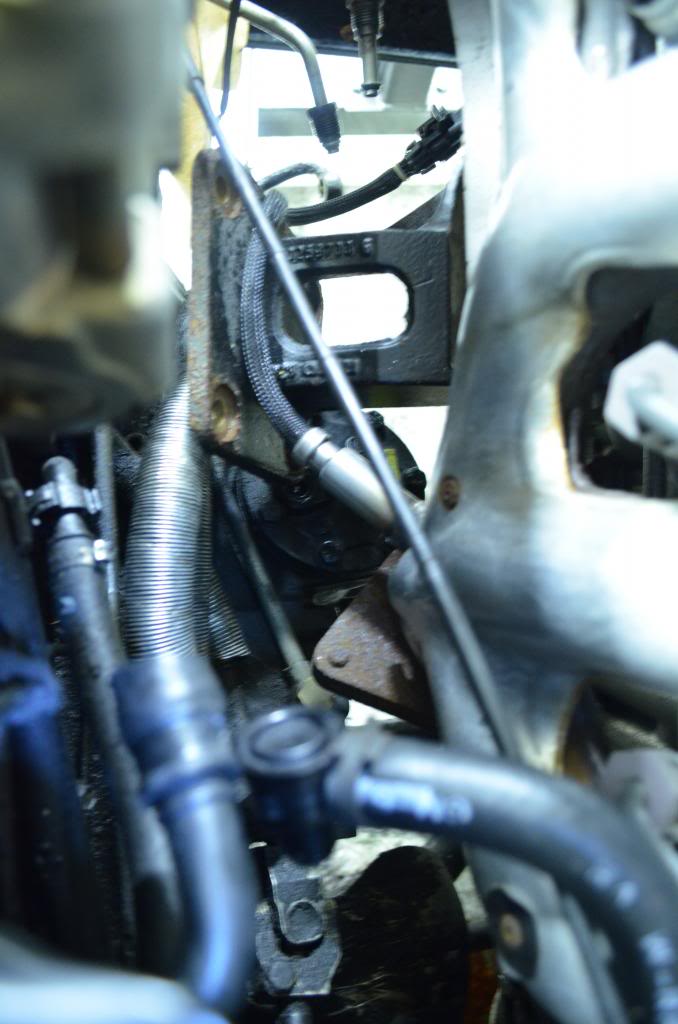
Here is how much I must notch the crossmember.

Name:  WheretoNotcj_zpsaee8defc.jpg
Views: 14226
Size:  79.7 KB
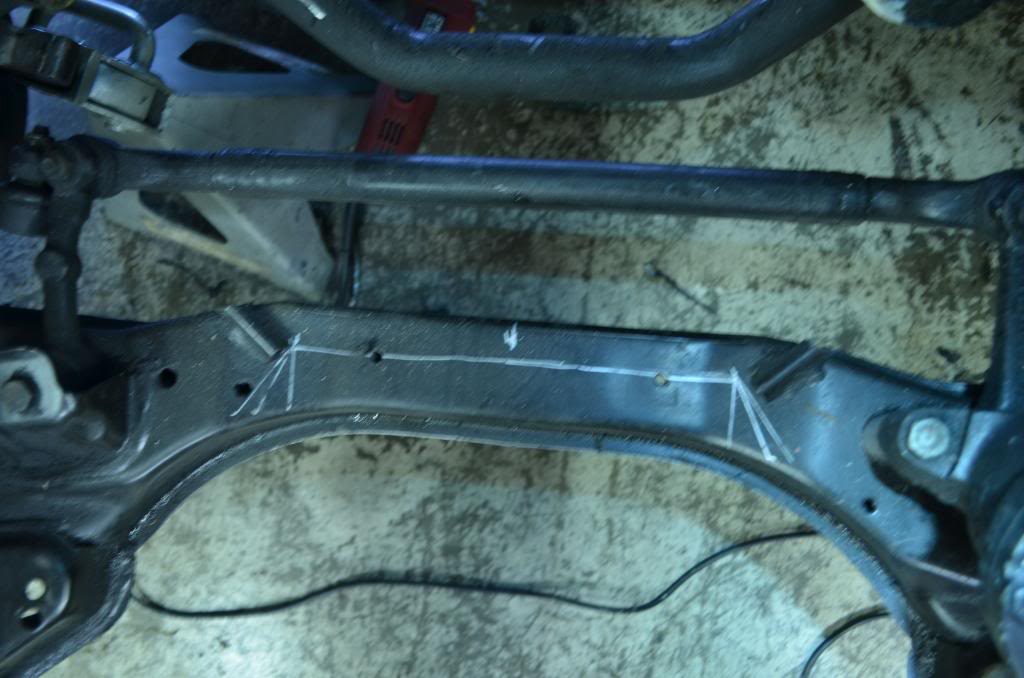
Here is where the notch will be.

Name:  Notchtime_zpsa8cdf576.jpg
Views: 14326
Size:  100.5 KB
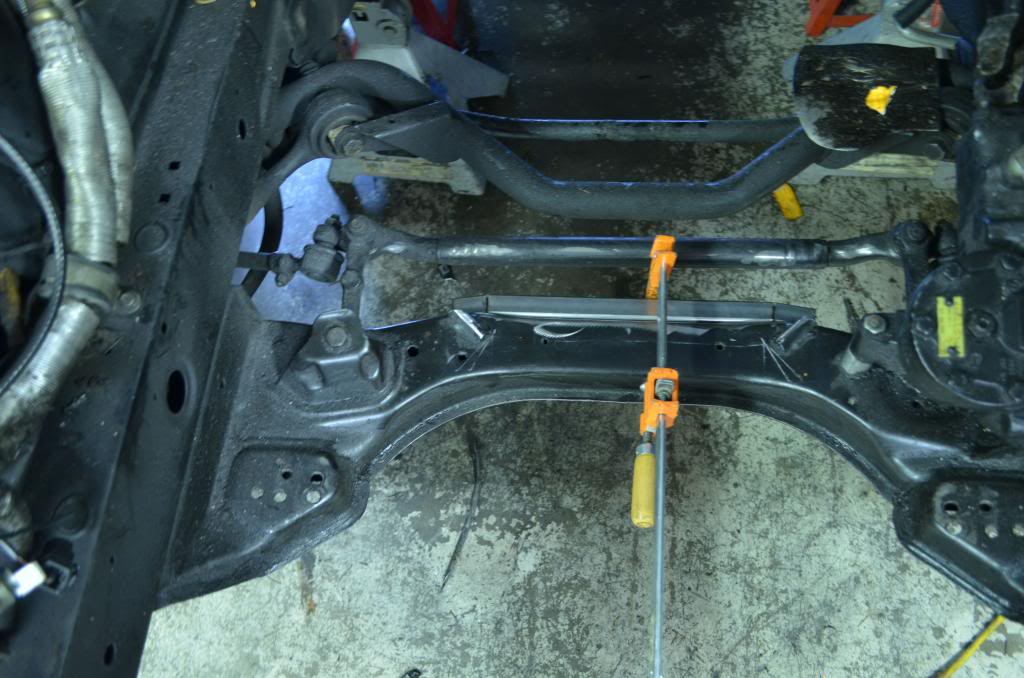
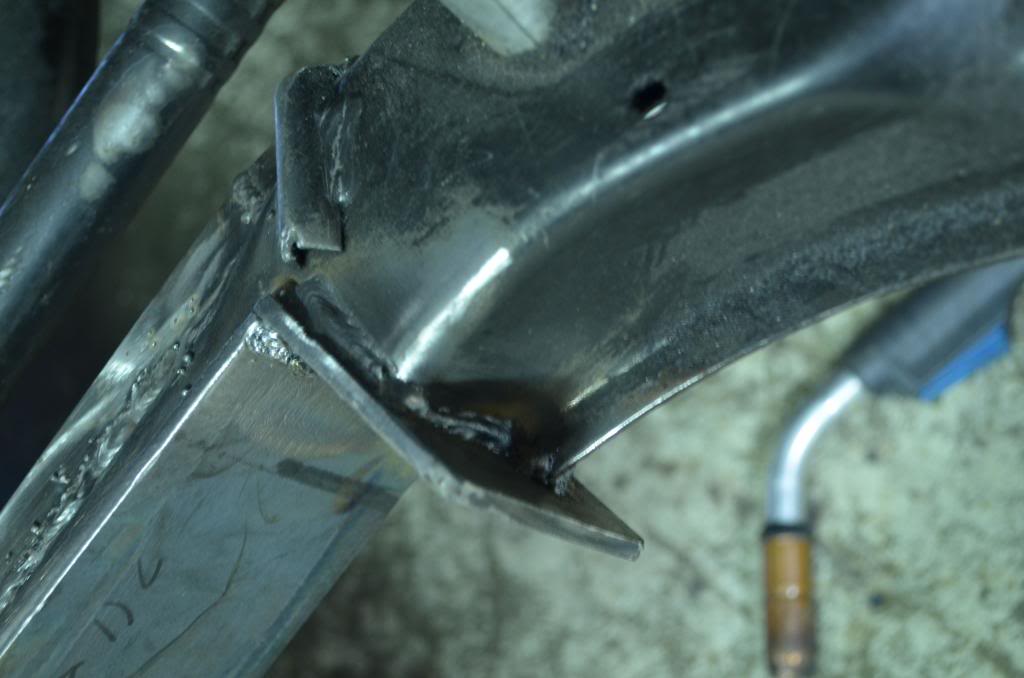
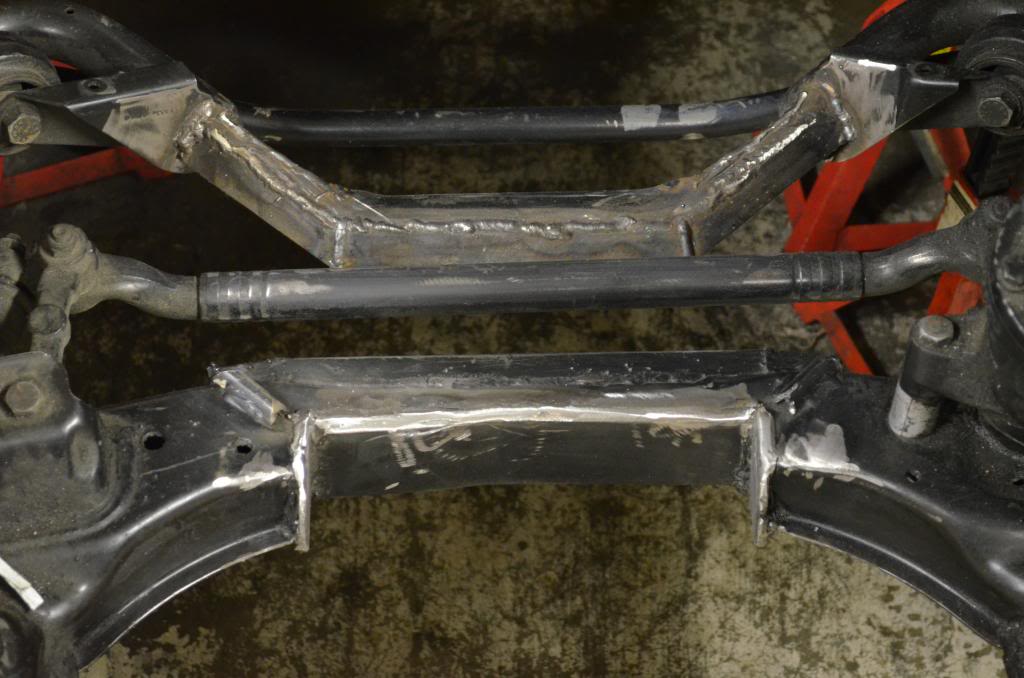
Prepping for the brace.

Name:  Brace_zps84f893be.jpg
Views: 14147
Size:  48.5 KB
Welding on he backside of the crossmember bracing. Welding under here was difficult because oil inside of the crossmember would get heated and seep out. Then the seeping oil would contaminate the weld. It took a long time to clean up the oil enough to get a suitable weld.

Name:  TheNotch_zpsf39e45a0.jpg
Views: 14604
Size:  84.6 KB
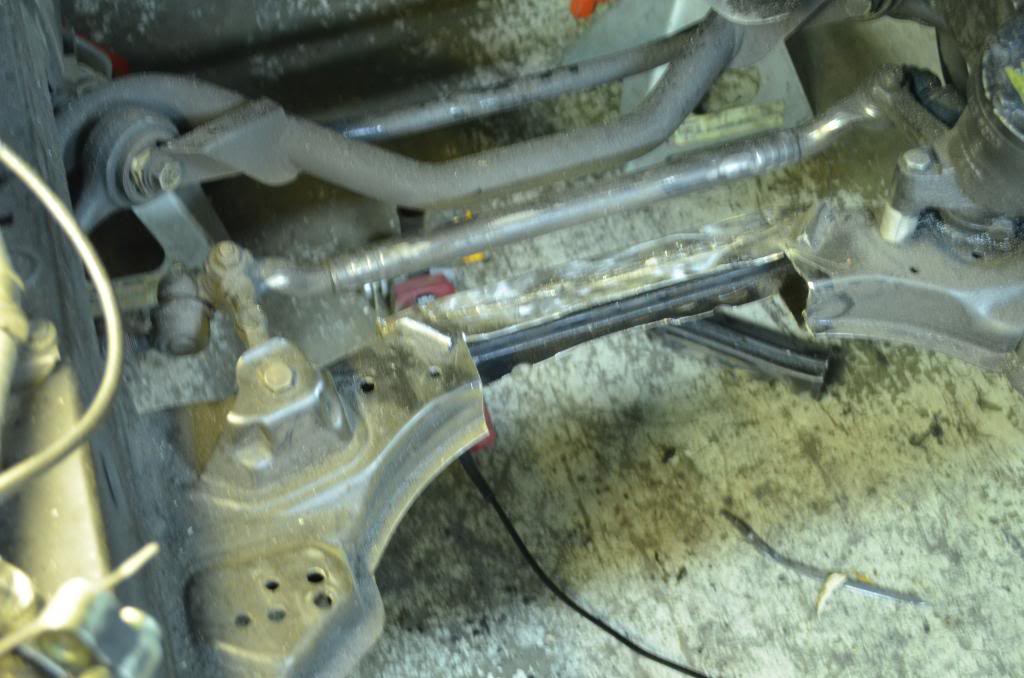
Notched. Now to box and reinforce, but first I must test fit the engine for a third time.

Last edited by vazfx16; 03-18-2013 at 01:13 AM.
Old 03-17-2013, 04:58 PM
  #37  
Registered User
 
flashgordon's Avatar
 
Join Date: Mar 2013
Location: Maryland
Posts: 4
Likes: 0
Received 0 Likes on 0 Posts
Default

Good work brother from another mother. Looking forward to more...subscribed.

Mitch
Old 03-17-2013, 09:20 PM
  #38  
TECH Regular
Thread Starter
 
vazfx16's Avatar
 
Join Date: Jan 2007
Posts: 411
Likes: 0
Received 8 Likes on 7 Posts

Default

Name:  TheFit_zpsa6168055.jpg
Views: 14389
Size:  55.8 KB
The notched xmember worked


The radiator fit.

Name:  CrossmemberWeld_zps2a8082b2.jpg
Views: 14307
Size:  56.5 KB
Boxing in xmember.

Name:  Crossmember_zps1314c00b.jpg
Views: 14938
Size:  93.4 KB
Xmember done. Next motor mounts.

Name:  DSC_0468_zpsd9603fde.jpg
Views: 14409
Size:  85.0 KB


Name:  DSC_0511_zpsfe00b9d1.jpg
Views: 14273
Size:  84.6 KB

Last edited by vazfx16; 07-08-2013 at 10:03 AM.
Old 03-17-2013, 09:37 PM
  #39  
Launching!
iTrader: (1)
 
red04montels's Avatar
 
Join Date: Mar 2013
Location: Janesville/Milwaukee WI
Posts: 211
Likes: 0
Received 1 Like on 1 Post

Default

wow amazing work here! Subbed for this one!
Old 03-17-2013, 09:51 PM
  #40  
TECH Regular
Thread Starter
 
vazfx16's Avatar
 
Join Date: Jan 2007
Posts: 411
Likes: 0
Received 8 Likes on 7 Posts

Default

Originally Posted by red04montels
wow amazing work here! Subbed for this one!
Thank you.


Quick Reply: BMW e34 Touring LS1 swap (BMW 5 series wagon)


All times are GMT -5. The time now is 04:05 AM.