
1937 Ford Sedan
 01-09-2017, 12:41 PM
#441

Nice project, good luck.
__________________

Your Source for LSX Conversion Parts!
www.psiconversion.com
Ebay Store
Facebook/psiconversion
Instagram/psiconversion
'Dont Let EFI Pass You By!'
Your Source for LSX Conversion Parts!
www.psiconversion.com
Ebay Store
Facebook/psiconversion
Instagram/psiconversion
'Dont Let EFI Pass You By!'

 01-09-2017, 01:12 PM
#443
TECH Regular
Thread Starter

 By the way....I ordered some silicone rubber to make that seal with. SUPPOSEDLY just form, cook, and voila' a rubber seal is created! You may want to delay your order pending this experiment
  01-10-2017, 08:51 AM
#444
TECH Apprentice
dang boy, now you are just showing off....
Nice work and a great idea to get the wiring routed and some what hidden. I started my new year by rolling my old C10 back in the shop. I guess I need to start a thread here too.
Nice work and a great idea to get the wiring routed and some what hidden. I started my new year by rolling my old C10 back in the shop. I guess I need to start a thread here too.
 01-17-2017, 11:26 AM
#446

WOW. Love where this is going. Very cleaver
01-18-2017, 08:37 AM
#448
TECH Regular
Thread Starter
Yeah a little bit. I had to figure out how to mold a custom one off rubber grommet for the wiring pass through. Man this build is taking all my skills and teaching me new stuff too! It actually turned out nice and I will post some pics soon as the info may help other people make a rubber piece for their project. I recently stopped using Photobucket due to IT issues and started using imgur.com. So far it seems to be better, but I don't have my password and pictures with me today. Over the past weekend I worked on a subfloor for the passenger side of the car. Planning on mounting 2 computers and the fuse block under Melisa's seat and hiding the harnesses under the floor. Wish my ol' beater had as much room as your truck LOL! More soon....
01-19-2017, 08:46 AM
#449
TECH Regular
Thread Starter
I'm hesitant to post such a small item, BUT it may help someone so here goes. I was faced with creating a rubber grommet that didn't exist. Did a little internet surfing and found a product made by Rowe Industries called Versimold. It is a silicon rubber that you can form and it cures when heat is applied. I used a piece of copper the same size as my wiring harness to form the ID. Then I used the parts themselves to create the mold. I cooked it in my shop oven for 20 minutes and PRESTO ! I will do the final assembly with a thin layer of silicone and it should seal just fine in the firewall.
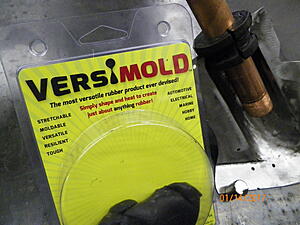
! I will do the final assembly with a thin layer of silicone and it should seal just fine in the firewall. 
 01-19-2017, 11:14 AM
#451
TECH Regular
Thread Starter
ps - the grommet didn't create much smell ..........SOOOO........ if you cook in the house proceed with caution when she isn't around
 01-19-2017, 12:50 PM
#452
The directions say a heat gun will also work for the cure. An oven in a shop can be very handy at times if you have the room (and I barely do have the room for it). The reason I got mine is that my son used to race go karts and we used the oven to cook, treat, and size tires ALL the time. Ovens are usually cheap or free on Craigslist. When people remodel they want everything in the kitchen to match or upgrade everything and want someone to haul off the old stuff and that's how I got mine. Can also be used for bearing installs to grow something a little or even cook some paint on a part.
ps - the grommet didn't create much smell ..........SOOOO........ if you cook in the house proceed with caution when she isn't around
ps - the grommet didn't create much smell ..........SOOOO........ if you cook in the house proceed with caution when she isn't around
May want consider that you may be eating the residue next time that she bakes something though.
 03-31-2017, 10:09 PM
#454
TECH Regular
Thread Starter
Hello Eric:
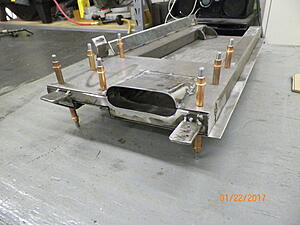
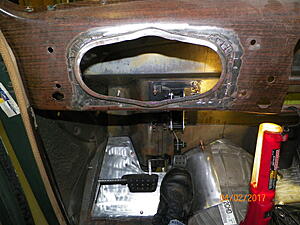
I have some updates but not nearly as many as you have lately! Cool first time start video by the way.... I hope I can remember to video mine. My work schedule has been a little rough here lately, but I have managed to get some things done in my small windows. As you know from your street rod its all about creating space. I've been trying to make some room for the wiring harness which will come in the firewall and run down the floor toward the passenger seat. The main computer, trans computer and fuse block will be under the wife's seat. SO here is the entire floor cut out.
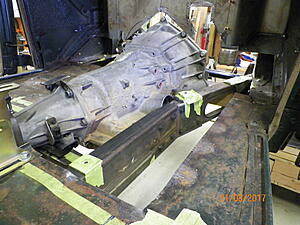
Beginning of the structure for a subfloor
Where the harnesses and other wiring will go back and forth
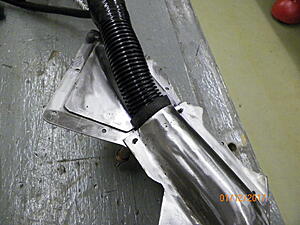
More structure and the wiring pass through piece welded in the firewall
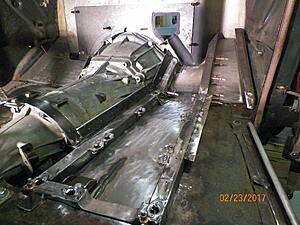
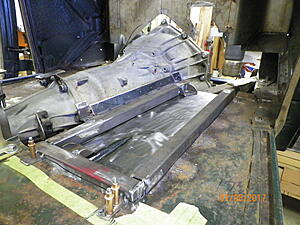
Covers with dzus fasteners (had to have some racecar stuff somewhere) The flat bar stock beside the trans will serve as a structure for a removable tunnel.
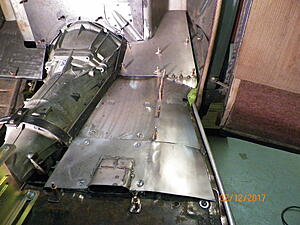
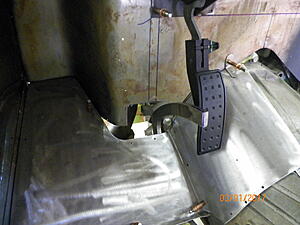
All that is roughed in but the tunnel is not done yet because I needed to see about mounting the gas and brake pedals. Here is the current issue. I mounted the gas where it feels right and the brake pedal is right beside the gas pedal. Cant really go any farther to the right for the gas pedal. Solution will be figured out and posted soon hopefully.
I have some updates but not nearly as many as you have lately! Cool first time start video by the way.... I hope I can remember to video mine. My work schedule has been a little rough here lately, but I have managed to get some things done in my small windows. As you know from your street rod its all about creating space. I've been trying to make some room for the wiring harness which will come in the firewall and run down the floor toward the passenger seat. The main computer, trans computer and fuse block will be under the wife's seat. SO here is the entire floor cut out.

Beginning of the structure for a subfloor

Where the harnesses and other wiring will go back and forth

More structure and the wiring pass through piece welded in the firewall

Covers with dzus fasteners (had to have some racecar stuff somewhere
) The flat bar stock beside the trans will serve as a structure for a removable tunnel. 
All that is roughed in but the tunnel is not done yet because I needed to see about mounting the gas and brake pedals. Here is the current issue. I mounted the gas where it feels right and the brake pedal is right beside the gas pedal. Cant really go any farther to the right for the gas pedal. Solution will be figured out and posted soon hopefully.
 04-01-2017, 04:23 PM
#455
Looking good Keith! I wasn't accusing you of sleeping on the job or anything. Lol
As for the brake pedal/gas pedal conflict, can you bend the brake pedal over to the left any? If the gas pedal is at a comfortable location, I wouldn't move it if it were mine, since you will be using it a lot more than the brake. I would see if the brake pedal could be bent over to make some room, just make sure the pedal travel bottoms out before the bend area hits the opening in the floor, then weld a 90* on the end of the pedal to bolt the pad to it. Just a thought, but I'm sure you've probably already thought of that!
As for the brake pedal/gas pedal conflict, can you bend the brake pedal over to the left any? If the gas pedal is at a comfortable location, I wouldn't move it if it were mine, since you will be using it a lot more than the brake. I would see if the brake pedal could be bent over to make some room, just make sure the pedal travel bottoms out before the bend area hits the opening in the floor, then weld a 90* on the end of the pedal to bolt the pad to it. Just a thought, but I'm sure you've probably already thought of that!
04-01-2017, 06:34 PM
#456

Had about the same problem while building my '39 Chevy. Adding to the problem is the steering column. Get things positions far enough apart and find out your toe rubs the column when pushing the brakes. Again, I'm sure you have factored the column in but it seems all systems require the SAME space. Quality build, sets the bar where a safe and durable build should be.
04-02-2017, 08:28 AM
#459

Like I said earlier............The boy has Skilz !!!!!!!!
04-02-2017, 06:18 PM
#460
TECH Regular
Thread Starter
Thanks for all the feedback. Eric I must confess I have been behind on posting and did have something in the works on the brake pedal, but I didn't finish it until just a few minutes ago - no kidding just now! We were thinking just alike it just HAD to go to the left. And by the way I had to put the motor in AGAIN to make sure the arm would clear, and sure enough it didn't have enough CLARENCE ! I'm referring to one of your previous posts about stabbing the motor over and over. Trust me I can relate! Anyway I realize the steering column will be a challenge later, but I'm thinking I can make a shorty work and possibly use the steering offset piece, but I haven't even mocked any of that up yet. More on that later. My factory brake pedal didn't exactly match the late model gas pedal.
Attachment 720050
I did some research early on and found that my drive by wire pedal was used in some Caddilac CTS cars, so I found a junkyard brake assembly on Ebay for $20 so I would have the piece the pad wraps around and wouldn't have to make it. I also bought a brand new pad from Bigg Daddy Caddy (that name makes me grin).. It matches much better!
Attachment 720051
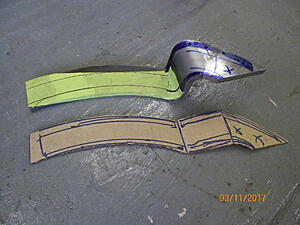
Some of that high powered CAD (cardboard aided drawing) for my pattern for a 2" offset in some 3/8" plate. Here's the rough cut.
Fab director came up with this handy fixture for assembly and welding.
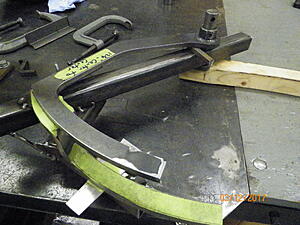
New piece and original piece put together in fixture to be welded by a real welder (not me).
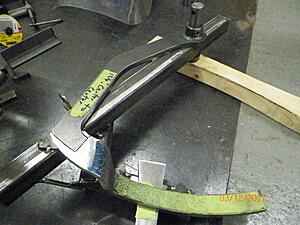
Used part of the fixture to swing it on the pin and work it into the belt sander. Made a perfect radius so my bushing/boot in the firewall will be pretty small.
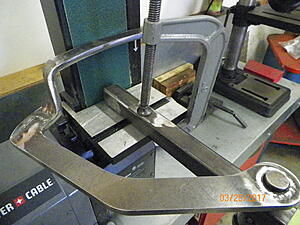
And here is how it came out. I haven't attached the pedal permanently yet because there is a slight amount of slack in the top of the pedal, so that is why it has a c clamp. I'm not sure when the master cylinder is put on and the system has pressure where the actual top of the pedal will be so I left it unfinished for right now.
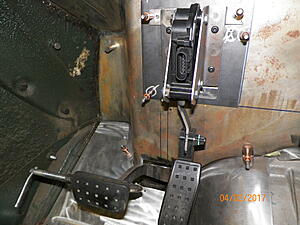
From the drivers seat.
! I'm referring to one of your previous posts about stabbing the motor over and over. Trust me I can relate! Anyway I realize the steering column will be a challenge later, but I'm thinking I can make a shorty work and possibly use the steering offset piece, but I haven't even mocked any of that up yet. More on that later. My factory brake pedal didn't exactly match the late model gas pedal.Attachment 720050
I did some research early on and found that my drive by wire pedal was used in some Caddilac CTS cars, so I found a junkyard brake assembly on Ebay for $20 so I would have the piece the pad wraps around and wouldn't have to make it. I also bought a brand new pad from Bigg Daddy Caddy (that name makes me grin
).. It matches much better!Attachment 720051
Some of that high powered CAD (cardboard aided drawing) for my pattern for a 2" offset in some 3/8" plate. Here's the rough cut.

Fab director came up with this handy fixture for assembly and welding.

New piece and original piece put together in fixture to be welded by a real welder
(not me).
Used part of the fixture to swing it on the pin and work it into the belt sander. Made a perfect radius so my bushing/boot in the firewall will be pretty small.

And here is how it came out. I haven't attached the pedal permanently yet because there is a slight amount of slack in the top of the pedal, so that is why it has a c clamp. I'm not sure when the master cylinder is put on and the system has pressure where the actual top of the pedal will be so I left it unfinished for right now.

From the drivers seat.
