

98 Jeep Cherokee 5.3 Swap
 04-28-2016, 02:25 AM
#1

**Disregard first post. Found the problem in post #2***
Hey guys. I've been a lurker for a long time trying to read up before my swap started. I've got my motor in and everything hooked up but I am having some problems. Hopefully someone can help.
I am swapping in an 05 5.3 and 4L60E in to a 98 Jeep Cherokee. Everything used in this swap all came from the same donor vehicle. The PCM has been reprogrammed by Brendan at LT1swap.com.
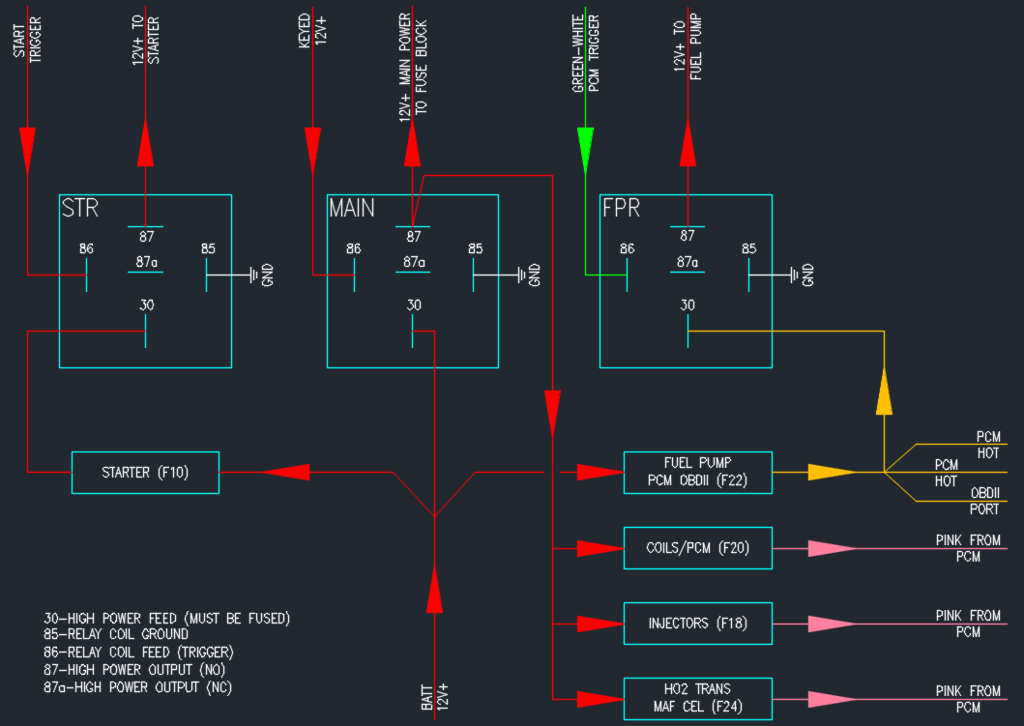
I have everything hooked up from the GM PCM to the Jeep side, however I am not getting any voltage for the fuel pump trigger wire which is pin 9 on the green connector. I have double checked all of my grounds and power wires and they all seem to be hooked up correctly.
Also when I key on, the throttle body just rapidly clicks and the pedal does nothing.
I have plenty of voltage in the battery. Below is the schematic I drew up when hooking all this stuff up which shouldn't have anything to do with the no voltage problem at the PCM but I'd like to make sure I'm hooking all that up correctly
Any ideas guys? Thanks for your help-
I am swapping in an 05 5.3 and 4L60E in to a 98 Jeep Cherokee. Everything used in this swap all came from the same donor vehicle. The PCM has been reprogrammed by Brendan at LT1swap.com.
I have everything hooked up from the GM PCM to the Jeep side, however I am not getting any voltage for the fuel pump trigger wire which is pin 9 on the green connector. I have double checked all of my grounds and power wires and they all seem to be hooked up correctly.
Also when I key on, the throttle body just rapidly clicks and the pedal does nothing.
I have plenty of voltage in the battery. Below is the schematic I drew up when hooking all this stuff up which shouldn't have anything to do with the no voltage problem at the PCM but I'd like to make sure I'm hooking all that up correctly
Any ideas guys? Thanks for your help-
Last edited by stomperxj; 04-28-2016 at 05:08 PM.
 04-28-2016, 05:05 PM
#2
**Disregard**
I'm an idiot. I didn't have the ground for the TAC module hooked up. It was wrapped up with all the cruise control wires and apparently I forgot to label it. Pedal works and the fuel pump trigger works now...
I guess I can post some pics of the whole project since I have a thread going-
So I think I�ve made enough progress to start a build thread. I�m starting with a 98 SE model I bought several years ago at a government auction for way too much money. It had low miles though so whatever. I�m going to give a bit of backstory so skip this if you are bored easily.
I did the standard lift/wheels/tires/rack/bumper treatment about 8 years ago and it has been a great rig and has taken me everywhere I wanted to go. In the last couple years though the mileage seemed to get worse and worse and the power seemed to be dropping too. About a year and a half ago I started researching the 5.3 as an option. Frank Z had his thread and there were a few others that had somewhat documented the swap and it seemed doable but the price always put me off of it. LS/Vortec motors in my area are rather expensive compared to what other people have reported. I decided I was going to do a 5.3, I just needed to find a motor that was reasonably priced. Fast forward to last December and I came across an 05 Yukon for sale on craigslist listed as parts with only 140k on the clock. I emailed and asked how much he wanted for just the motor/trans and he said $2k for the motor/trans or $2k for everything. He was a repo guy and just wanted rid of the whole thing. We settled on $1800 for the rig and he even delivered it to my house. I pulled everything off that I wanted and sold a bunch of parts off of it to try and recoup some of the cost. I made back about half of what I spent on the rig.
Instead of going the Novak route on everything and chopping a hole in the hood I�m building my own bracketry and mounts and using an LS1 intake so as not to disrupt the attractive lines of the stock XJ hood. I personally think the Novak stuff is overpriced and have read more than a couple peoples comments that the motor mounts are a pain to deal with anyway. Plus I�m not rich and the Novak radiator, motor mounts, xfer case adapter and headers total well over $1600.
I�ll also be posting cost information and part numbers for everything I have purchased so it is available to future swappers.
Here are the threads I referenced a lot during my research phase
FrankZ:
http://www.naxja.org/forum/showthread.php?t=1007477
PhotoJared:
http://www.naxja.org/forum/showthread.php?t=1122178
blistovmhz Poverty Method:
http://www.naxja.org/forum/showthread.php?t=1119575
xjbubba
http://www.naxja.org/forum/showthread.php?t=945920
Huge shout out to the guys who have answered my questions over the last year. Especially JohnD. I have bugged him a lot via PM and he has answered all of my questions. Thanks John-
Blah blah� shut up and show some pics already
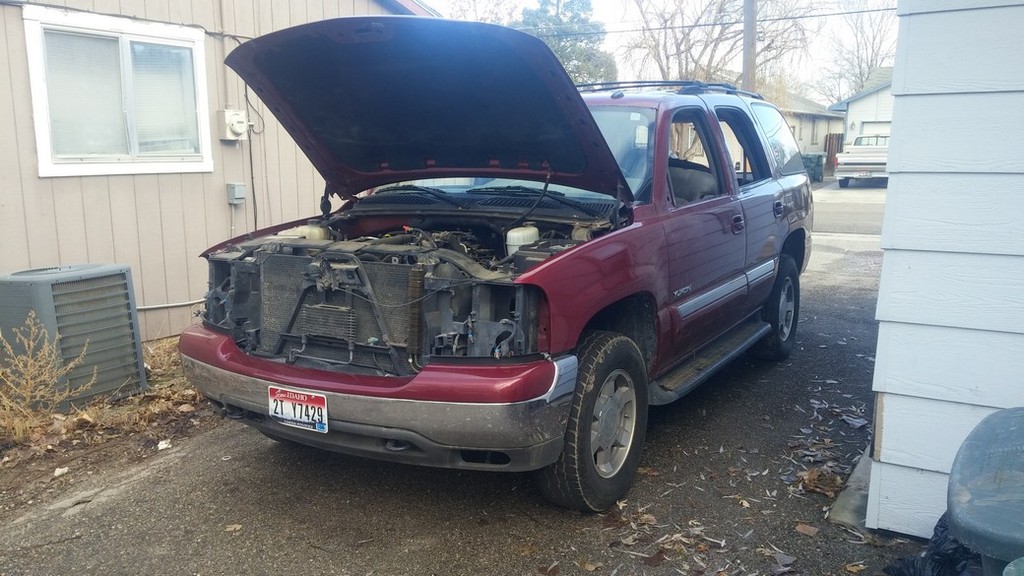
05 Yukon donor:
Motor pulled

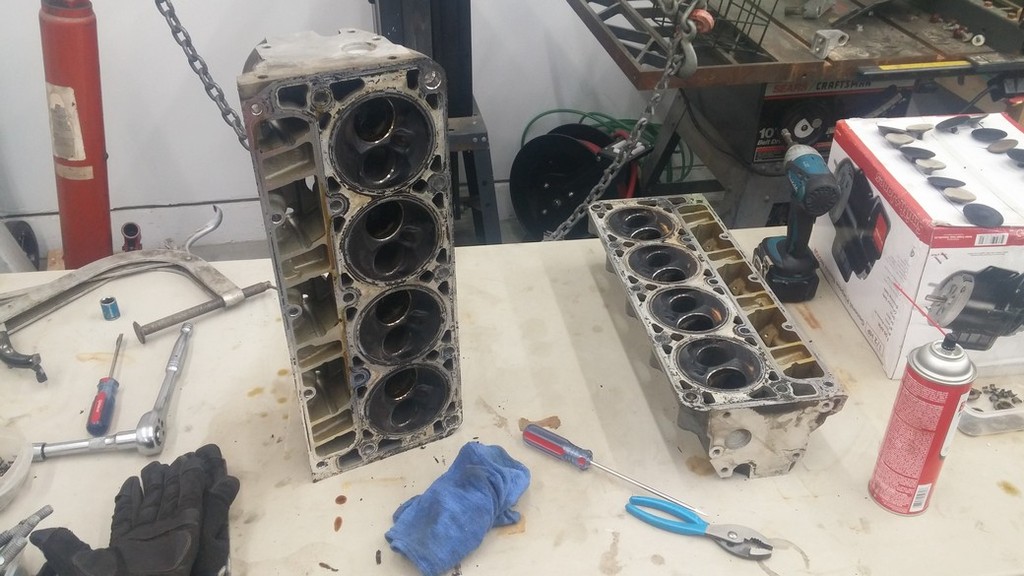
Stripped and ready for cleaning

The heads were super gunked up with oil/crap
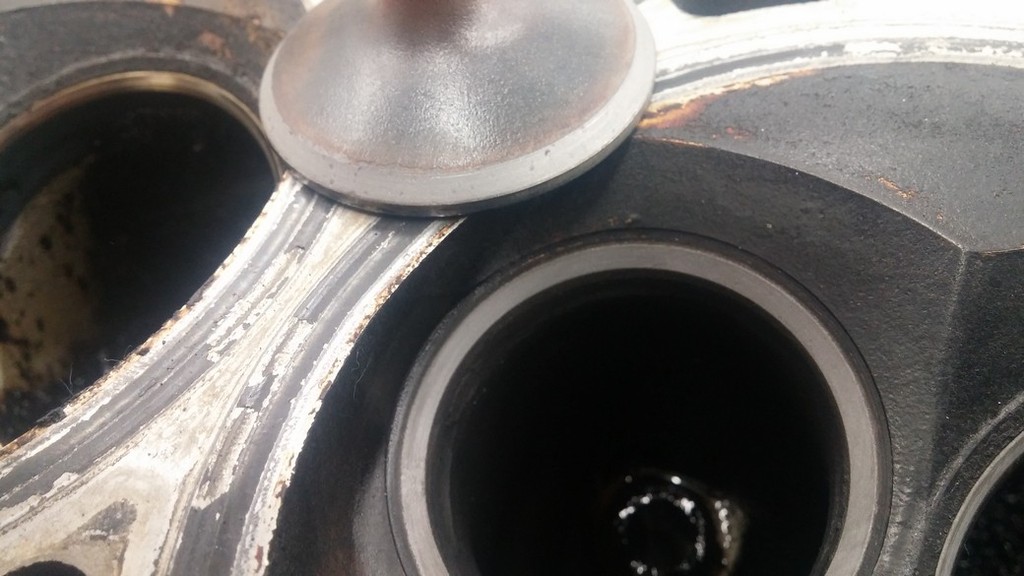
Piston cleaning

Valve seats were pitted

So I hand lapped them
One of the exhaust manifold bolts broke off in the head so I tried drilling it and using an easy out and ended up breaking a small drill bit off in the broken off bolt. I thought I was screwed and then did some reading and found out carbide will cut through high speed steel. So I took the head over to dad's shop and he had a small diameter end mill I was able to plunge into the broken cluster**** I had created


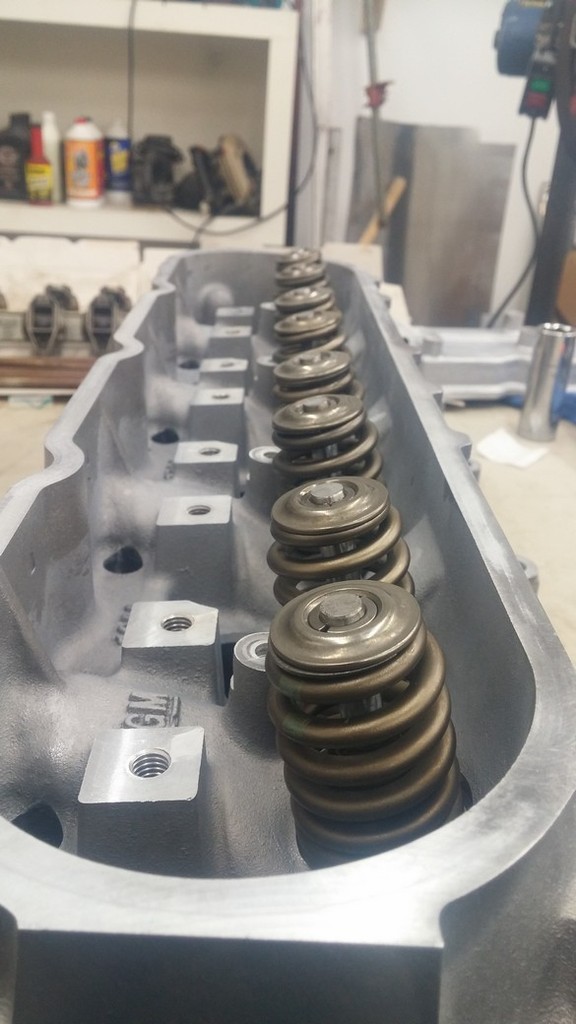
New guide seals
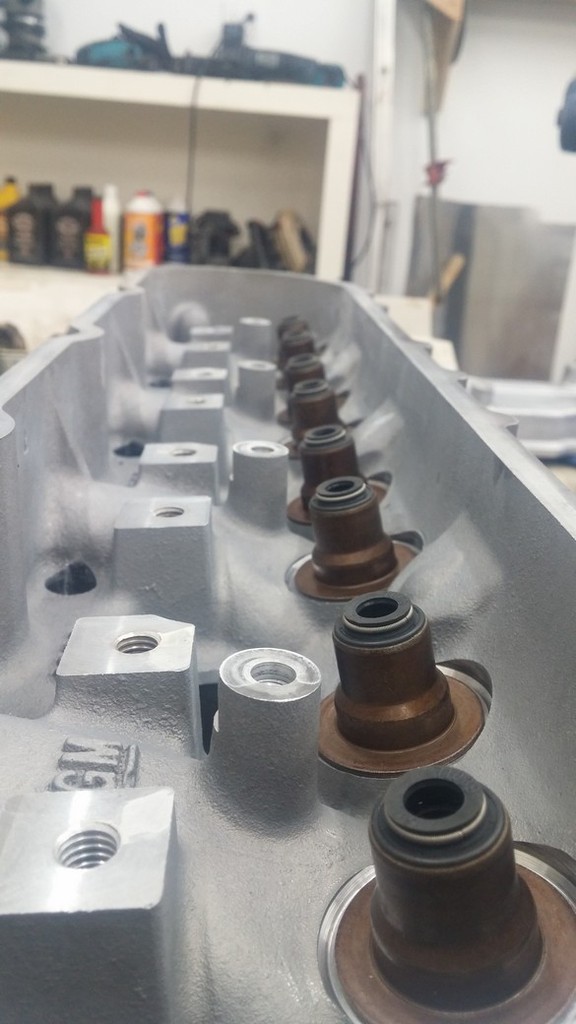
Stock springs
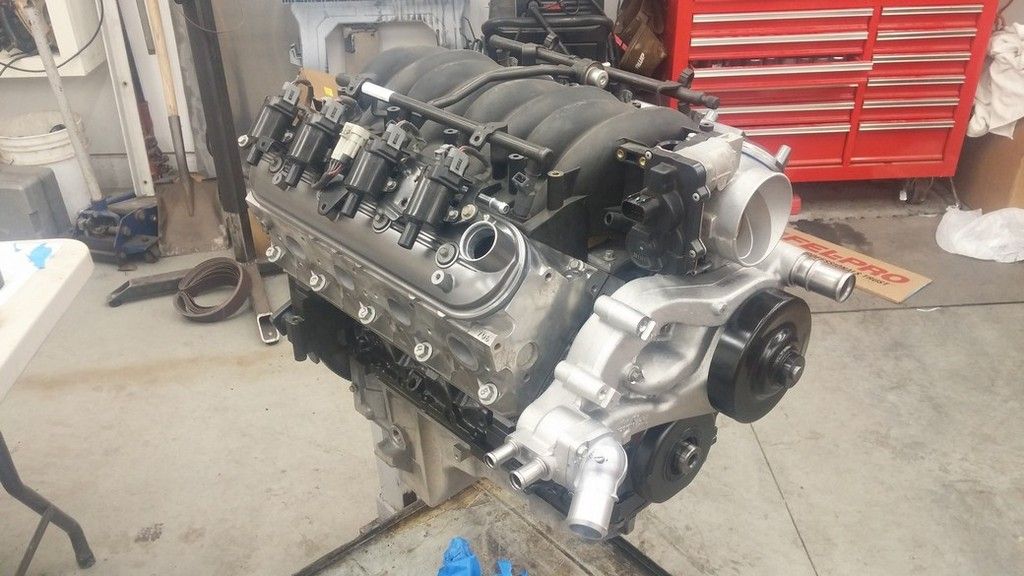
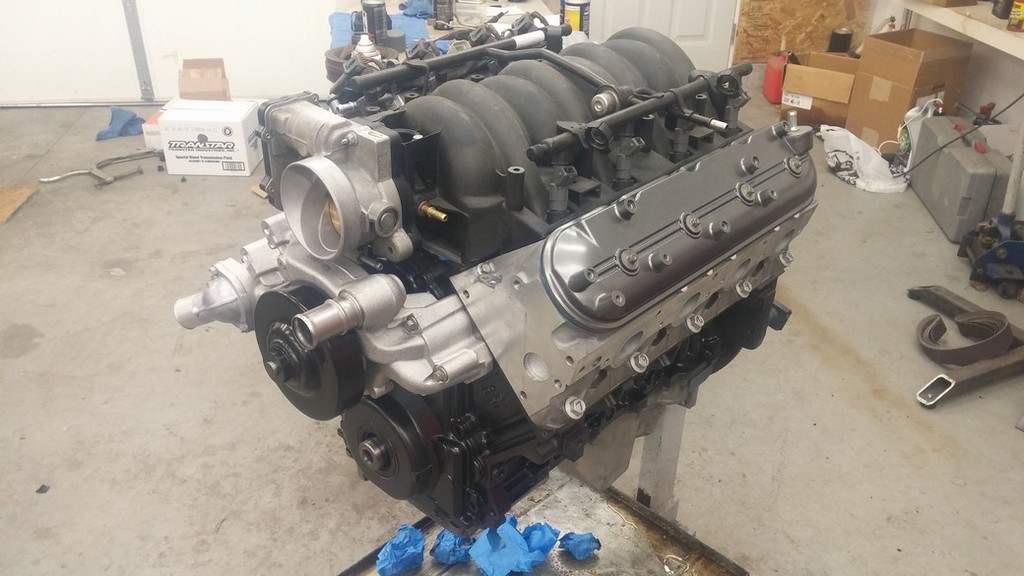
And here is the motor partially assembled and painted. I used some high temp black metallic on the block and high temp "graphite" color on the valve covers and pan
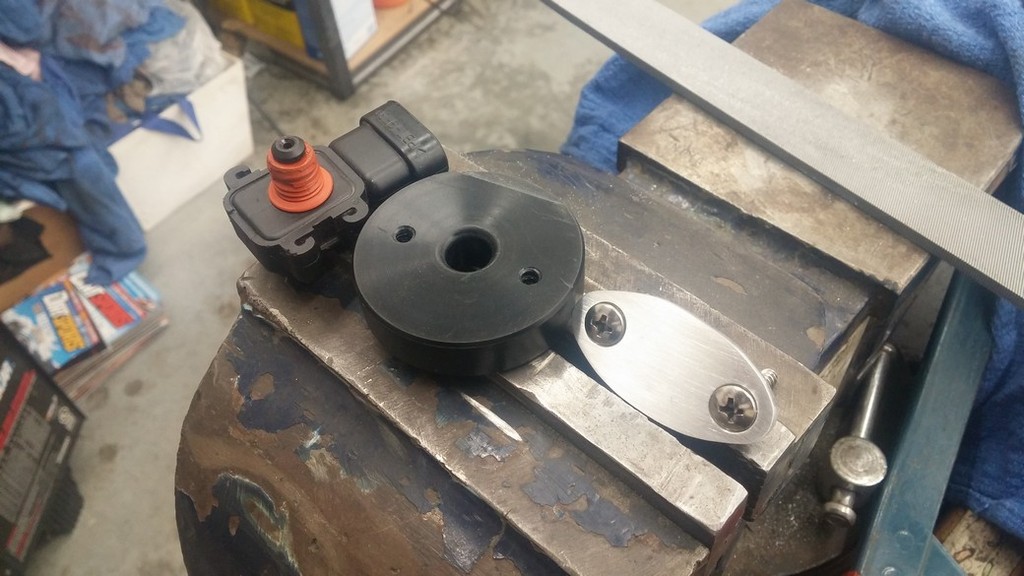
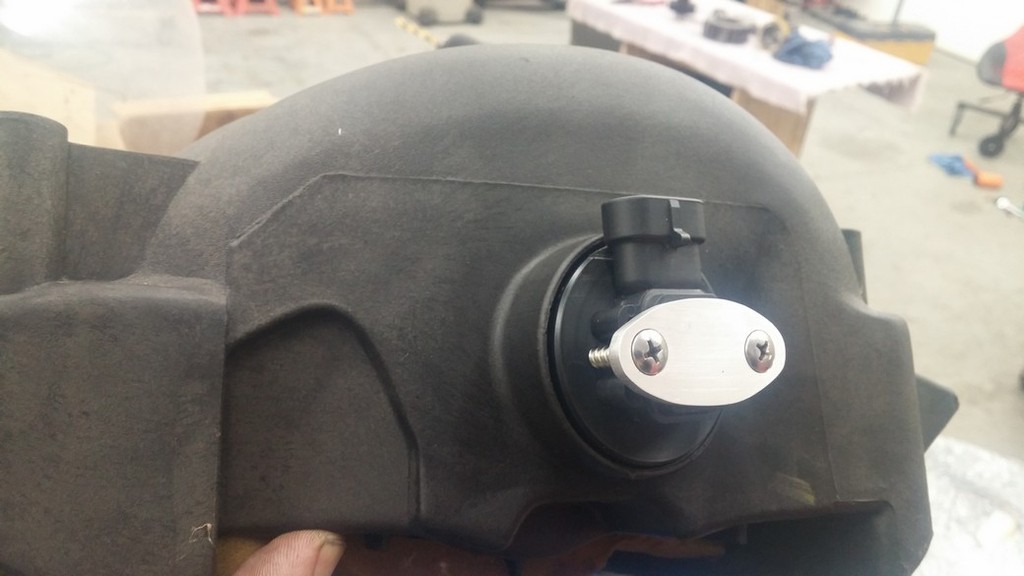
I cut the connector off the back of the intake and made a bracket/plug to hold the MAP sensor. Mostly for clearance as some guys said it was too close to the firewall
I forgot to add in the cost of a new valve body harness and the fluid for the trans rebuild. The pic below shows all of my costs up to today with part numbers. Some of this stuff is obviously specific to the year motor I have:

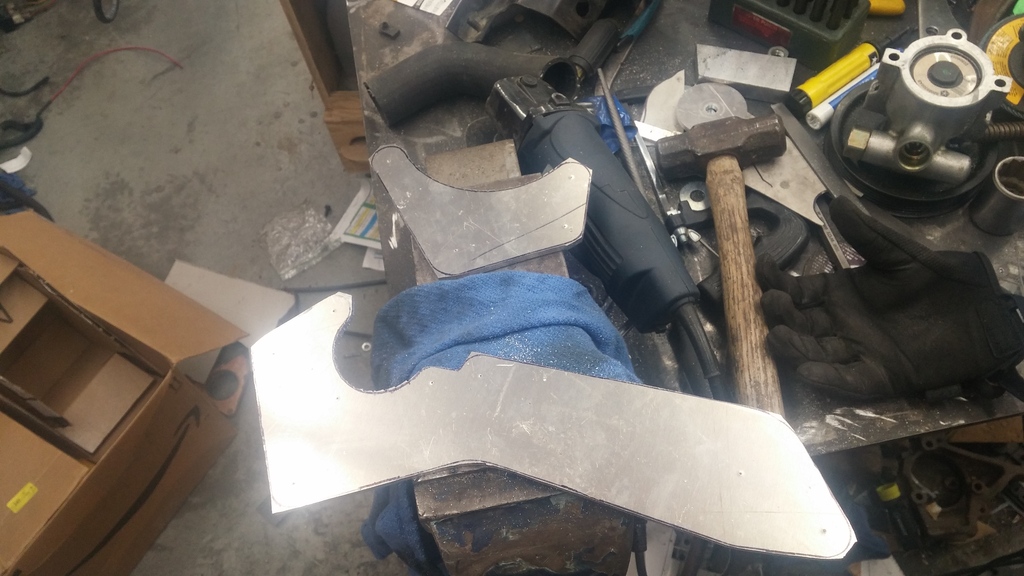
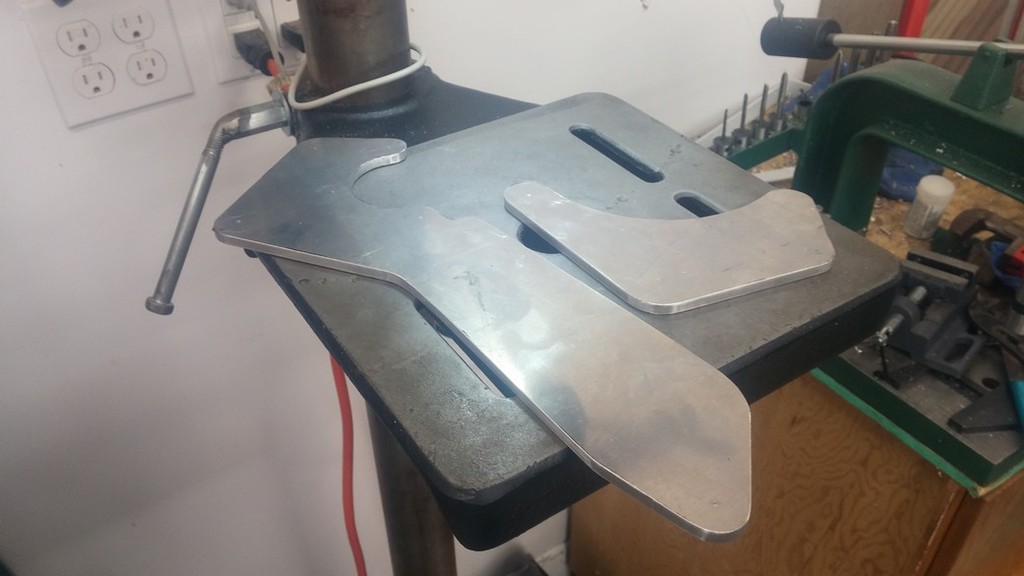
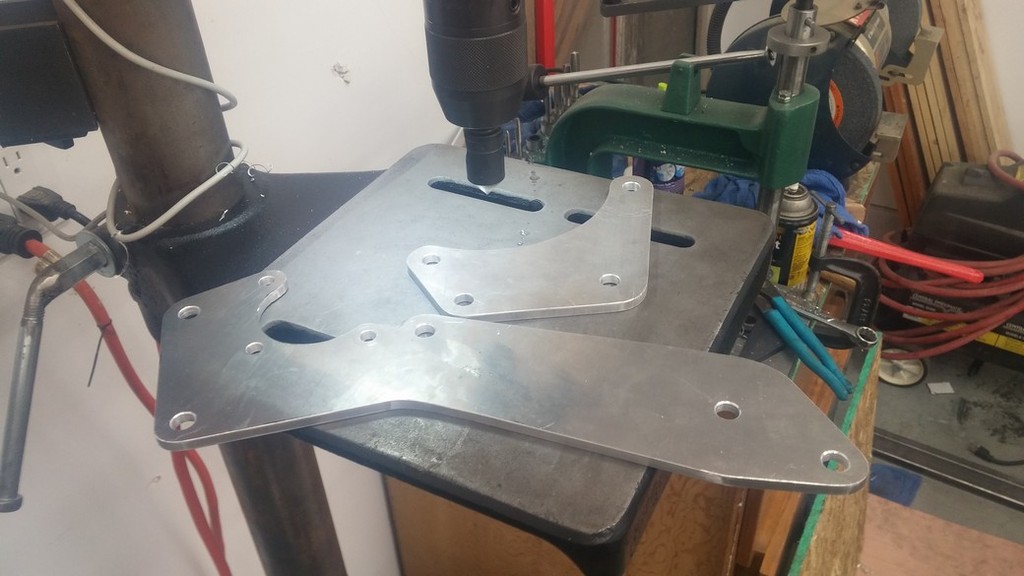
This past weekend I worked on the new accessory brackets and finished the motor mounts and trans mount. The original accessory brackets I made did not work. The alt was too high and the GM steering pump pulley hit the steering box. So I'm going back to using a high mount Jeep PS pump. The Jeep hoses are a bolt in as is so if I need to replace them its an off the shelf item. The idler and tensioner are off of an 02 GMC Envoy.
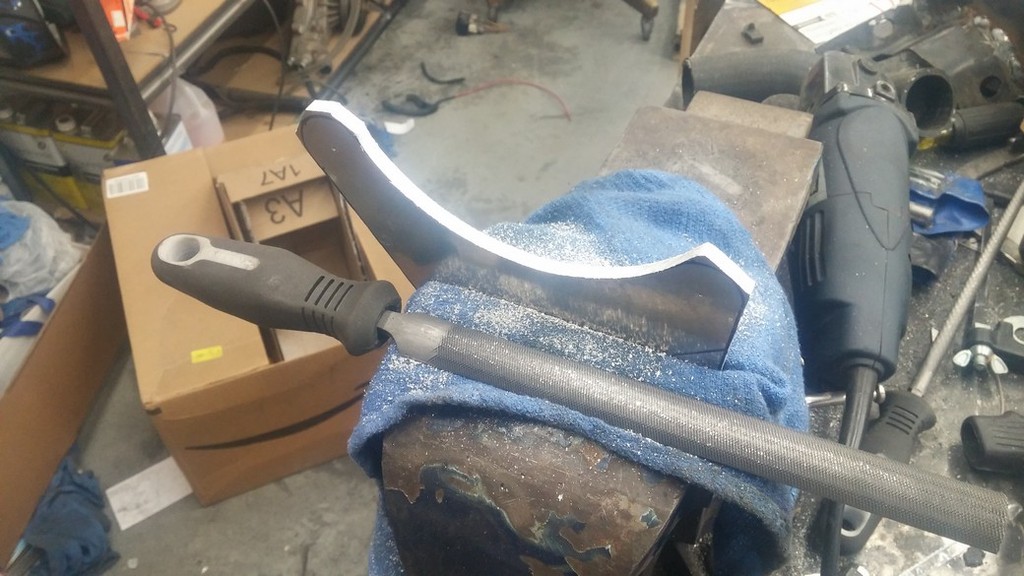
Brackets are .25" aluminum
Hand finished with a file, belt sander and sandpaper
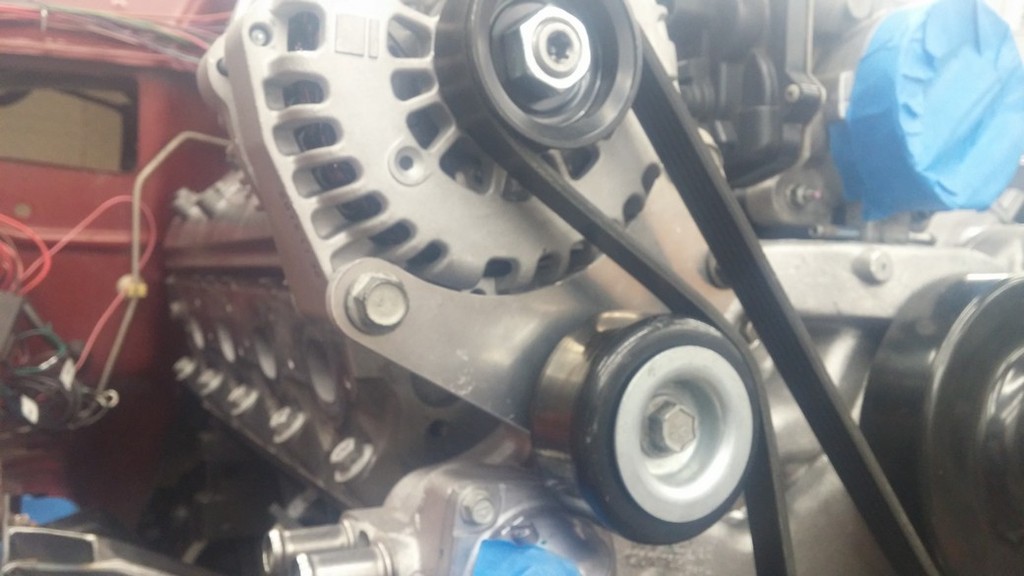
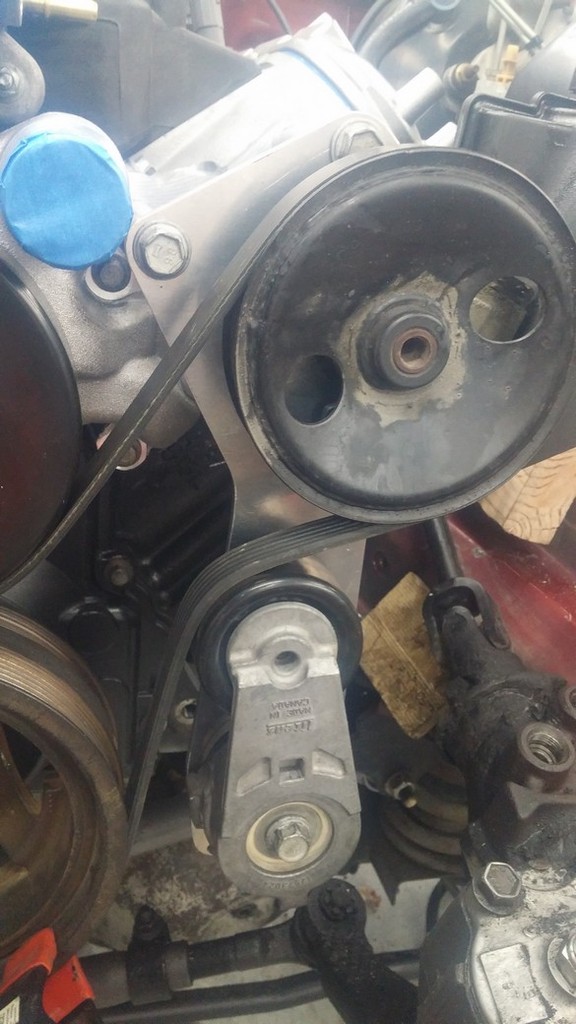
Belt routing. I think I forgot to mention I'm using an L99 water pump. It lines up with the truck crank pulley.

Passenger motor mount

Driver motor mount
I cut the middle out of the Yukon trans cross member and spliced it into the XJ cross member. I'm using an OEM Yukon trans mount.


I think I'm caught up on pics now. The motor/trans is supported 100% by the Jeep now which is a big step. I have to make some slight adjustments to the firewall by the back corners of the heads. Its a little tight but should be easy to clearance. I'll be posting another video on youtube tonight.
Jess
I'm an idiot. I didn't have the ground for the TAC module hooked up. It was wrapped up with all the cruise control wires and apparently I forgot to label it. Pedal works and the fuel pump trigger works now...
I guess I can post some pics of the whole project since I have a thread going-
So I think I�ve made enough progress to start a build thread. I�m starting with a 98 SE model I bought several years ago at a government auction for way too much money. It had low miles though so whatever. I�m going to give a bit of backstory so skip this if you are bored easily.
I did the standard lift/wheels/tires/rack/bumper treatment about 8 years ago and it has been a great rig and has taken me everywhere I wanted to go. In the last couple years though the mileage seemed to get worse and worse and the power seemed to be dropping too. About a year and a half ago I started researching the 5.3 as an option. Frank Z had his thread and there were a few others that had somewhat documented the swap and it seemed doable but the price always put me off of it. LS/Vortec motors in my area are rather expensive compared to what other people have reported. I decided I was going to do a 5.3, I just needed to find a motor that was reasonably priced. Fast forward to last December and I came across an 05 Yukon for sale on craigslist listed as parts with only 140k on the clock. I emailed and asked how much he wanted for just the motor/trans and he said $2k for the motor/trans or $2k for everything. He was a repo guy and just wanted rid of the whole thing. We settled on $1800 for the rig and he even delivered it to my house. I pulled everything off that I wanted and sold a bunch of parts off of it to try and recoup some of the cost. I made back about half of what I spent on the rig.
Instead of going the Novak route on everything and chopping a hole in the hood I�m building my own bracketry and mounts and using an LS1 intake so as not to disrupt the attractive lines of the stock XJ hood. I personally think the Novak stuff is overpriced and have read more than a couple peoples comments that the motor mounts are a pain to deal with anyway. Plus I�m not rich and the Novak radiator, motor mounts, xfer case adapter and headers total well over $1600.
I�ll also be posting cost information and part numbers for everything I have purchased so it is available to future swappers.
Here are the threads I referenced a lot during my research phase
FrankZ:
http://www.naxja.org/forum/showthread.php?t=1007477
PhotoJared:
http://www.naxja.org/forum/showthread.php?t=1122178
blistovmhz Poverty Method:
http://www.naxja.org/forum/showthread.php?t=1119575
xjbubba
http://www.naxja.org/forum/showthread.php?t=945920
Huge shout out to the guys who have answered my questions over the last year. Especially JohnD. I have bugged him a lot via PM and he has answered all of my questions. Thanks John-
Blah blah� shut up and show some pics already
05 Yukon donor:
Motor pulled
Stripped and ready for cleaning
The heads were super gunked up with oil/crap
Piston cleaning
Valve seats were pitted
So I hand lapped them
One of the exhaust manifold bolts broke off in the head so I tried drilling it and using an easy out and ended up breaking a small drill bit off in the broken off bolt. I thought I was screwed and then did some reading and found out carbide will cut through high speed steel. So I took the head over to dad's shop and he had a small diameter end mill I was able to plunge into the broken cluster**** I had created
New guide seals
Stock springs
And here is the motor partially assembled and painted. I used some high temp black metallic on the block and high temp "graphite" color on the valve covers and pan
I cut the connector off the back of the intake and made a bracket/plug to hold the MAP sensor. Mostly for clearance as some guys said it was too close to the firewall
I forgot to add in the cost of a new valve body harness and the fluid for the trans rebuild. The pic below shows all of my costs up to today with part numbers. Some of this stuff is obviously specific to the year motor I have:
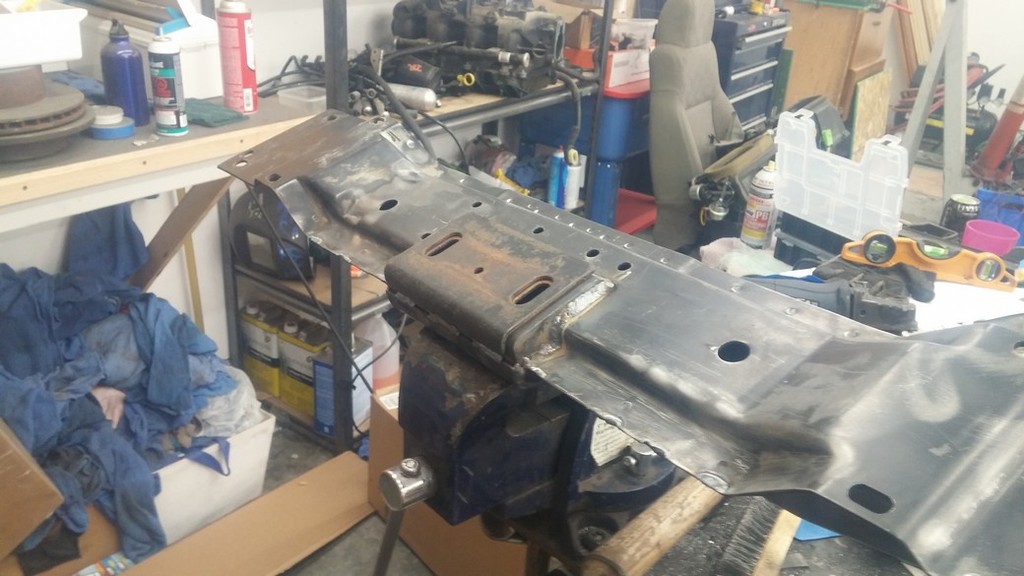
This past weekend I worked on the new accessory brackets and finished the motor mounts and trans mount. The original accessory brackets I made did not work. The alt was too high and the GM steering pump pulley hit the steering box. So I'm going back to using a high mount Jeep PS pump. The Jeep hoses are a bolt in as is so if I need to replace them its an off the shelf item. The idler and tensioner are off of an 02 GMC Envoy.
Brackets are .25" aluminum
Hand finished with a file, belt sander and sandpaper
Belt routing. I think I forgot to mention I'm using an L99 water pump. It lines up with the truck crank pulley.
Passenger motor mount
Driver motor mount
I cut the middle out of the Yukon trans cross member and spliced it into the XJ cross member. I'm using an OEM Yukon trans mount.
I think I'm caught up on pics now. The motor/trans is supported 100% by the Jeep now which is a big step. I have to make some slight adjustments to the firewall by the back corners of the heads. Its a little tight but should be easy to clearance. I'll be posting another video on youtube tonight.
Jess
04-28-2016, 05:07 PM
#3
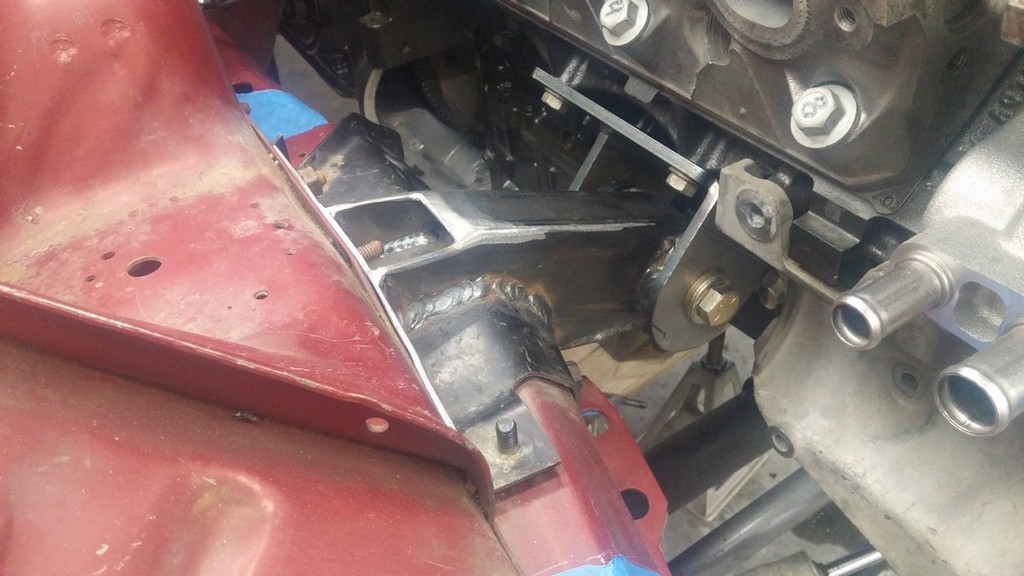
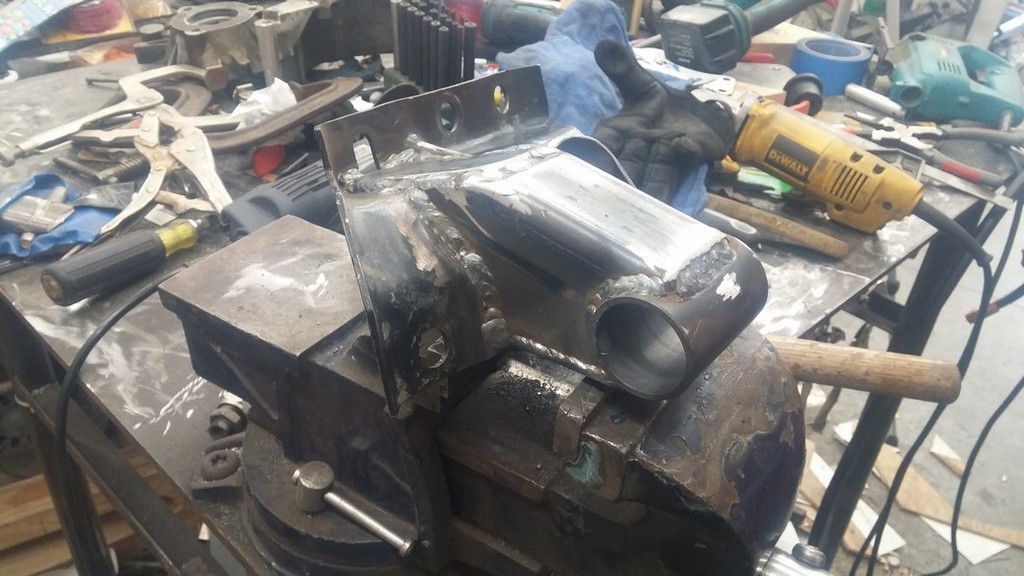
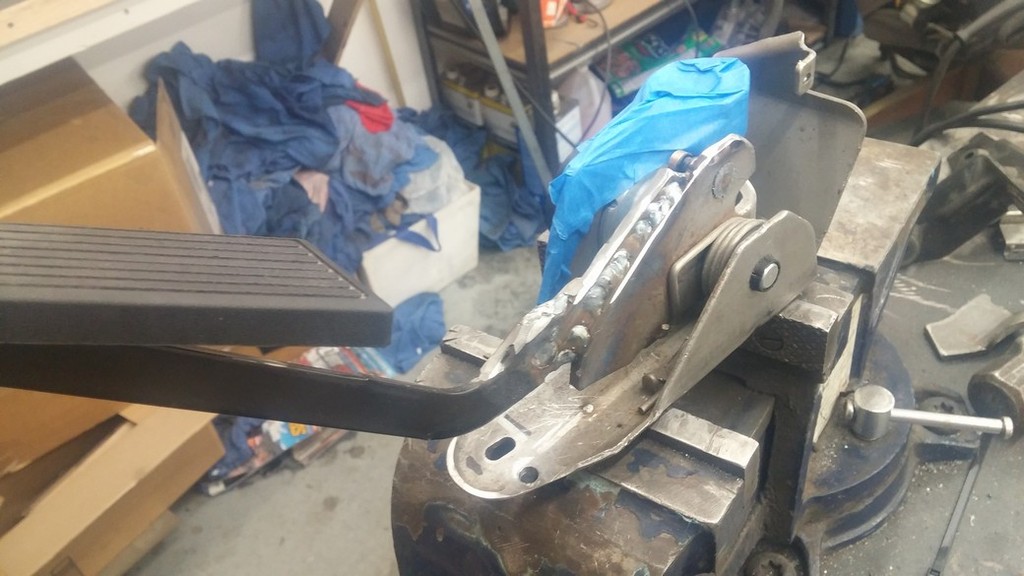
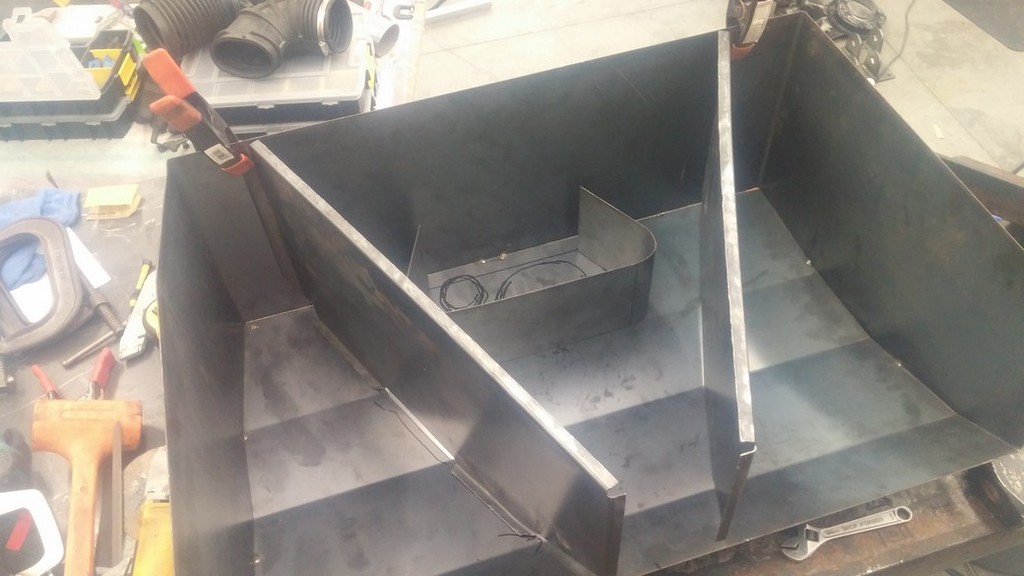
I made some progress yesterday and today on some smaller stuff. Got the air box mounts done and the 4" outlet welded on. Chopped up the factory GM plastic computer holder and made some mounts for it. Got the gas pedal modified too. Just have to drill an upper hole for the top bolt and that should be mounted and done. Disregard the booger welds. Not my prettiest work but they are plenty strong.


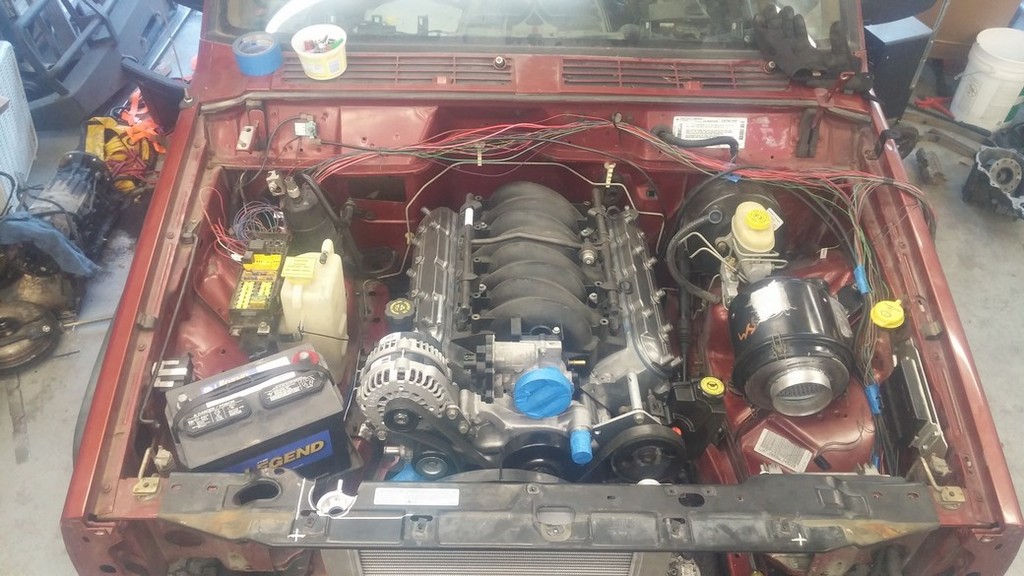
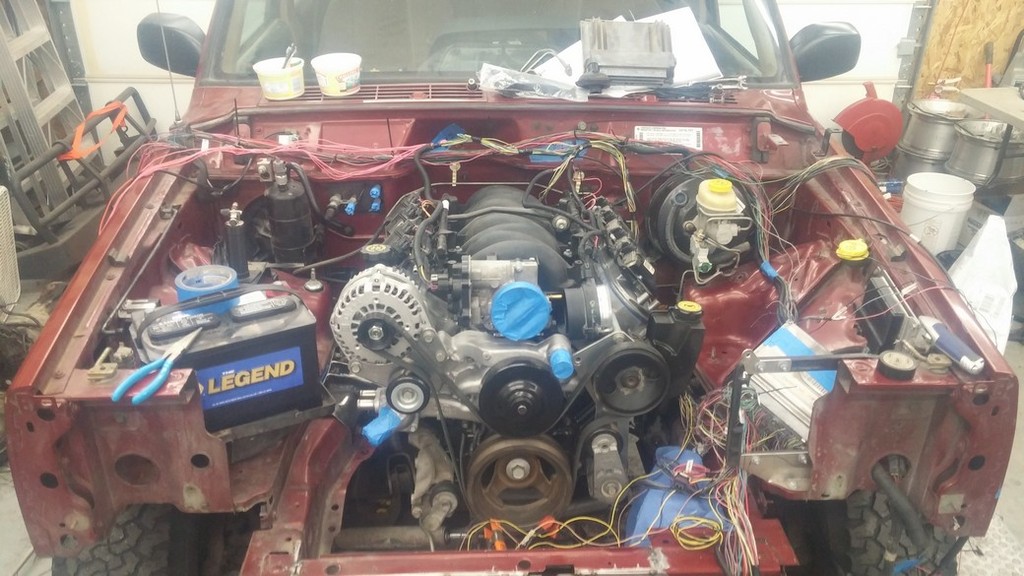
And I threw everything in the engine bay to check fitment and to get an overall shot of how everything fits
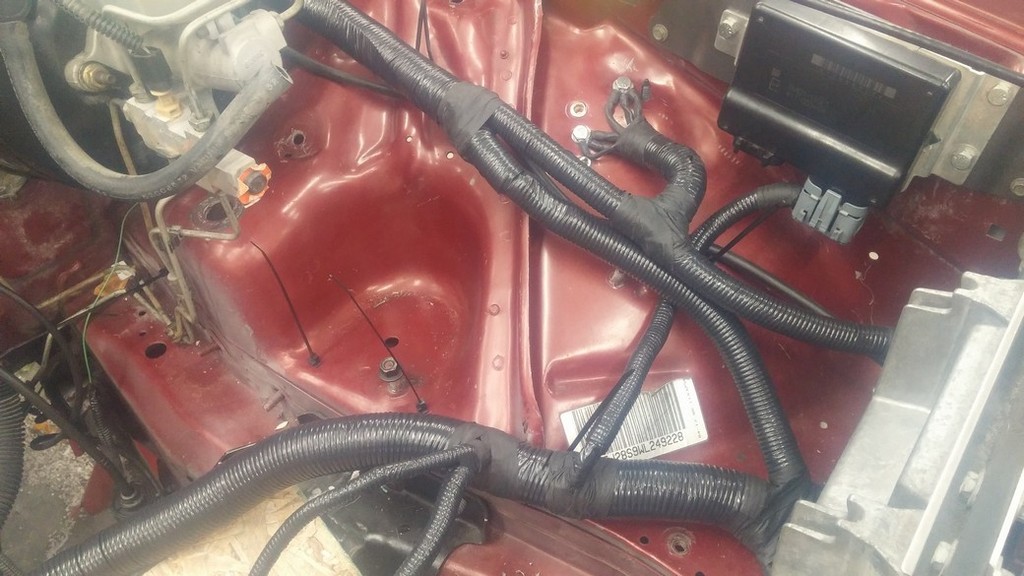
I've been working on wiring a lot lately. What a pain in the ***.
Plug for the back side of the cluster:
I ran all of my gauge signal wires through the main firewall connector. After thinning out the Jeep harness I had enough wires left over that were unused to do so.
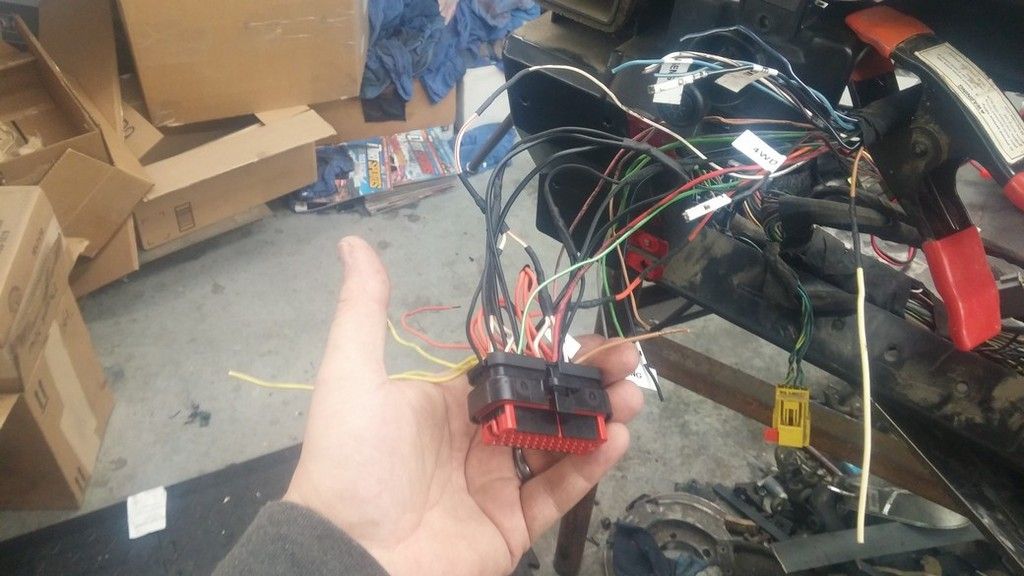
Laying out the GM harness:
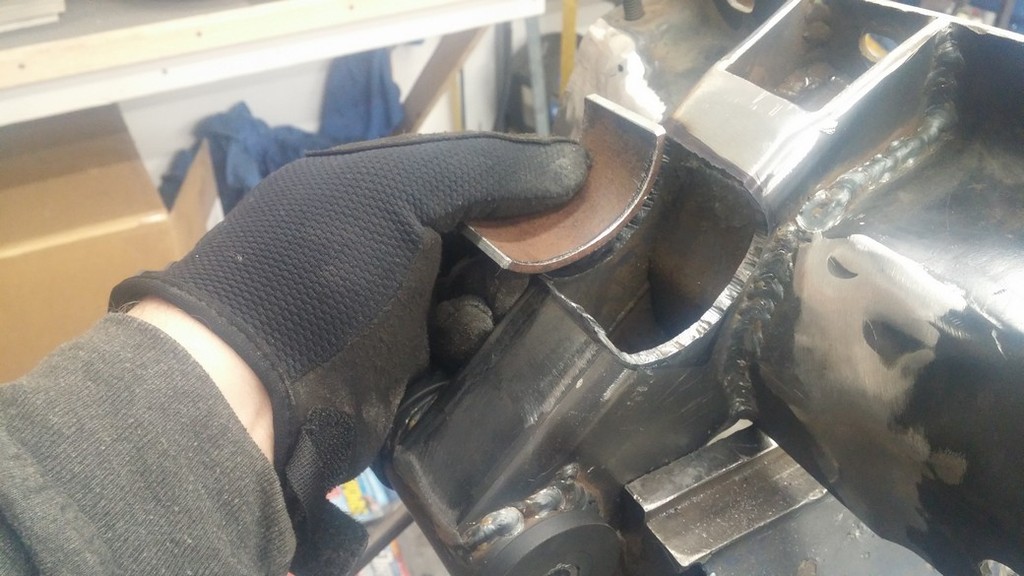
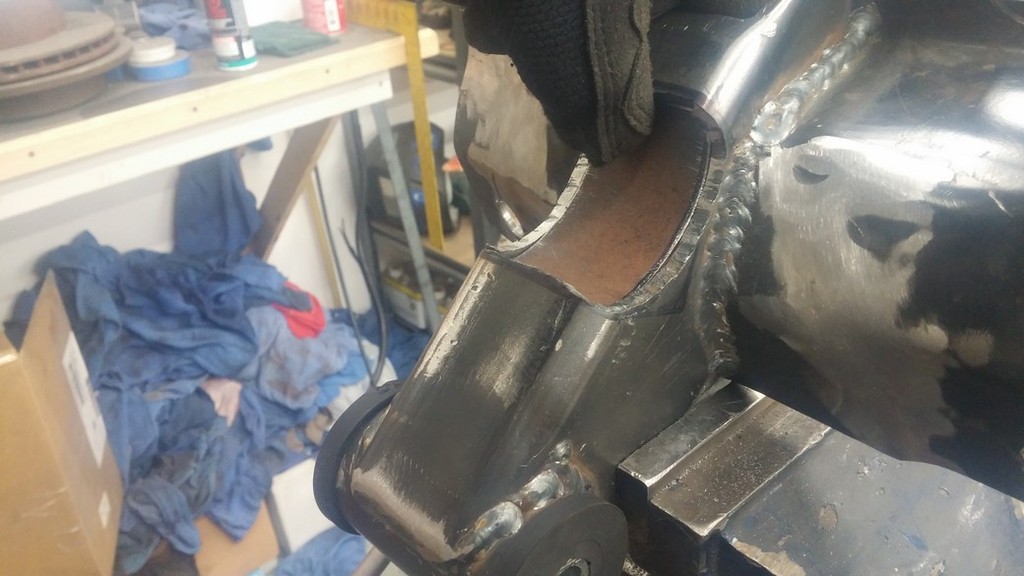
Well I came across a mistake I made yesterday. I put the manifolds in and they fit fine, plenty of clearance. Then proceeded to build the motor mounts without checking fit on the manifolds at all. Passenger side hit the motor mount so I had to notch the mount down about 3/4" and about 2.5" wide. I cut out a chunk with the plasma and used a piece of pipe cut in half and spread out to fill the gap. Oops...


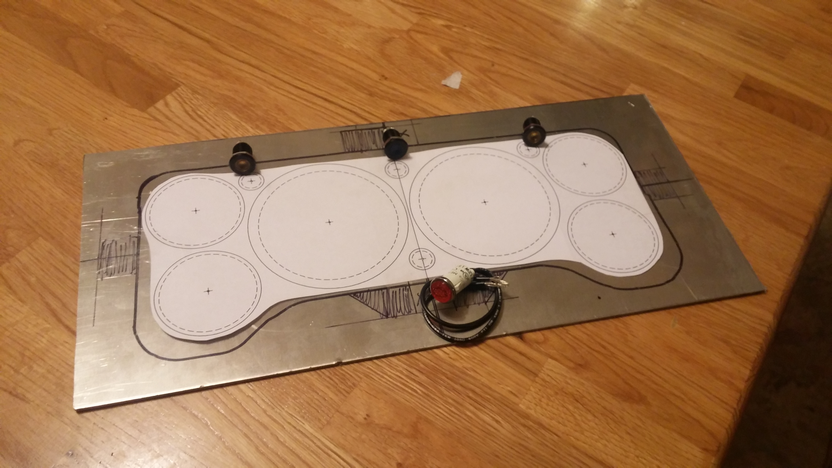
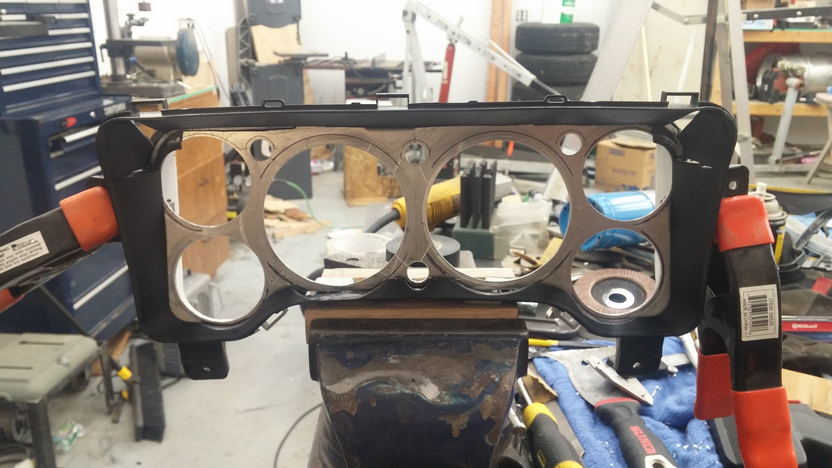
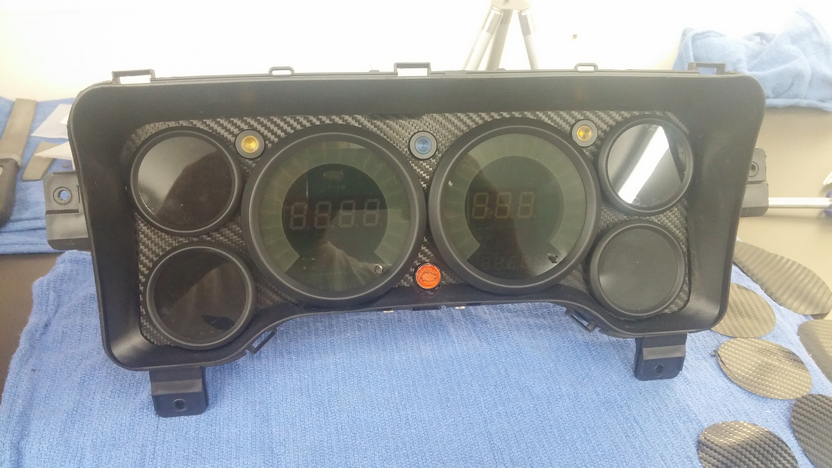
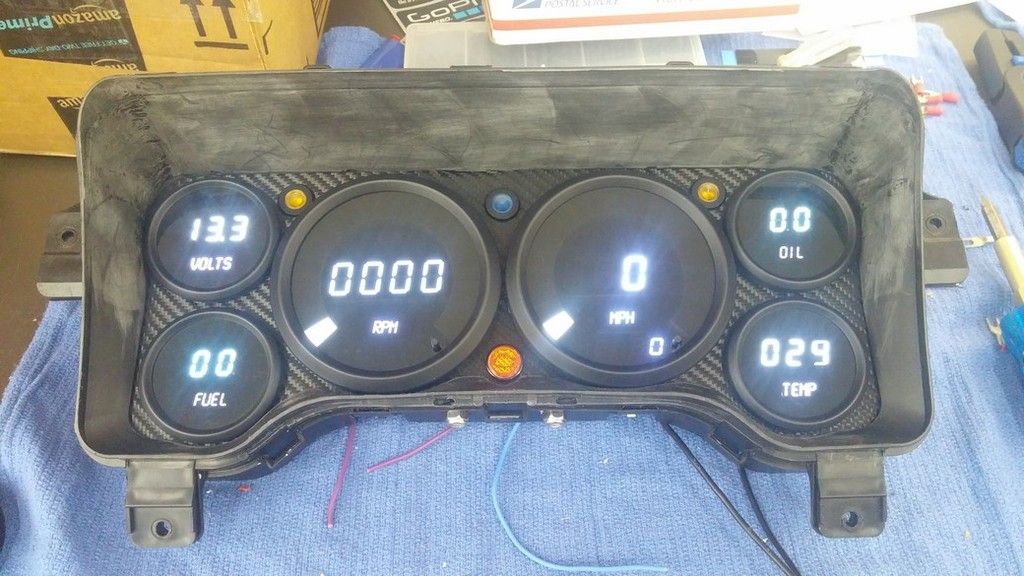
Since I have been working on wiring I thought I'd show my gauge cluster. I actually built this last fall before I even bought my motor/trans. I decided to go with Intelitronix segmented LED gauges for a couple reasons. I wanted to do something a little different and I didn't want to spend the money for Autometers.
A few words about Intellitronix. Definitely cool gauges but the whole ordeal was a huge pain in the ***. I ordered my gauges from their eBay store. When they showed up some of the LEDs had varying brightness and the OIL gauge lettering below the numbers was crooked. I emailed the company and sent the gauge back on my dime. It took about 6 weeks to get a gauge back from them. Then I noticed some of the other gauges were not right so I called and talked to a gal there. Long story short it took 7 different shipments of gauges and nearly 2 more months to get all the gauges I needed with the correct color, correct lens tint etc... Their QC absolutely sucks donkey nuts. They are Made in Murica and have a lifetime warranty on them though.... /rant
I modified the plastic surround so I could fit the entire large gauge bezels inside the cluster. I went to a local plastic outfit and asked for glue that I could use on the surround and since it is made from Polypropylene nothing will stick to it. So I cut the surround apart and then used a soldering iron to "weld" it back together. I made a backing piece from .090 5052 aluminum sheet and then covered it with some carbon fiber vinyl for some bling. LED indicators are from Amazon and I got my CEL from Painless I think.
I used a 35 pin connector I got from Digikey for the wiring. I used 32 of the 35 pins. Then made a small enclosure for the connector out of some .035 aluminum sheet.
Anyway... Pics:


That should catch me up to current....
And I threw everything in the engine bay to check fitment and to get an overall shot of how everything fits
I've been working on wiring a lot lately. What a pain in the ***.
Plug for the back side of the cluster:
I ran all of my gauge signal wires through the main firewall connector. After thinning out the Jeep harness I had enough wires left over that were unused to do so.
Laying out the GM harness:
Well I came across a mistake I made yesterday. I put the manifolds in and they fit fine, plenty of clearance. Then proceeded to build the motor mounts without checking fit on the manifolds at all. Passenger side hit the motor mount so I had to notch the mount down about 3/4" and about 2.5" wide. I cut out a chunk with the plasma and used a piece of pipe cut in half and spread out to fill the gap. Oops...
Since I have been working on wiring I thought I'd show my gauge cluster. I actually built this last fall before I even bought my motor/trans. I decided to go with Intelitronix segmented LED gauges for a couple reasons. I wanted to do something a little different and I didn't want to spend the money for Autometers.
A few words about Intellitronix. Definitely cool gauges but the whole ordeal was a huge pain in the ***. I ordered my gauges from their eBay store. When they showed up some of the LEDs had varying brightness and the OIL gauge lettering below the numbers was crooked. I emailed the company and sent the gauge back on my dime. It took about 6 weeks to get a gauge back from them. Then I noticed some of the other gauges were not right so I called and talked to a gal there. Long story short it took 7 different shipments of gauges and nearly 2 more months to get all the gauges I needed with the correct color, correct lens tint etc... Their QC absolutely sucks donkey nuts. They are Made in Murica and have a lifetime warranty on them though.... /rant
I modified the plastic surround so I could fit the entire large gauge bezels inside the cluster. I went to a local plastic outfit and asked for glue that I could use on the surround and since it is made from Polypropylene nothing will stick to it. So I cut the surround apart and then used a soldering iron to "weld" it back together. I made a backing piece from .090 5052 aluminum sheet and then covered it with some carbon fiber vinyl for some bling. LED indicators are from Amazon and I got my CEL from Painless I think.
I used a 35 pin connector I got from Digikey for the wiring. I used 32 of the 35 pins. Then made a small enclosure for the connector out of some .035 aluminum sheet.
Anyway... Pics:
That should catch me up to current....
 04-29-2016, 06:07 PM
#6

Very nice build. I really like the fab work.
05-02-2016, 01:35 AM
#7
Did some work on the transfer case this weekend. I picked up a first gen S10 231 to get my input shaft and 6 pinion planetary. Just for reference I was reading a couple S10 forums and a few guys said that all of the original body style S10 231 cases (82-93) have 6 pinion planetaries and wide chains. The downside is its the old style gear cut so it may be a little louder than the newer style. Everything I have read says the gear cut changeover year is 94 so if you are using the older style like me grab a 93 or older case or 95 or newer if you are using the newer cut.
Below is a comparison pic of the 3 different input shafts I have come across. Far left is the 27 spline input, wide bearing (BD50-8), 6 pinion planetary out of the S10 case. Middle is the 23 spline input, narrow bearing, 3 pinion planetary out of my original 98 case. Far right is the 23 spline input, wide bearing, 3 pinion planetary out of the 93 case I picked up this past weekend.

These next couple pics are of the difference in gear cut in the planetary pinion gears. you can see the older pre 94 cut has a wider crown on the teeth vs the post 94 narrow crown.


Getting the needle bearings out of the rear of the case is a pain in the ***. I used a Dremel and a few sanding drums to sand down the outer race until it split and I could knock it out with a small slide hammer.
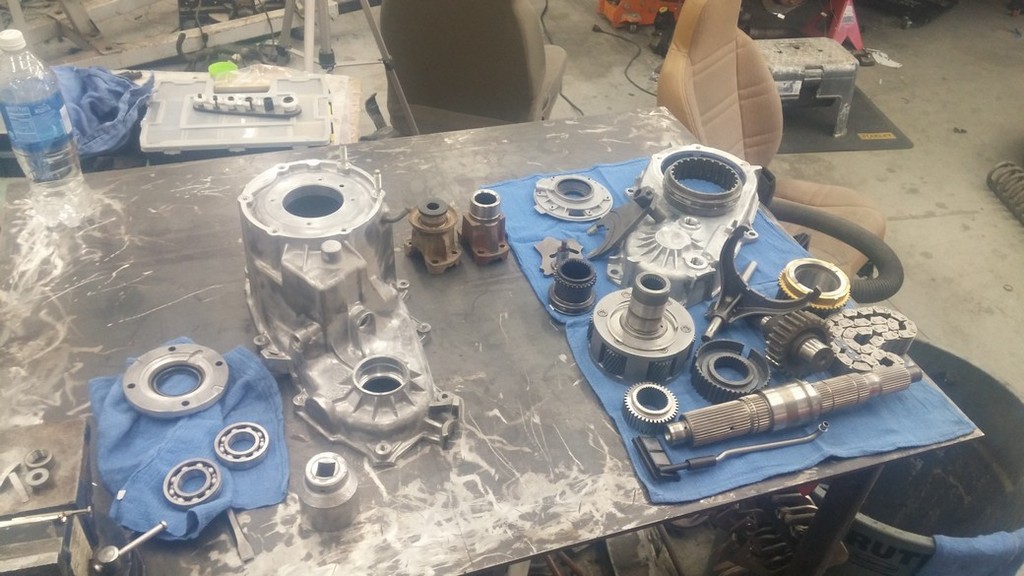
I'm pretty fortunate to have a good friend that rebuilds transmissions at home as a side business so I called him up and took all my parts out to his hot wash tank.

All the clean parts ready to drop in the case. I had to order a couple more bearings and one seal which should be here by the middle of the week and then the case can be final assembled.
This is a pic of the OEM shift comb vs the 2 low comb that came with the kit I bought several years ago from DC4WD.

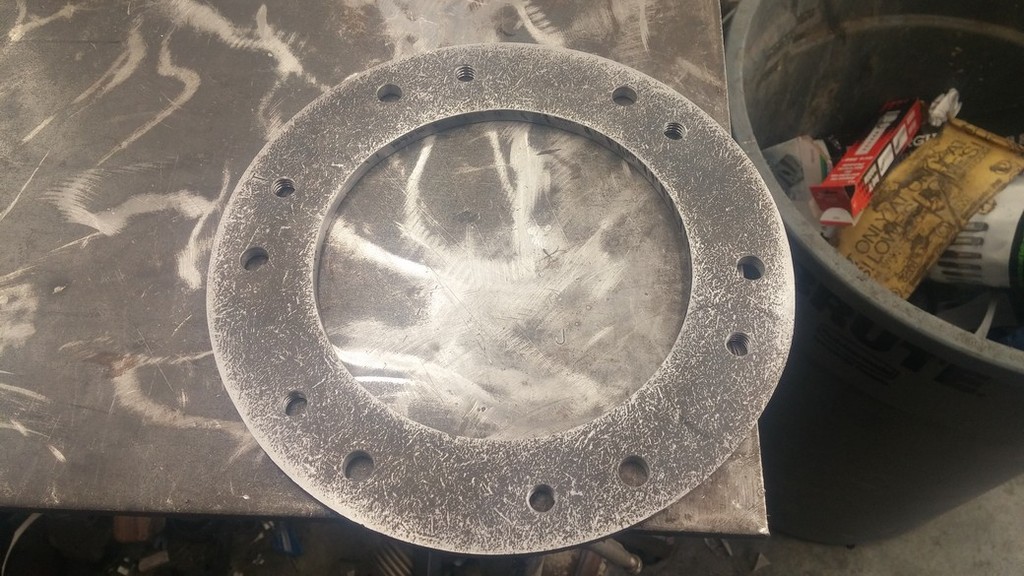
And this is a screen shot of the adapter ring I need to make. It is very similar to FrankZ's adapter plate he made. I haven't decided if I want to make it out of aluminum or steel yet. Any opinions on that?

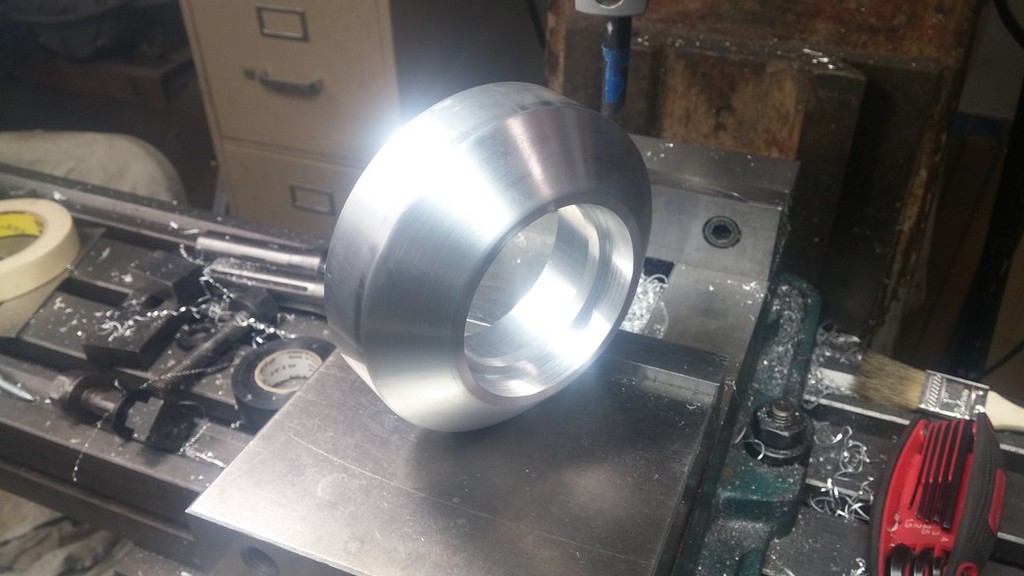
Here are some shots of me machining my custom tail shaft housing

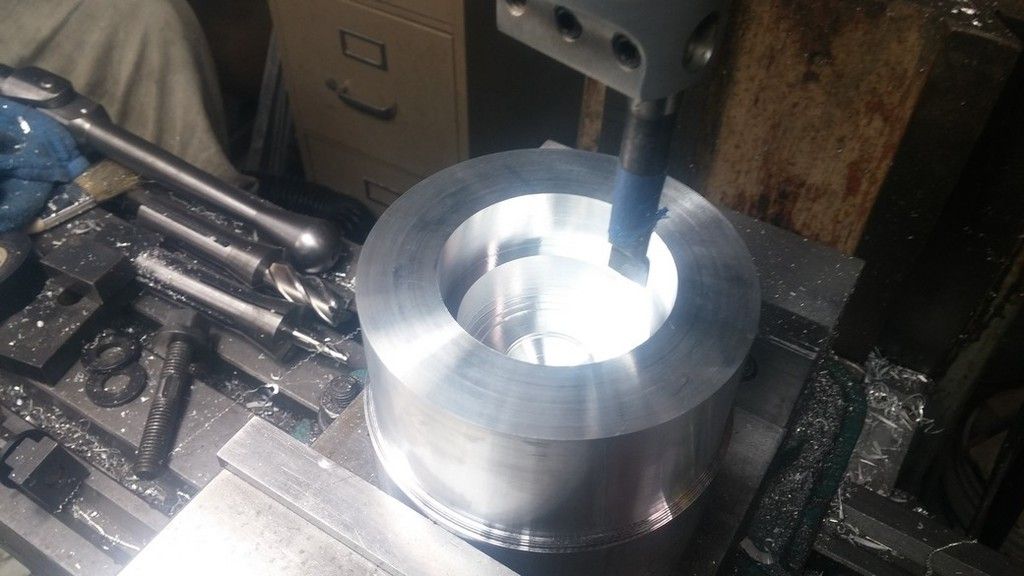


I uploaded another video to my channel showing the custom tail shaft work I am doing on this case as well. Check it out if you want: https://www.youtube.com/user/jesscneal
More later this week.
-Jess
Trending Topics
05-10-2016, 01:18 AM
#8
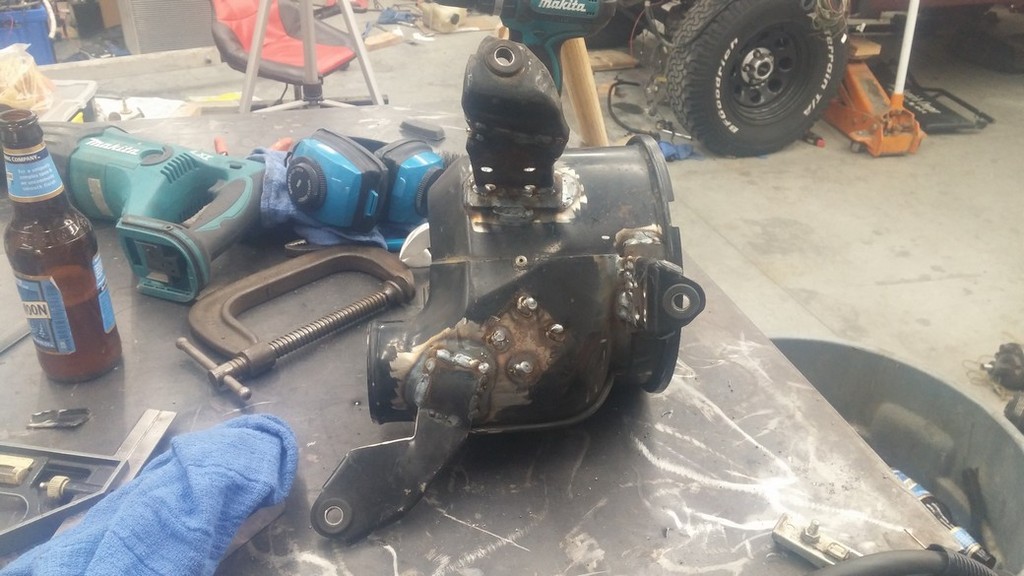
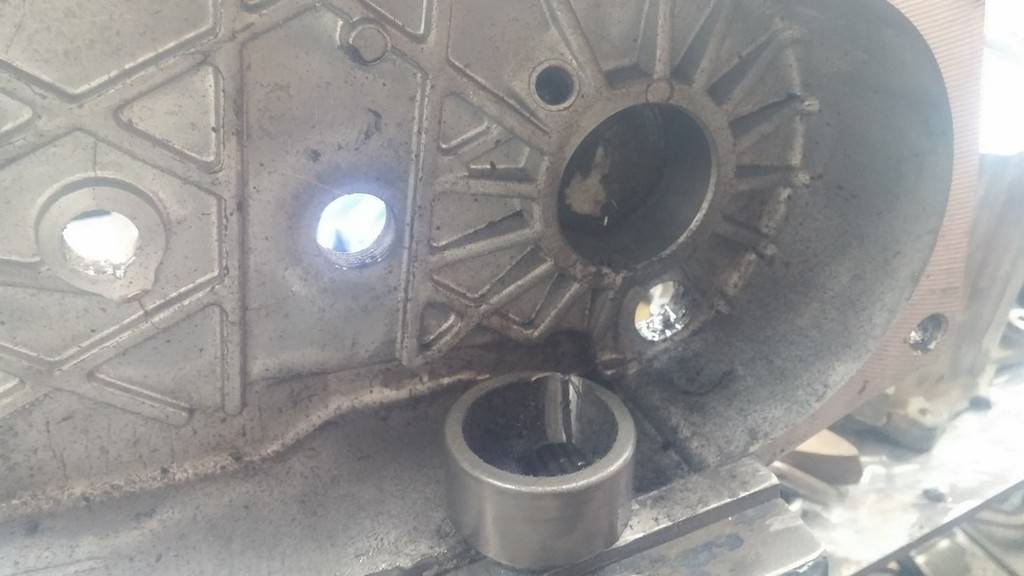
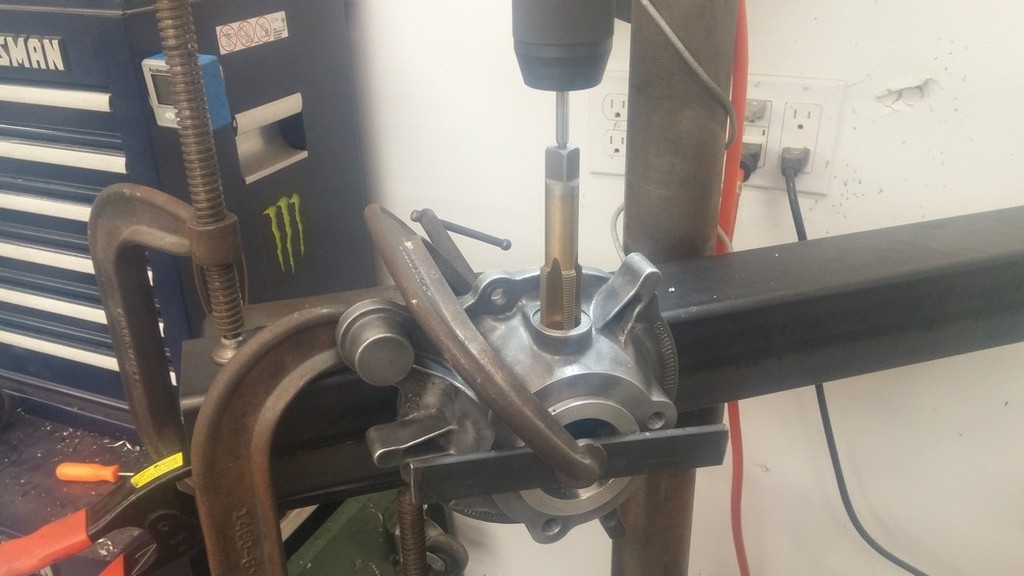
Got my transfer case all buttoned up. Gave it a coat of paint too. You can see in one pic below I had to bore out and tap the VSS hole to M22x1.5 for the 05 VSS. Had to make a little spacer to go below it too. Also got my adapter plate drilled and tapped. Just waiting on a new countersink from McMaster so I can finish the other 6 holes. Should be able to bolt it up this week sometime-
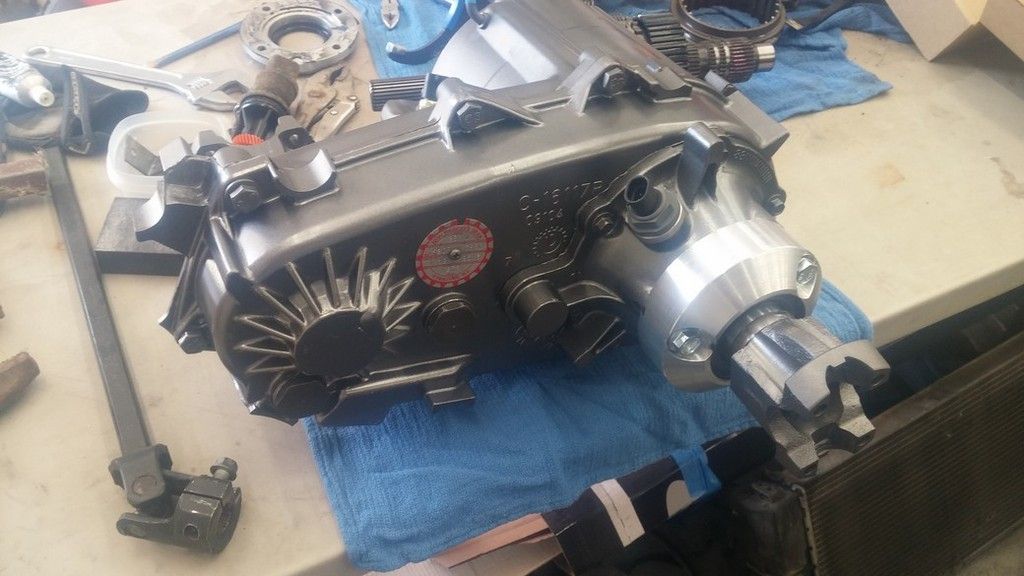

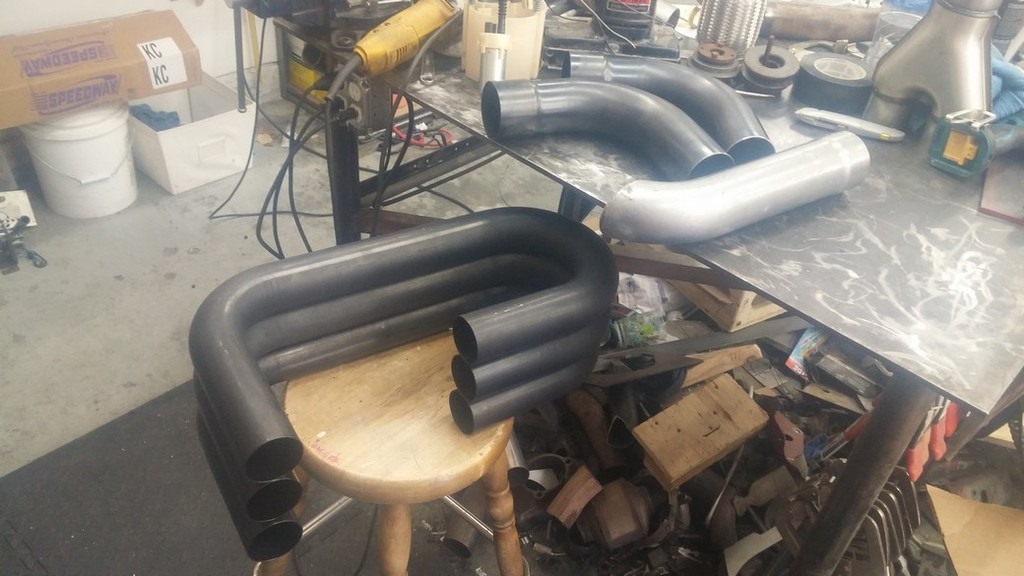
I ordered a bunch of exhaust tubing too so I can get that finished. Hopefully I can hear this thing run in the next week or two.
I ordered a bunch of exhaust tubing too so I can get that finished. Hopefully I can hear this thing run in the next week or two.
05-15-2016, 01:24 AM
#9
I got my countersink and studs in so I finished up the adapter plate this weekend and got the tcase installed.


I also ordered an exhaust system from Speedway. Some assembly required
I also ordered an exhaust system from Speedway. Some assembly required
05-15-2016, 02:21 PM
#10
this is getting good. the 98-04 ish JGC have always been on of my fav.s
05-15-2016, 04:13 PM
#11
05-16-2016, 11:28 AM
#12
Oh, Thanks for clearing that up. LOL. This should still be badass
05-22-2016, 02:31 PM
#13
First start vid. Maybe some of the experts here can shed some light on why its running so bad? Sounds like I have one cylinder missing quite a bit. Is this normal for first starts?
05-27-2016, 02:00 AM
#14
SPRAY EACH PRIMARY with water to see which cyl. is down. Could be many things.
06-08-2016, 06:50 PM
#15
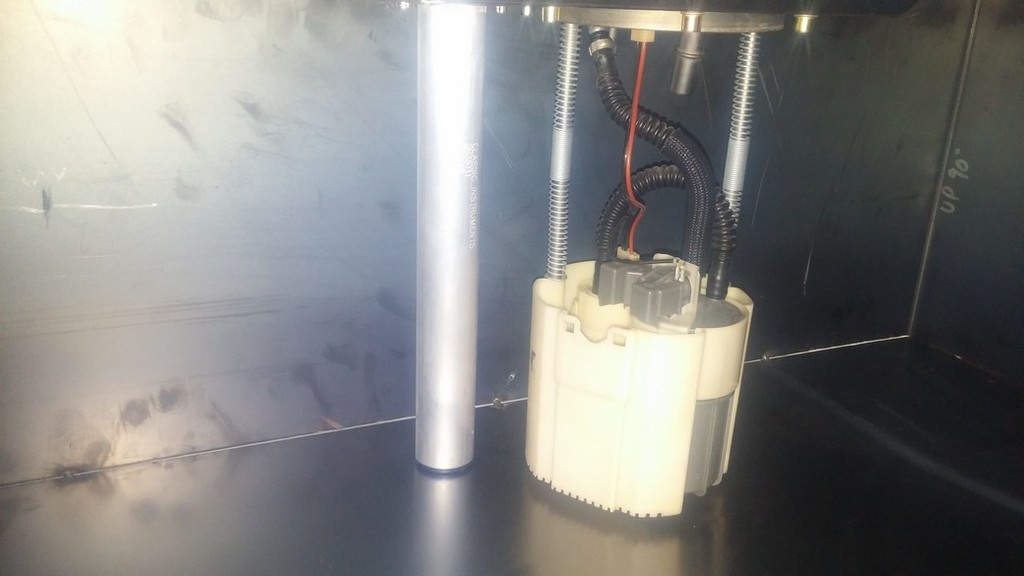
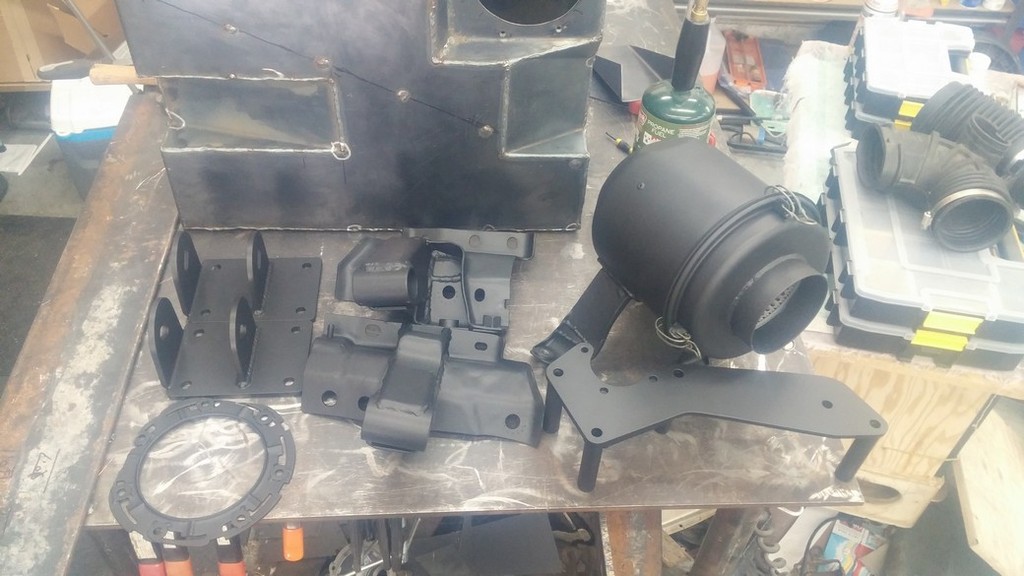
Made some progress on my fuel tank and got some wiring cleaned up. I'm using a classic industries fuel sender. I posted a video on my channel showing my bending process for the steel sheet too:


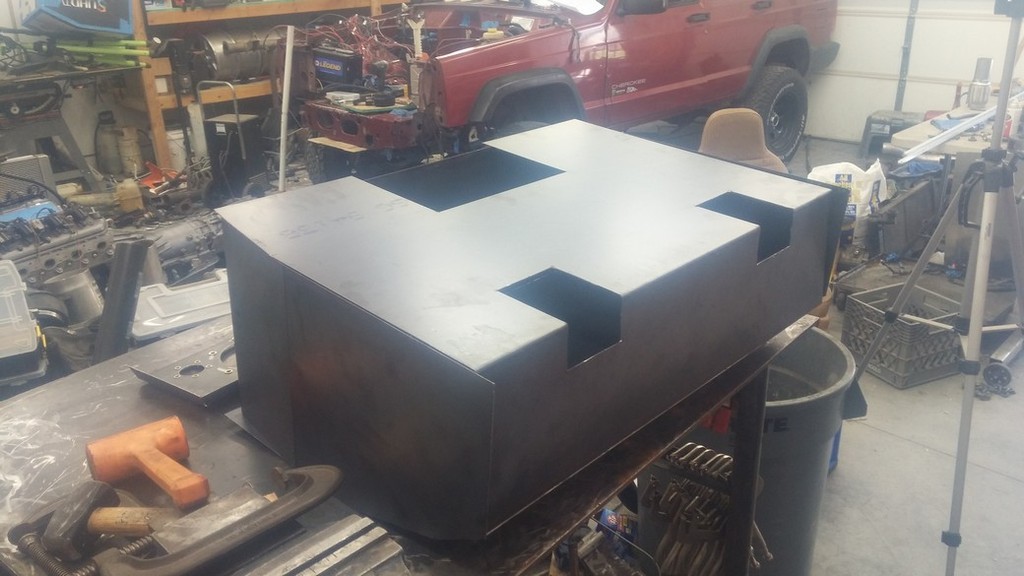
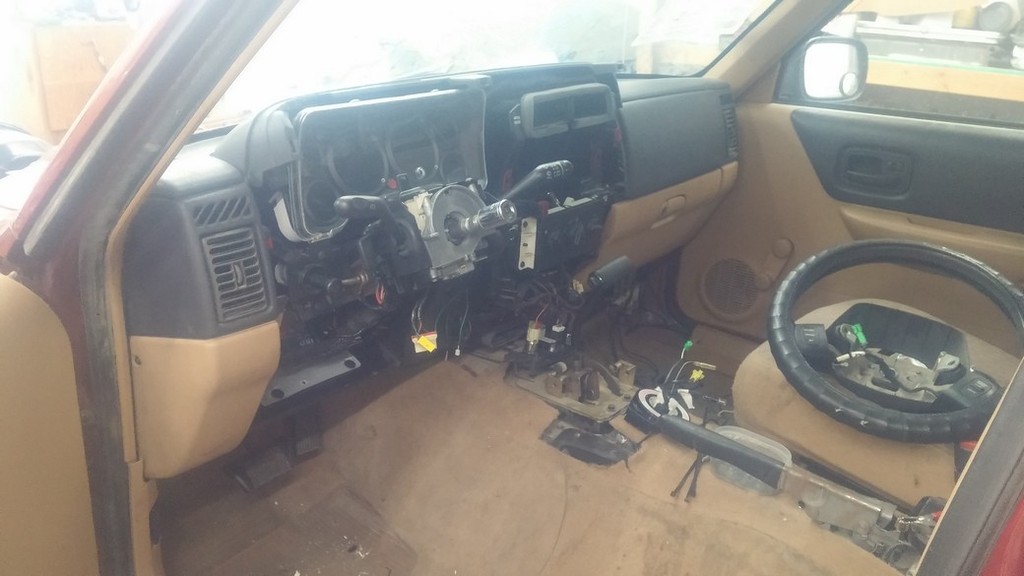
And my interior is finally looking like an interior again.
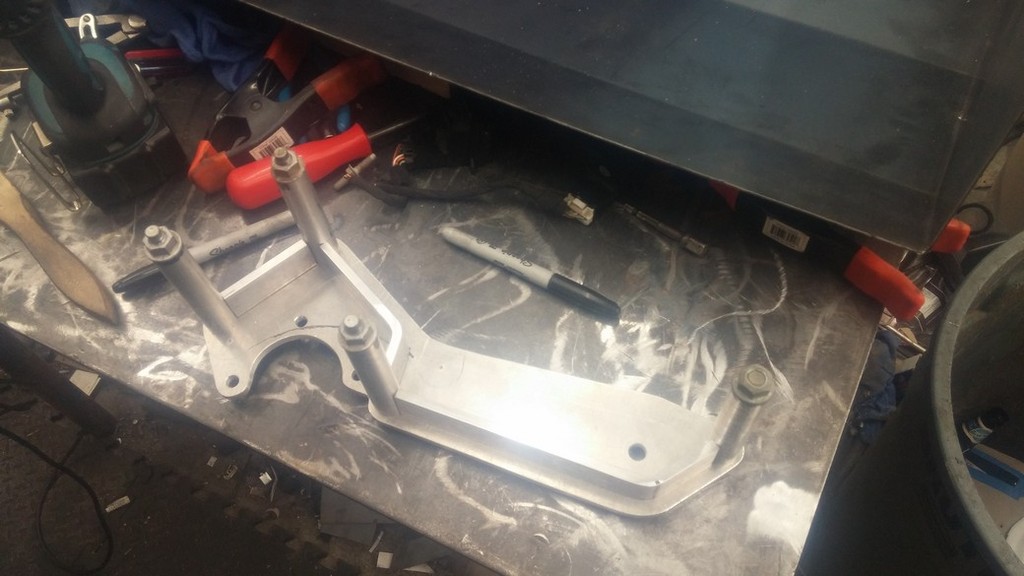
Here's my power steering/tesioner bracket. I'm not going to show my god awful welds. First time using an aluminum spool gun. Hopefully the powder coat covers some of them up
Thanks for looking...
 06-08-2016, 10:24 PM
#17
06-10-2016, 03:26 AM
#18

I built my 88xj a couple of years ago. Super low budget build. I have ran the crap out of it since. I used the novak motor mounts for for the lq4 with an ls6 intake and fbod accessories. Hood closes fine. I put a 4l80e and BW 4401 since that what I had on hand. It's been a great rig. Love the off idle torque, you will be pleased with your combo.
06-19-2016, 08:03 PM
#19
I built my 88xj a couple of years ago. Super low budget build. I have ran the crap out of it since. I used the novak motor mounts for for the lq4 with an ls6 intake and fbod accessories. Hood closes fine. I put a 4l80e and BW 4401 since that what I had on hand. It's been a great rig. Love the off idle torque, you will be pleased with your combo.
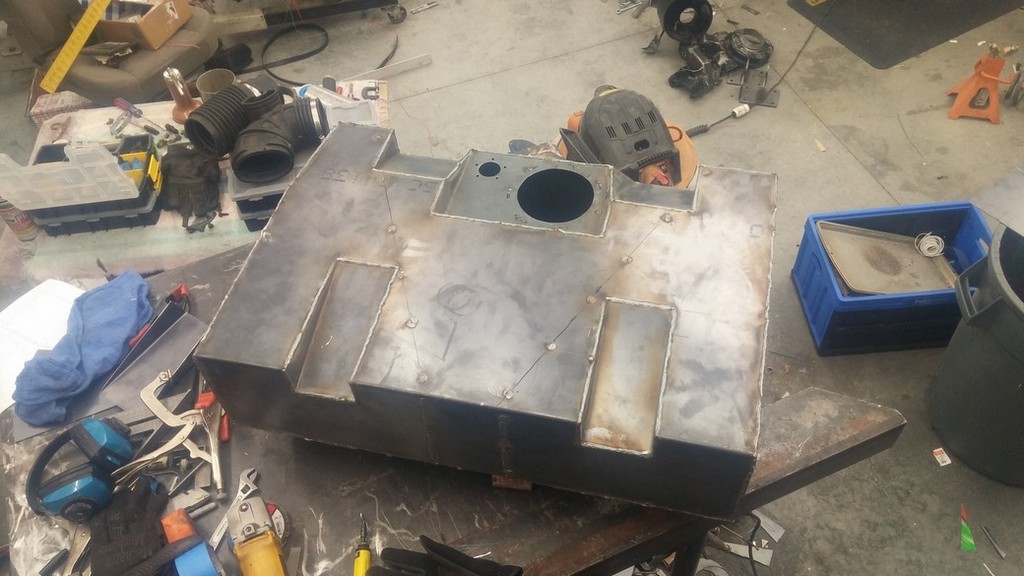
I've been working on my fuel tank and I took some parts to powder coat last week. Also made a cool air intake into the cowl. Ended up buying another set of tank straps as I cut mine when I took them out. Had to extend them to fit under the new tank.


I also need a new camera lens for my phone. These pics are getting super cloudy and look like ****...