
5.3 TH350 into a '65 C10
 01-11-2017, 04:51 PM
#1
TECH Apprentice
Thread Starter
Well here is my start to a build of mine. Long story short, this truck has been sitting neglected since about 1999, except for a short stint in 2010. For more back ground on the truck (I've owned it for 33 years now), have a look at: Project OLD Blue.
Anyway, my oldest son gave me a challenge over the Thanksgiving break to get my truck running and driving for the Lone Star Thowdown car show in Conroe, TX at the end of February. LST He is giving me his old 5.3 out of his turbo'd truck that he is going to upgrade to a 6.0 that he came into. The 5.3 has had a hard life and will not be a complete engine when I get it. I have a few parts laying around that I can use, but I am going to be doing this on the cheap as much as possible. Kinda Sloppy Style or has Korbin calls it "Meth Lab Kustoms" style (MLK). That is what he calls his work that him and a buddy do.
ANYWAY, I accepted and got started during the Christmas break and got the truck into the shop:
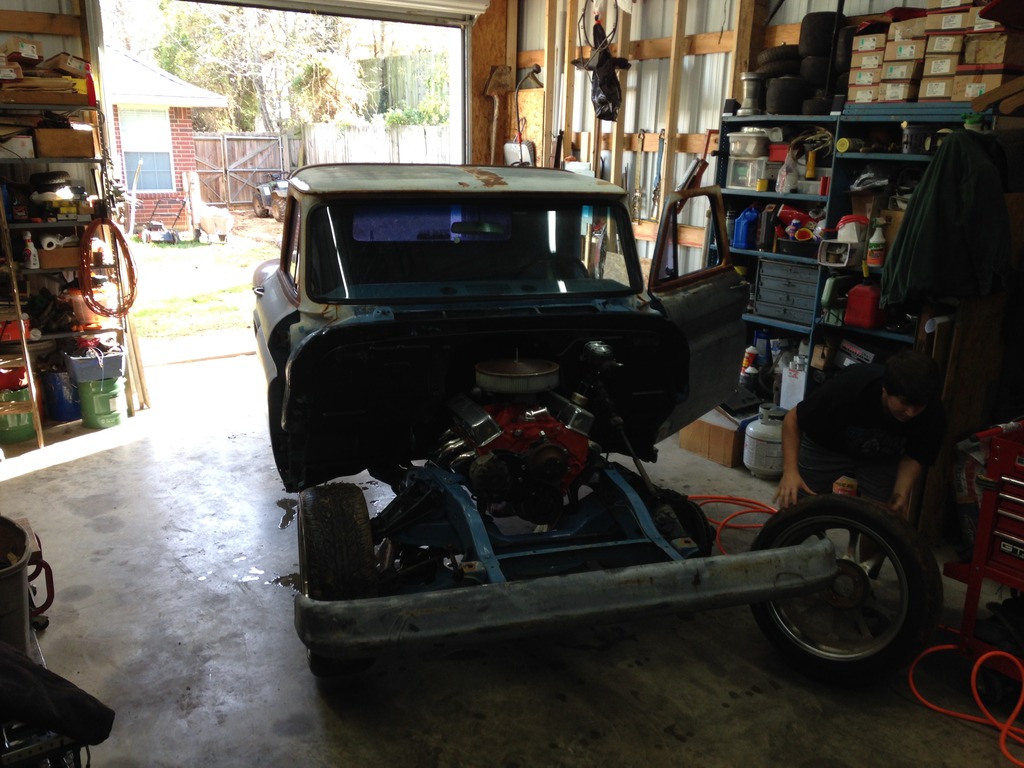
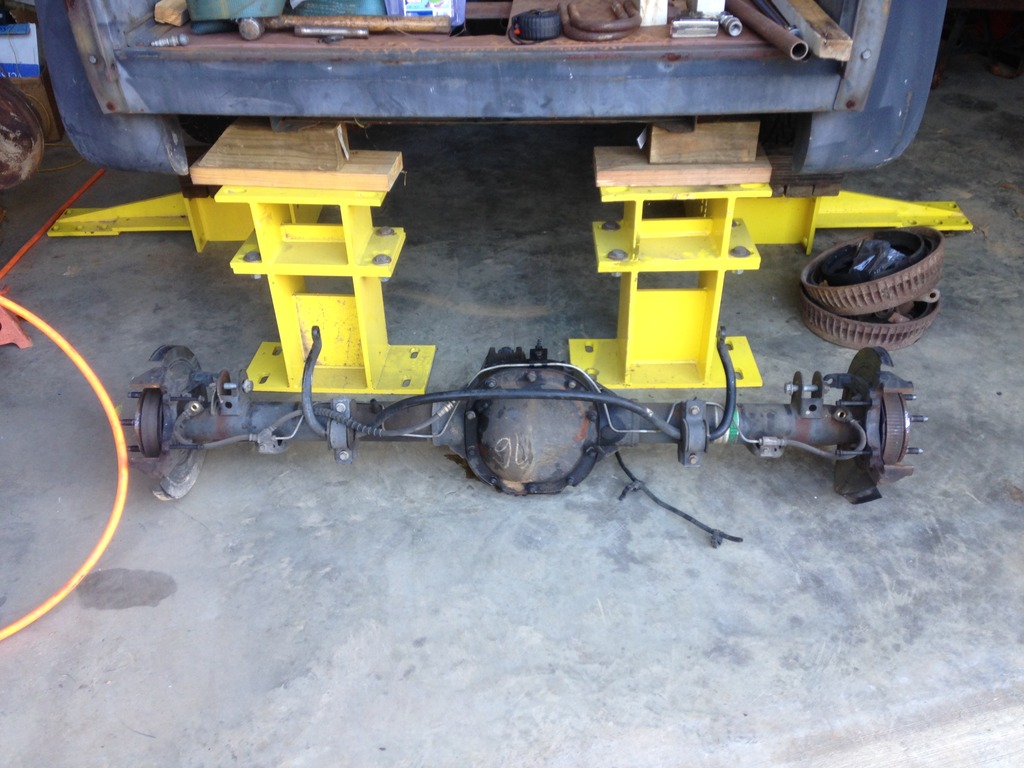
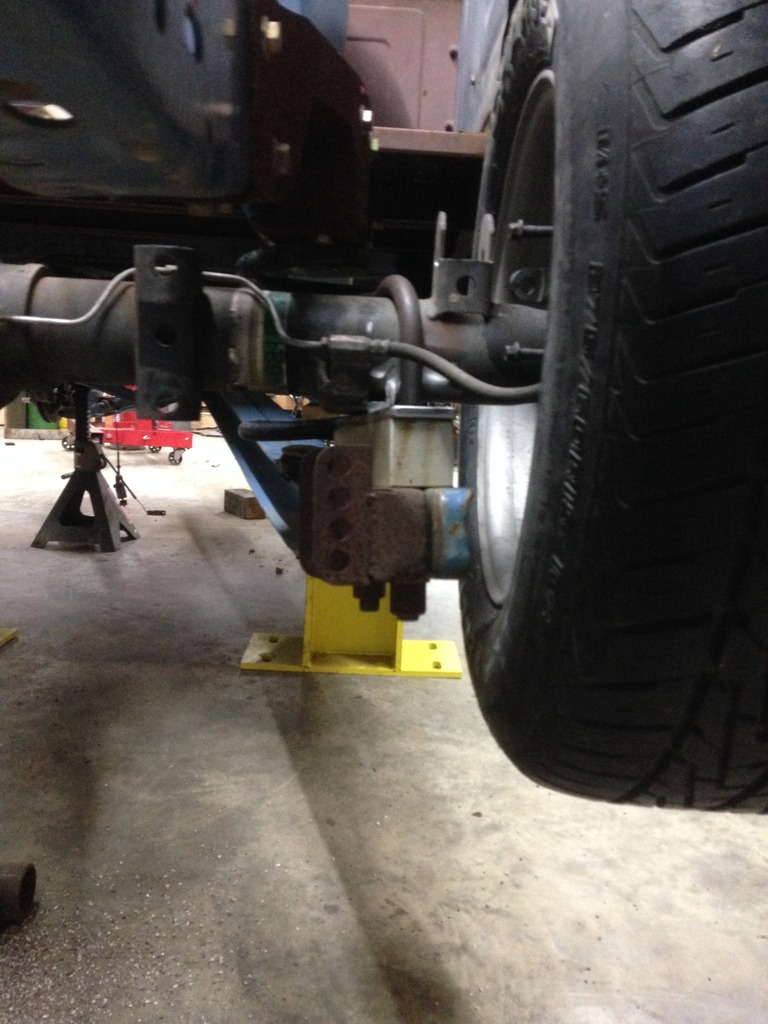
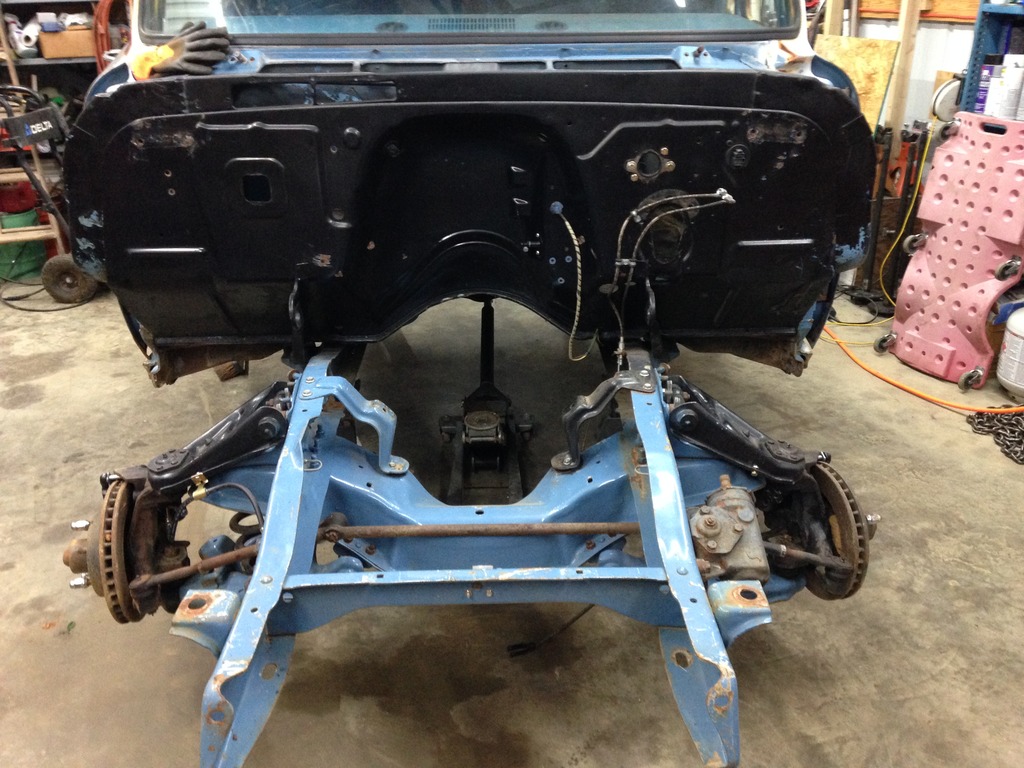
Got the wheels off and up on jack stands:
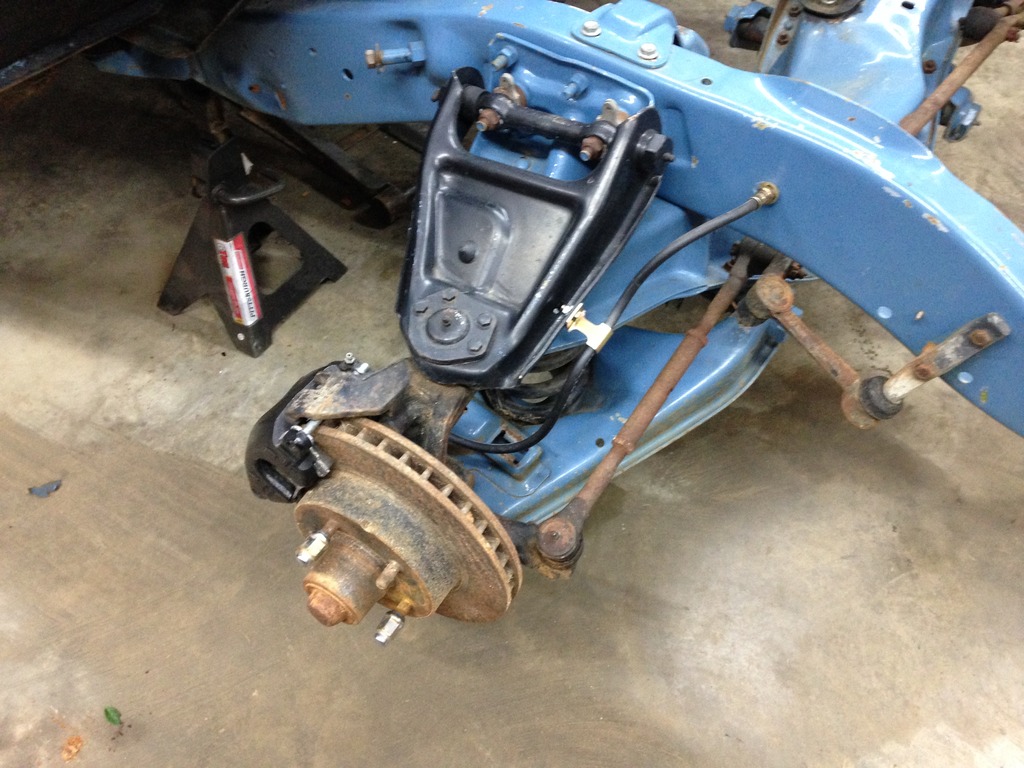
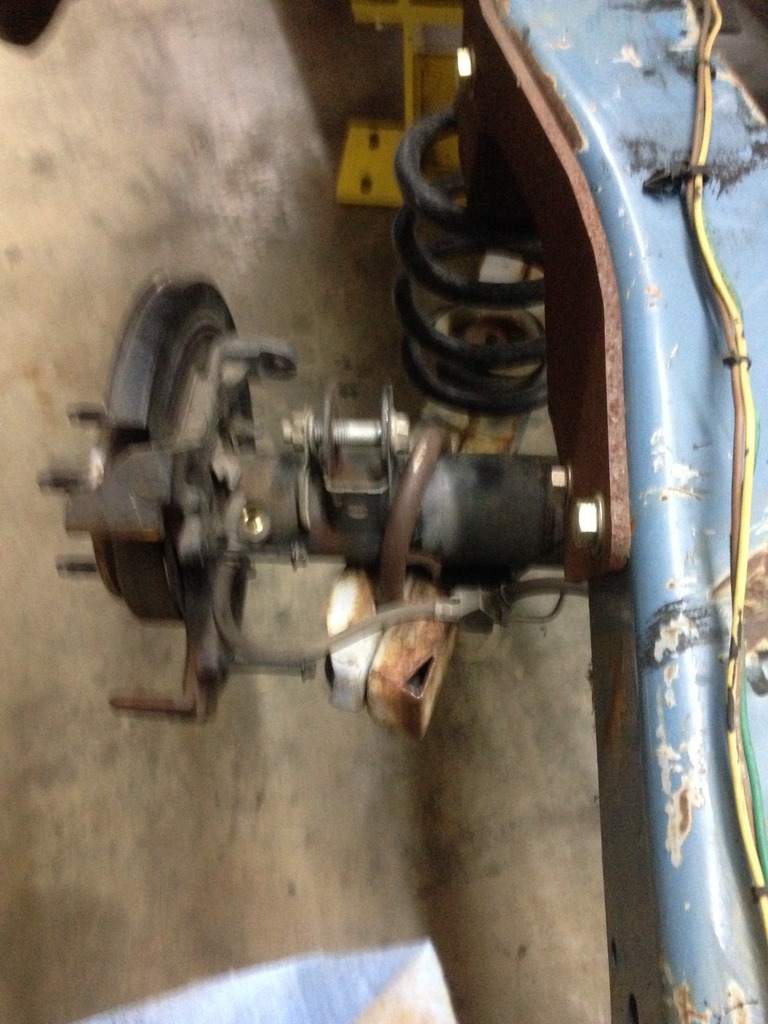
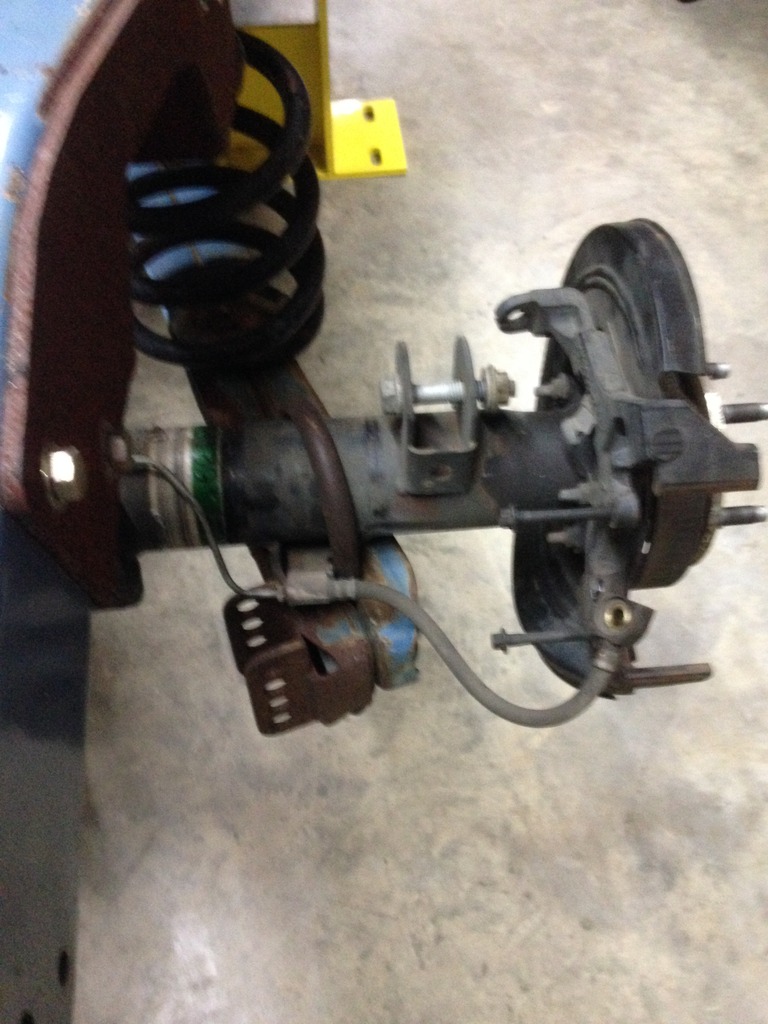
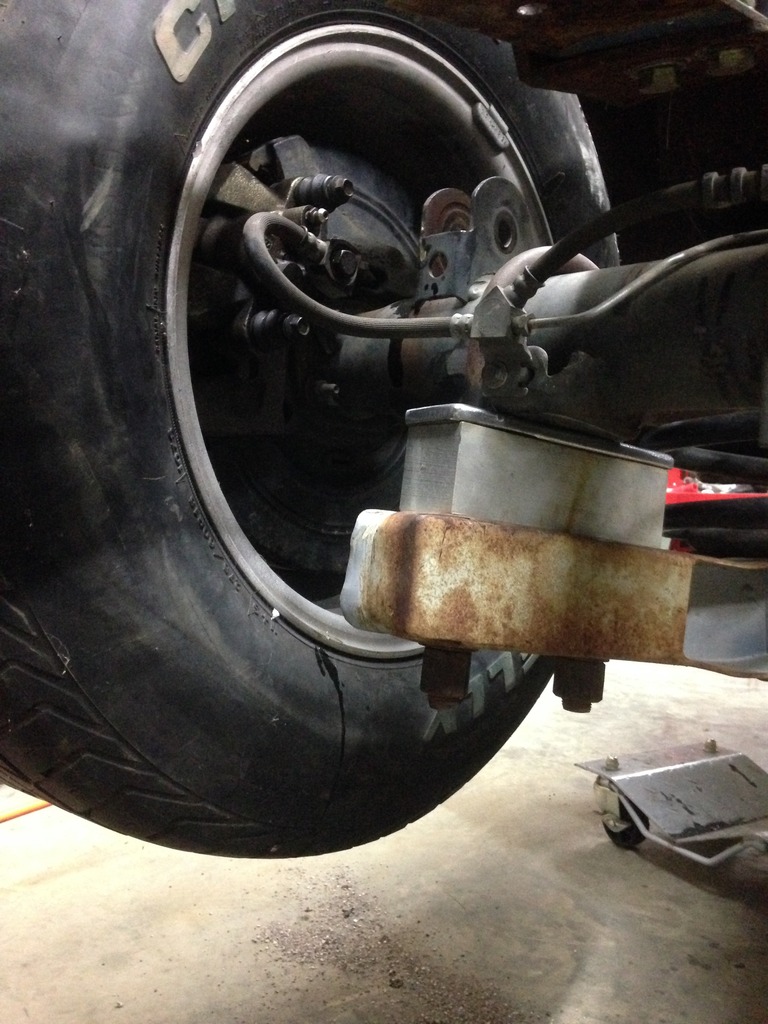
I had most of the parts for the front disks from the last time I worked on it in 2010 so I mocked them up to make sure I had everything, turns out I was missing on flex line for the driver's side.

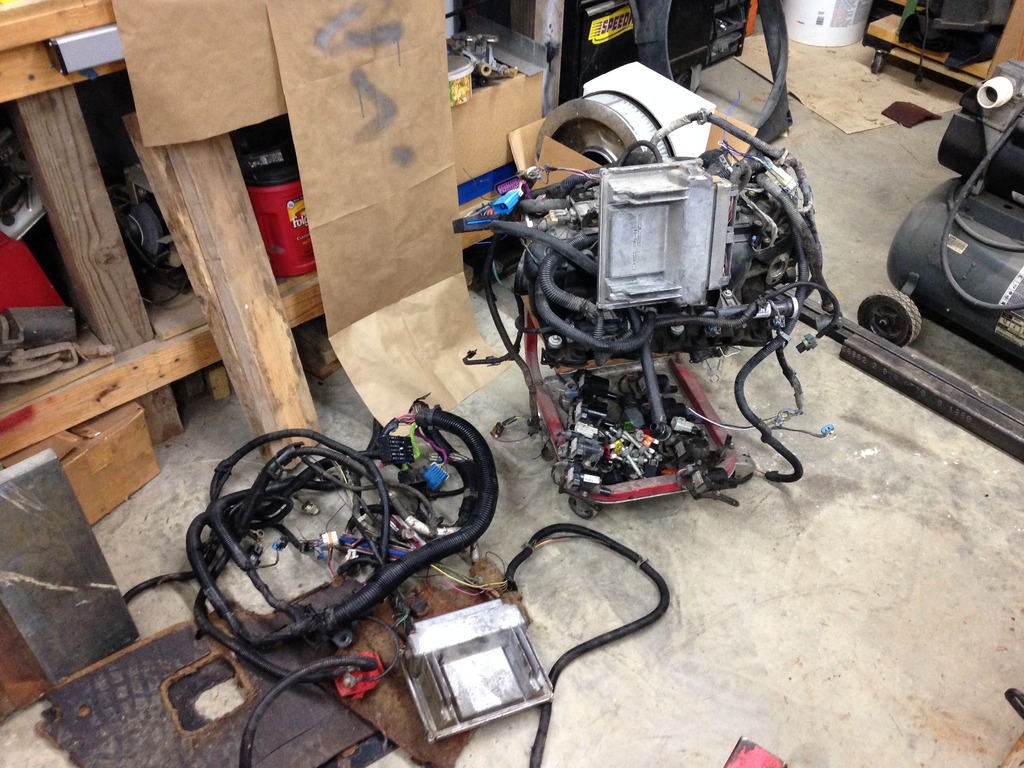
December 31st was a "All You Can Carry for $75" event at a local pick-n-pull yard. I scored a couple of LS truck intakes, a complete harness and PCM, a partial harness and PCM, dished flex plate and a few other odds and ends. Korbin scored a complete Ford 8.8, disc brakes, 3.73 posi rear and an extra short side axle for his truck:
That brings me up to where I was at the end of last week. Stay tuned for more...
Anyway, my oldest son gave me a challenge over the Thanksgiving break to get my truck running and driving for the Lone Star Thowdown car show in Conroe, TX at the end of February. LST He is giving me his old 5.3 out of his turbo'd truck that he is going to upgrade to a 6.0 that he came into. The 5.3 has had a hard life and will not be a complete engine when I get it. I have a few parts laying around that I can use, but I am going to be doing this on the cheap as much as possible. Kinda Sloppy Style or has Korbin calls it "Meth Lab Kustoms" style (MLK). That is what he calls his work that him and a buddy do.
ANYWAY, I accepted and got started during the Christmas break and got the truck into the shop:

Got the wheels off and up on jack stands:

I had most of the parts for the front disks from the last time I worked on it in 2010 so I mocked them up to make sure I had everything, turns out I was missing on flex line for the driver's side.


December 31st was a "All You Can Carry for $75" event at a local pick-n-pull yard. I scored a couple of LS truck intakes, a complete harness and PCM, a partial harness and PCM, dished flex plate and a few other odds and ends. Korbin scored a complete Ford 8.8, disc brakes, 3.73 posi rear and an extra short side axle for his truck:


That brings me up to where I was at the end of last week. Stay tuned for more...
Last edited by aggie91; 01-11-2017 at 05:11 PM.
 01-11-2017, 04:59 PM
#2
TECH Apprentice
Thread Starter
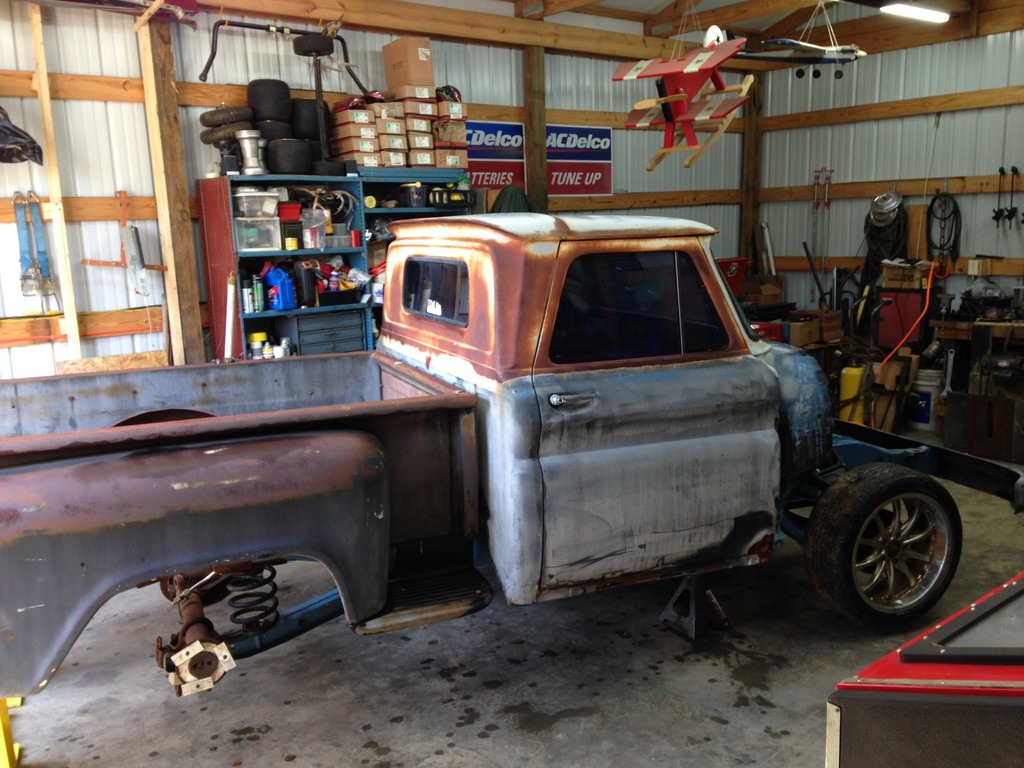
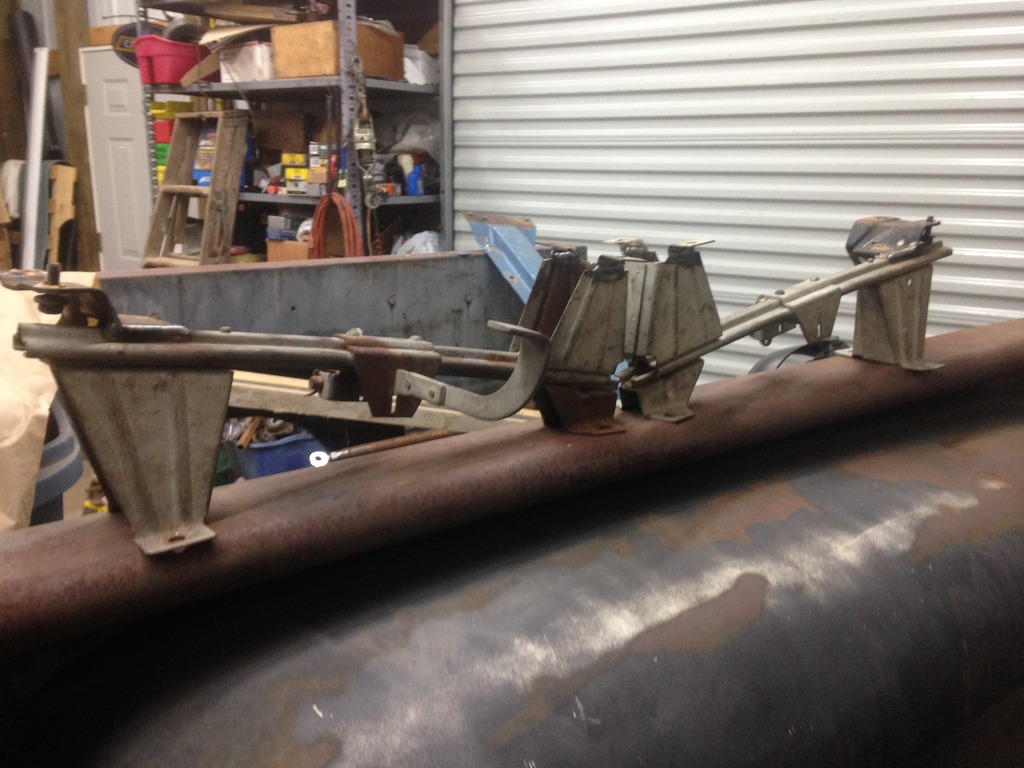
OK, this week I started off trying to decide on wheels/tires and what rear end I was going to use. After discussions with my boys, I am going to use a set of wheels that Owen bought last year for a now non-existent project and the 8.8 that Korbin just picked up. So I got that mocked up and the wheels tires put on to see how that will look. I still need to finalize the centering of the rear to the frame and center up the bed to the frame before welding my mounts in place. But it is in and the width works out pretty good, but I do have a scrub line issue that I will need to address before putting doing a lot of road time in it.
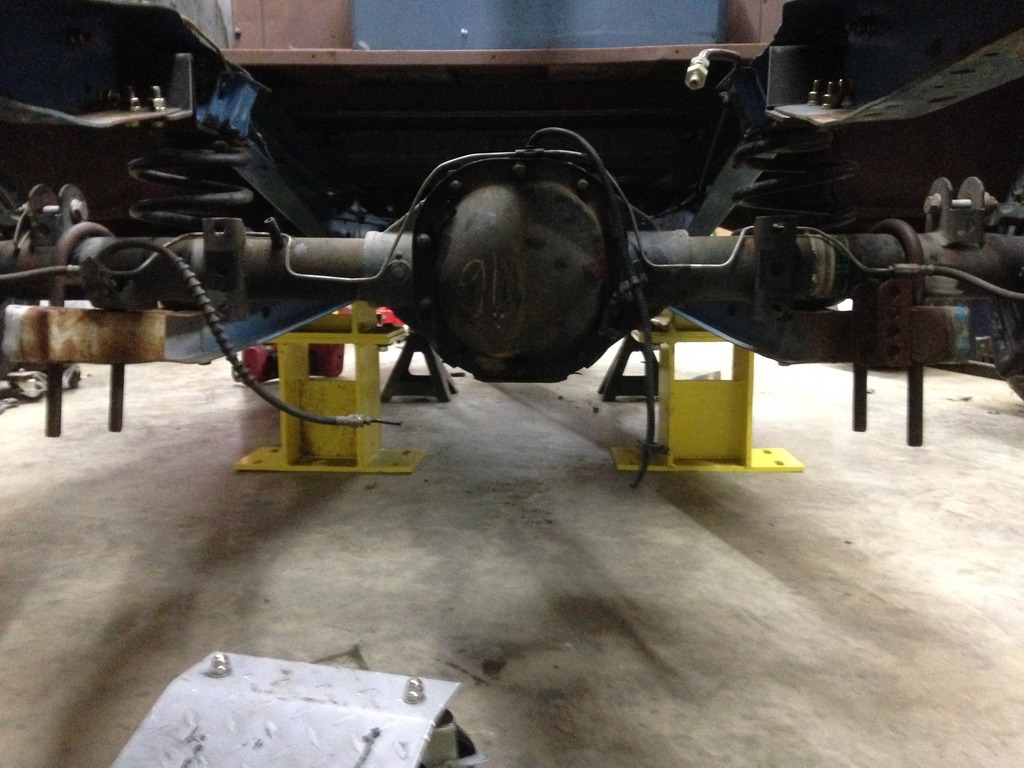
This is a side shot with the truck sitting on the springs and a jack under the center section:
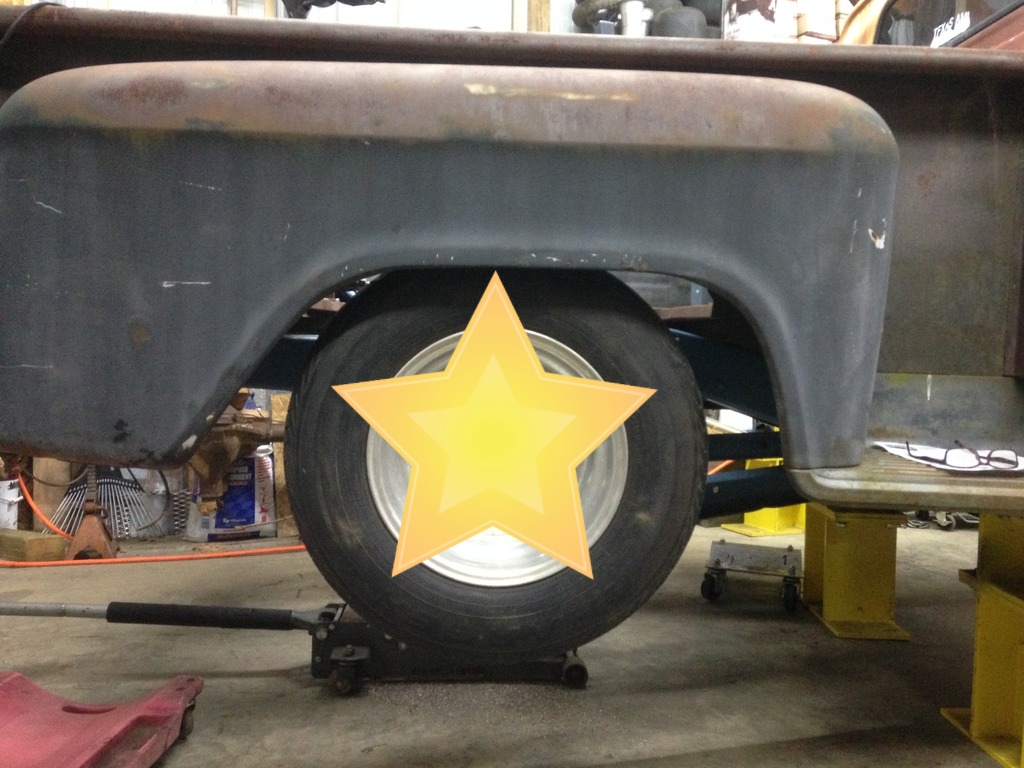
I think it needs to be lower, but there is still a bunch of weight not in the truck yet. I will go with this till its all back together.


This is a side shot with the truck sitting on the springs and a jack under the center section:

I think it needs to be lower, but there is still a bunch of weight not in the truck yet. I will go with this till its all back together.
01-11-2017, 05:06 PM
#3
TECH Apprentice
Thread Starter
This brings me up to the work I did last night. I am still waiting on a couple of brake parts to finish up the brake and the rear end install, so I moved on to something I could work on.
Harness rework...
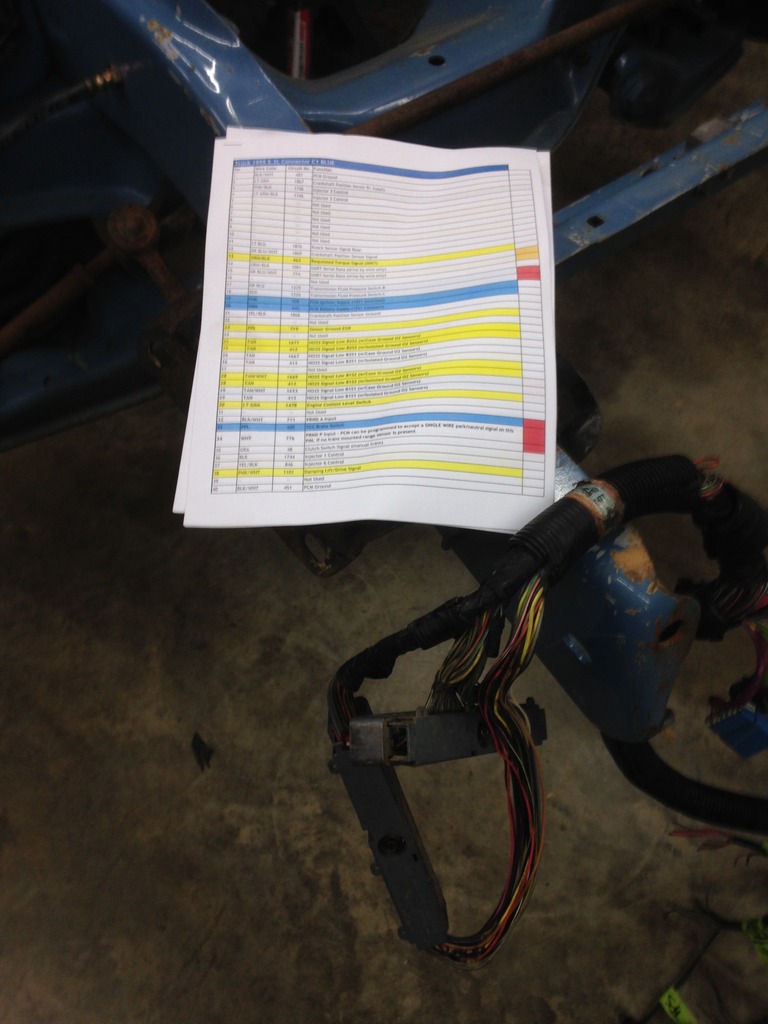
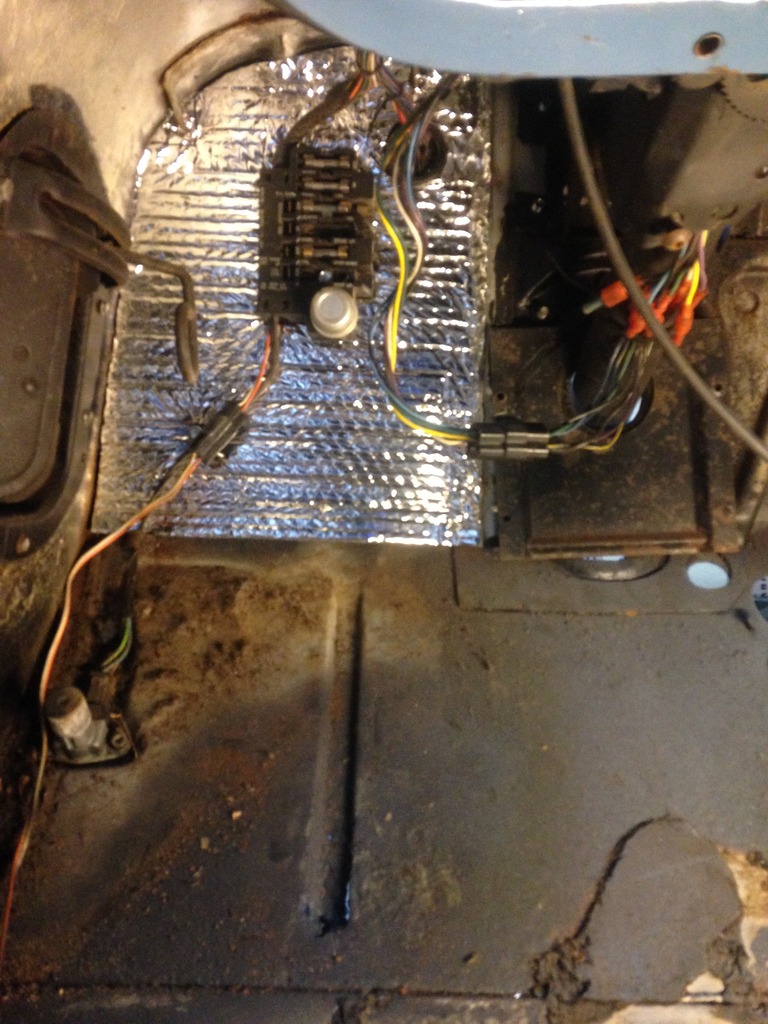
I decided to start cutting up the partial harness since it was missing the transmission section (among other wires) since I am going to run a TH350. So I got out my tools and my notes and a good seat to sit on in the shop. The front frame horn made a good place to drape the harness as I was working it over...
Started with this:
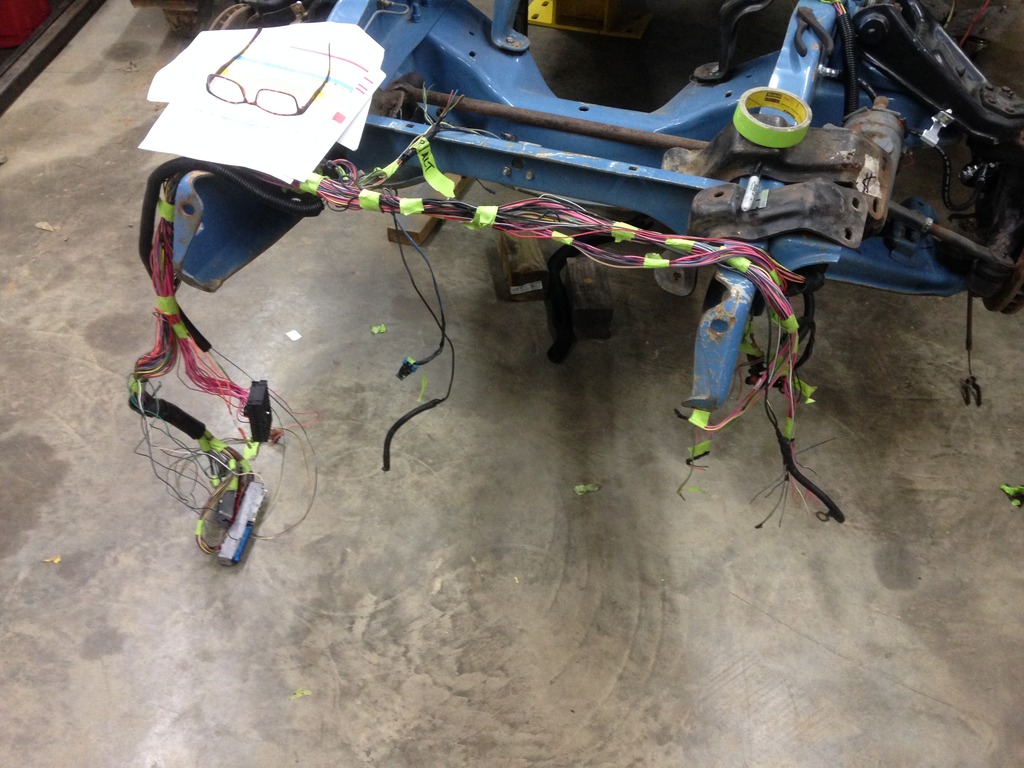
1-1/2 hours later I had this:
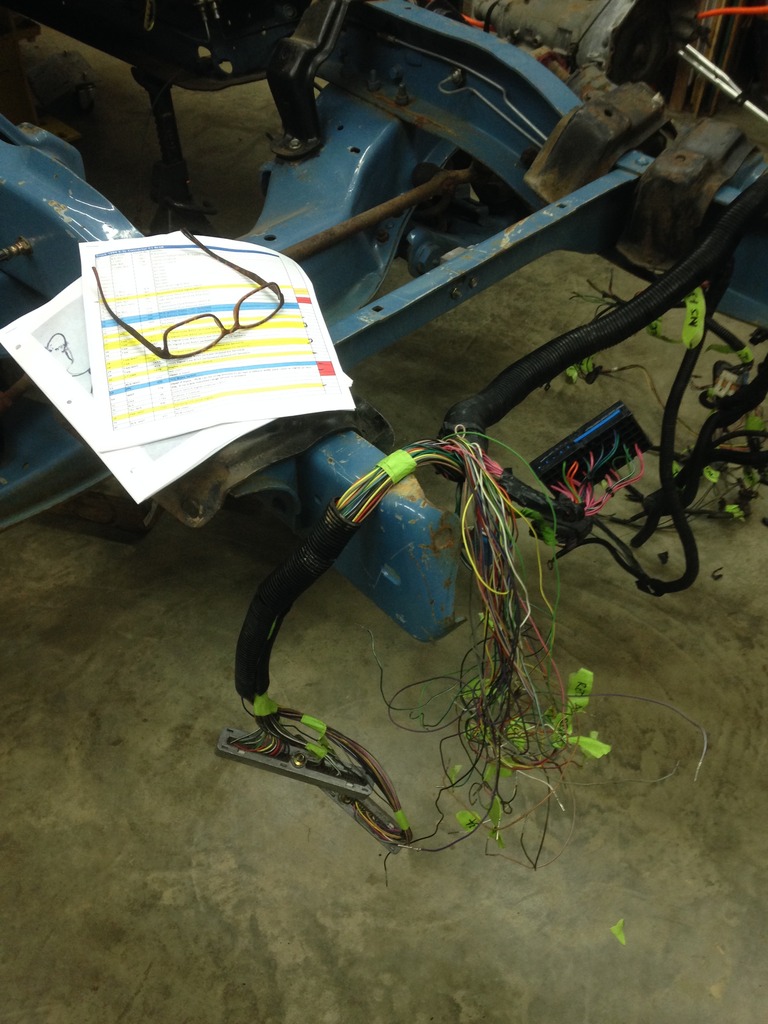
All the wires that are not needed are pulled out of the PCM plugs and taped up temporarily to keep it in the stock routing style. I was tired, so I cleaned up my mess and called it a day.
Harness rework...
I decided to start cutting up the partial harness since it was missing the transmission section (among other wires) since I am going to run a TH350. So I got out my tools and my notes and a good seat to sit on in the shop. The front frame horn made a good place to drape the harness as I was working it over...
Started with this:

1-1/2 hours later I had this:

All the wires that are not needed are pulled out of the PCM plugs and taped up temporarily to keep it in the stock routing style. I was tired, so I cleaned up my mess and called it a day.
01-11-2017, 08:54 PM
#4
The wiring is very tedious indeed, i just finished mine the other day. Id cry if i knew exactly how much time ive got in it, but i estimate about 20 hours. But i did my ls and my trucks body harness too
I would have liked to seen him carrying out that 8.8 etc. Must be a good size boy LOL
I would have liked to seen him carrying out that 8.8 etc. Must be a good size boy LOL
01-11-2017, 10:25 PM
#5
TECH Enthusiast
Join Date: Sep 2014
Location: alburnett, iowa
Posts: 732
Likes: 0
Received 0 Likes
on
0 Posts
oh Aggie knows the Ls project would pretty good I'm sure. That was pretty good score at the junkyard. Looks like you have hands full to get it ready tho. After done a few wiring harnesses they get easier. I have done 3 now
01-11-2017, 10:59 PM
#6

So I guess this is the C10 you mentioned in Keith's thread. Nothing like a deadline to get you motivated, but damn, 3 months???? I had a buddy of mine try to make LST a couple of years ago with his LS swapped 59 ElCamino, he didn't make it. LOL! I'll be watching and wishing you the best of luck on your goal!
01-11-2017, 11:13 PM
#7
good luck on your goal. love them '60-'66 trucks.
i found a good and cheap way to get the front end driving nice. these trucks came with about zero degrees caster. fine for the farm hauling they were built for, but we like to cruise 'em on the highway a lil faster.
so if you redrill the the lower a-arm control shaft to move the arm forward about 3/4" it gives you about 5-6* of positive caster...which makes it way more stable at speed and adds outside tire camber in a turn. you will need to do a power steering swap since the added caster has a tire-jacking phenomenon you can really notice at parking lot speed.
if you wanna know more I can dig up the thread on 67-72.com that goes over it all.
Trending Topics
01-12-2017, 08:33 AM
#8
TECH Apprentice
Thread Starter
The wiring is very tedious indeed, i just finished mine the other day. Id cry if i knew exactly how much time ive got in it, but i estimate about 20 hours. But i did my ls and my trucks body harness too
I would have liked to seen him carrying out that 8.8 etc. Must be a good size boy LOL
I would have liked to seen him carrying out that 8.8 etc. Must be a good size boy LOL
So I guess this is the C10 you mentioned in Keith's thread. Nothing like a deadline to get you motivated, but damn, 3 months???? I had a buddy of mine try to make LST a couple of years ago with his LS swapped 59 ElCamino, he didn't make it. LOL! I'll be watching and wishing you the best of luck on your goal!

good luck on your goal. love them '60-'66 trucks.
i found a good and cheap way to get the front end driving nice. these trucks came with about zero degrees caster. fine for the farm hauling they were built for, but we like to cruise 'em on the highway a lil faster.
so if you redrill the the lower a-arm control shaft to move the arm forward about 3/4" it gives you about 5-6* of positive caster...which makes it way more stable at speed and adds outside tire camber in a turn. you will need to do a power steering swap since the added caster has a tire-jacking phenomenon you can really notice at parking lot speed.
if you wanna know more I can dig up the thread on 67-72.com that goes over it all.
i found a good and cheap way to get the front end driving nice. these trucks came with about zero degrees caster. fine for the farm hauling they were built for, but we like to cruise 'em on the highway a lil faster.
so if you redrill the the lower a-arm control shaft to move the arm forward about 3/4" it gives you about 5-6* of positive caster...which makes it way more stable at speed and adds outside tire camber in a turn. you will need to do a power steering swap since the added caster has a tire-jacking phenomenon you can really notice at parking lot speed.
if you wanna know more I can dig up the thread on 67-72.com that goes over it all.
Thanks for the support guys, I did not get any shop time last night and tonight will be limited, but I plan on working over the harness some more tonight.
01-17-2017, 03:44 PM
#9
TECH Apprentice
Thread Starter
Well I got the harness all stripped down, but need a few electrical items so I will put it aside for now.
The pile of wires that are not needed:
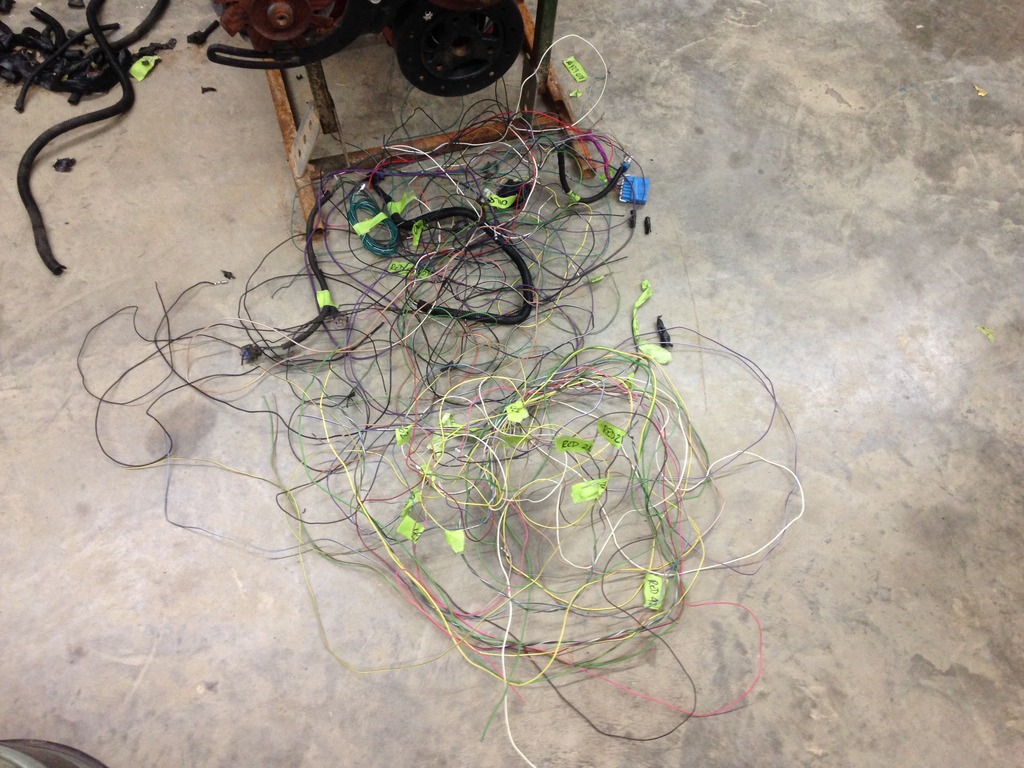
So, I moved on to the engine mount adapters. I know I can buy them, but I have an idea I want to try on this truck. So, a quick drawing and some flat bar, a saw and a few drill bits in the drill press, I end up with the start of the adapters. I need the engine to finalize the design of these, but its a start.
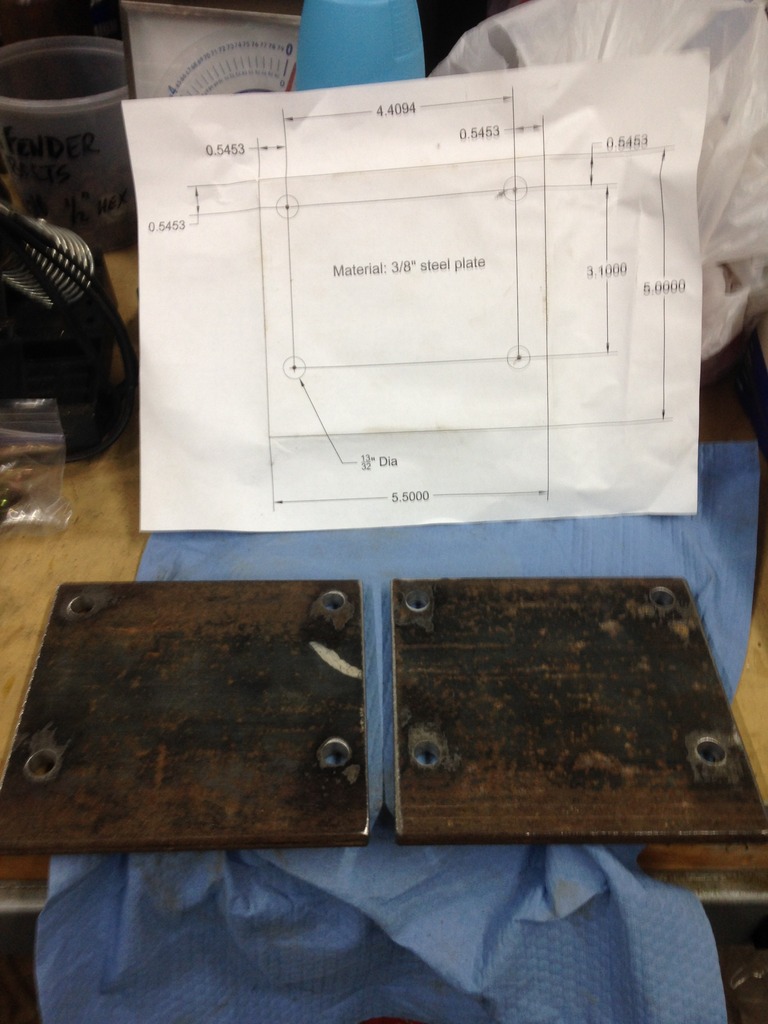
While Korbin was pulling the cam out of the old engine he is giving me, 2 of the cam bearings came out and the others are trashed. Not really what I wanted to hear, but it is what it is. Local machine shop should be able to replace them for $85 plus the bearings. I am just waiting on him to bring over the engine so that I can do the mock up before sending it out for repairs. Figured I have plenty to do anyway before I need it to run...
01-17-2017, 03:45 PM
#10
TECH Apprentice
Thread Starter
Well I got the harness all stripped down, but need a few electrical items so I will put it aside for now.

The pile of wires that are not needed:

So, I moved on to the engine mount adapters. I know I can buy them, but I have an idea I want to try on this truck. So, a quick drawing and some flat bar, a saw and a few drill bits in the drill press, I end up with the start of the adapters. I need the engine to finalize the design of these, but its a start.

While Korbin was pulling the cam out of the old engine he is giving me, 2 of the cam bearings came out and the others are trashed. Not really what I wanted to hear, but it is what it is. Local machine shop should be able to replace them for $85 plus the bearings. I am just waiting on him to bring over the engine so that I can do the mock up before sending it out for repairs. Figured I have plenty to do anyway before I need it to run...
The pile of wires that are not needed:
So, I moved on to the engine mount adapters. I know I can buy them, but I have an idea I want to try on this truck. So, a quick drawing and some flat bar, a saw and a few drill bits in the drill press, I end up with the start of the adapters. I need the engine to finalize the design of these, but its a start.
While Korbin was pulling the cam out of the old engine he is giving me, 2 of the cam bearings came out and the others are trashed. Not really what I wanted to hear, but it is what it is. Local machine shop should be able to replace them for $85 plus the bearings. I am just waiting on him to bring over the engine so that I can do the mock up before sending it out for repairs. Figured I have plenty to do anyway before I need it to run...
01-17-2017, 06:15 PM
#11
I second the comment about your friend carrying the 8.8 out!
You guys scored a lot for some good pricing!
We do have DIY kits in stock for reworking your own harness. They should have everything you need!
Good luck with the build. Subd'!
You guys scored a lot for some good pricing!
We do have DIY kits in stock for reworking your own harness. They should have everything you need!
Good luck with the build. Subd'!
__________________

Standalone LS Swap Harnesses IN STOCK!
LSX, LTX Stand alone swap harnesses. S10 LSX conversion PLUG AND PLAY harnesses, 24x conversion PLUG AND PLAY harnesses. LT1 to LSX PLUG AND PLAY Harnesses.
sales@bp-automotive.com
www.bp-automotive.com
1-888-467-4491
Standalone LS Swap Harnesses IN STOCK!
LSX, LTX Stand alone swap harnesses. S10 LSX conversion PLUG AND PLAY harnesses, 24x conversion PLUG AND PLAY harnesses. LT1 to LSX PLUG AND PLAY Harnesses.
sales@bp-automotive.com
www.bp-automotive.com
1-888-467-4491
01-18-2017, 08:47 AM
#12
TECH Regular

Karl thanks for posting your project! I know you will have some good ideas people can learn from and that is what I love about these type of forums. A group of car people learning more about cars (or trucks in this case  ) Just a couple of comments about your build. How tall is the rear tire and with the 3 speed combined with 3:73 gears what will the highway RPM be? I enjoyed reading your entire thread and did notice it says running and driving to the LST - assuming actually driving the truck to the event and not running and driving on to a trailer? 38 days are going to happen pretty dang quick
  I wish you luck and the world will be watching closely!
) Just a couple of comments about your build. How tall is the rear tire and with the 3 speed combined with 3:73 gears what will the highway RPM be? I enjoyed reading your entire thread and did notice it says running and driving to the LST - assuming actually driving the truck to the event and not running and driving on to a trailer? 38 days are going to happen pretty dang quick I wish you luck and the world will be watching closely!
01-18-2017, 10:07 AM
#13
TECH Apprentice
Thread Starter
Keith, to answer your questions, I am running a 28" tall rear tire, so at 70 mph, that's 3133 rpm. The original challenge Korbin gave me was to drive it down there, but that has changed to trailer it to Conroe, drive from the hotel to the event. I'm to old to drive that thing spinning the engine that high for that long. Long term plan is a 4l80e and some 3.27 gears. The 38 days are bothering me now since I don't have the engine yet from Korbin. While waiting, I am moving on to other areas that need my attention to get this thing together.
01-18-2017, 10:15 AM
#14
TECH Apprentice
Thread Starter
Last night's work:
Since I am waiting on electrical parts and the engine, I moved my attention to another area that started bothering me. I had not planned on this, but I gotta do it...
The firewall needed some touch up, so I decided to change color to something that is really close to the future (read VERY Distant Future) exterior color.
Before:
During:
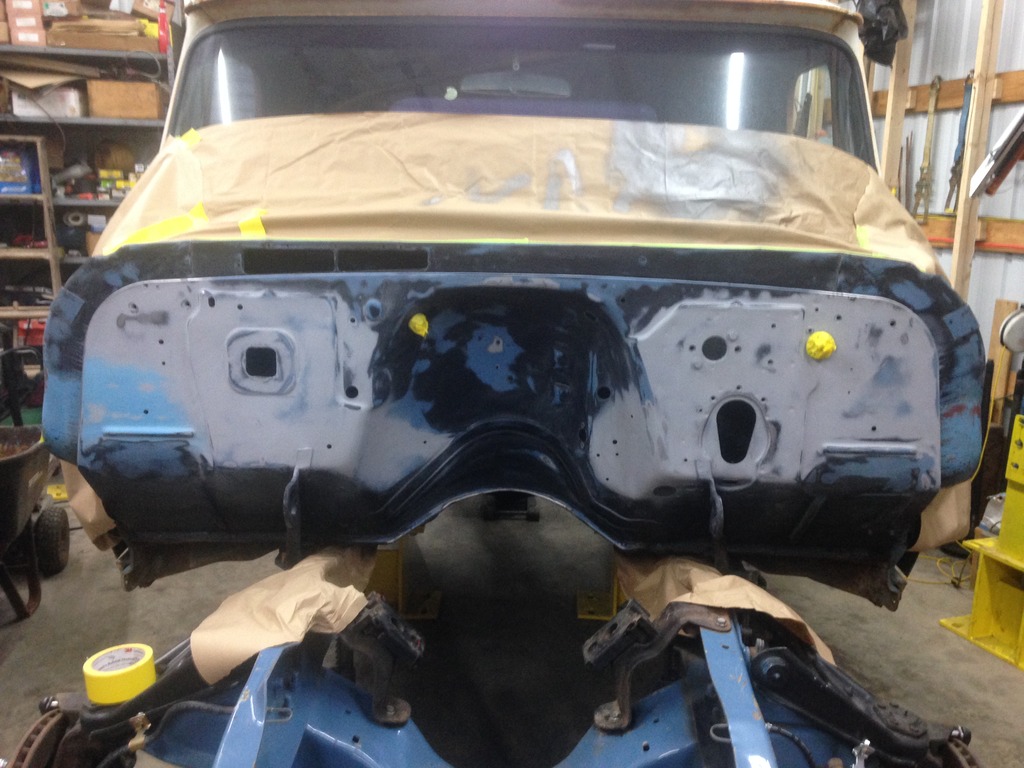
After:

This may have started me down a path that I was not attending to go down. I am going to try resisting the urge to make things look nice at this point and focus on running and driving this old heap.
01-18-2017, 10:50 AM
#15
TECH Apprentice
Thread Starter
This is a bit out of order, this took place before last night's work.
Once I hit a bump in the road of reworking the harness, I moved on to the two front harnesses of the truck. They have been in storage for a long time so once I found them, I got them out and looked them over. The main front harness is complete, but in bad shape. This one has the front lights, the alternator, and the horn leads.
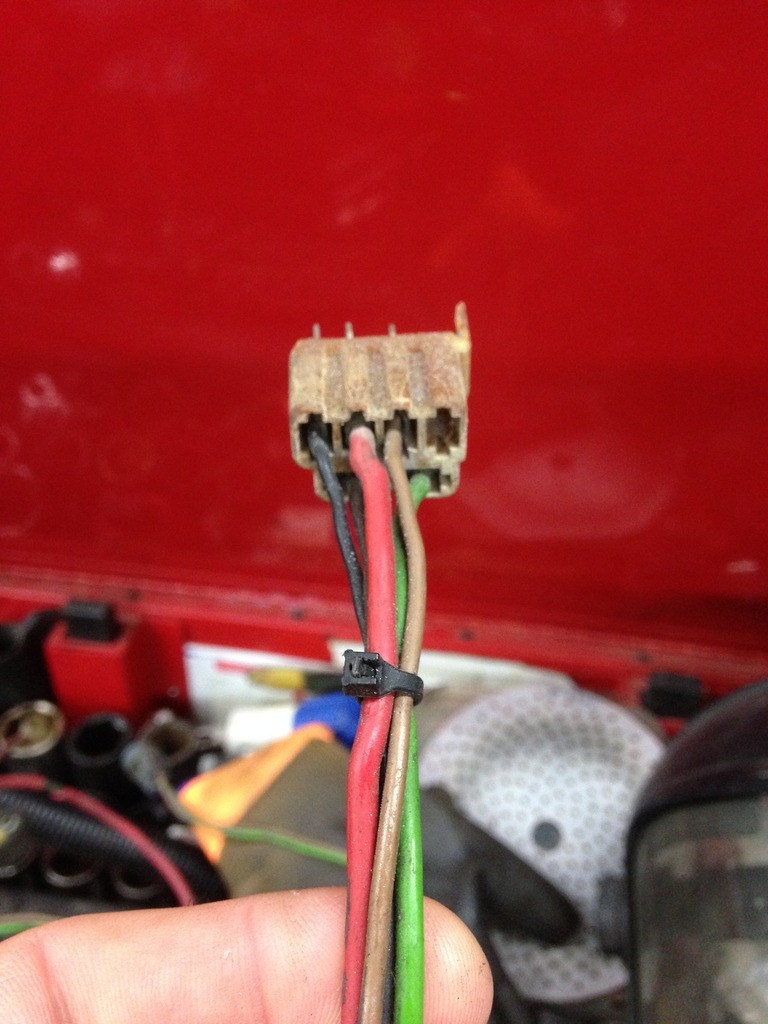

It has to have a new plug so I researched the net for replacement parts. I found a complete front harness section, but this being a swap and an update, I just needed the connector and the terminals. I found them on Terminals & Connectors. So I placed an order for what I needed and a few extras.
The engine harness was in worse shape for the wiring, but the connector is OK and can be reused. I decided to replace that connector and all the wires making the modifications that I wanted and need for the LS swap. But I had a harder time finding the correct connector. T&C did not have it and most other Delphi locations on the net did not have it either. I lucked out and found a kit on American Autowire that had the connector, the grommet, the plug in the firewall, and the terminals. I don't need the plug, but I might replace it on the firewall just to make me feel good.
Grommet & Connector Kit - 6-wire
Now I am waiting on parts for that portion of my build. Guess I need to move on to another area that needs addressing...
01-19-2017, 02:29 PM
#17
TECH Apprentice
Thread Starter
Yeah, that's easier said than done with me...
I did move on and started working on the cab floor to mound my seat. I am going to be using a bench seat out of a '77 C10 that is in decent shape. The seat mounts are different and the width of the bottom frame is greater. Looks like I need to modify the OE sliders to fit the '77 seat frame. Maybe tonight I will get some shop time and get a few pics...
I did move on and started working on the cab floor to mound my seat. I am going to be using a bench seat out of a '77 C10 that is in decent shape. The seat mounts are different and the width of the bottom frame is greater. Looks like I need to modify the OE sliders to fit the '77 seat frame. Maybe tonight I will get some shop time and get a few pics...
01-23-2017, 09:57 AM
#18
TECH Apprentice
Thread Starter
This weekend was for my daughter and not the truck. So Friday and Saturday where for her. She is a competitive Gymnast and had a competition this weekend. She place 4th in the all around for her age group at the first meet of the season at her new level. So proud of her!
Sunday, I got a little time in the shop and worked on getting the seat mounts finished up. Got them finished and the seat in the truck, seams to feel fine, but the steering column/wheel was not in the truck, so not 100% sure it's perfect. Pulled it back out so I can have more room to work on the floor issues and under the dash with the wiring and the heater install.
Stock bracket on the left, modified rear portion on the right.
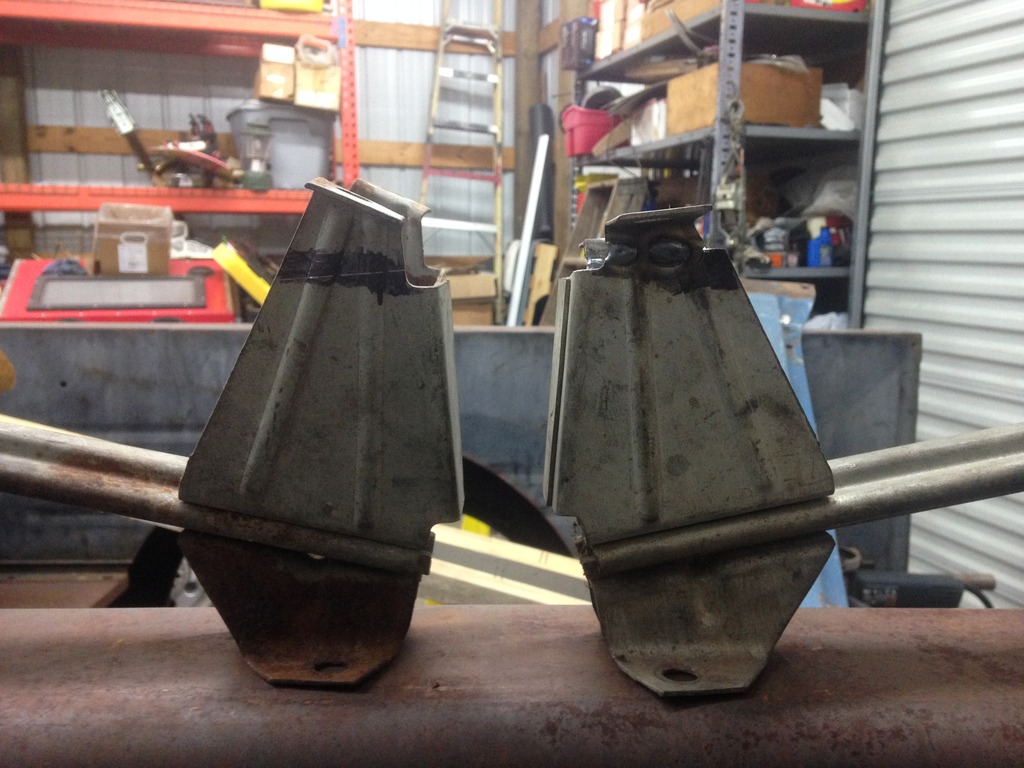
Both brackets modified and ready to go in.
 01-23-2017, 12:30 PM
#19
TECH Regular
I can totally relate to having family obligations. I was on a 2 hour drive Friday night to a soccer game and I got some brackets designed in my head while I was driving. Then I made them later in the weekend .....33 days left on your countdown
.....33 days left on your countdown
01-25-2017, 11:38 AM
#20
TECH Apprentice
Thread Starter
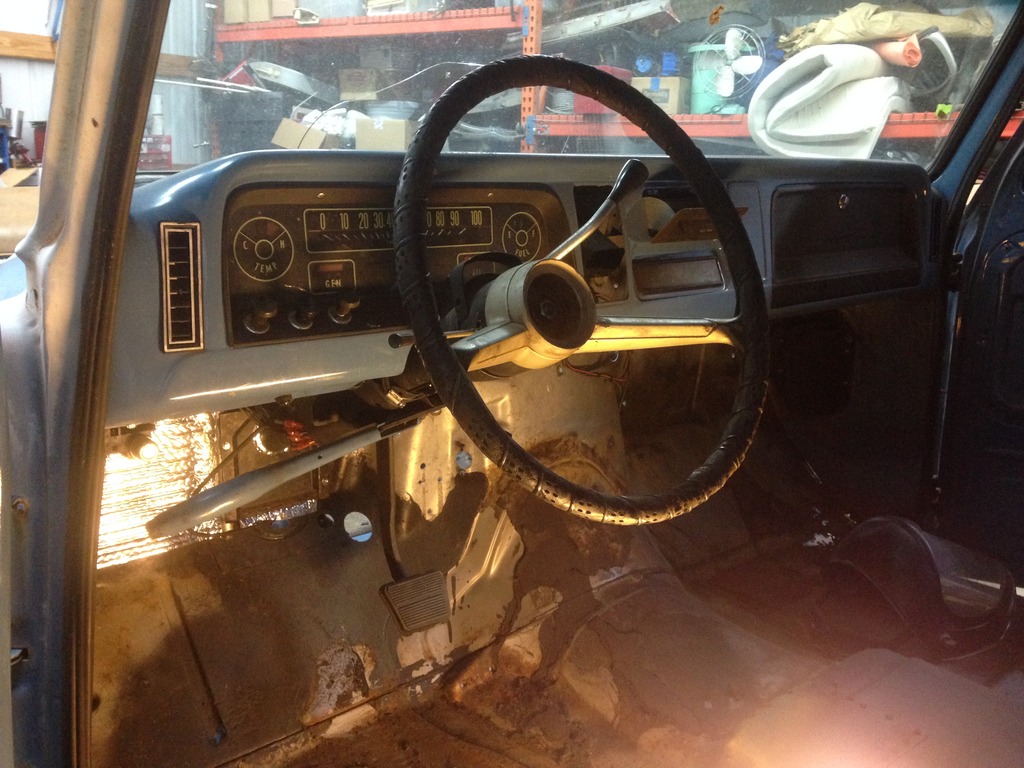
Last night I was able to get the column back together and it feels much better now.
Here is what was done the night before:
Pulled the old firewall pad and replaced it with some reflective insulation for now.
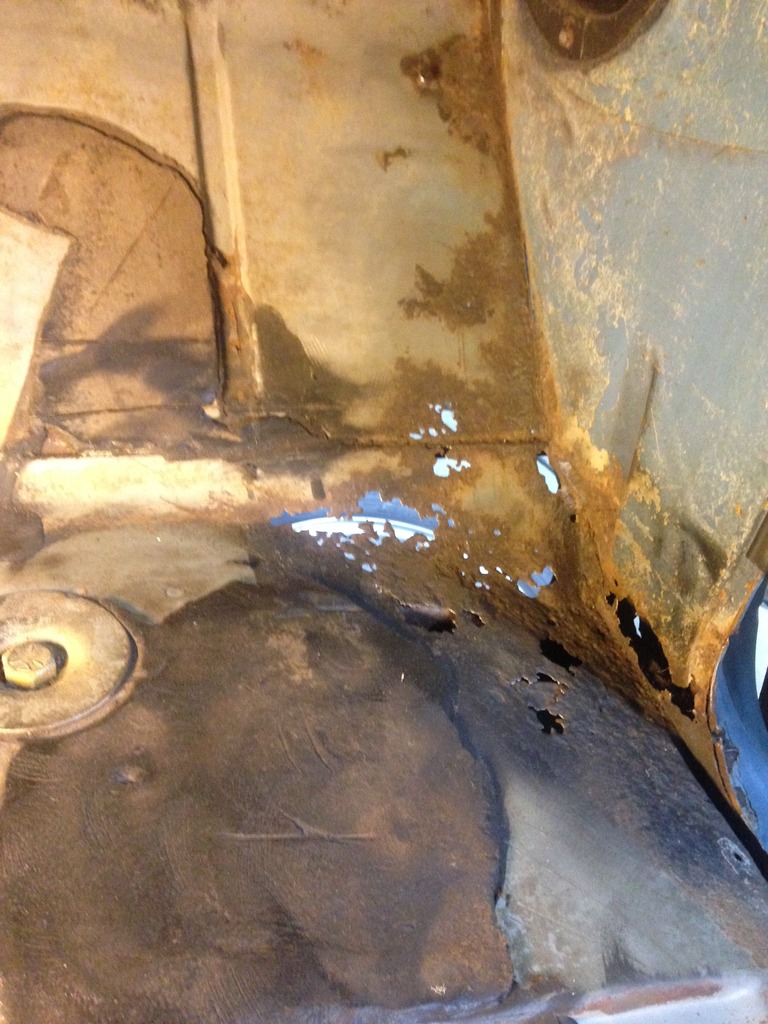
Wire wheeled the passenger floor to see what all was going on over there:
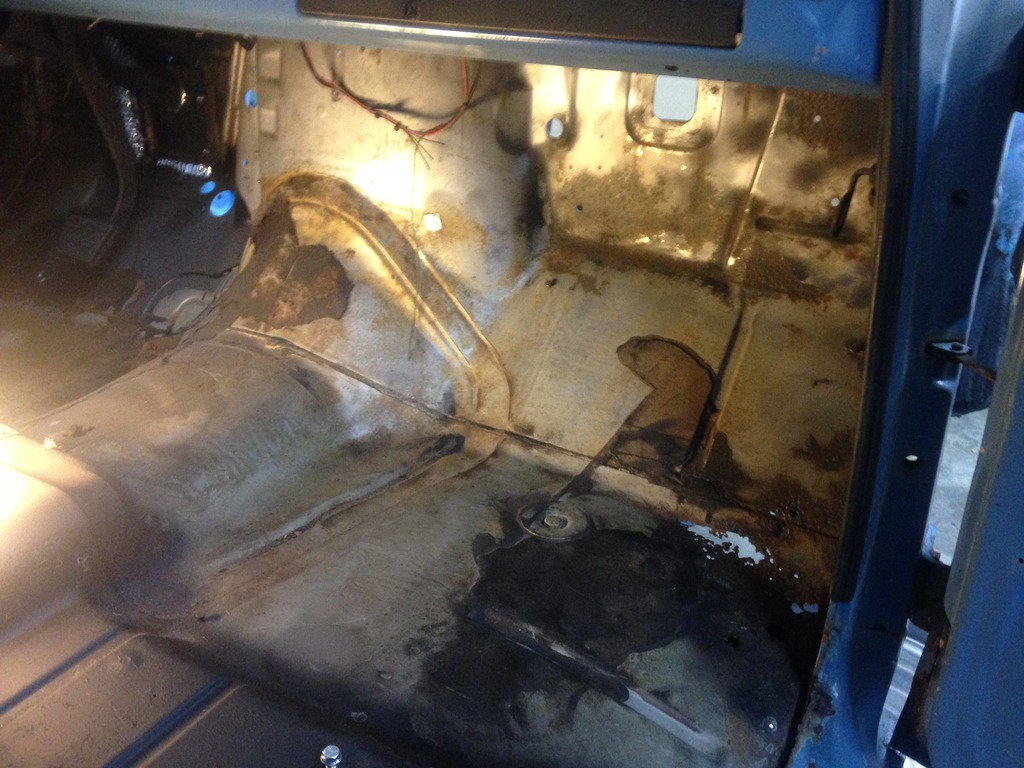
Just a little bit of rust:
Here is the pic of the column and the steering wheel mounted back in the truck:
Now I just need to find all the parts to make the horn work. I hope I can find the OE horn button. I believe I still have it, just not sure where...
The rest of the evening, I spent chipping away at getting that OE sound deadener tar paper crap off the floor. What a PIA...
Here is what was done the night before:
Pulled the old firewall pad and replaced it with some reflective insulation for now.

Wire wheeled the passenger floor to see what all was going on over there:

Just a little bit of rust:

Here is the pic of the column and the steering wheel mounted back in the truck:

Now I just need to find all the parts to make the horn work. I hope I can find the OE horn button. I believe I still have it, just not sure where...
The rest of the evening, I spent chipping away at getting that OE sound deadener tar paper crap off the floor. What a PIA...